
When I sat down to design this poncho, I had one mission. I wanted to create a wearable costume that looked absolutely stunning but could actually be completed by someone who has moved past the beginner stage. Every decision I made was intentional. The graduated teal tones, the surface slip stitch veining on the wings, the cozy lined hood with those adorable antenna pompoms. I wanted a piece that would make parents gasp when they saw their little one wearing it. I am SO pleased with how it turned out.
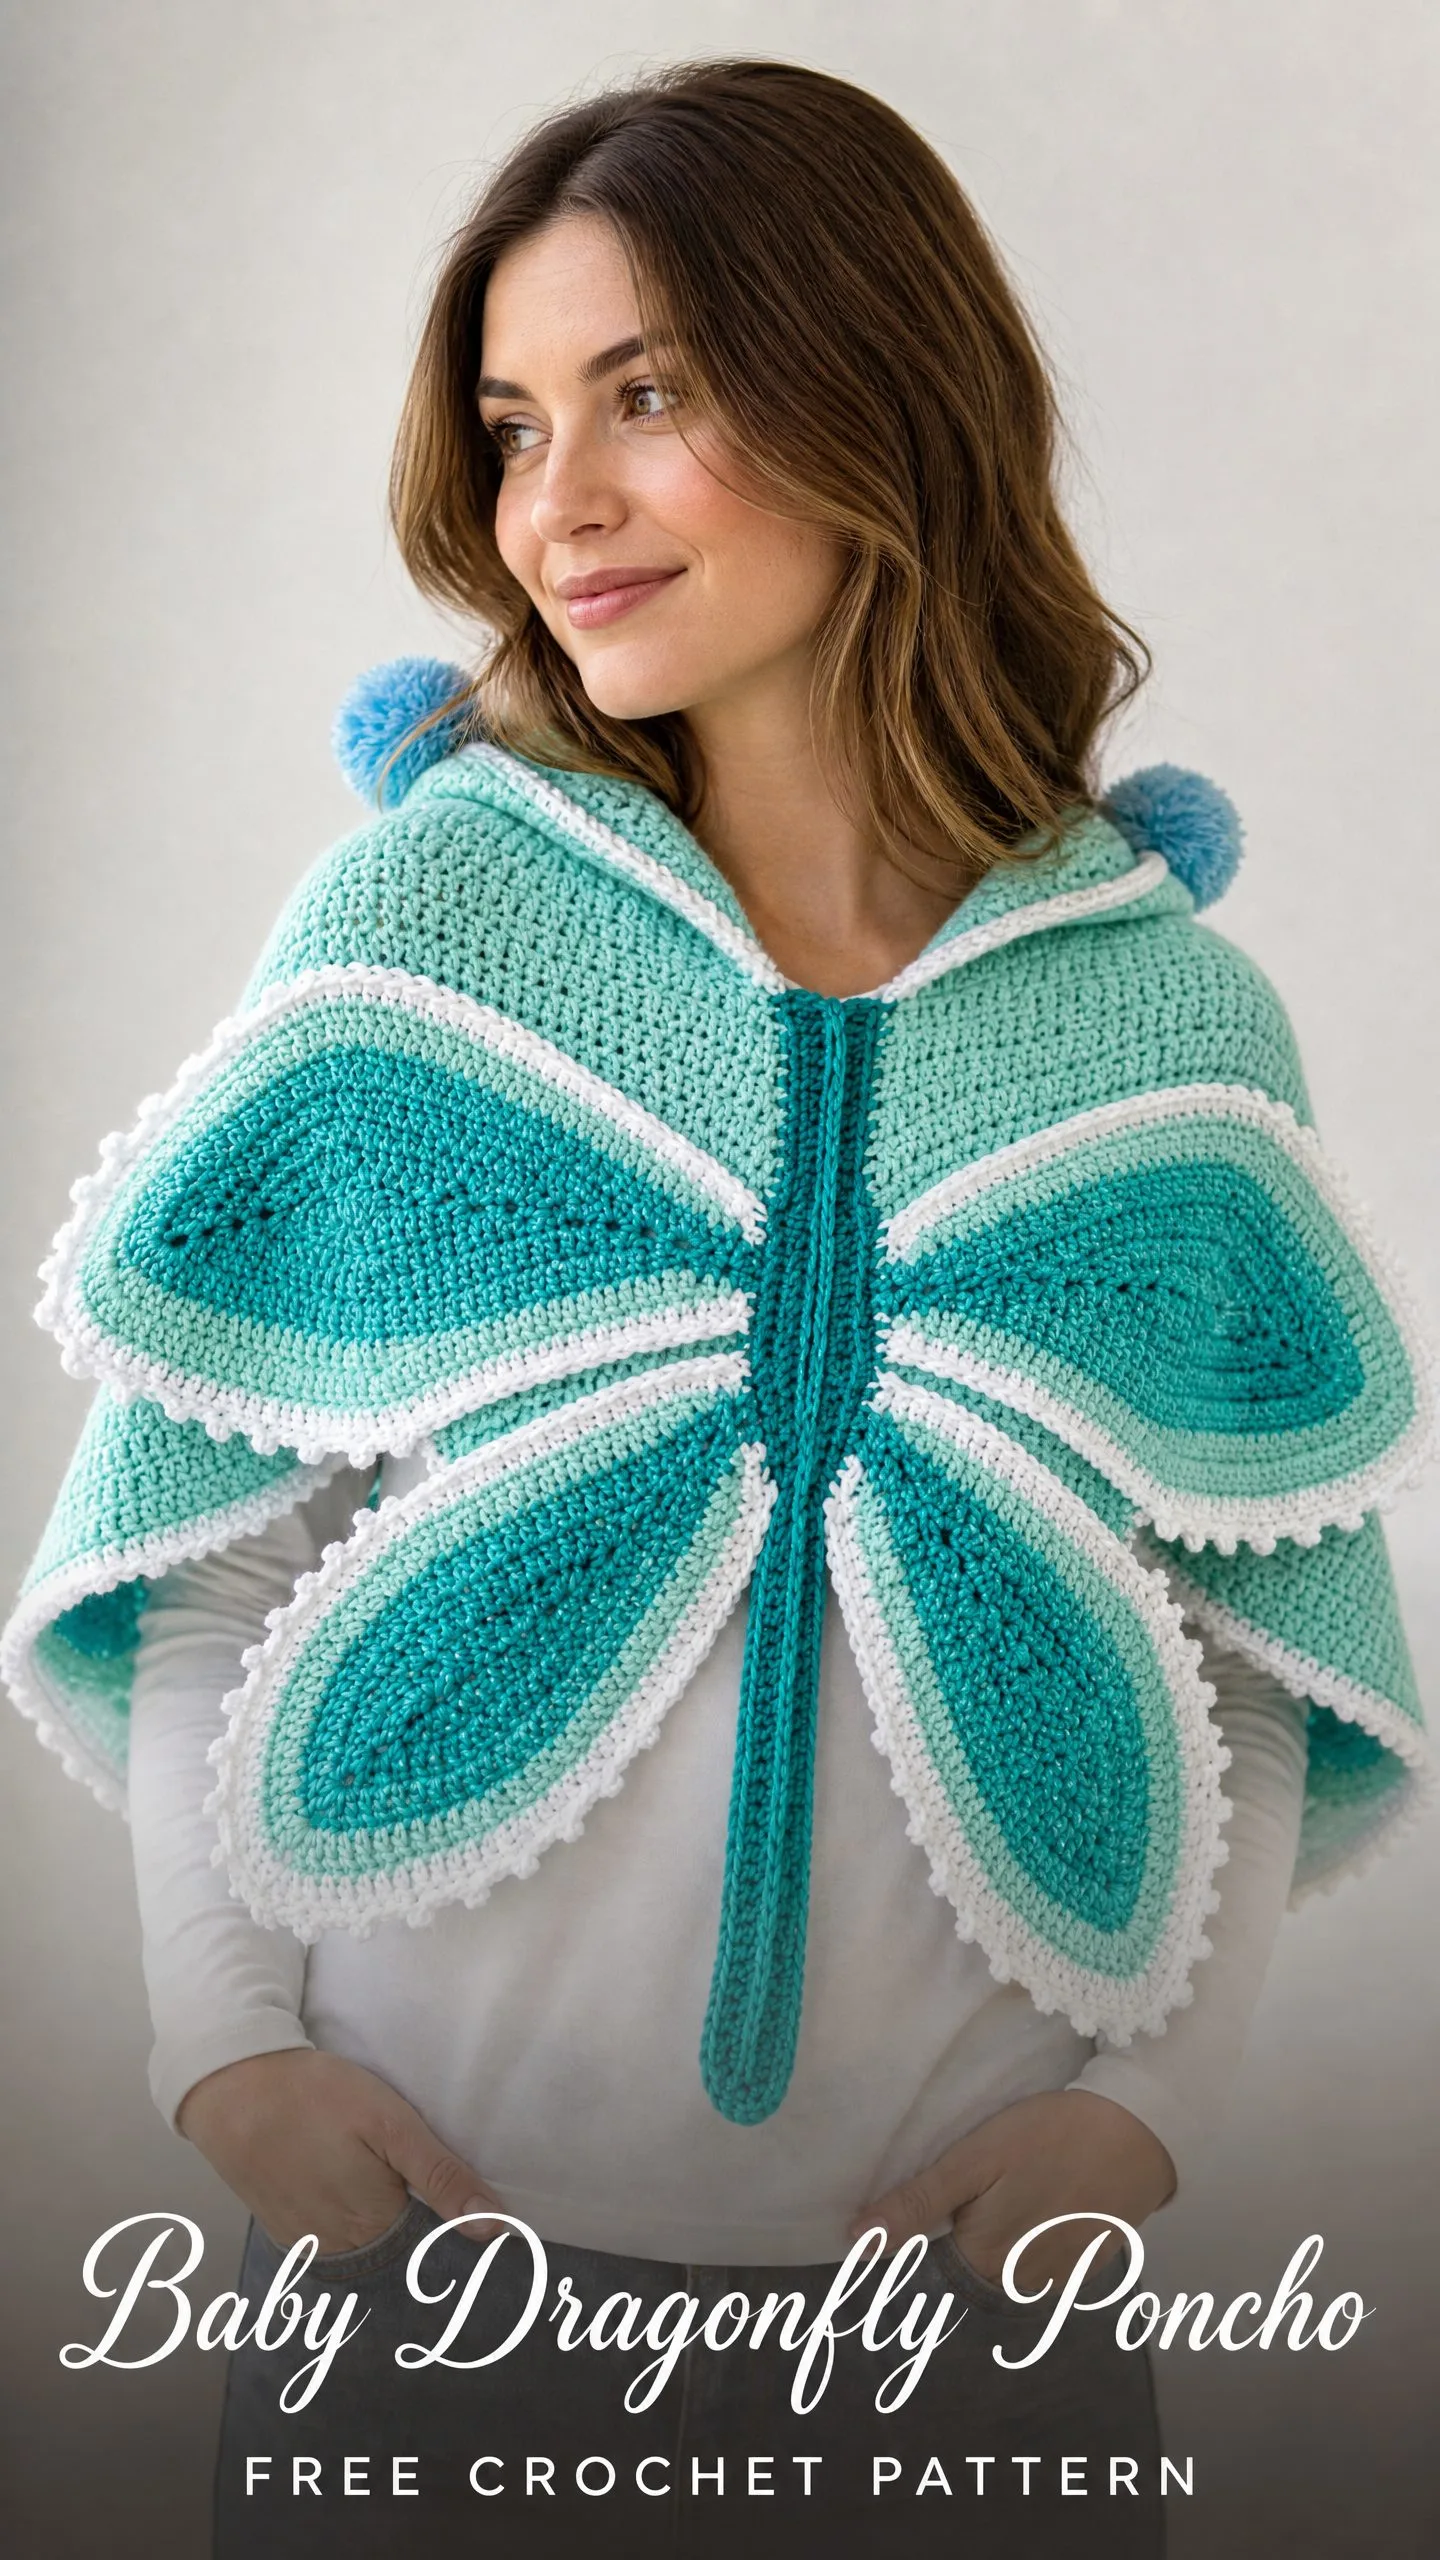
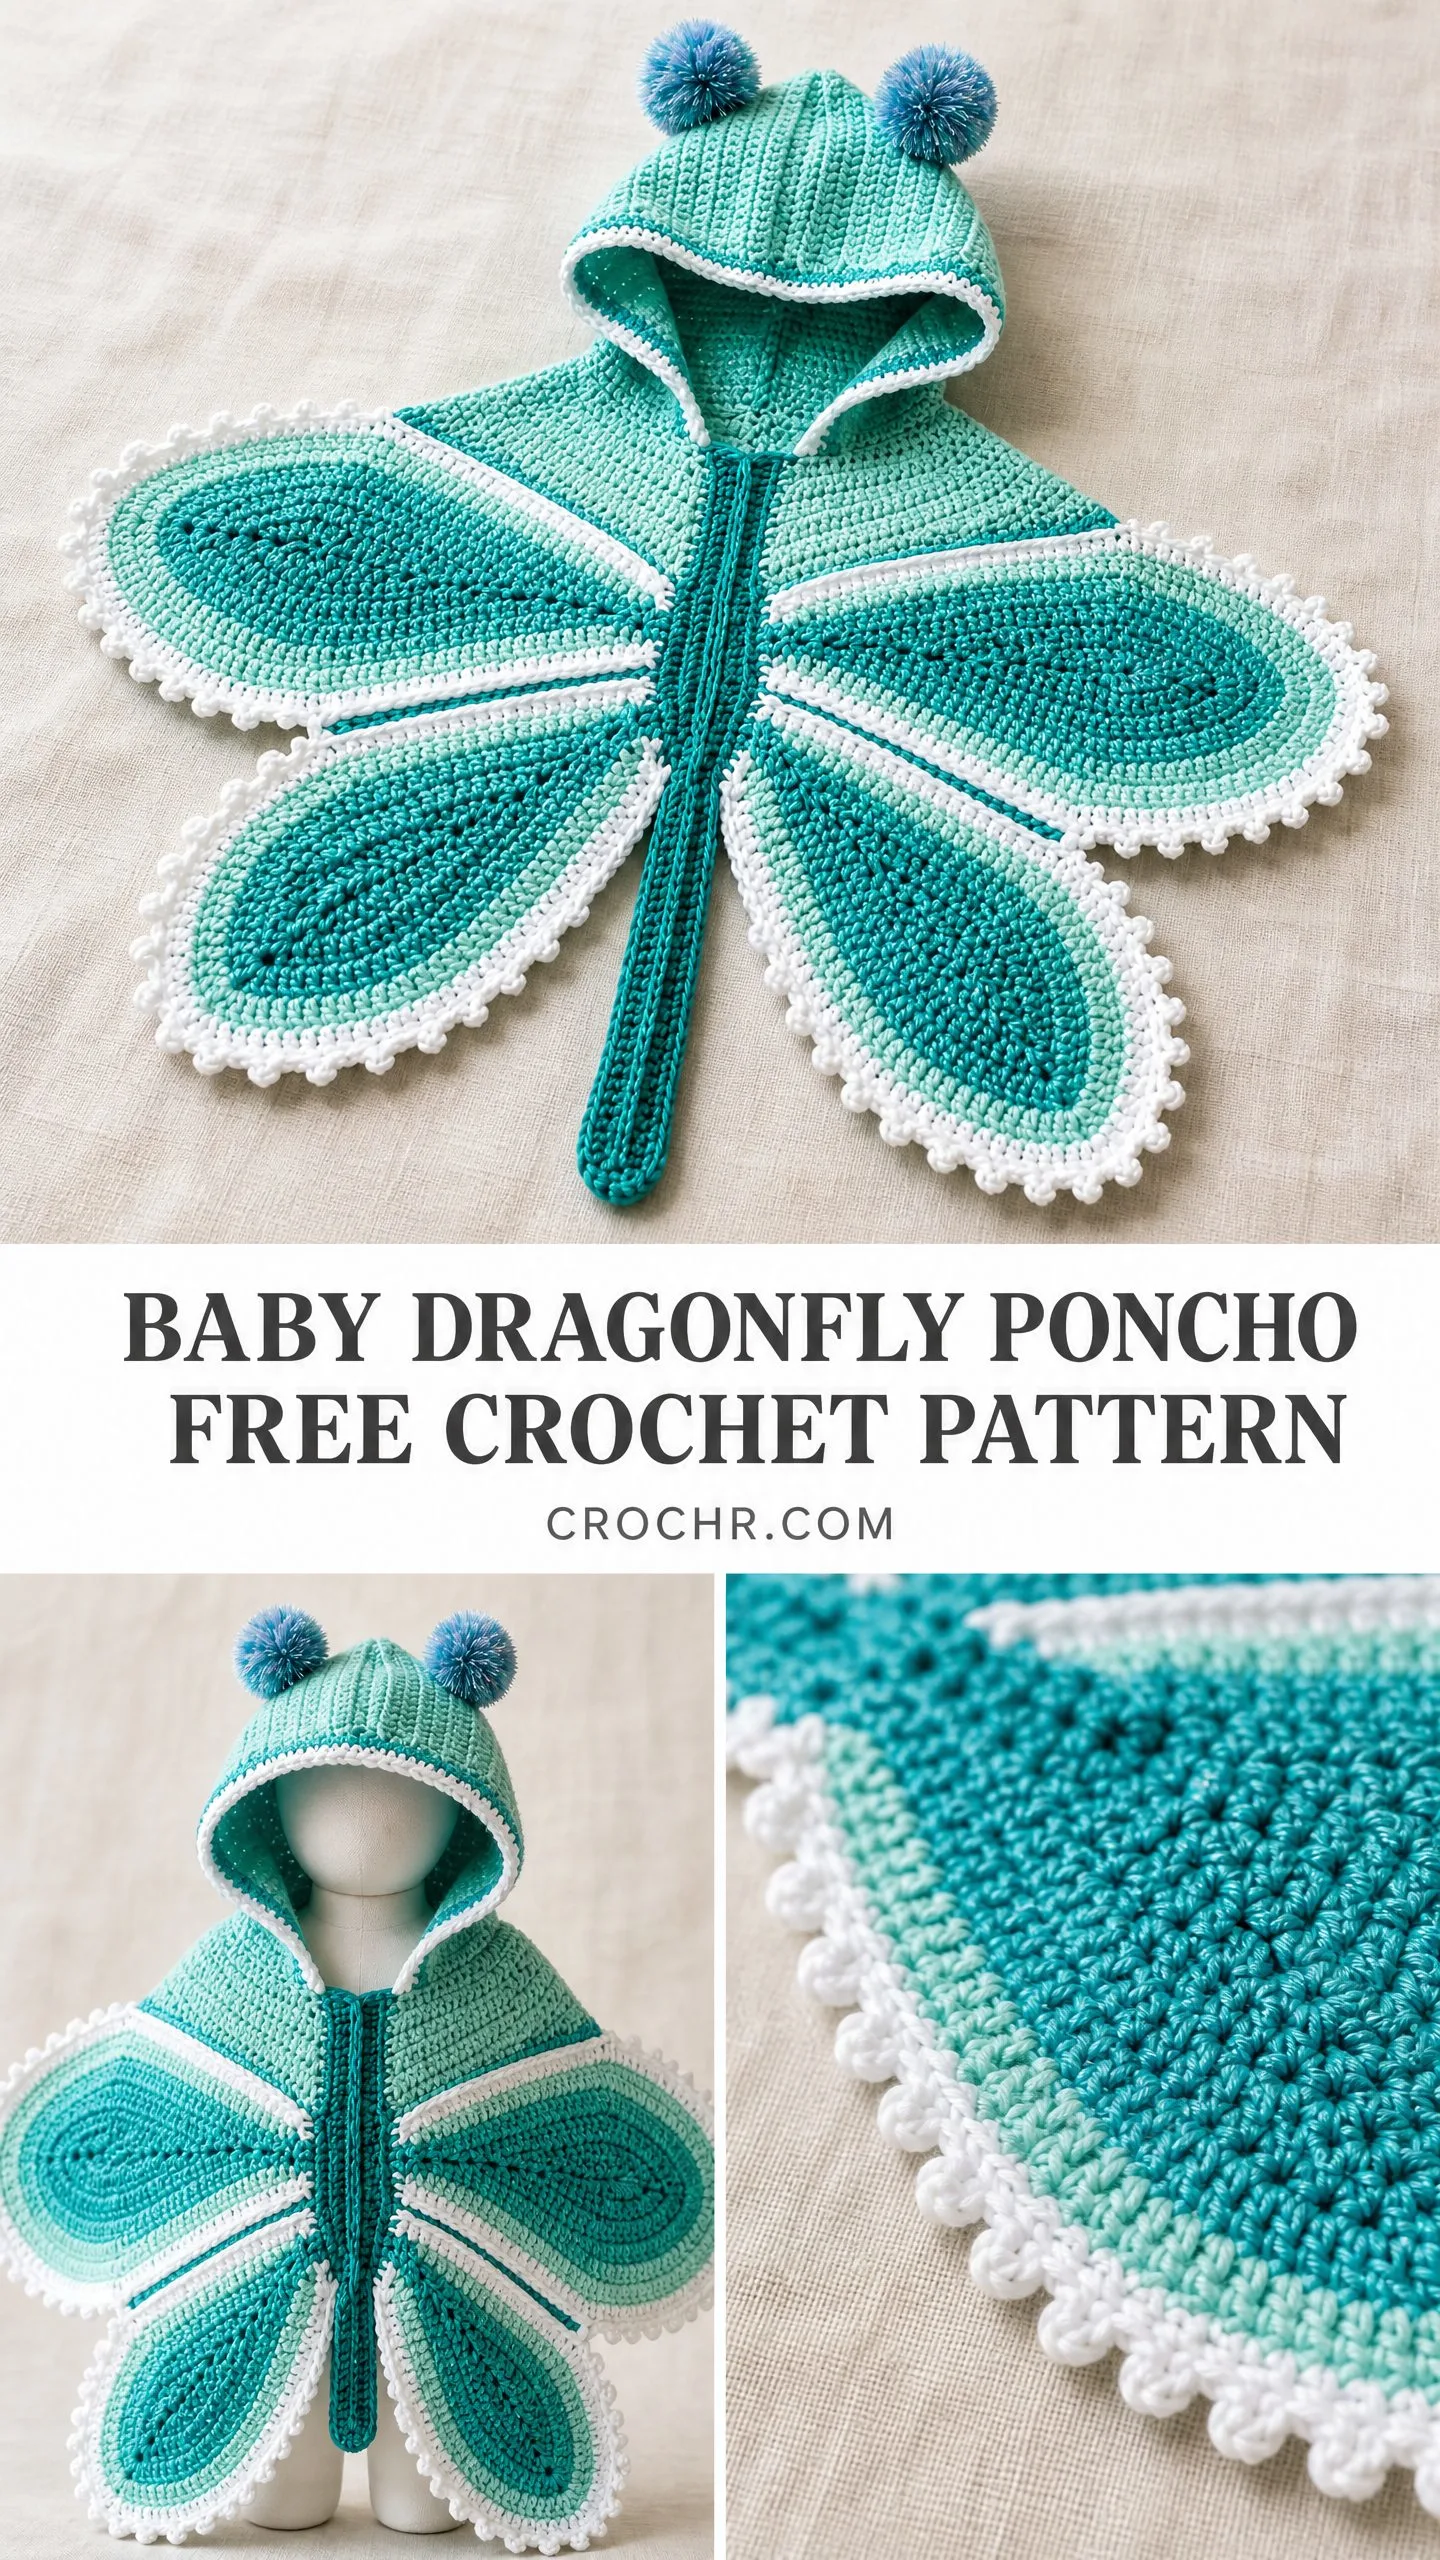
This baby dragonfly poncho transforms your littlest human into the cutest insect you have ever seen. Four oversized wings fan out from the shoulders while a narrow tail hangs down the front center. The structured hood keeps little ears warm and provides the perfect perch for two fluffy blue antenna pompoms.
The construction moves from the hood outward to the body panel and then to each wing. Everything gets joined and finished as one cohesive garment. If you have been wanting to level up your crochet skills with a multi-piece project that actually teaches you something, this is your pattern.
Pattern Overview and Skill Level
This baby dragonfly poncho crochet pattern falls into the intermediate skill range. You need to be comfortable working in both rows and rounds, shaping pieces with increases and decreases, creating surface slip stitch details for the wing veins, seaming multiple panels together, and installing a separating zipper. No advanced lace or colorwork is required here. But the multi-piece construction and precise shaping do demand familiarity with crochet fundamentals.
The finished garment fits infants approximately 6 to 12 months old. Total wingspan measures approximately 28 inches tip to tip. The hood circumference comes in at approximately 14 inches, and the tail hangs approximately 8 inches long.
Expect to spend somewhere between 12 and 18 hours completing this project if you are an experienced intermediate crocheter. I recommend spreading the work across multiple sessions to keep your hands fresh and your seaming precise.
Materials You Will Need
Yarn:
Hook: US Size J-10 / 6.0 mm
Notions:
Yarn Suggestions: Lion Brand Wool-Ease works beautifully for this project. The 80% acrylic and 20% wool blend offers great stitch definition for the veining work and washes well for a baby garment. Look for Succulent for Color A and Mint Sprinkles for Color B. Caron Simply Soft is another excellent budget option if you want something softer with more drape.
Avoid highly textured or fuzzy yarns. They will obscure the beautiful surface stitch veining on the wings.
Gauge Information
14 single crochet stitches x 16 rows = 4 inches / 10 cm worked in single crochet with US J-10 / 6.0 mm hook, blocked.
To check your gauge, chain 20. Work single crochet (sc) in each chain across. Chain 1, turn. Repeat for 20 rows. Block and measure the center 14 stitches over 16 rows. Adjust your hook size up or down as needed.
Gauge matters a lot here. Wing dimensions and overall poncho fit depend directly on hitting this gauge. Even half a stitch per inch off will alter the wingspan by 1 to 2 inches.
Abbreviations and Stitch Definitions
ch: chain, the foundation stitch created by pulling yarn through a loop on your hook
sl st: slip stitch, insert hook, pull up a loop, and pull that loop through the loop already on your hook in one motion
sc: single crochet, insert hook into stitch, pull up a loop (2 loops on hook), yarn over and pull through both loops
hdc: half double crochet, yarn over, insert hook into stitch, pull up a loop (3 loops on hook), yarn over and pull through all 3 loops
dc: double crochet, yarn over, insert hook into stitch, pull up a loop (3 loops on hook), yarn over and pull through 2 loops, yarn over and pull through remaining 2 loops
st(s): stitch or stitches
inc: increase, work 2 single crochet stitches in the same stitch
sc2tog: single crochet decrease, insert hook in next stitch, pull up loop (2 loops on hook), insert hook in following stitch, pull up loop (3 loops on hook), yarn over and draw through all 3 loops
RS: right side
WS: wrong side
pm: place marker
rem: remaining
rep: repeat
Special Stitches for This Pattern
Picot Edging
This creates the decorative white scalloped border visible along all wing edges and the hood opening. Work 3 sc into the next 3 stitches, chain 3, slip stitch into the first of those 3 chains to form a small picot loop, then continue with 3 sc into the next 3 stitches. Repeat along any edge.
Surface Slip Stitch
This technique creates the raised ridge lines on the wings that mimic dragonfly wing veins. With the RS facing you, make a slip knot on your hook. Insert the hook from front to back through a designated stitch on the surface of your finished wing. Catch the yarn and pull up a loop through to the front. Insert the hook into the next stitch and pull a loop through both the fabric and the loop on your hook. Continue along the marked vein line.
Section 1: Hood Instructions
The hood is worked in two parts. The dome is worked in joined rounds, and the face opening is worked in rows after the dome. Color C lines the interior for that beautiful aqua peek.
Hood Dome Outer Shell in Color B
Round 1: Using Color B, make a magic ring. Ch 2 (does not count as st). Work 10 hdc into ring. Join with sl st to first hdc. (10 hdc)
Round 2: Ch 2. Work 2 hdc in each st around. Join. (20 hdc)
Round 3: Ch 2. (2 hdc in next st, hdc in next st) around. Join. (30 hdc)
Round 4: Ch 2. (2 hdc in next st, hdc in next 2 sts) around. Join. (40 hdc)
Round 5: Ch 2. (2 hdc in next st, hdc in next 3 sts) around. Join. (50 hdc)
Round 6: Ch 2. (2 hdc in next st, hdc in next 4 sts) around. Join. (60 hdc)
Rounds 7 through 12: Ch 2. Hdc in each st around. Join. (60 hdc each round)
After Round 12, do not join. Turn. Now work in rows to create the face opening.
Row 13 (RS): Ch 1. Sc in first 42 sts. Leave rem 18 sts unworked. Ch 1, turn. (42 sc)
Row 14: Sc in each st across. Ch 1, turn. (42 sc)
Row 15: Sc in each st across. (42 sc) Fasten off Color B, leave a long tail for seaming.
Hood Face Opening Trim in Color D
Join Color D at any point along the face opening edge. Work 1 round of sc evenly around the face opening, placing 1 sc per row end on the vertical sides and 1 sc per st along the base. Join. Fasten off. Set aside.
Hood Interior Lining in Color C
Work identical to Hood Dome Outer Shell Rounds 1 through 12. Do not work Rows 13 through 15. Place lining inside outer dome with WS together and whip stitch around the face opening to secure.
Checkpoint: The completed hood should measure approximately 7 inches from crown to face opening base and approximately 14 inches in circumference at the face opening.
Section 2: Body Panel Instructions
The body panel sits over the baby’s shoulders. It is wider at the top and tapers slightly toward the bottom where the tail attaches.
Foundation: Using Color B, ch 43.
Row 1 (RS): Sc in 2nd ch from hook and in each ch across. Ch 1, turn. (42 sc)
Rows 2 through 4: Sc in each st across. Ch 1, turn. (42 sc each row)
Row 5 (Color A accent): Join Color A. Sc in each st across. Ch 1, turn. (42 sc) Do not cut Color A. Drop to back.
Row 6: Pick up Color B. Sc in each st across. Ch 1, turn. (42 sc)
Rows 7 through 8: Sc in each st across. Ch 1, turn. (42 sc)
Row 9 (Color A accent): Pick up Color A. Sc in each st across. Ch 1, turn. (42 sc)
Row 10: Pick up Color B. Sc in each st across. Ch 1, turn. (42 sc)
Rows 11 through 12: Sc in each st across. Ch 1, turn. (42 sc)
Row 13 (decrease row): Sc2tog at beg, sc to last 2 sts, sc2tog. Ch 1, turn. (40 sc)
Rows 14 through 15: Sc in each st across. Ch 1, turn. (40 sc)
Row 16 (decrease row): Sc2tog, sc to last 2 sts, sc2tog. Ch 1, turn. (38 sc)
Rows 17 through 18: Sc in each st across. Ch 1, turn. (38 sc)
Row 19 (Color A accent): Pick up Color A. Sc in each st across. Ch 1, turn. (38 sc)
Row 20: Pick up Color B. Sc in each st across. Ch 1, turn. (38 sc)
Rows 21 through 22: Sc in each st across. Ch 1, turn. (38 sc)
Row 23 (decrease row): Sc2tog, sc to last 2 sts, sc2tog. Ch 1, turn. (36 sc)
Rows 24 through 25: Sc in each st across. Ch 1, turn. (36 sc)
Row 26: Sc in each st across. (36 sc) Fasten off. Leave long tails for seaming.
Checkpoint: The body panel should measure approximately 12 inches wide at the top and taper to approximately 10.25 inches wide at the bottom, and approximately 6.5 inches tall.
Section 3: Tail Instructions
The tail is a narrow rectangular piece that hangs from the center bottom front.
Using Color A, ch 9.
Row 1: Sc in 2nd ch from hook and in each ch across. Ch 1, turn. (8 sc)
Rows 2 through 32: Sc in each st across. Ch 1, turn. (8 sc each row)
Row 33 (taper): Sc2tog, sc in next 4 sts, sc2tog. Ch 1, turn. (6 sc)
Row 34: Sc in each st across. Ch 1, turn. (6 sc)
Row 35: Sc2tog, sc in next 2 sts, sc2tog. Ch 1, turn. (4 sc)
Row 36: Sc in each st across. Ch 1, turn. (4 sc)
Row 37: Sc2tog twice. Ch 1, turn. (2 sc)
Row 38: Sc2tog. (1 sc) Fasten off.
Fold the tail in half lengthwise with WS together and sl st the long side seam closed using Color A. Leave the top open for attachment. The tail should measure approximately 8 inches long and 1 inch wide when seamed.
Section 4: Upper Wings (Make 2)
Each upper wing is wider and rounder at the top. The two upper wings are mirror images but are crocheted identically and reversed when seamed.
Using Color A, ch 3.
Row 1 (RS): Work 4 sc in 2nd ch from hook, 4 sc in 3rd ch. Ch 1, turn. (8 sc)
Rows 2 through 10: Inc in first st, sc to last st, inc in last st. Ch 1, turn. (Row 2: 10 sc, Row 3: 12 sc, Row 4: 14 sc, Row 5: 16 sc, Row 6: 18 sc, Row 7: 20 sc, Row 8: 22 sc, Row 9: 24 sc, Row 10: 26 sc)
Rows 11 through 12: Sc in each st across. Ch 1, turn. (26 sc)
Row 13: Inc, sc to last st, inc. Ch 1, turn. (28 sc)
Row 14: Sc in each st across. Ch 1, turn. (28 sc)
Row 15: Inc, sc to last st, inc. Ch 1, turn. (30 sc)
Row 16: Sc in each st across. Ch 1, turn. (30 sc)
Row 17: Inc, sc to last st, inc. Ch 1, turn. (32 sc)
Row 18: Sc in each st across. Ch 1, turn. (32 sc)
Row 19: Inc, sc to last st, inc. Ch 1, turn. (34 sc)
Rows 20 through 21: Sc in each st across. Ch 1, turn. (34 sc)
Rows 22 through 33: Sc2tog, sc to last 2 sts, sc2tog. Ch 1, turn. (Row 22: 32 sc, Row 23: 32 sc even, Row 24: 30 sc, Row 25: 30 sc even, Row 26: 28 sc, Row 27: 26 sc, Row 28: 24 sc, Row 29: 22 sc, Row 30: 20 sc, Row 31: 18 sc, Row 32: 16 sc, Row 33: 14 sc) Fasten off.
Work the Color B midtone overlay ring by joining Color B at any outer edge corner and working a row of sc evenly around the entire outer perimeter. For the inner Color C highlight, work a small oval using Color C: chain 14, sc in 2nd ch from hook and in next 11 chs (13 sc), work 3 sc in last ch to round the tip, continue along the opposite side of the foundation chain working 13 sc, work 3 sc in the first ch to round the other tip. Join. (32 sc total). Seam this oval to the center front of each upper wing.
Checkpoint: Each upper wing should measure approximately 7 inches at its widest point and approximately 9 inches from pointed base to outer tip.
Section 5: Lower Wings (Make 2)
The lower wings are slightly smaller and more tapered.
Using Color A, ch 3.
Row 1: Work 4 sc in 2nd ch from hook, 4 sc in 3rd ch. Ch 1, turn. (8 sc)
Rows 2 through 8: Inc, sc to last st, inc. Ch 1, turn. (Row 2: 10 sc, Row 3: 12 sc, Row 4: 14 sc, Row 5: 16 sc, Row 6: 18 sc, Row 7: 20 sc, Row 8: 22 sc)
Row 9: Sc in each st across. Ch 1, turn. (22 sc)
Row 10: Inc, sc to last st, inc. Ch 1, turn. (24 sc)
Row 11: Sc in each st across. Ch 1, turn. (24 sc)
Row 12: Inc, sc to last st, inc. Ch 1, turn. (26 sc)
Row 13: Sc in each st across. Ch 1, turn. (26 sc)
Row 14: Inc, sc to last st, inc. Ch 1, turn. (28 sc)
Rows 15 through 16: Sc in each st across. Ch 1, turn. (28 sc)
Rows 17 through 26: Sc2tog, sc to last 2 sts, sc2tog. Ch 1, turn. (Row 17: 26 sc, Row 18: 26 sc even, Row 19: 24 sc, Row 20: 24 sc even, Row 21: 22 sc, Row 22: 20 sc, Row 23: 18 sc, Row 24: 16 sc, Row 25: 14 sc, Row 26: 12 sc) Fasten off.
Work the Color B midtone ring and Color C inner highlight oval using the same method as the upper wings, sizing the inner oval to a chain of 10 foundation. (24 sc total).
Checkpoint: Each lower wing should measure approximately 6 inches at its widest point and approximately 7.5 inches from base to tip.
Section 6: Wing Veins
After all four wings are complete with their inner ovals seamed on, add veining using Color A via the surface slip stitch technique.
For each upper wing, work 3 vein lines. Vein 1 runs from the inner base point outward toward the outer tip, approximately 6 inches long. Vein 2 branches left from approximately one-third along Vein 1 at a 30 degree angle, approximately 2.5 inches long. Vein 3 branches right from approximately two-thirds along Vein 1, approximately 2.5 inches long.
For each lower wing, work 2 vein lines. Vein 1 runs from base point outward to tip, approximately 5 inches long. Vein 2 branches from the midpoint of Vein 1 at a 30 degree angle, approximately 2 inches long.
Section 7: Assembly
Step 1: Block all pieces. Lightly dampen each piece and pin to measurements on a foam mat. Allow to dry completely before seaming.
Step 2: Join hood to body panel. Center the base of the hood along the top edge of the body panel. The center 14 stitches of the body panel top edge form the neck opening. Do not seam these. Whip stitch the left 14 stitches and right 14 stitches separately.
Step 3: Attach upper wings. Position one upper wing on the right side of the body panel with the pointed base aligned to the right side edge. Whip stitch approximately 4 inches along the side edge. Repeat mirror image on left side.
Step 4: Attach lower wings. Position one lower wing approximately 1 inch below and slightly behind the upper wing attachment. Whip stitch a 3 inch seam. Repeat on left side.
Step 5: Attach the tail. Seam the top open edge of the tail to the center bottom of the body panel, centered over approximately 8 stitches.
Step 6: Apply white picot border using Color D continuously around all four wing outer edges, around the tail tip and sides, and along the hood face opening.
Step 7: Install zipper. Pin the 8 inch separating zipper under the front center seam line. Sew in by hand using a backstitch.
Step 8: Attach antenna pompoms approximately 1.5 inches apart at the top of the hood.
Step 9: Weave in all remaining ends.
Finishing and Care
Wet blocking is recommended for this baby dragonfly poncho crochet pattern. Fill a basin with cool water and a drop of wool wash. Submerge all pieces and gently squeeze without wringing. Press gently in a towel to remove excess water, then pin to measurements on a foam blocking mat.
For ongoing care, hand wash in cool water with gentle soap. Do not wring. Lay flat to dry. Remove the pompoms before washing if they are made of non-washable materials. Do not put in dryer. Store folded flat to preserve wing shape.
Size Customization Tips
For newborn sizing (0 to 3 months), reduce the body panel foundation chain to 37 and work into 36 stitches. Reduce upper wing shaping by 4 rows of increase and 4 rows of decrease. Use a 6 inch separating zipper.
For 12 to 18 month sizing, increase the body panel foundation chain to 49 and work into 48 stitches. Add 2 additional rows of increase to each upper and lower wing. Use a 10 inch separating zipper.
Thank you so much for choosing this pattern for your little one. I truly hope you enjoy every stitch of this project. When you finish your poncho, I would absolutely love to see it! Tag me on Instagram or share a photo in the Facebook group. Seeing your creations makes my entire week.
If this pattern is calling to you, go ahead and save it to your Pinterest boards so you can find it whenever you are ready to start. And please drop a comment below if you make one. I read every single comment and love hearing how your projects turn out!
You Might Also Like
- Blush Pink Monochrome Daisy Blanket Free Crochet Pattern
- Mint and Sage Green Baby Dress Free Crochet Pattern
- Sage Green Daisy Square Mini Dress Free Crochet Pattern
- Sunset Pink Coral Crochet Platform Wedge Sandals Pattern
