You know that moment when you’re scrolling through your closet, looking for something that feels polished but effortless? Something you can throw on for brunch, a gallery opening, or just a really good coffee date? This dress is exactly that.
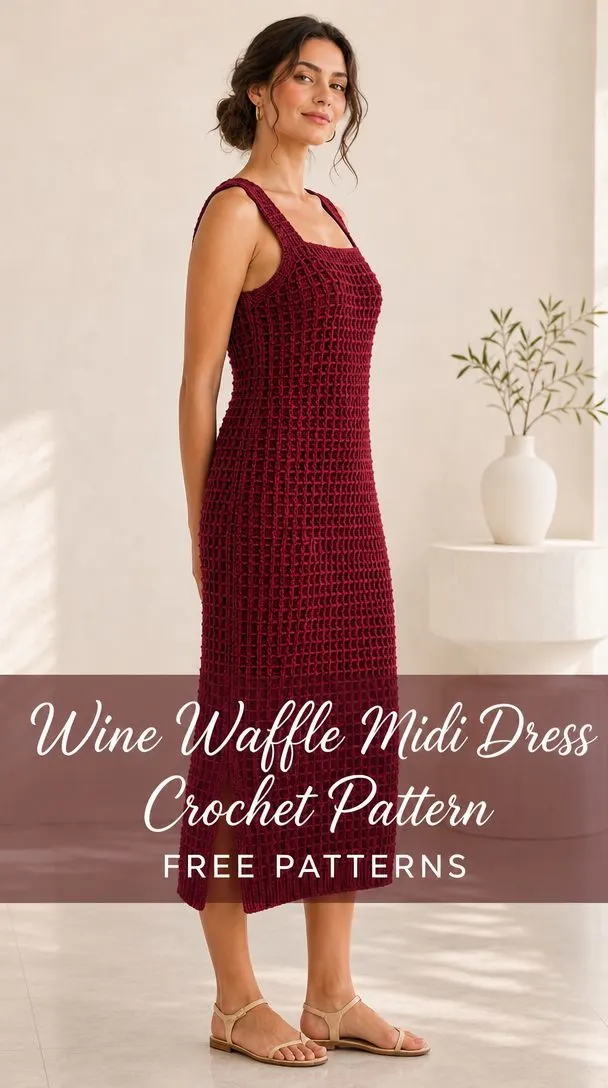
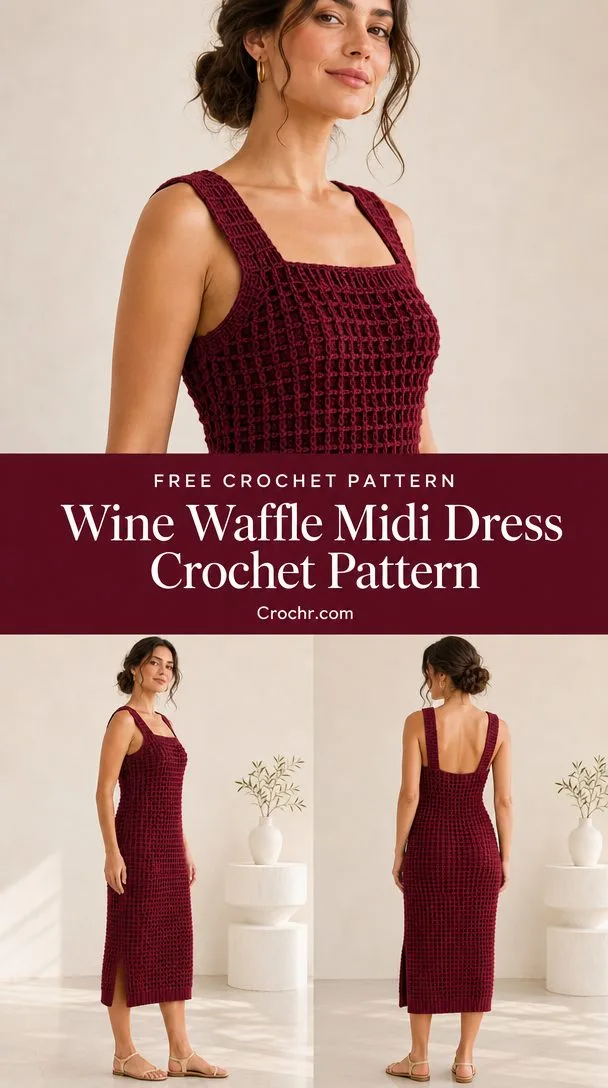
The Wine Waffle Midi Dress is a stunning, body-skimming crochet garment with serious texture appeal. The rich burgundy color and distinctive waffle stitch create a look that’s equal parts sophisticated and cozy. It’s the kind of piece that makes people ask, "Wait, you made that?"
This pattern uses a clever combination of front post double crochets and regular double crochets to achieve that signature grid-like waffle texture. The construction is straightforward, with two flat panels worked from the hem up, then seamed together. If you’ve been wanting to try your hand at garment making, this midi dress offers a satisfying challenge without overwhelming complexity.
About This Crochet Dress Pattern
This design creates a fitted midi-length dress with approximately 7.5 to 11.5 cm of positive ease. The worked example fits a body bust of 96 to 100 cm and a hip measurement no larger than 100 cm. The finished garment measures about 107.5 cm around the bust and hip, with a total length of 105 cm from shoulder to hem.
The silhouette features a square neckline, wide shoulder straps, and a sleeveless bodice. A thoughtful detail appears at the hem: the pattern calls for leaving the lowest 12 cm of the side seams open, creating walking slits that add both style and ease of movement.
The waffle texture runs continuously from the bodice through the skirt, giving the dress a cohesive, design-forward look. A separate ribbed hem band adds structure and a polished finish at the bottom edge.
Materials You Will Need
Gathering your supplies before you begin makes the crocheting process smoother. Here’s everything required for this crochet midi dress pattern:
Yarn:
- DK weight smooth wool/cotton blend
- Approximately 1000 g or 2400 m in burgundy wine
- Choose a smoothly plied yarn to show the texture clearly
Hooks:
- 4 mm hook for the main body
- 3.5 mm hook for edgings and the hem band
Notions:
- Tapestry needle
- Measuring tape
- 10 stitch markers
- Blocking mat
The yarn quantity includes trims and approximately 15% allowance. These are estimates rather than sample-measured amounts, so purchasing a bit extra is always wise for larger garments.
Gauge Information
Achieving the correct gauge ensures your dress fits as intended. This is especially important for a fitted garment like this one.
Target Gauge:
16 pattern positions and 12 rows = 10 x 10 cm in waffle texture after washing
For this stitch pattern, count each stitch position (whether it’s a front post double crochet or a regular double crochet) as one position.
Making Your Gauge Swatch:
Chain 38 stitches (2 edge stitches plus 36 texture positions). Work at least 20 rows in the waffle texture pattern. Wash your swatch, dry it flat, and measure the center 10 cm.
If your width is off, change your hook size. If your height differs but width is correct, work to the measurements in the schematic and record your actual row count. The ribbed hem band must be measured relaxed, without stretching.
Abbreviations and Special Stitches
Understanding these terms before you begin will help you work through the pattern smoothly.
Standard Abbreviations:
- ch = chain
- sl st = slip stitch
- sc = single crochet (insert hook, yarn over, pull up a loop, yarn over, pull through both loops)
- hdc = half double crochet
- dc = double crochet (yarn over, insert hook, pull up a loop, yarn over, pull through two loops twice)
- st(s) = stitch(es)
- sp = space
- sk = skip
- rep = repeat
- RS/WS = right side/wrong side
- BLO = back loop only
- yo = yarn over
- rnd = round
Special Stitches:
FPdc (Front Post Double Crochet): Yarn over, insert your hook from front to back around the post of the indicated stitch, then complete the double crochet as normal. This creates a raised stitch on the right side.
BPdc (Back Post Double Crochet): Work the same as FPdc, but insert your hook from back to front around the post.
dc2tog (Double Crochet Two Together): Work 2 incomplete double crochets over the next 2 stitches (yarn over, insert hook, pull up loop, yarn over, pull through 2 loops for each), then yarn over and pull through all 3 remaining loops. This decreases 2 stitches to 1.
The Waffle Texture Pattern
This is the signature stitch pattern that gives the dress its distinctive grid-like appearance.
Right Side Row:
Work 1 edge dc, then repeat [FPdc, dc, dc] 28 times across, ending with 1 edge dc.
Wrong Side Row:
Work 1 edge dc, then repeat [FPdc, FPdc, dc] 28 times across, ending with 1 edge dc.
Alternate these two rows to create the waffle texture. The pattern is specified for a full 86-position body row. Once you begin shaping the armhole and neck, preserve existing stitch columns in their original positions. Use plain dc for any incomplete edge repeats. Never add stitches to complete a partial repeat.
Pattern Notes Before You Begin
Read through the entire pattern before starting. All measurements are taken after washing and drying flat.
Turning and Chains:
- Turn after every flat row
- Ch 1 for sc or hdc fabric does not count as a stitch
- Ch 2 for dc or post-stitch fabric does not count as a stitch
- Work the first stitch into the first stitch of the previous row
Working Rounds:
- Joined rounds are not turned unless stated
- End every joined round with a slip stitch to the first stitch
- The joining slip stitch does not count as a stitch
Reading the Pattern:
- Square brackets group a repeat
- Stitch counts refer only to the active piece
- Do not crochet over abandoned neckline or armhole stitches
- Right and left refer to the wearer’s perspective
Construction Overview
This crochet midi dress is constructed from two matching panels (front and back) worked from the hem upward. Here’s the basic roadmap:
- Work the back lower panel from foundation to armhole
- Shape the back yoke and shoulders
- Work the front lower panel identically
- Shape the front yoke and shoulders (with deeper neck shaping)
- Create two ribbed hem bands
- Seam shoulders and sides
- Attach hem bands
- Add neck and armhole edgings
- Block and finish
Key Measurements:
| Measurement | Worked Size |
|---|---|
| Body width (one panel) | 53.75 cm / 86 positions |
| Upper yoke width | 46.25 cm / 74 positions |
| Armhole depth | 22.5 cm / 27 nominal rows |
| Shoulder width | 13.75 cm / 22 positions |
| Neck width | 18.75 cm / 30 positions |
| Total length | 105 cm including 5 cm hem band |
Step-by-Step Instructions
Back Lower Panel
Foundation Row:
Ch 88. Work dc in the 3rd chain from hook and in every remaining chain. [86 dc]
Body Rows 2 through 93:
Work the waffle texture pattern across all 86 positions. Continue until the piece measures 77.5 cm from the foundation chain. [86 positions]
Back Yoke
Row numbering restarts here.
Yoke Row 1:
Slip stitch across the first 6 positions. Ch 2, then work the next 74 stitches in the established texture pattern. Leave the final 6 stitches unworked and turn. [74 positions]
Yoke Rows 2 through 24:
Work even in pattern. [74 positions]
Yoke Row 25 (Shoulder Split):
Work the first 22 positions in pattern. Leave the middle 30 positions and the opposite 22 positions unworked. [22 positions]
Yoke Rows 26 through 27:
Work the shoulder even. Fasten off. [22 positions]
Other Shoulder, Rows 25 through 27:
Rejoin yarn at the outer edge of the opposite 22 positions. Work even for 3 rows. [22 positions]
Front Lower Panel
Foundation and Body Rows 2 through 93:
Repeat the back lower panel instructions exactly. [86 positions]
Front Yoke
The front yoke features a deeper neckline than the back.
Yoke Row 1:
Repeat back Yoke Row 1. [74 positions]
Yoke Rows 2 through 9:
Work even in pattern. [74 positions]
Yoke Row 10 (Neck Split):
Work the first 22 positions. Leave the middle 30 positions and the opposite 22 positions unworked. [22 positions]
Yoke Rows 11 through 27:
Work the first shoulder even. [22 positions]
Other Shoulder, Rows 10 through 27:
Rejoin yarn at the outer edge of the final 22 positions. Work even for 18 rows. [22 positions]
Hem Band (Make Two)
Switch to your 3.5 mm hook for this section.
Band Row 1:
Ch 11. Work sc in the 2nd chain from hook and in each remaining chain. [10 sc]
Band Row 2:
Ch 1, turn. Work sc in the back loop only (BLO) of each sc across. [10 sc]
Repeat Band Row 2 until the strip measures 53.75 cm without stretching. Record your row count as "B" for reference. Make the second strip with the same number of rows.
Each finished strip should be approximately 5 cm deep.
Assembly Instructions
You Will Need:
Burgundy wine yarn, tapestry needle, 4 mm hook, stitch markers
Seam Pass 1 (Shoulders):
Using mattress stitch, join the matching shoulder stitches from front and back panels. [2 seams x 22 positions each]
Seam Pass 2 (Sides):
Join each side seam below the stepped armholes. For the wine version, leave the lowest 12 cm of each side seam open to create walking slits. [2 seams x 93 body row ends]
Seam Pass 3 (Hem Bands):
Sew each hem strip to its matching lower panel edge, easing the band rows across the 86 body stitches. Join the band ends at the side seams. [2 strips]
Assembly Checkpoint:
Your garment circumference should measure approximately 107.5 cm. Total length should be about 105 cm. Both shoulders should align, and both armholes should measure 22.5 cm deep.
Edgings and Details
You Will Need:
3.5 mm hook, main yarn, tapestry needle
Neckline Edging
Neck Round 1:
Work sc in each exposed neckline stitch. Work 2 sc in each dc row end (1 sc per sc row end if applicable). Add extra sc at corners only if needed to keep the work flat. Record your total as "N." [N sc]
Neck Round 2:
Work sc in every stitch around. [N sc]
Armhole Edging
Armhole Round 1:
Work sc in each stitch across the underarm step. Work 2 sc per dc side row end. Record your count as "A" for one opening. [A sc]
Armhole Round 2:
Work sc in each sc around. Repeat identically on the second armhole. [A sc per opening]
Edging Checkpoint:
All borders should lie flat without puckering or flaring. The neckline should pass comfortably over the head. If any edging feels tight, adjust before finishing.
Finishing Your Crochet Dress
You Will Need:
Matching yarn tails, tapestry needle, cool water, towel, blocking mat
Finishing Pass 1 (Weave Ends):
Weave each yarn tail through at least 5 cm of matching stitches. Reverse direction and weave again for security. [0 loose ends]
Finishing Pass 2 (Wet Block):
Wash the garment gently in cool water. Support the weight while wet to prevent stretching. Lay flat on a blocking mat and shape to schematic measurements. Use your fingertips to define the raised waffle texture rather than pressing hard. Allow to dry completely.
Final Checkpoint:
Your dried garment should measure approximately 107.5 cm around the body and 105 cm in length. Try on the dress to confirm comfortable stride, arm movement, and neckline fit before wearing.
Care Instructions
Follow your yarn label for specific guidance. Generally, hand wash gently in cool water with mild detergent. Do not wring or twist. Support the wet garment to prevent stretching, reshape on a towel, and dry flat away from direct heat or sunlight.
Store your finished dress folded rather than hanging to prevent the fabric from stretching over time.
Sizing Adjustments
The worked size fits a body bust of 96 to 100 cm with positive ease. To adjust the circumference by approximately 15 cm, add or remove 12 positions per panel. When adjusting, recalculate shoulder widths while keeping the neckline centered.
Always make and block a sample swatch before committing your full yarn quantity to ensure the texture and drape meet your expectations.
Tips for Success
Maintain Consistent Tension:
The waffle texture relies on the interplay between raised post stitches and regular double crochets. Keep your tension even throughout to achieve uniform cells in the grid pattern.
Count Regularly:
With 86 stitches per row in the body, it’s easy to accidentally skip or add a stitch. Place markers every 20 stitches or so to help you stay on track.
Block Before Seaming:
Blocking your panels before assembly makes seaming much easier. The edges will lie flat, and you can match rows precisely.
Try It On:
Before finishing all your seams, loosely pin the panels together and try on the dress. This gives you a chance to adjust the length or fit if needed.
Why You Will Love Making This Dress
This crochet midi dress pattern offers the perfect balance of simplicity and sophistication. The waffle texture looks intricate but relies on just two basic row patterns that become meditative once you establish your rhythm. The flat panel construction means no fiddly working in the round for the main body, and the separate hem bands add a professional finish without complicated techniques.
The burgundy wine color is universally flattering and seasonless. Wear it with sandals and gold jewelry for warm weather, or layer it over a turtleneck with boots when temperatures drop. It’s a true wardrobe workhorse.
Whether you’re an experienced garment maker or taking your first steps into crochet clothing, this pattern delivers a wearable, stylish result you’ll reach for again and again.
If this Wine Waffle Midi Dress Crochet Pattern is calling your name, save it to your Pinterest boards so you can find it when you’re ready to cast on. And if you make one, I’d love to see it! Drop a comment below and share your finished dress. Your version might just inspire someone else to give it a try.
You Might Also Like
- Midnight Garden Peony Motif Tote Free Crochet Pattern
- Sunset Shell Stripe Dress Crochet Pattern
- Pink Sparkle Starfish Swaddle Free Crochet Pattern
- Fox Baby Shortalls Free Crochet Pattern