
Okay, yarn lovers. This is your sign to dig into that stash and pull out the good stuff. You know the skeins I mean. The midnight navy that’s been waiting for something special. The silvery gray you bought on impulse. That creamy ivory you’ve been saving for "the right project."
Get the Ad-Free PDF Pattern
You can find the free pattern below, or you can purchase the ad-free printable PDF from my shop.
Get the Printable PDF →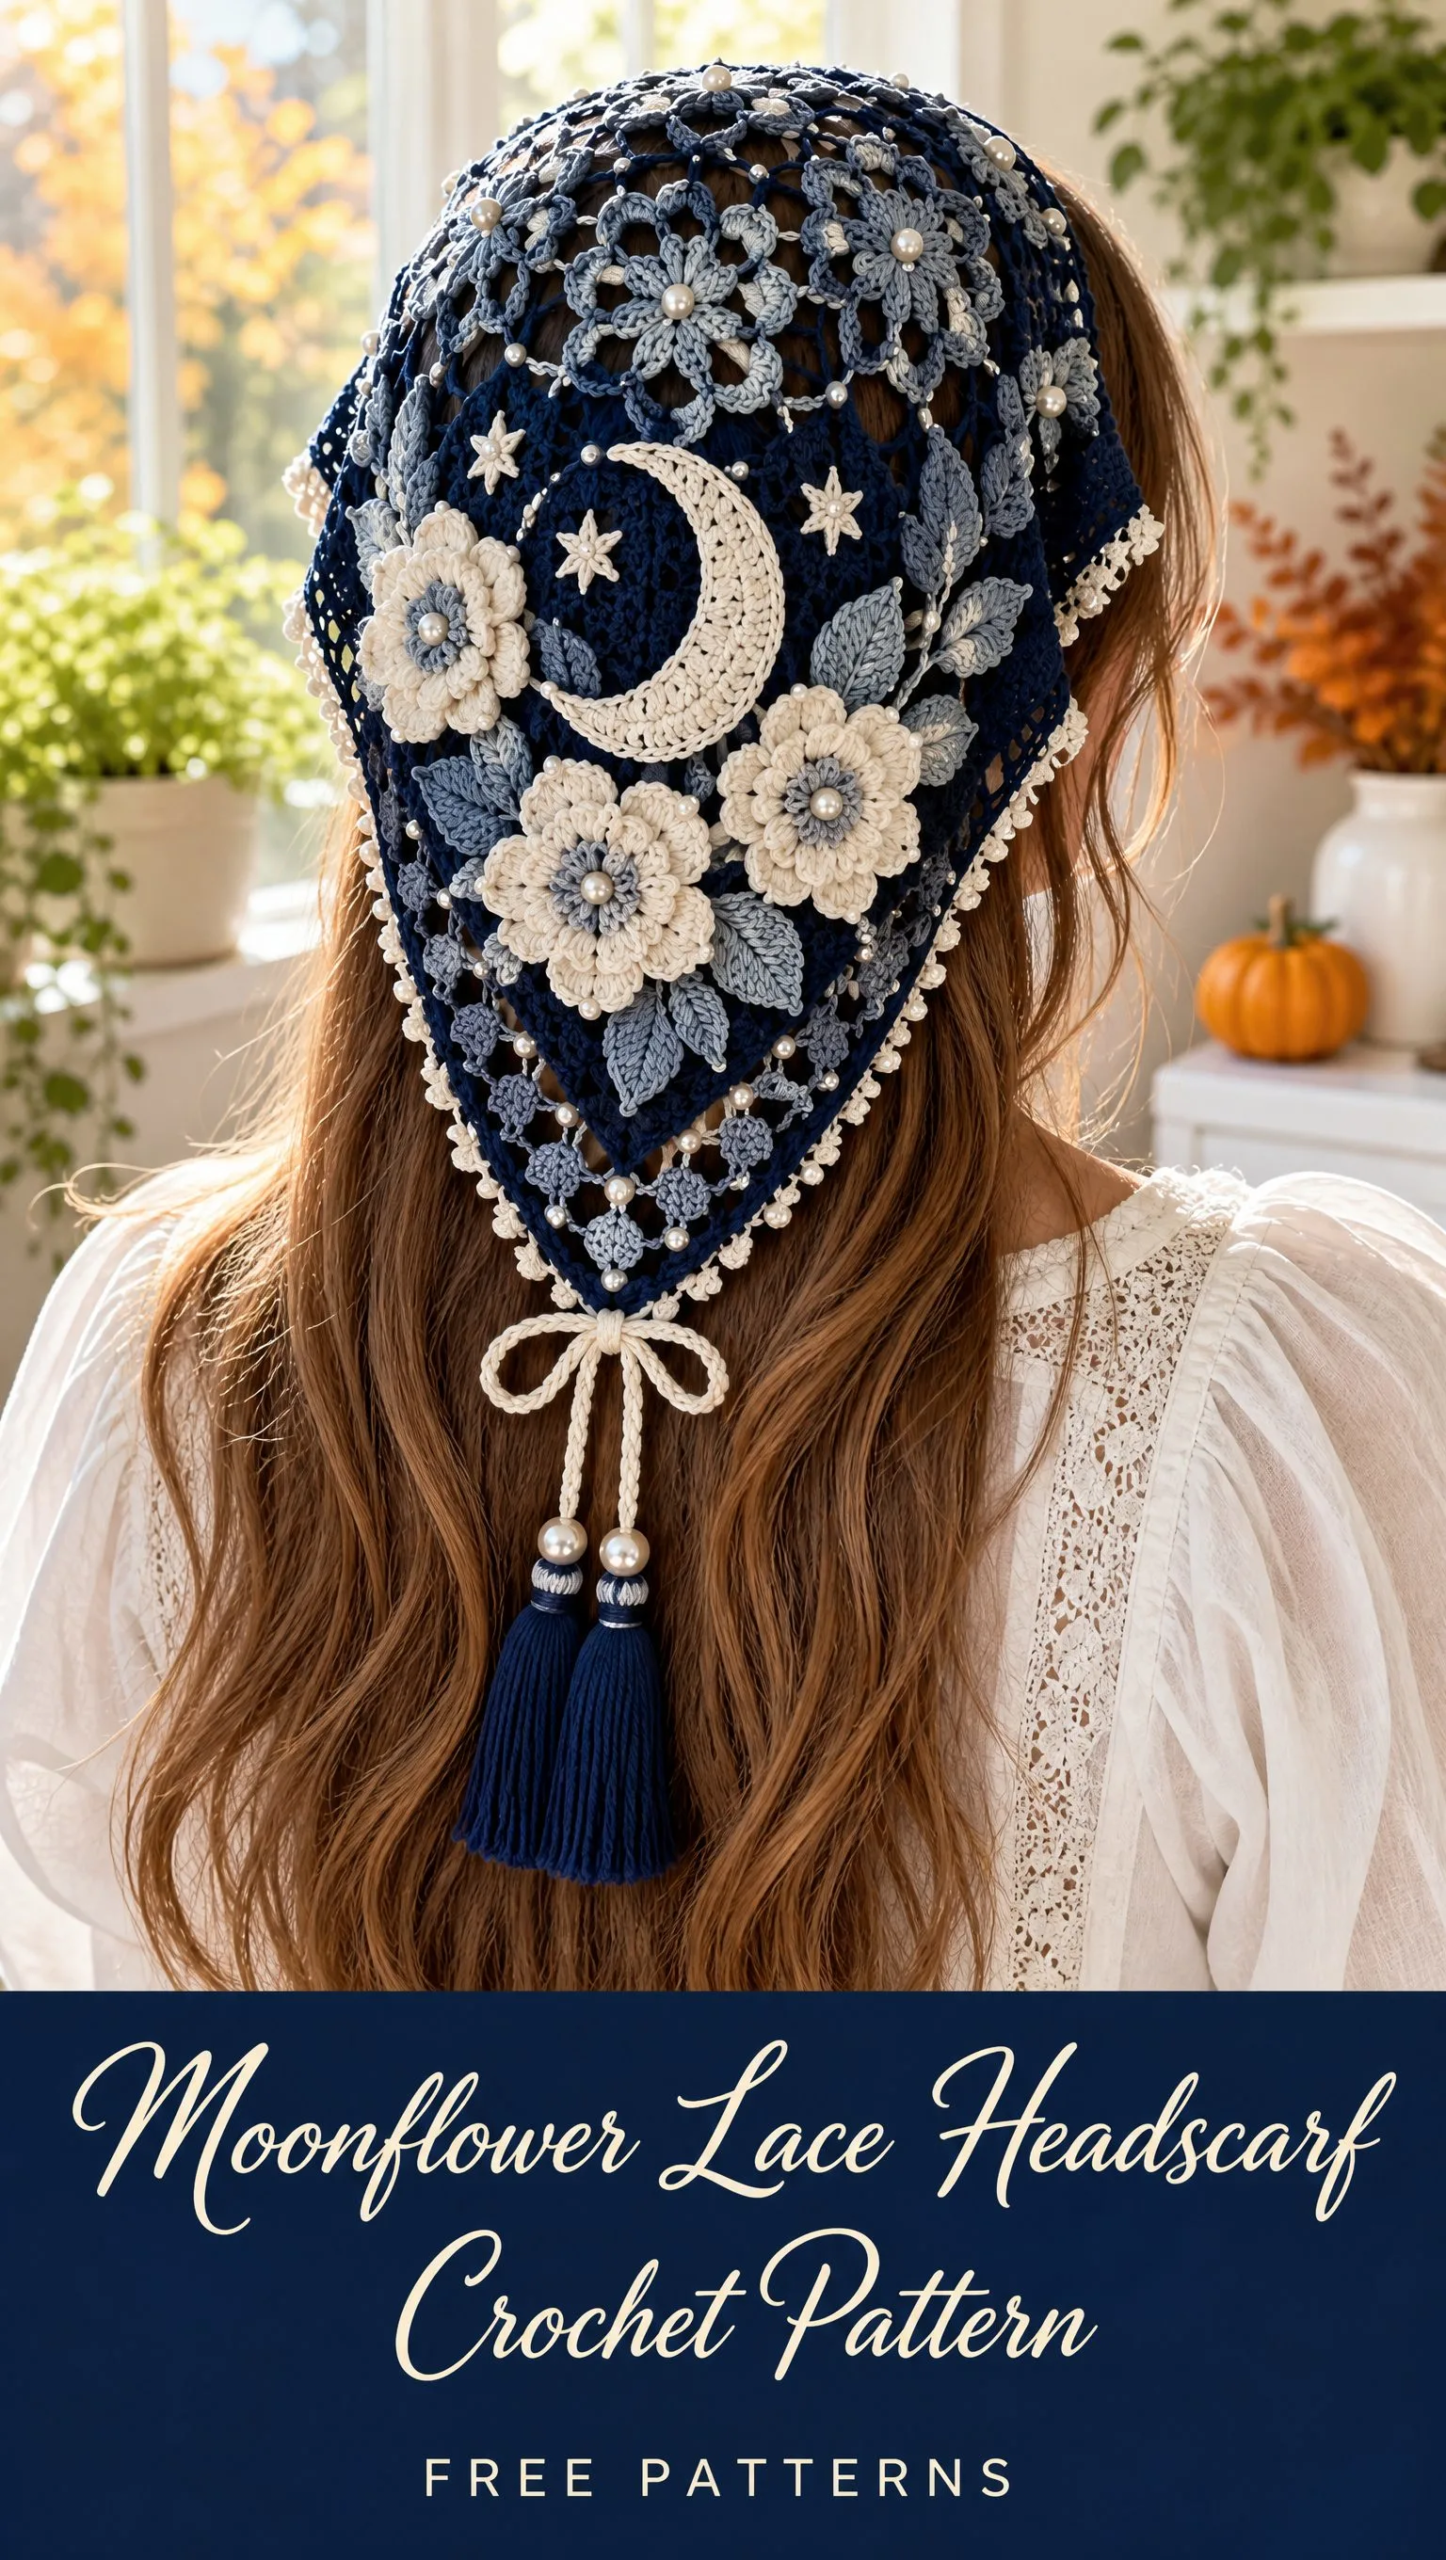
This is the right project.
The Moonflower Lace Headscarf combines modular hexagonal motifs with a flowing triangular lace panel, topped with sculptural appliqués that look incredibly impressive but are totally achievable. I won’t lie to you. This pattern sits firmly in intermediate territory. You’ll be working with multiple techniques: motif construction, join-as-you-go assembly, surface crochet, and three-dimensional flower shaping. But if you’ve made granny squares and feel comfortable reading a pattern, you can absolutely do this. Take it one section at a time, and you’ll create something truly stunning.
What Makes This Headscarf Special
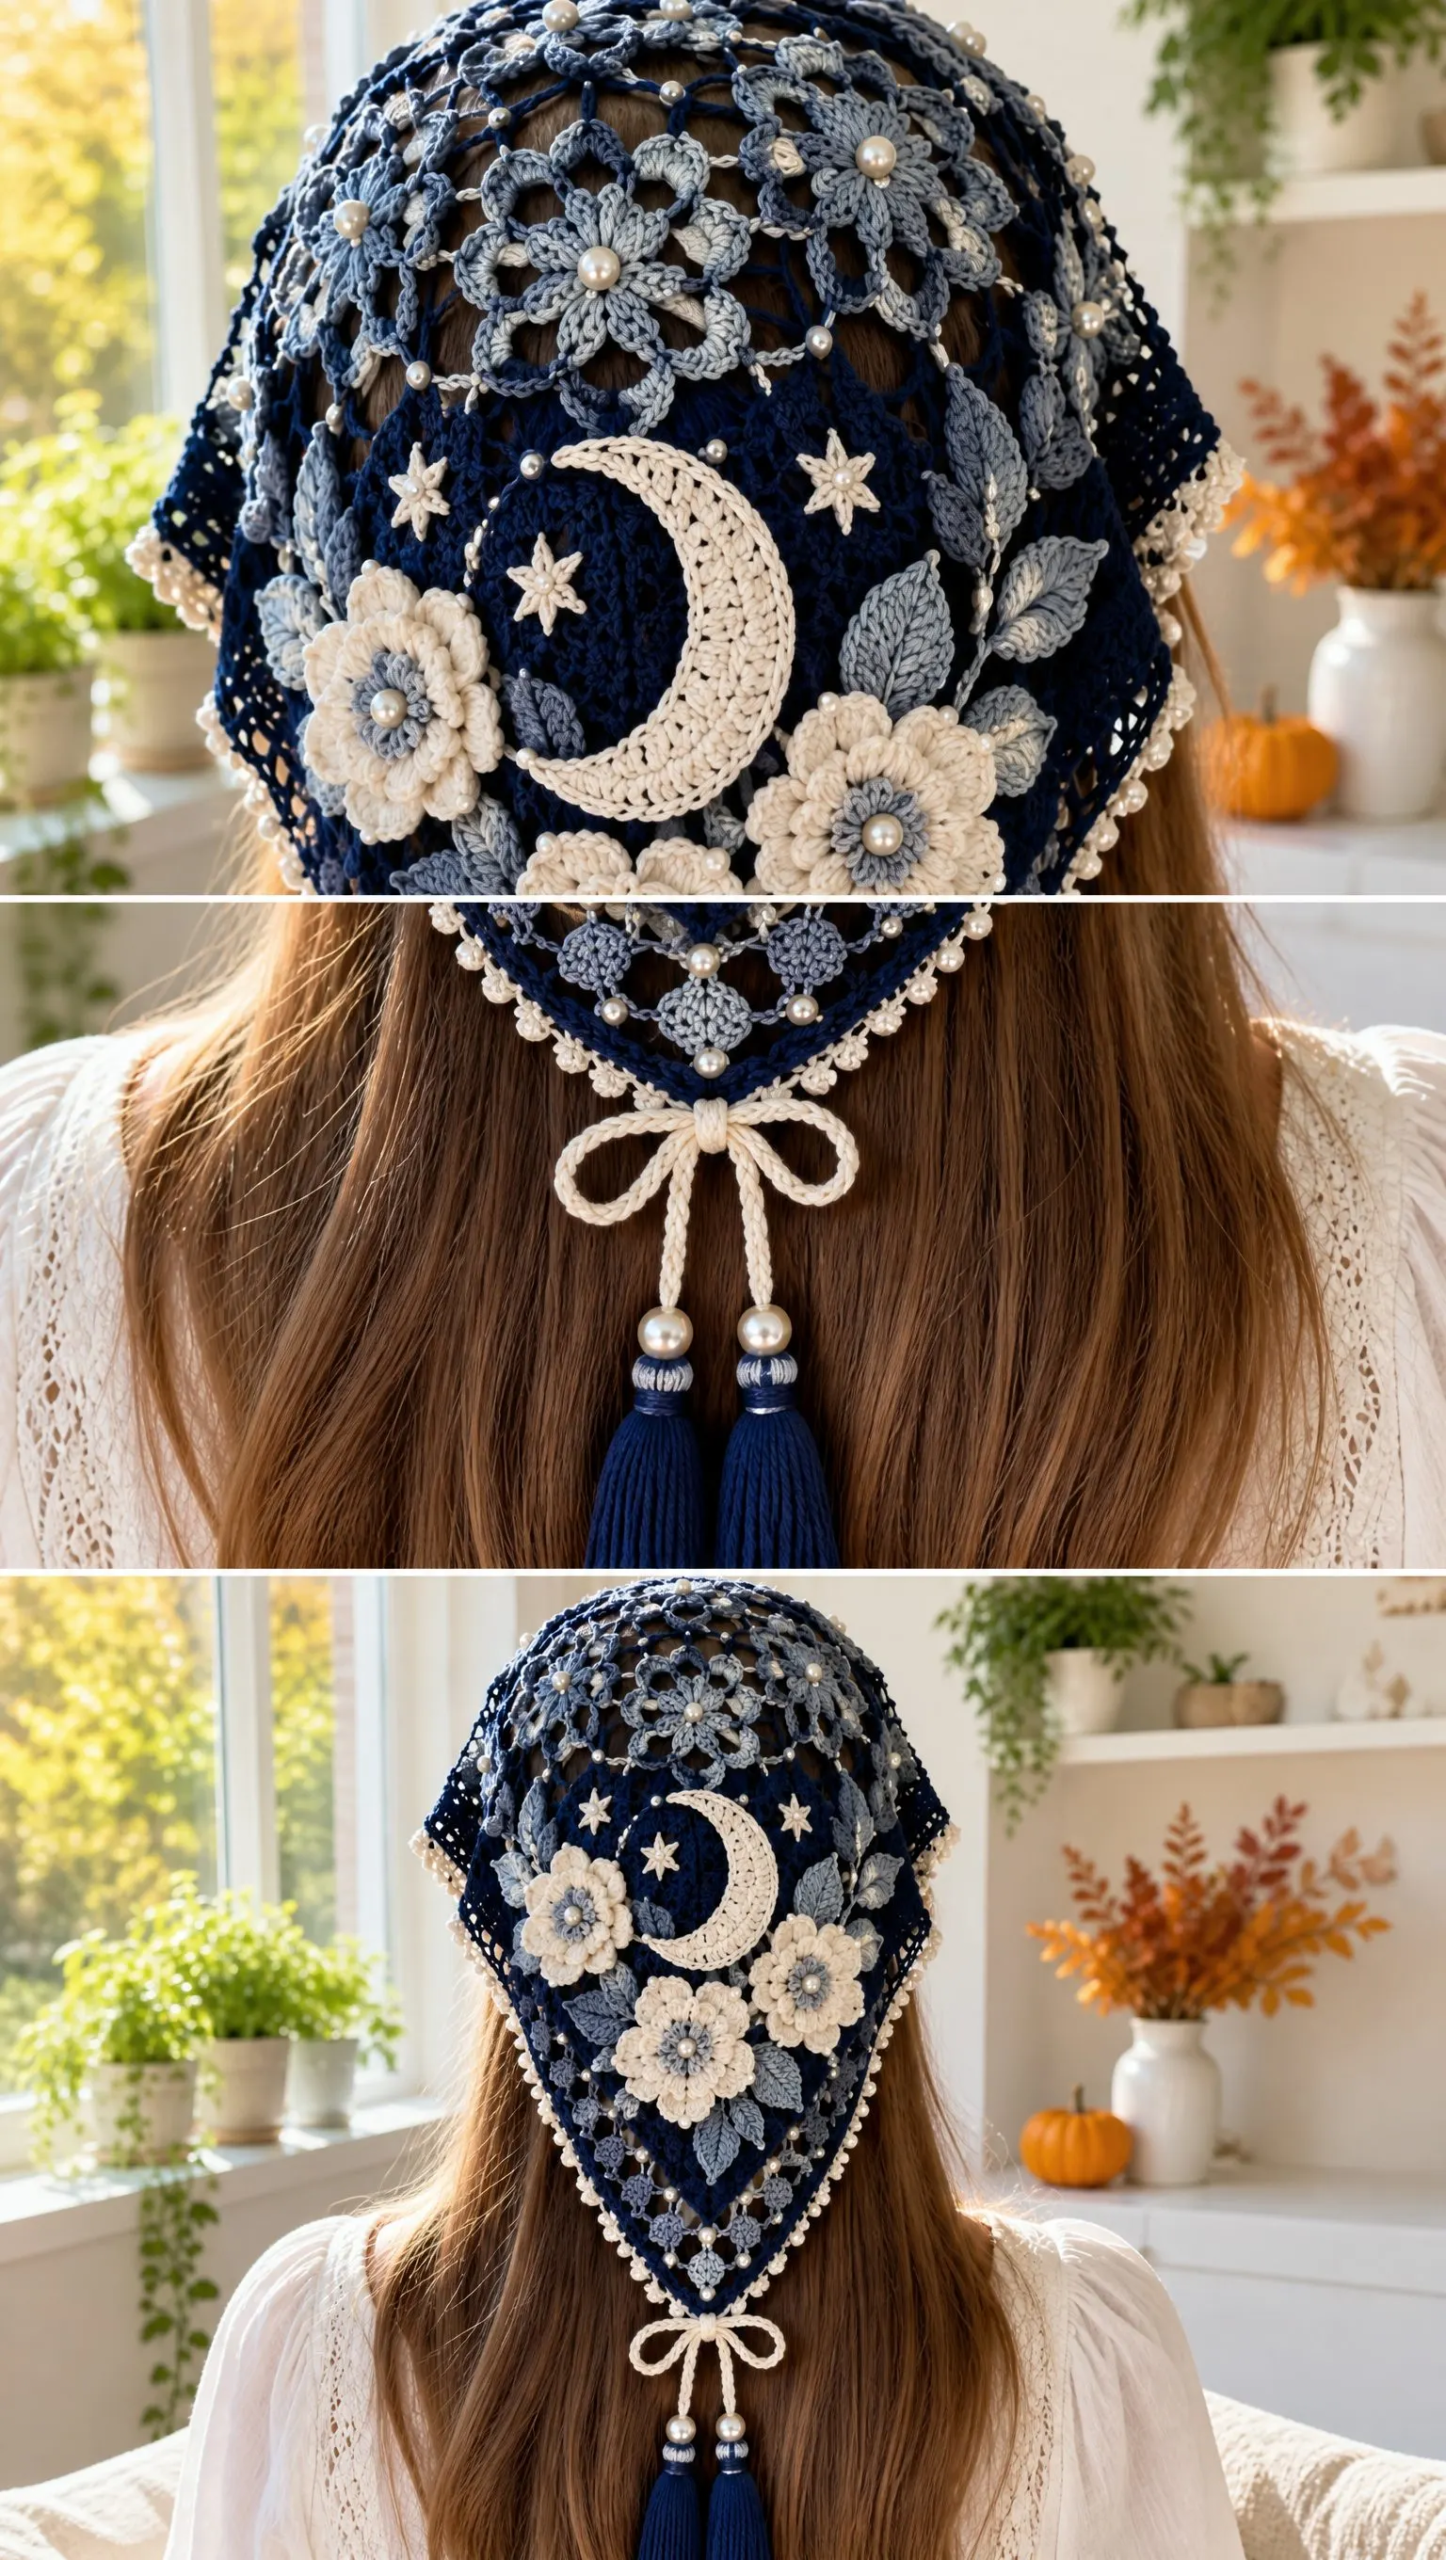
This isn’t your average bandana kerchief. The Moonflower Lace Headscarf features a curved crown made from joined hexagonal flower motifs, a long triangular lower panel worked in open mesh, and gorgeous surface embellishments including a crescent moon, layered moonflowers, pointed leaves, raised stars, and pearl beads.
The construction is modular, which means you can work on small pieces and then bring them all together. If you’ve ever felt overwhelmed by large projects, this approach keeps things manageable. You’ll make your motifs, join them, work the triangle downward, add the border, and then have fun placing all the decorative elements.
The finished piece measures approximately 21 inches across the crown and 20 inches to the tassel bow. It sits beautifully on the back of the head with a softly curved crown rather than a flat rectangle.
Materials You’ll Need
Before you start, gather everything so you’re not hunting for supplies mid-project.
Yarn:
Hook:
Notions:
Gauge and Target Measurements
| Item | Target |
|---|---|
| One hex flower after blocking | 3.0 to 3.25 inches across opposite points |
| Crown band width | 8.5 to 9.5 inches from top center to lower edge |
| Scarf width at temples | 20 to 22 inches |
| Depth to triangular point, excluding tassels | 18 to 20 inches |
| Tassel length | 3.5 to 4 inches |
Important: Treat your first motif as your gauge swatch. Make one hex flower, block it, and measure. If it’s too small, go up a hook size. If it’s too large, go down. This single motif determines your finished crown size more reliably than unblocked gauge alone.
Fit note: If your hair is very thick or you want more crown coverage, add one extra motif to each side of the crown row before beginning the lower triangle.
Abbreviations
Let me walk you through every abbreviation you’ll encounter in this pattern. If you’re newer to crochet patterns, bookmark this section.
Part 1: Hexagonal Crown Flower Motif
Make 11 motifs total: 7 midnight-blue dominant and 4 silver-gray dominant. For a lighter crown, reverse those quantities. Each motif has six petals and six chain-bridge corners so adjacent pieces can be joined neatly.
Color Plan
Navy-dominant motif: Ivory or silver center ring, navy petals, silver-gray bridge/frame.
Silver-dominant motif: Ivory center ring, silver-gray petals, navy bridge/frame.
Optional focal top-center motif: Navy petals with ivory picots added to every second outer single crochet.
Instructions
Round 1: With center color, ch 6 and join with sl st to form a ring. Ch 1, work 12 sc into ring. Join to first sc. Fasten off if changing color.
Round 2 (petal setup): Join petal color in any sc. Ch 5, sk 1 sc, sl st in next sc; rep from around to make 6 ch-5 loops. Join.
Round 3 (tall petals): Into each ch-5 loop work: sc, hdc, 2 dc, 2 tr, 2 dc, hdc, sc. Sl st in the anchoring sl st between petals. Repeat around. You should have 6 pointed oval petals.
Round 4 (bridge round): Working behind petals, join border color in any valley between petals. *Ch 5, sc around the back post/anchor at tip area of next petal, ch 5, sc in next valley; rep around. Adjust each bridge so it lies behind the flower and does not pull the petal inward.
Round 5 (hex frame): In each corner bridge work (2 sc, ch 3, 2 sc). Along each side bridge work 5 sc. Repeat around; join and fasten off. Block each motif to 3.0 to 3.25 inches across.
Part 2: Assemble and Shape the Crown
Lay motifs right side up before sewing. The crown should curve over the back of the head rather than form a flat rectangle. Use mattress stitch through the outer loops of corresponding border stitches, or slip-stitch join on the wrong side.
1. Arrange the first row in a shallow arc of 5 motifs. The center motif sits highest; tilt the two outer motifs slightly downward.
2. Place a second row of 4 motifs below, offset so each motif nests into the gap between two motifs above.
3. Add 1 motif at each lower side to extend coverage toward the ears. You now have 11 motifs total.
4. Sew all touching edges. At three-way intersections, pass the needle through all adjacent corner loops once, then continue normally. Do not knot bulky joins at the intersection.
5. Try the crown on or pin it over a head form. If the lower edge is too wide, take a tiny 1/4 inch dart by overlapping one side junction; if too narrow, add a short 3 to 5 ch bridge between the two lowest side motifs.
Crown Stabilizing Edge
With navy and right side facing, join at one lower side corner. Work sc evenly around the lower crown edge only, placing approximately 2 sc per row-end space and 1 sc in each motif border stitch. At each deep valley work sc2tog (single crochet two together) to smooth the curve. Fasten off. This edge is where the triangular panel will be attached.
Part 3: Triangular Lace Panel
The lower V is worked downward from the stabilized crown edge. The written counts assume roughly 96 sc across the lower crown edge. If your count differs, center the repeats and leave the same number of unused stitches at each side.
Foundation row: With navy and right side facing, join 6 stitches in from the right lower corner. Ch 3 (counts as dc), dc in next st, *ch 2, sk 2 sts, dc in next 2 sts; rep across until 6 sts remain. Turn.
Row 2: Ch 3, dc in next dc, *ch 2, 2 dc in next ch-2 sp; rep across, ending with 2 dc over final dc pair. Turn.
Row 3 (first decrease row): Sl st across first dc pair and into first ch-2 sp. Ch 3, dc in same sp, *ch 2, 2 dc in next ch-2 sp; rep across, stopping before final ch-2 sp. Turn. One mesh repeat decreased at each side.
Rows 4 through 11: Repeat Rows 2 and 3 alternately, maintaining the open diamond mesh and decreasing one repeat at each side on every odd-numbered row.
Silver-gray diamond band: Change to silver-gray. Work 3 rows in the same mesh pattern, but make each ch-2 as ch-3 for a more open diamond band. Continue the side decreases.
Rows 15 onward: Return to navy. Continue mesh rows and paired side decreases until only 2 dc groups remain.
Point: Ch 3, work dc3tog across the remaining two groups and center space. Ch 1 and fasten off. The point should be centered beneath the crown.
Refining the V Shape
If your panel begins to look too short and wide, work one non-decrease row between decrease rows for the next 4 to 6 rows. If it looks too narrow, decrease every row for 2 to 3 rows. The goal is a long, elegant V rather than a compact triangle.
Part 4: Dense Navy Border and Ivory Picots
1. Join navy at the right temple edge. Work 1 round of sc evenly around both diagonal sides and the bottom point. Along motif edges, use 1 sc per stitch; along mesh row ends, use about 2 sc per dc row-end. Keep the edge flat.
2. Work a second round of sc in the back loop only for a narrow raised navy ridge. At the very tip, work 3 sc in one stitch so the point stays sharp.
3. Join ivory. Sl st in next 3 sts, picot; rep from around both diagonal sides. On the crown/top edge, space picots every 5 sts so the edge remains comfortable against the head.
4. Fasten off and weave tails to the wrong side.
Part 5: Pearl-Ivory Crescent Appliqué
Make one crescent approximately 4.0 to 4.5 inches tall. It is worked as a curved strip, then shaped by uneven row lengths.
1. With ivory, ch 31. Row 1: sc in second ch and across (30 sc). Turn.
2. Row 2: ch 1, sc in first 5 sts, hdc in next 5, dc in next 10, hdc in next 5, sc in last 5. Turn.
3. Row 3: ch 1, sc2tog, sc 3, hdc 5, dc 10, hdc 5, sc 3, sc2tog. Turn.
4. Row 4: sl st in first 3 sts, sc 4, hdc 4, dc 8, hdc 4, sc 4; leave remaining sts unworked. Turn.
5. Row 5: sl st in first 3 sts, sc 3, hdc 3, dc 6, hdc 3, sc 3; leave remaining sts unworked. Fasten off.
6. Gently curve the strip into a crescent, pin it so the inner edge is strongly concave and the outer edge smoothly rounded, then steam or wet block. Sew invisibly through the back loops onto the navy panel.
Part 6: Sculptural Moonflowers (Make 3)
Each flower has a raised center and two petal layers. Make two flowers 2.25 to 2.5 inches wide and one flower slightly smaller.
Center: With silver-gray, make a magic ring. Ch 1, 10 sc in ring; join. Next round: working in front loops, *ch 3, sl st in same st, sl st in next st; rep around to form 5 small center points. Fasten off.
Back petal loops: Join ivory in any unused back loop. *Ch 7, sl st in next back loop; rep around to make 10 loops.
Petals: In each ch-7 loop work sc, hdc, 2 dc, tr, 2 dc, hdc, sc. Repeat around. Join.
Second raised layer: On the wrong side, join ivory around the base of every second petal. *Ch 5, sl st around base of next selected petal; repeat to make 5 loops. Turn to right side and work sc, hdc, 2 dc, hdc, sc in each loop.
Pin petals upward and slightly cupped. Block lightly only; too much flattening removes the sculptural effect.
Part 7: Slate-Blue Leaves and Raised Stars
Pointed leaf (make 8 to 12): With slate blue, ch 10. Starting in second ch work sl st, sc, hdc, dc, tr, dc, hdc, sc, sl st. Ch 1; working along opposite side of foundation chain, mirror the stitches back to the start. Sl st to first st. Fasten off, leaving a sewing tail.
Small star (make 5 to 7): With ivory or silver-gray, magic ring, 5 sc in ring. Sl st in next sc, ch 4, sl st in second ch, sc in next ch, hdc in next ch, sl st in same base sc; repeat from around. Tighten ring and fasten off.
Part 8: Decorative Placement and Sewing
1. Place the crescent slightly above the vertical midpoint of the lower triangle, offset just a touch to one side if desired.
2. Arrange three moonflowers around the crescent in a loose triangular cluster: one lower-left, one lower-right, one below or slightly overlapping the crescent edge.
3. Tuck slate-blue leaves beneath the flowers in balanced pairs, keeping the pointed tips visible.
4. Scatter raised stars above and around the crescent, leaving at least 1 inch between motifs so the lace remains visible.
5. Sew appliqués with tiny whip stitches using matching thread or split yarn. Stitch through the panel intersections rather than across open chain spaces whenever possible.
Part 9: Pearl Beads
Use 24 to 30 beads. For a balanced effect, place them at regular intervals along the lower V border and at selected flower centers rather than covering every motif.
Part 10: Ivory Bow and Navy Tassels
Ivory cord: With ivory, ch 95 to 110, then sl st back along the chain for a firm narrow cord. Fasten off. Thread horizontally through two sturdy border spaces about 1/2 inch above the scarf point and tie a neat bow.
Tassels: Cut 30 to 36 strands of navy yarn, each 8.5 inches long, for each tassel. Fold one bundle in half over a separate 10 inch tie strand. Tie firmly at the fold.
Wrap a 12 inch navy strand several times around the bundle about 5/8 inch below the top to form the tassel neck. Knot and bury the ends.
Trim each tassel to 3.5 to 4 inches. Attach one tassel to each cord end. Optionally add one pearl bead above each tassel if the bead opening is large enough.
Part 11: Final Blocking and Finishing
1. Weave all yarn ends on the wrong side, changing direction at least once so they do not pull free.
2. Hand wash or soak in cool water with a small amount of gentle wool/cotton wash. Press water out in a towel; do not wring.
3. Pin the scarf right side up. Shape the crown into a shallow curve, square each hex motif, straighten both diagonal edges, and pull the point downward until the V is symmetrical.
4. Pin picots individually only where needed. Arrange moonflower petals upward rather than flattening them.
5. Allow to dry completely before removing pins. After drying, re-check every bead and appliqué for secure attachment.
Sizing Adjustments
| Adjustment | How to Change It |
|---|---|
| Wider crown | Add one hex motif to each lower side before attaching the triangle |
| Narrower crown | Omit the two lowest side motifs and attach the triangle directly to the 5 + 4 motif body |
| Longer scarf point | Insert a non-decrease mesh row after every two decrease rows until desired depth is reached |
| Shorter scarf point | Decrease on every row for the final third of the triangle |
| Larger motifs | Use a 2.5 to 2.75 mm hook, then reduce motif count if overall width becomes too large |
Assembly Checklist
Before you call this project complete, run through this checklist:
Care Instructions
Hand wash cool. Roll in a towel to remove excess moisture, reshape flat, and air dry. Store flat rather than hanging from the tassels. If the moonflowers flatten during storage, lift the petals gently with your fingers and steam from a distance without pressing.
Final Thoughts on This Moonflower Lace Headscarf Crochet Pattern
Thank you so much for choosing this pattern! I hope you love making it as much as I loved designing it. The combination of structured lace, dimensional flowers, and celestial details makes this headscarf a true statement piece.
If you make one, I would absolutely love to see it! Tag me on Instagram or share a photo in my Facebook group. There’s nothing better than seeing your finished projects.
Don’t forget to save this Moonflower Lace Headscarf pattern to your Pinterest boards so you can find it whenever inspiration strikes. And if you have any questions or just want to share your progress, drop a comment below. I always love hearing from you!
Want a Quick & Easy Printable Version?
Get a clean, beautifully formatted PDF of this pattern — easy to follow step by step, ready to print or save on any device. No scrolling, no distractions, just the pattern.
Get the Printable PDF →You Might Also Like
- Sage Green Boho Tiered Lace Dress Free Crochet Pattern
- Blue Shark Baby Cocoon Wrap Free Crochet Pattern
- Sage Green Bohemian Lace Dress Free Crochet Pattern
- Forest Green Elegant Peplum Crochet Top Free Pattern
