
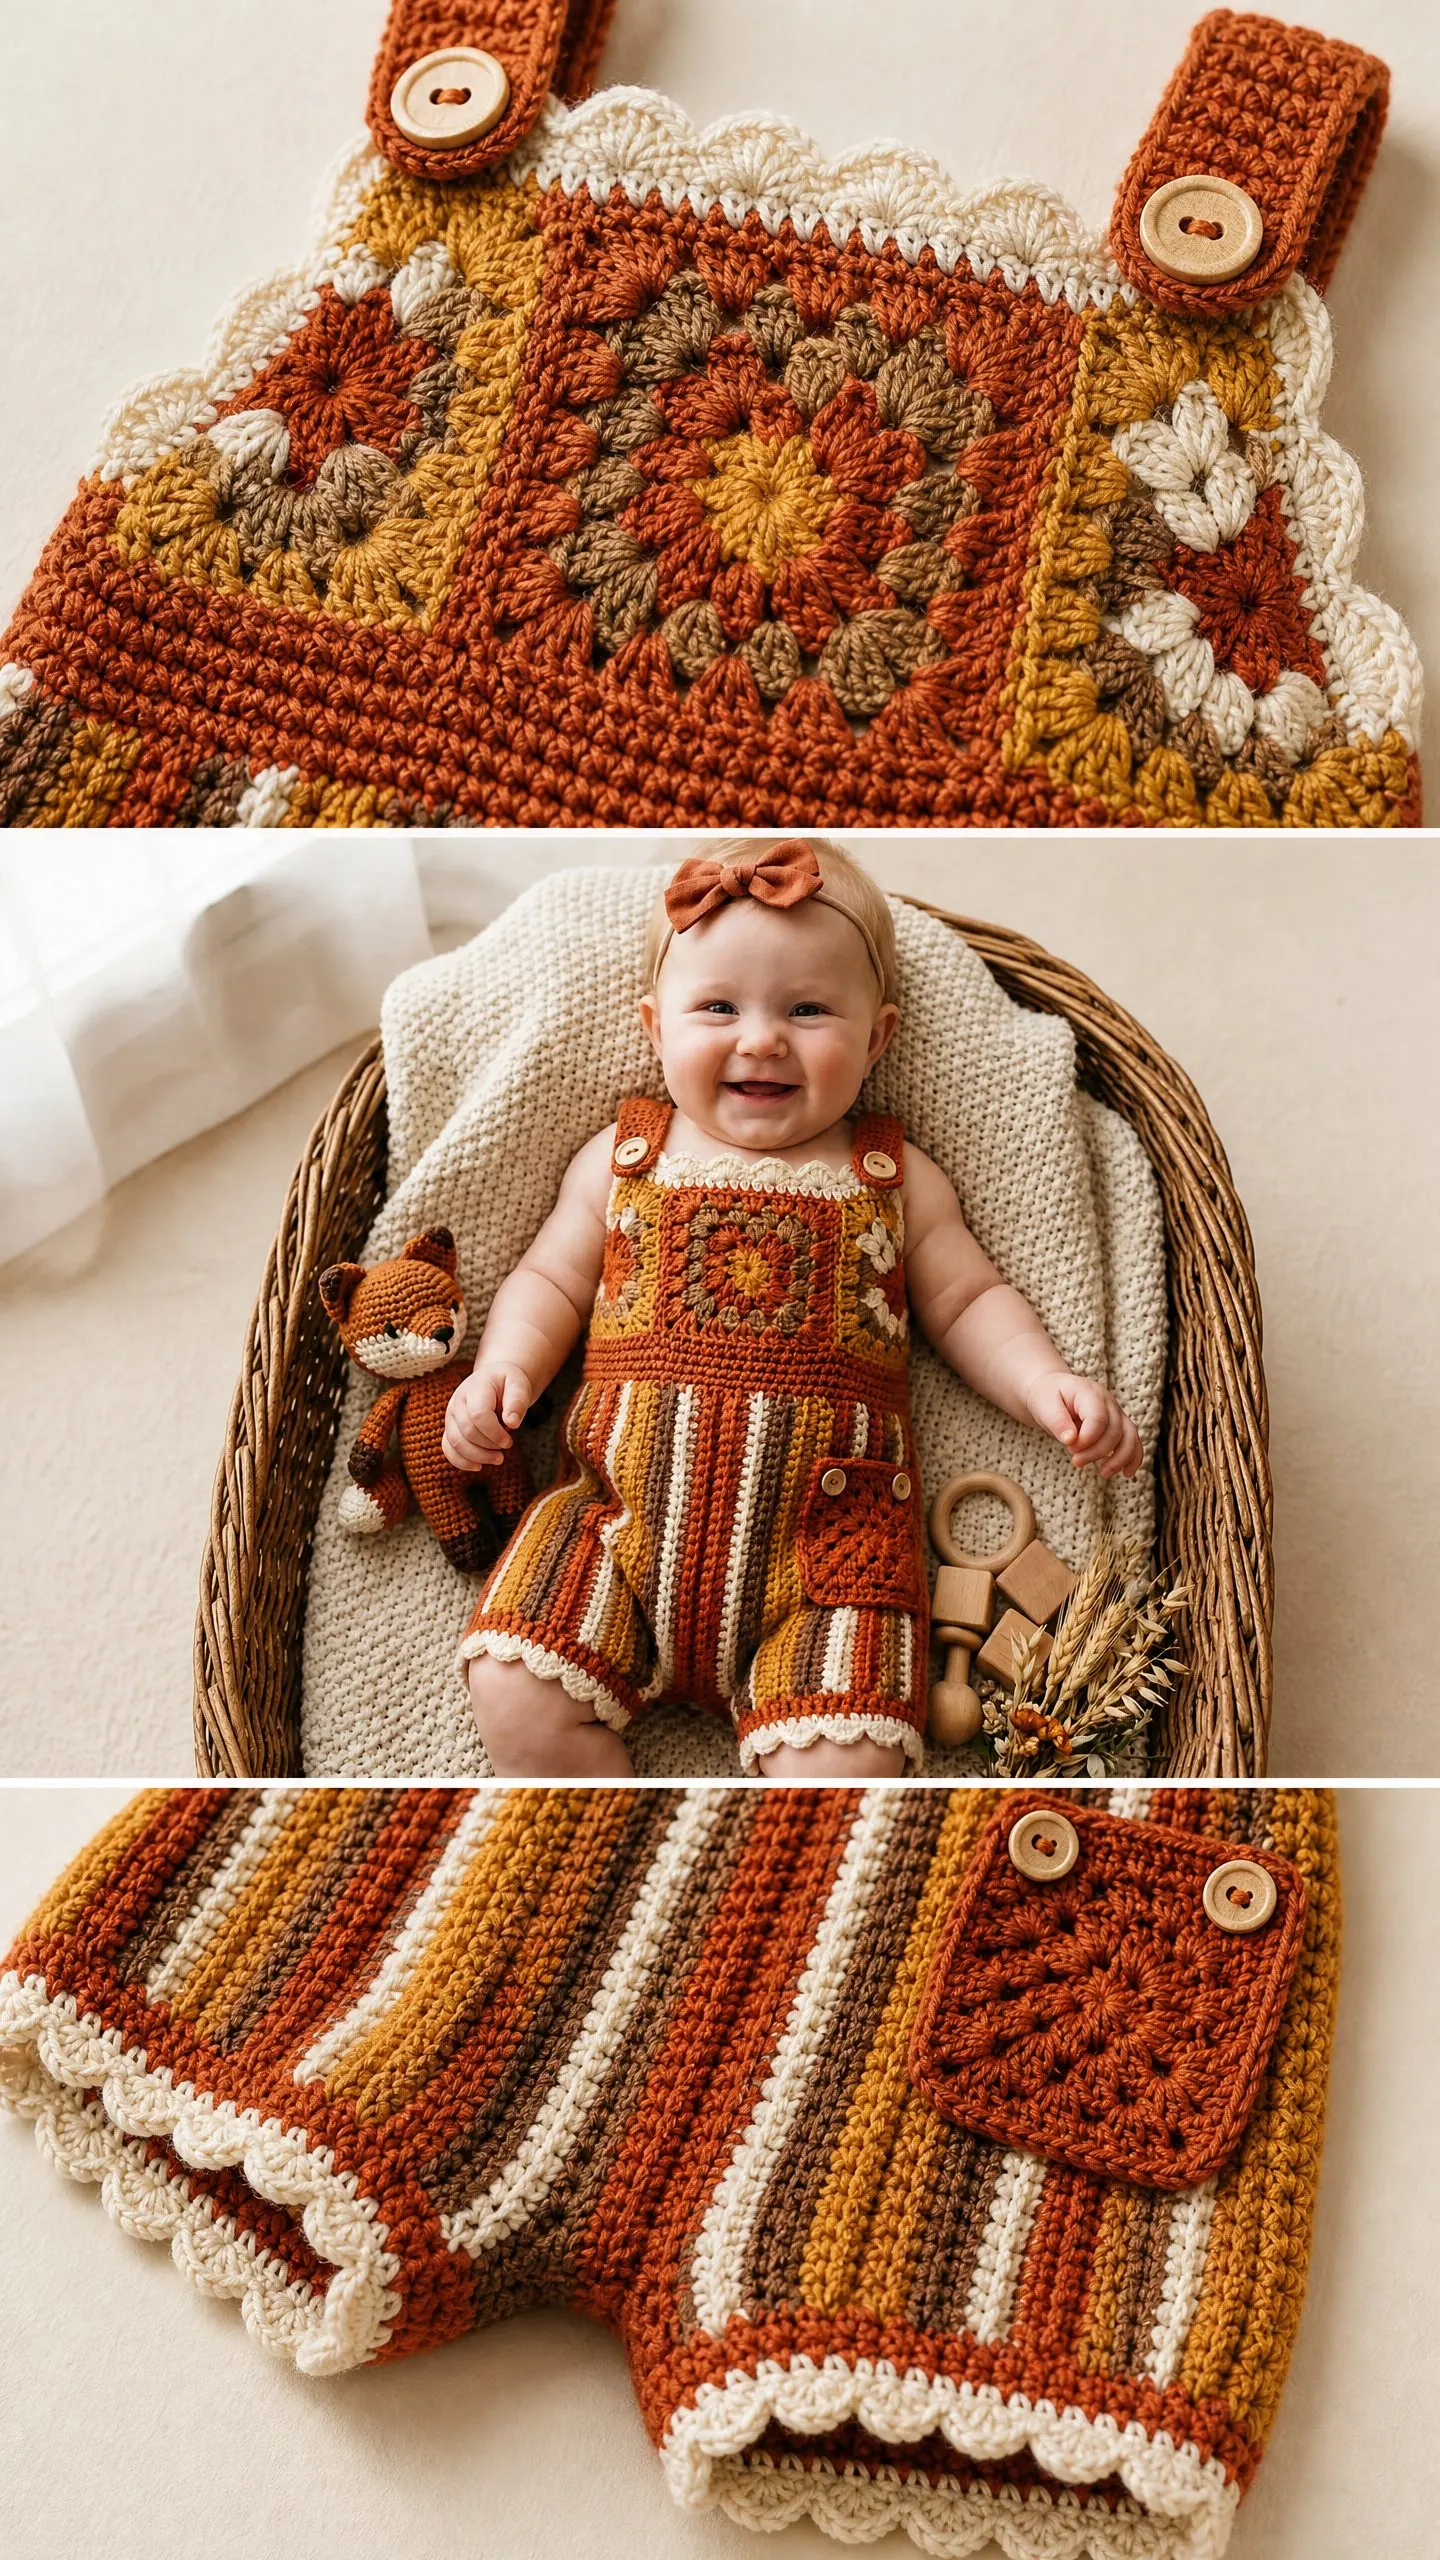
This is a baby romper that combines granny squares with vertical stripes. The bib features classic granny square construction in warm autumn colors. The body uses front post and back post double crochet to create cheerful striped columns. If you can work a granny square and know how to do post stitches, you can make this romper.
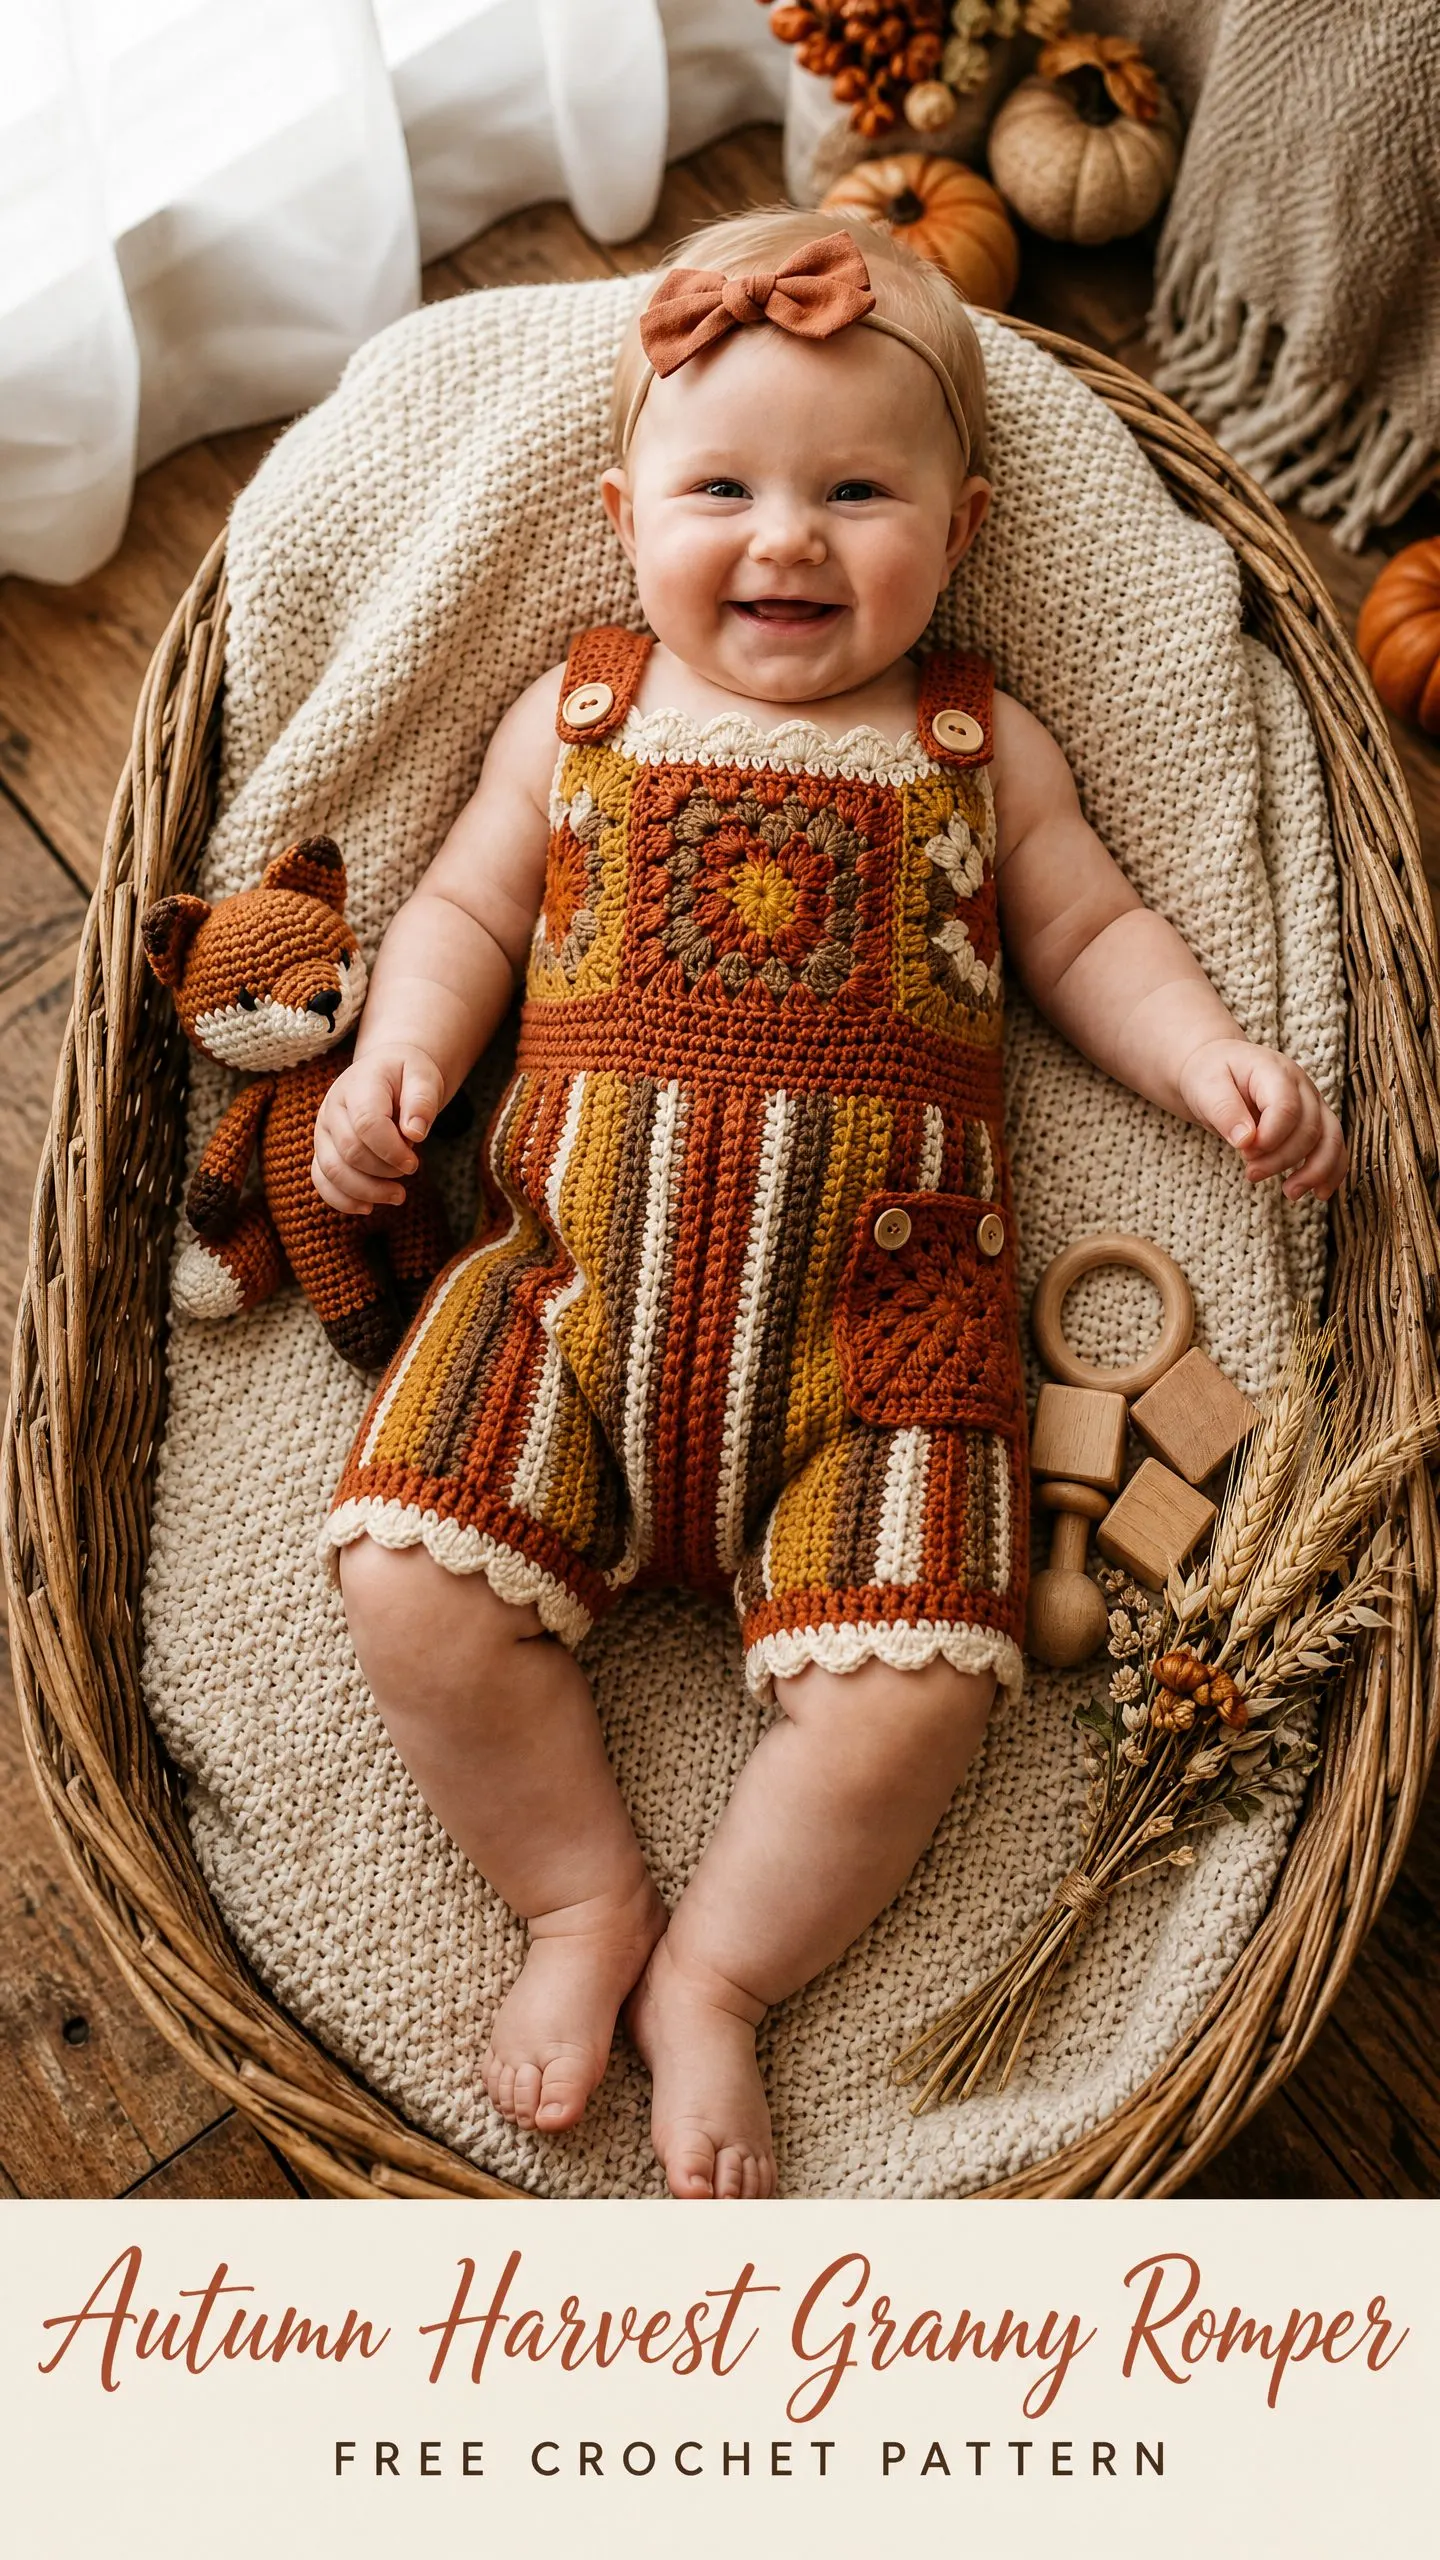
The construction is straightforward once you break it down. You start with the granny square bib panel, work the body downward, shape the leg openings, then create a matching back panel and seam everything together. Shell edging finishes all the hems for a polished look.
I love how this romper captures that cozy fall feeling. The rust, gold, brown, cream, and olive color palette looks absolutely stunning on little ones. The finished piece makes an incredible gift or a sweet keepsake for your own baby’s first autumn season.
Materials You Will Need
Before you start, gather all your supplies. Having everything ready makes the project flow smoothly.
Yarn: Worsted weight, 100% cotton or cotton blend. Cotton works best for baby comfort and gives excellent stitch definition for the post stitch work.
Color breakdown and yardage:
Hook: US size G-6 / 4.0 mm. Adjust if needed to meet gauge.
Notions:
Yarn Suggestions
Here are three excellent options that work beautifully for this autumn harvest granny romper crochet pattern.
Lion Brand 24/7 Cotton in Terracotta, Goldenrod, Cafe au Lait, Ecru, and Sage. This yarn is widely available, machine washable, and has excellent stitch definition for post stitch work. It holds color well without bleeding.
Paintbox Yarns Simply DK worked at a slightly tighter gauge. Choose Dusty Rose as a substitute for rust, Mustard Yellow, Coffee Bean, Champagne White, and Khaki. This is a budget friendly option with a smooth finish.
WeCrochet Dishie in Terracotta, Canary, Linen, Cream, and Fern. A slightly drapier option that works beautifully for baby garments and softens with washing.
Any worsted or heavy DK weight cotton or cotton acrylic blend that achieves the stated gauge will work. Avoid fluffy or textured yarns because they obscure the granny square and post stitch stripe detail. Always check for colorfast dyes and baby safe fiber content.
Gauge
With US G-6 / 4.0 mm hook:
Gauge is critical for this garment. Incorrect gauge will affect chest circumference, bib fit, and overall length. Work a gauge swatch and adjust hook size as needed before beginning. Trust me on this one.
Finished Measurements
The pattern is written for size 3 to 6 months.
Skill Level
Intermediate. This pattern requires comfort with granny squares, post stitches for vertical stripes, seaming, picking up stitches along edges, button placement, and working shell edging. Beginners who have completed a few projects can attempt this with patience.
Time estimate: 8 to 12 hours for an experienced crocheter. Allow 14 to 18 hours if new to garment construction.
Abbreviations and Stitch Definitions
Let me walk you through every stitch you will use. I have included plain English definitions so nothing feels confusing.
Special Stitches Explained
These are the techniques that give this romper its distinctive look. Take your time learning them before you begin.
Granny Square Cluster
This is the building block of the granny square bib. Yarn over, insert hook into space, yarn over and pull up a loop, yarn over and draw through two loops on hook. Repeat this two more times in the same space so you have four loops on hook. Yarn over and draw through all four loops. This creates a 3 double crochet cluster. In this pattern, clusters are always worked as 3 dc cluster unless noted.
Front Post Double Crochet (FPDC)
This stitch creates the raised vertical stripes on the front of your work. Yarn over. Insert hook from front to back around the post (the vertical bar) of the indicated stitch in the row below, going from right to left. Yarn over and pull up a loop. Yarn over and draw through two loops. Yarn over and draw through the remaining two loops. The stitch sits raised on the front of the work.
Back Post Double Crochet (BPDC)
This is the companion to FPDC. Yarn over. Insert hook from back to front around the post of the indicated stitch in the row below, going from right to left. Yarn over and pull up a loop. Yarn over and draw through two loops. Yarn over and draw through the remaining two loops. The stitch sits raised on the back of the work, creating a recessed column on the front.
Shell Stitch
Used for all the pretty hem and leg edging. Work [2 dc, ch 1, 2 dc] all into the same stitch or space. This forms one shell unit.
Picot (Optional)
Ch 3, sl st into the first chain made. Creates a small decorative loop. This is optional and can be added for extra detail.
Adjustable Ring
Make a loop with the yarn, crossing the working yarn over the tail. Insert hook through the center of the loop, yarn over and pull up a loop, chain one to secure. Work the required stitches into the ring. Pull the tail end to close the center hole firmly.
Important Pattern Notes
Read these before you start. They will save you confusion later.
1. The romper is worked in separate panels that are seamed together. The granny square bib is worked first, the front body is picked up from the bib base, the back bodice and body are worked separately, then side seams and leg finishing complete the garment.
2. The granny square bib panel consists of one large central granny square flanked by two partial granny square half motifs on each side. This creates a rectangular bib panel approximately 6.5 inches wide by 4 inches tall.
3. The ch 2 at the beginning of post stitch rows does NOT count as a stitch throughout this pattern.
4. All stitch counts in parentheses at end of each row refer to working stitches only, not counting the turning chain.
5. Block all pieces before seaming for best results.
6. When changing colors in the stripe body, carry unused colors loosely up the side of the work or cut and rejoin. Carrying Color A up the side is practical since it appears in every other post column.
Section 1: Granny Square Bib Panel
The bib panel is built from one large center granny square and two side granny squares joined together to form the full bib width. Each granny square is worked through Round 3.
Large Center Granny Square (make 1)
With Color B and adjustable ring.
Round 1: Ch 3 (counts as first dc), 2 dc into ring, ch 2, [3 dc into ring, ch 2] 3 times, sl st to top of beg ch 3 to join, pull ring closed. (12 dc, 4 ch 2 spaces)
Round 2: Join Color A to any ch 2 corner space with sl st. Ch 3 (counts as dc), [2 dc, ch 2, 3 dc] into same corner sp (first corner made). Ch 1. [3 dc, ch 2, 3 dc, ch 1] into each rem 3 corner spaces. Sl st to top of beg ch 3. (24 dc, 4 ch 2 corner spaces, 4 ch 1 side spaces)
Round 3: Join Color C to any ch 2 corner space. Ch 3 (counts as dc), [2 dc, ch 2, 3 dc] into same corner sp. Ch 1. 3 dc into next ch 1 side sp. Ch 1. [3 dc, ch 2, 3 dc, ch 1, 3 dc, ch 1] into each rem 3 corner spaces and side spaces. Sl st to top of beg ch 3. Fasten off, leaving a 12 inch tail for joining. (36 dc, 4 ch 2 corner spaces, 8 ch 1 spaces)
The completed square measures approximately 3.25 inches / 8.25 cm square.
Side Granny Squares (make 2)
These are the same as the center square. Make 2 more squares following the same Round 1 through Round 3 instructions above. You may vary the Round 1 color to Color E on one and Color D on the other for visual interest matching the reference, or keep all Color B for center rings.
Joining Squares into Bib Panel
Lay squares in a horizontal row: Side Square Left, Center Square, Side Square Right.
Using yarn needle and Color A, whip stitch or single crochet join the squares together along one full side edge each. Align corner spaces and cluster tops carefully. You will have a bib rectangle approximately 9.75 inches / 24.75 cm wide and 3.25 inches / 8.25 cm tall after joining.
Bib Top Edging
This creates the shell and cream picot trim visible at the bib top.
Join Color D to top right corner of bib panel with sl st on RS.
Row 1: Ch 1, sc evenly across top edge of all three squares, working 3 sc per cluster top and 1 sc into each ch space. Across a 3 square joined panel top you will have approximately 32 sc. Adjust by 1 sc if needed to land on an even number. Turn. (32 sc)
Row 2: Ch 1, [sk 1 sc, shell (2 dc, ch 1, 2 dc) into next sc, sk 1 sc, sl st into next sc] repeat across. Work to end. Fasten off Color D. (8 shell units, 8 sl sts)
Mark the two top outer corners of the bib panel with stitch markers now. These are your strap attachment points.
Checkpoint: After completing the bib panel and its top edging, the piece should measure approximately 9.75 inches / 24.75 cm wide and approximately 4 inches / 10 cm tall including the shell edging row.
Section 2: Front Body
The front body is worked flat in rows, picking up stitches along the bottom edge of the joined bib panel, and is worked downward.
With RS facing, join Color A to bottom right corner of bib panel.
Setup Row: Ch 2 (does not count as st), working across the bottom edge of the 3 square bib panel, work dc evenly into each stitch and space across. You will work approximately 3 dc per cluster base and 1 dc per ch 1 space at joins. Work until you have 52 dc across. Adjust as needed so that 52 dc are on hook. Turn. (52 dc)
The vertical stripe body uses a 2 stitch repeat (1 FPDC column + 1 BPDC column) in alternating colors. With 52 stitches you have 26 pairs, which divides evenly.
Stripe Sequence
The color scheme from left to right across the RS front is set on Row 1 and maintained by working each post stitch around the corresponding post below on every subsequent row. The pattern cycles as A, B, A, C, A, D, A, E repeated across. This means Column 1 = A, Column 2 = B, Column 3 = A, Column 4 = C, Column 5 = A, Column 6 = D, Column 7 = A, Column 8 = E, then repeat from Column 1 = A.
Work Color A continuously as the dominant color, cutting and rejoining accent colors (B, C, D, E) per column, or carry them loosely across WS.
Body Row 1 (RS): Ch 2, [FPDC around next dc in Color A, FPDC around next dc in Color B] across following the stripe sequence above. When working FPDC in a non A color, join that color with a new strand, work the FPDC, then drop it (to be picked up on the return or cut and rejoined). Turn. (52 FPDC)
Body Rows 2 through 18: Ch 2, work BPDC on WS rows and FPDC on RS rows around each post of the row below, maintaining color alignment by always working each column in its established color. The stripe columns will become clear vertical lines of color on the RS. Turn after each row. (52 sts per row)
Continue for 18 total rows of post stitch stripe body.
Do not fasten off. Continue to leg shaping.
Checkpoint: After 18 rows of stripe body, the front body panel should measure approximately 8 inches / 20 cm from bib top to current working row.
Section 3: Leg Openings and Crotch Shaping (Front)
After Row 18 of stripe body, the leg openings are formed by dividing the work.
Left Leg Front Shaping
Row 19 (RS): Ch 2, work 20 sts in established stripe pattern across first 20 sts. Leave remaining 32 sts unworked. Turn. (20 sts)
Row 20 (WS): Ch 2, work 20 sts in established pattern. Turn. (20 sts)
Row 21 (RS): Ch 2, sc2tog over first 2 sts, work in established stripe pattern to end. Turn. (19 sts)
Row 22 (WS): Work in established stripe pattern to last st, 2 sc into last st (increase 1 to maintain 20). Turn. (20 sts)
Fasten off Color A and all accent colors for left leg front.
Right Leg Front Shaping
With RS facing, skip the center 12 sts of Row 18 (this creates the crotch width of approximately 3 inches / 7.5 cm), rejoin Color A to the 33rd stitch of Row 18.
Row 19 (RS): Ch 2, work 20 sts in established stripe pattern across last 20 sts. Turn. (20 sts)
Row 20 (WS): Ch 2, work 20 sts. Turn. (20 sts)
Row 21 (RS): Ch 2, work to last 2 sts, sc2tog. Turn. (19 sts)
Row 22 (WS): Ch 2, 2 sc in first st, work to end. Turn. (20 sts)
Fasten off.
Section 4: Front Body Hem Edging
With RS facing, join Color D to bottom corner of right leg panel.
Shell Hem Row: Ch 1, [sk 1 st, shell (2 dc, ch 1, 2 dc) into next st, sk 1 st, sl st into next st] across the bottom of each leg panel, working across the 20 sts of the right leg panel. At crotch gap, work 1 sc into each of the 12 skipped sts, then continue shell pattern across left leg panel bottom 20 sts. Fasten off Color D. (5 shells per leg)
Section 5: Back Bodice and Back Body
The back is worked as a single flat panel in Color A double crochet, seamed to the front at sides.
Foundation Chain: With Color A, ch 55.
Row 1: Dc in 4th ch from hook and in each ch across. Turn. (52 dc)
The ch 3 at beg counts as first dc in the back bodice for Row 1 only, since this establishes the panel from a chain. From Row 2 onward, ch 2 does not count as a stitch.
Row 2 through Row 18: Ch 2, dc in each dc across. Turn. (52 dc per row)
After Row 18, divide for leg openings same as front.
Back Left Leg
Row 19: Ch 2, dc in first 20 dc. Turn. (20 dc)
Row 20: Ch 2, dc across. Turn. (20 dc)
Row 21 (RS): Ch 2, dc to last 2 sts, dc2tog. Turn. (19 dc)
Row 22 (WS): Ch 2, 2 dc in first st, dc to end. Turn. (20 dc)
Fasten off.
Back Right Leg
Skip center 12 sts, rejoin Color A to 33rd st.
Row 19: Ch 2, dc in next 20 sts. Turn. (20 dc)
Row 20: Ch 2, dc across. Turn. (20 dc)
Row 21: Ch 2, dc2tog, dc to end. Turn. (19 dc)
Row 22: Ch 2, dc to last st, 2 dc in last st. Turn. (20 dc)
Fasten off.
Back Body Hem Edging
Work shell edging with Color D along leg hems of back panel, same as front (5 shells per leg). Fasten off.
Back Bodice Upper Edge Edging
With Color D, join to top right corner of back body panel.
Row 1: Ch 1, sc across top edge of back bodice. Work 52 sc. Turn. (52 sc)
Row 2: Ch 1, [sk 1, shell into next, sk 1, sl st] across. (13 shell units)
Fasten off Color D.
Section 6: Straps (Make 2)
Each strap is a narrow strip in Color A with a button loop at one end.
Foundation: With Color A, ch 7.
Row 1: Sc in 2nd ch from hook, sc in each ch across. Turn. (6 sc)
Rows 2 through 32: Ch 1, sc in each sc across. Turn. (6 sc per row)
Work 32 rows total for approximately 7 inches length.
Button Loop End
Row 33: Ch 1, sc in first 2 sc, ch 4 (forms button loop), sk 2 sc, sc in last 2 sc. Turn.
Row 34: Ch 1, sc in first 2 sc, 4 sc into ch 4 loop, sc in last 2 sc. (6 sc)
Fasten off, leaving a 12 inch tail for sewing.
Make 2 straps.
Strap Attachment
The non loop end of each strap is sewn securely to the inner front top corner of the bib panel (at the two marked corner points). Use a yarn needle and Color A, stitching through at least 6 to 8 sts in a square formation for security. The loop end crosses over the shoulder and buttons to the back bodice top edge.
Sew buttons onto the back bodice top, one at approximately 1.5 inches from each outer corner, and a second button 0.75 inch below the first on each side for adjustable fit.
Section 7: Pocket (Make 1)
The pocket is a small granny square worked to Round 2.
With Color B and adjustable ring.
Round 1: Ch 3 (counts as dc), 2 dc into ring, ch 2, [3 dc into ring, ch 2] 3 times. Sl st to top of ch 3. Pull ring closed. (12 dc, 4 ch 2 corner spaces)
Round 2: Join Color A to any corner sp. Ch 3 (counts as dc), [2 dc, ch 2, 3 dc] into same corner sp, ch 1. [3 dc, ch 2, 3 dc, ch 1] into each of rem 3 corner spaces. Sl st to top of ch 3. Fasten off. (24 dc, 4 ch 2 corner spaces, 4 ch 1 side spaces)
The completed 2 round pocket square measures approximately 2.25 inches / 5.75 cm square.
Pocket Flap
Join Color A to top edge of pocket square on RS.
Row 1: Ch 2, dc across top edge of square, working 3 dc per cluster and 1 dc per ch 1 space. You will have approximately 10 dc. Turn. (10 dc)
Row 2: Ch 1, sc across. Turn. (10 sc)
Row 3: Ch 1, sc in 4 sc, ch 3 (button loop), sk 2 sc, sc in last 4 sc. Turn.
Row 4: Ch 1, sc in 4 sc, 3 sc into ch 3 sp, sc in last 4 sc. (10 sc)
Fasten off.
Add Color D shell edging along bottom and two sides of pocket square (not top flap edge): Join Color D to bottom right corner, [sk 1, shell into next, sk 1, sl st] across each side. Fasten off.
Sew pocket to front right hip of romper with yarn needle and Color A, leaving the flap free. The pocket base sits approximately 5 rows above the leg hem. Sew one button through the pocket flap button loop and into the front body.
Section 8: Leg Edging
With RS facing and Color D, join to inner crotch bottom of right leg opening.
Work sc evenly around entire right leg opening, placing 1 sc per row end along body sides and 1 sc per stitch along cast off edges. Aim for a multiple of 4 stitches for the shell repeat. For a leg opening of approximately 8 to 10 inches circumference: target 40 sc. Join with sl st to first sc. (40 sc)
Shell Round: Ch 1, [sk 1, shell (2 dc, ch 1, 2 dc) into next sc, sk 1, sl st into next sc] 10 times around. Sl st to beg. Fasten off. (10 shell units)
Repeat for left leg opening.
Section 9: Side Seaming
With yarn needle and Color A (or use sl st join on RS for a visible seam, or whip stitch on WS for invisible seam), seam front and back body panels together along each side edge, from leg hem up to the armhole edge. The armhole is left open. Work from bottom to top, aligning rows carefully.
After seaming, the leg shells from front and back panels should meet at the side seam, continuing the shell edging around the lower body in a continuous visual line.
Section 10: Bib Side Edging and Shaping
With Color A, join to right outer edge of front bib panel with RS facing.
Row 1: Ch 1, sc evenly down the right side of bib panel to body join, approximately 12 sc. Do not turn. Work 1 sl st into the body at the join point. Fasten off.
Repeat on left side.
This creates a clean edge on the bib sides and helps the bib sit flat against the body.
Finishing and Blocking
Weave in all ends securely using a yarn needle, burying tails at least 1 inch in two directions within the fabric.
Wet block all pieces before final assembly if seaming was done first, or block the flat pieces before seaming. To wet block: submerge the piece in cool water, gently press out excess water (do not wring), lay flat on a blocking mat, pin to dimensions given in the finished size section, and allow to dry completely away from direct sunlight or heat.
Sew all buttons with matching thread using a hand sewing needle, passing through the crochet fabric and securing with a button shank wrap at back if needed to reduce stress on the fabric.
Size Customization Tips
To size up to 6 to 9 months: Add 6 stitches to the foundation row of the back body and the setup row of the front body (58 dc per panel). Work 4 additional rows in the stripe body before leg shaping. Add one extra round to each granny square in the bib. Increase strap length by 4 rows.
To size up to 9 to 12 months: Add 12 stitches to both body panels (64 dc). Work 6 additional stripe rows. Add one extra round to granny squares. Increase strap length by 6 to 8 rows.
To size down to 0 to 3 months: Reduce body foundation by 6 stitches (46 dc). Work 4 fewer stripe rows. Omit Round 3 from the side granny squares or work the bib from 2 squares instead of 3.
General principle: Every 4 stitches added across the full body adds approximately 1 inch / 2.5 cm to the total chest circumference. Every 3 to 4 rows added to the body adds approximately 0.75 inch / 1.9 cm to the body length.
Care Instructions
Machine wash on gentle cycle in cold water. Lay flat to dry. Do not tumble dry or wring. Cotton yarn will soften beautifully with each wash.
You Did It!
Thank you so much for making this autumn harvest granny romper. I hope you enjoyed combining those granny square traditions with the fun vertical stripe technique. This little romper is going to look absolutely adorable on a special baby in your life.
If you make this crochet pattern, I would love to see it. Tag me on Instagram or share a photo in my Facebook group. Seeing your finished projects is honestly the best part of sharing patterns.
Save this pattern to your Pinterest boards so you can find it easily when you are ready to make another one, maybe in different colors for spring. And please drop a comment below if you have any questions or just want to share how yours turned out. I read every single one and love hearing from you!
You Might Also Like
- Mint Seafoam Green Crochet Platform Wedge Sandals Pattern
- Granny Square Patchwork Baby Dress Free Crochet Pattern
- Mint Green Spring Baby Dress Free Crochet Pattern
- Mustard Yellow Backpack Free Crochet Pattern
