
When I started sketching this design, I had a very specific vision in my mind. I wanted something romantic and feminine that would work across multiple sizes, feel special without being fussy, and capture that dreamy cottagecore aesthetic I keep seeing everywhere. The construction needed to be straightforward enough that intermediate crocheters could tackle it with confidence, but the finished piece had to look absolutely stunning.
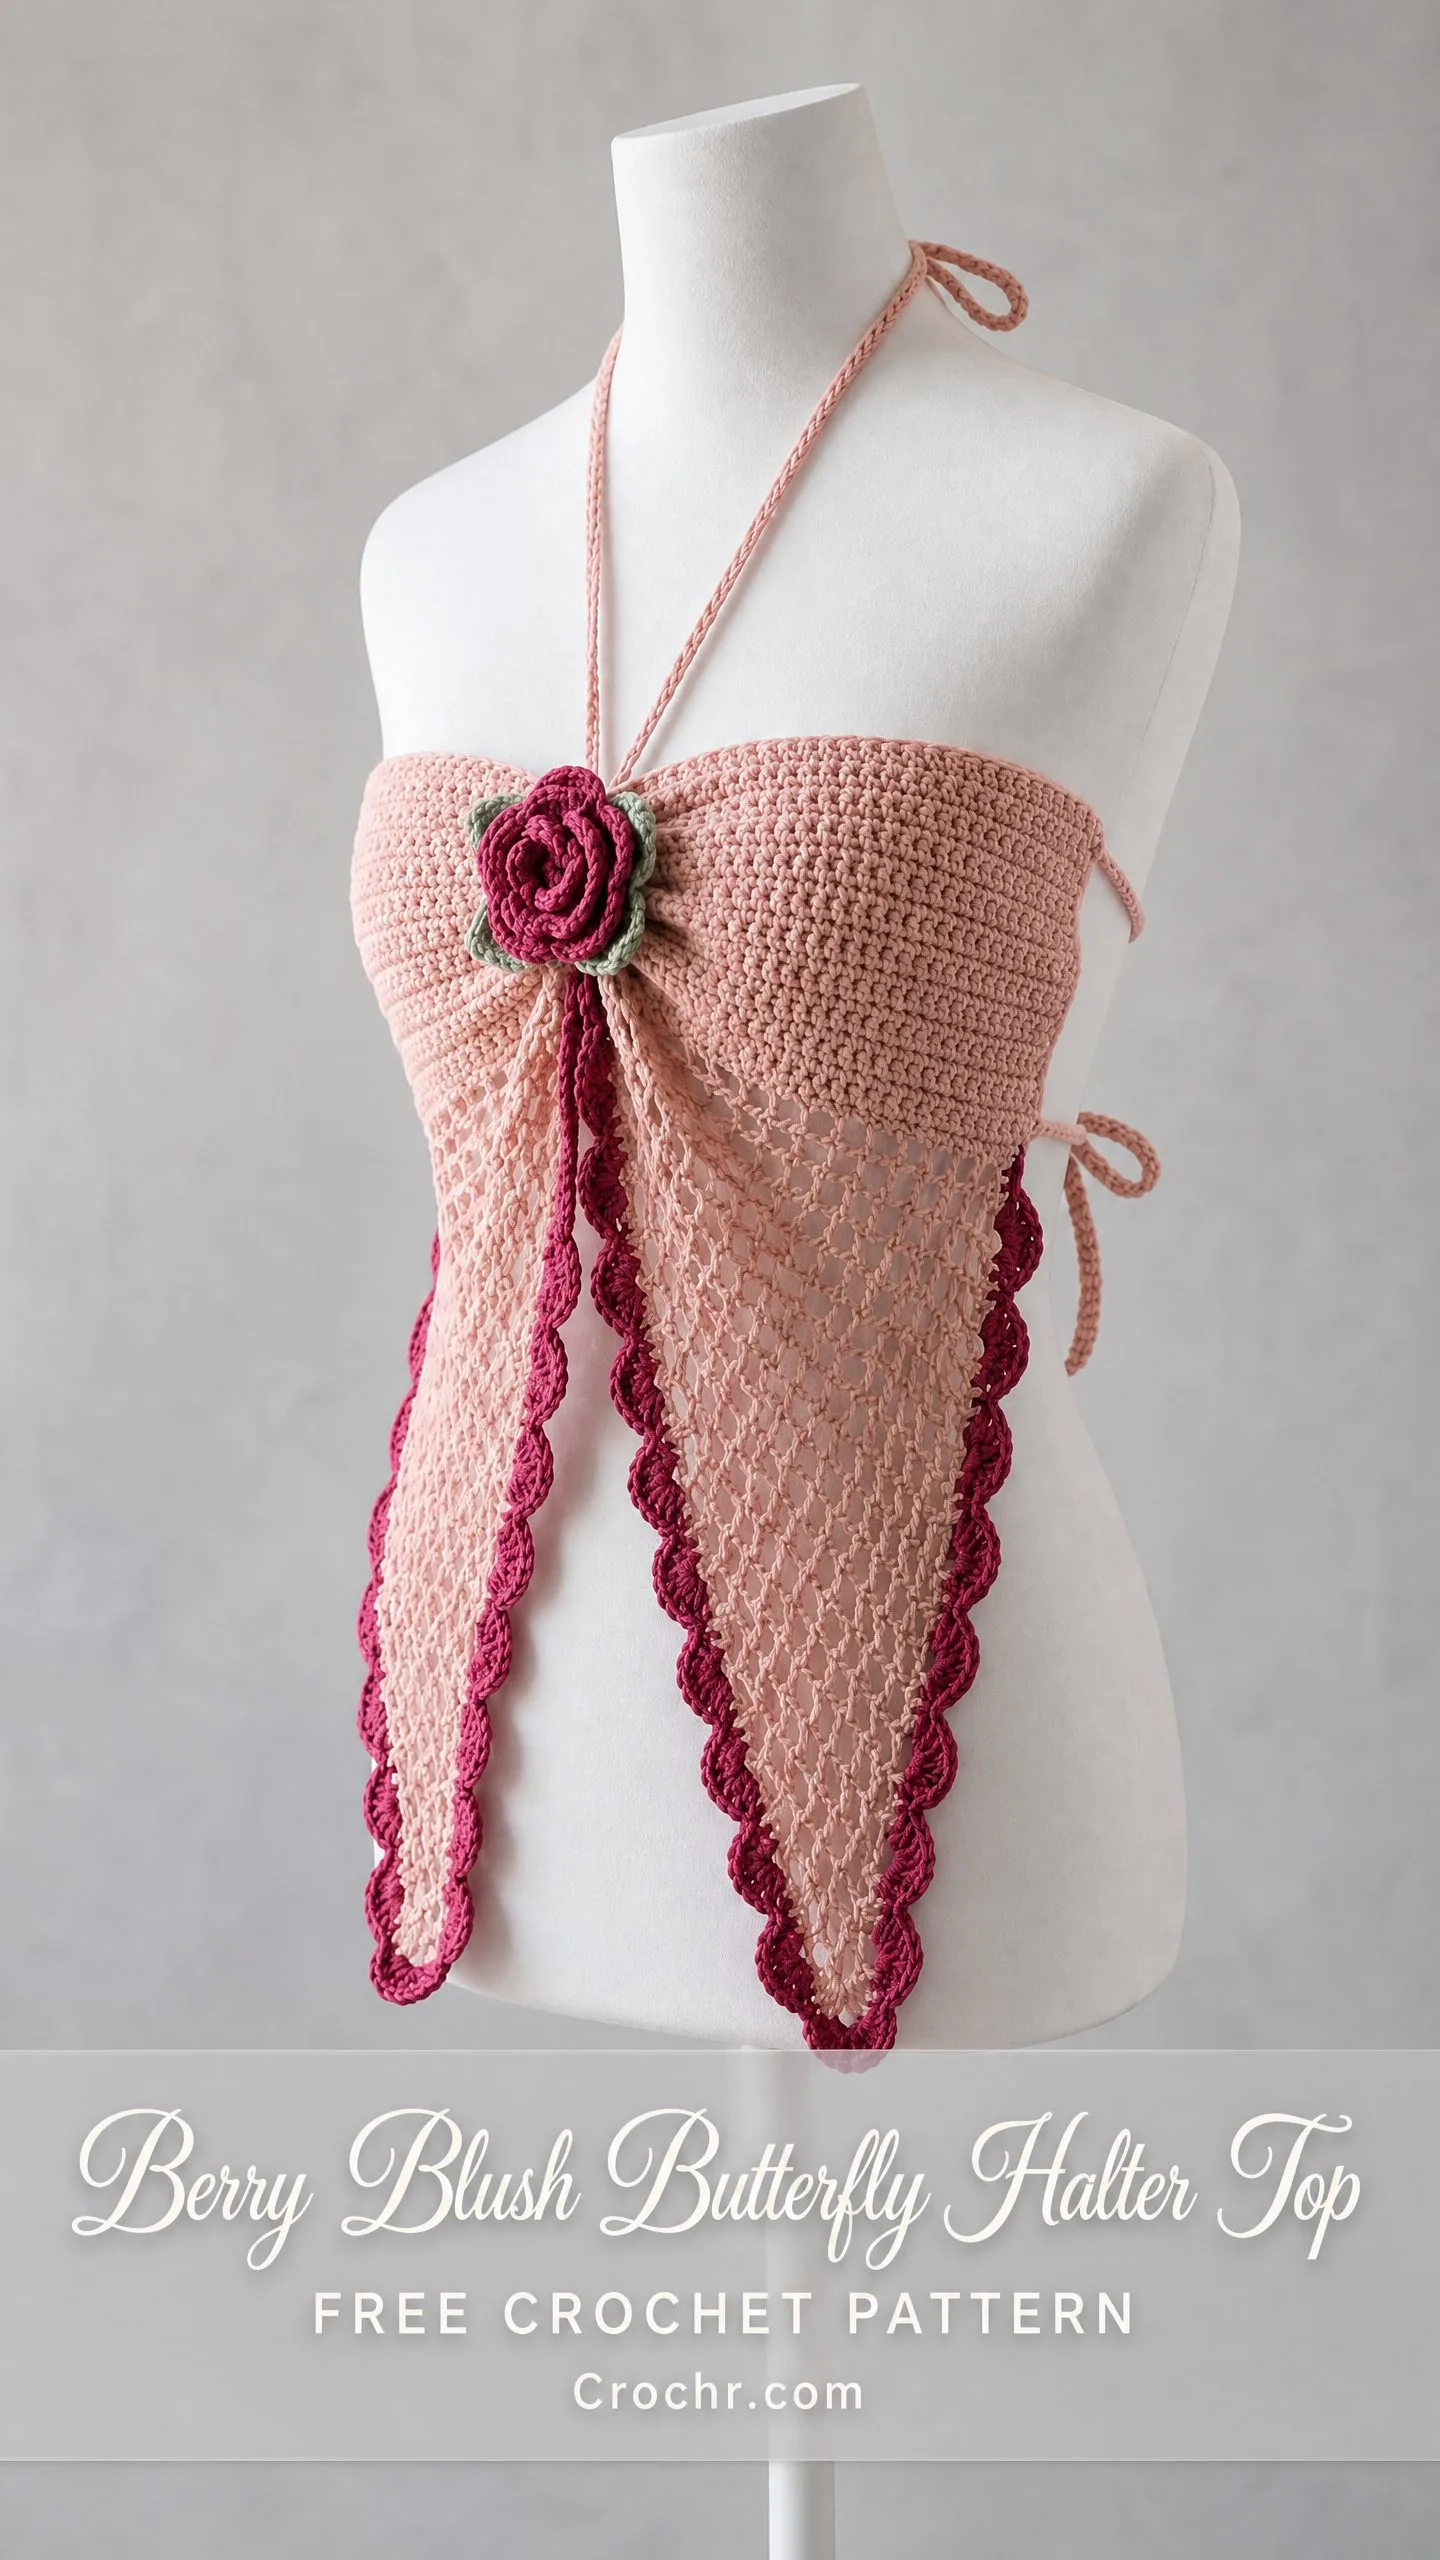
After countless swatches and a few late nights tweaking the mesh panel shaping, I finally got it right. The way those triangular panels drape from the bodice creates this gorgeous butterfly silhouette that moves beautifully when you walk. The deep rose scallop edging frames everything perfectly, and that little crocheted rose at the center front ties the whole design together.
I am SO pleased with how this turned out. Every detail came together exactly as I imagined, and I cannot wait to share every step with you so you can make your own.
About This Romantic Crochet Halter Top Pattern
This Berry Blush Butterfly Halter Top is a cottagecore dream brought to life with your hook and some gorgeous cotton yarn. The design features two main sections: a solid double crochet (dc) bandeau bodice and two open mesh triangular panels that drape from the center front. When worn, those panels create a butterfly or wrap silhouette that is absolutely stunning.
The bodice fastens with a halter tie at the neck and side ties at the underbust. A crocheted rose applique with leaf accents decorates the center front, hiding the seam where the panels attach. The back stays clean and open, showing off the halter cord and a single underbust tie.
This crochet tutorial walks you through every single step, from the first chain to the final rose petal.
Skill Level
This pattern is rated intermediate. The bodice uses basic double crochet with simple shaping. The mesh panels require comfort with chain spaces and decrease shaping over many rows. The scallop border involves a small shell repeat, and the rose applique requires working into a spiral and managing petal shaping.
If you have completed at least two crochet projects and feel comfortable with tension and counting, you will succeed with patience. Take your time with the mesh decreases and trust the process.
Time Estimate
Plan for 14 to 20 hours for a medium size, depending on your experience level. The rose and edging add approximately 2 to 3 hours to the total project time.
Finished Measurements
This pattern is written for size Small (Medium, Large).
Bodice width (flat, unstretched): 13 (14.5, 16) inches / 33 (37, 40.5) cm
Bodice height: 5.5 (6, 6.5) inches / 14 (15, 16.5) cm
Each mesh panel length from bodice lower edge to point: 14 (14.5, 15) inches / 35.5 (37, 38) cm
Each mesh panel width at top edge: 5 (5.5, 6) inches / 12.5 (14, 15) cm
Designed for a 32 to 34 (36 to 38, 40 to 42) inch / 81 to 86 (91 to 97, 101 to 107) cm bust. The bandeau bodice is intentionally worked to roughly 80 percent of the wearer’s bust measurement since double crochet has gentle stretch.
Materials Needed for This Crochet Halter Top
Yarn A (main color, blush pink): 350 (400, 450) yards / 320 (366, 411) meters of DK weight yarn, 100 percent cotton or cotton blend
Yarn B (contrast color, deep rose/berry): 120 (140, 160) yards / 110 (128, 146) meters of DK weight yarn, same fiber as Yarn A
Yarn C (leaf green, small amount): approximately 15 yards / 14 meters of DK weight yarn for applique leaves only
Hooks: US Size F-5 (3.75 mm) for bodice and panels, US Size E-4 (3.5 mm) for scallop edging and appliques
Notions: Tapestry needle for weaving ends, stitch markers (at least 4), scissors
Yarn Suggestions
Lion Brand 24/7 Cotton in Rose (Yarn A), Cranberry (Yarn B), and Sage (Yarn C) works beautifully. This mercerized cotton has excellent stitch definition and holds shape after washing.
Paintbox Yarns Simply DK in Blush Pink, Raspberry Red, and Pistachio Green is another great option. Smooth, affordable, and available in a large color range.
Drops Safran in Light Pink, Dark Old Rose, and Light Khaki offers a cotton-viscose blend that gives a soft drape ideal for summer tops.
When substituting yarn, use any DK weight that achieves the stated gauge. Avoid fuzzy or hairy fibers as they obscure the mesh stitch detail. Pure cotton or a cotton-nylon blend is recommended for structure and washability.
Gauge
With larger hook (F-5 / 3.75 mm) and double crochet:
18 stitches and 10 rows = 4 inches / 10 cm, blocked
With larger hook and mesh pattern (chain-1 spaces):
One 2-stitch repeat (1 dc, ch 1) = approximately 0.44 inches / 1.1 cm wide
10 mesh rows = 4 inches / 10 cm tall
Gauge is mandatory for a fitted garment. Swatch in double crochet, wash and block your swatch before measuring. Adjust hook size up if your gauge is too tight, down if too loose.
Abbreviations
beg = beginning
ch = chain
ch-sp = chain space (the gap created when you chain between stitches)
dc = double crochet (yarn over, insert hook, pull up loop, yarn over, pull through 2 loops, yarn over, pull through remaining 2 loops)
dc2tog = double crochet 2 together, a decrease that turns 2 stitches into 1
hdc = half double crochet
rep = repeat
rnd = round
RS = right side (the pretty side that faces out)
sc = single crochet (insert hook, pull up loop, yarn over, pull through both loops)
sk = skip
sl st = slip stitch (insert hook, yarn over, pull through stitch and loop on hook in one motion)
sp = space
st(s) = stitch(es)
t-ch = turning chain
WS = wrong side
yo = yarn over
Special Stitches Explained
Mesh Stitch
This creates the beautiful open diamond pattern in your triangular panels.
Row setup: Chain 3 (counts as first dc), skip 1 stitch, dc in next stitch, (ch 1, skip 1 stitch, dc in next stitch) across.
Continuing rows: Chain 3, turn. Dc in first ch-1 sp, (ch 1, dc in next ch-1 sp) across, dc in top of t-ch.
The ch-1 sp and dc alternate to create an open diamond mesh. Think of it like a simple grid pattern where you work into the holes instead of into stitches.
Dc2tog (Double Crochet Two Together)
This decrease turns two stitches into one.
Yarn over, insert hook into indicated stitch, yarn over and pull up a loop, yarn over, pull through 2 loops (2 loops remain on hook). Yarn over, insert hook into next indicated stitch, yarn over and pull up a loop, yarn over, pull through 2 loops (3 loops remain on hook). Yarn over, pull through all 3 loops. One stitch decreased.
Scallop Edging
Worked with smaller hook and Yarn B.
Join yarn at corner stitch. Single crochet in first stitch. (Skip 2 stitches, work 5 dc in next stitch, skip 2 stitches, sc in next stitch) across. Each scallop uses 6 stitches and produces a shell of 5 dc between two sc anchors.
Crocheted Rose Applique
Worked in spiral with smaller hook and Yarn B.
Foundation: Chain 36.
Row 1: Work 2 dc in 4th chain from hook, 2 dc in each chain across. (68 dc)
Row 2: Do not turn. Working into the base chain on the opposite side (the bottom of each stitch), sl st into each stitch across.
Finishing: Beginning at one end, roll the strip tightly into a coil. The Row 1 dc edge forms the outer petals, the Row 2 sl st edge forms the flat base. Secure by stitching through the base several times with tapestry needle and tail. Weave in ends.
Leaf Applique
Worked flat with Yarn C and smaller hook.
Chain 10.
Row 1: Sc in 2nd ch from hook, hdc in next, dc in next 4, hdc in next, sc in next, sl st in last ch. Do not turn. Working along other side of foundation chain: sc in next, hdc in next, dc in next 4, hdc in next, sc in next. Sl st to first sc to close. Fasten off, leaving tail for sewing. Make 2 leaves.
Pattern Notes Before You Begin
The bodice is worked flat from bottom edge to top. Right side faces you on odd-numbered rows.
Each triangular panel is a separate piece worked downward from a foundation chain equal to the lower edge of each panel section.
When working the mesh panels, each row begins with ch 3 (counts as first dc throughout). The final dc of each row is worked into the top of the turning chain from the previous row.
Stitch counts for mesh panels are given as the number of dc columns (not including the ch-1 spaces). A panel with 12 dc columns has 11 ch-1 spaces between them.
Size instructions are written as Small (Medium, Large). When only one number appears, it applies to all sizes.
Step by Step Crochet Pattern Instructions
Section 1: Bodice
The bodice is a flat rectangle of double crochet worked in rows. It wraps around the torso from side seam to side seam at underbust height.
With larger hook and Yarn A, chain 60 (67, 74).
Foundation Row (WS): Dc in 4th ch from hook (skipped 3 ch count as first dc), dc in each ch across. Turn.
(58, 65, 72 dc)
Row 1 (RS): Ch 3, dc in each dc across, dc in top of t-ch. Turn.
(58, 65, 72 dc)
Rows 2 through 13 (14, 16): Repeat Row 1.
(58, 65, 72 dc each row)
After completing all bodice rows, your piece should measure approximately 5.5 (6, 6.5) inches tall and 13 (14.5, 16) inches wide when gently blocked. Do not fasten off.
Halter Cord
Turn work to RS.
With Yarn A and larger hook, sl st across the top edge of the bodice to the center stitch. Mark this center stitch with a stitch marker.
From the center stitch, chain 80 (the halter cord). Sl st in 2nd ch from hook and in each ch back to the bodice center stitch. This creates the right half of the halter cord.
Rejoin Yarn A at the same center stitch. Chain 80. Sl st in 2nd ch from hook and in each ch back to center. This creates the left half of the halter cord. The two cords join at the neck and can be tied.
Fasten off and weave in ends.
Side Ties
With Yarn A and larger hook, join yarn at the right lower corner of the bodice.
Chain 60. Sl st in 2nd ch from hook and in each ch back to the corner. Fasten off.
Repeat on the left lower corner of the bodice for the second side tie.
These ties wrap around to the back and tie at center back.
Checkpoint: The bodice should lie flat and measure 13 (14.5, 16) inches wide and 5.5 (6, 6.5) inches tall. The halter cord should measure approximately 20 inches per side.
Section 2: Mesh Triangular Panels
Two panels are worked separately and attached to the lower edge of the bodice. Panel A attaches to the left half and Panel B attaches to the right half. Each panel begins with a wider top edge and tapers to a pointed tip.
Panel A (Left Panel)
With larger hook and Yarn A, chain 24 (27, 30).
Foundation Row (RS): Dc in 4th ch from hook, (ch 1, skip 1 ch, dc in next ch) across. Turn.
(12, 13, 15 dc columns, 11, 12, 14 ch-1 spaces)
Rows 1 through 4: Ch 3, turn. Dc in first ch-1 sp, (ch 1, dc in next ch-1 sp) across to last position, dc in top of t-ch. No change in count.
(12, 13, 15 dc columns)
Begin decreasing by eliminating one dc column at each end every other row.
Row 5 (decrease row): Ch 3, turn. Skip the first ch-1 sp (this eliminates one column at this end), dc in 2nd ch-1 sp, (ch 1, dc in next ch-1 sp) across until 2 ch-1 spaces remain, dc in next ch-1 sp (combining last two columns into one), do not work final dc into t-ch.
(10, 11, 13 dc columns)
Row 6: Ch 3, turn. Dc in first ch-1 sp, (ch 1, dc in next ch-1 sp) across, dc in top of t-ch. No change.
(10, 11, 13 dc columns)
Row 7 (decrease row): Repeat Row 5 pattern.
(8, 9, 11 dc columns)
Row 8: Repeat Row 6. No change.
(8, 9, 11 dc columns)
Row 9 (decrease row): Repeat Row 5.
(6, 7, 9 dc columns)
Row 10: Repeat Row 6. No change.
(6, 7, 9 dc columns)
Row 11 (decrease row): Repeat Row 5.
(4, 5, 7 dc columns)
Row 12: Repeat Row 6. No change.
(4, 5, 7 dc columns)
Row 13 (decrease row): Repeat Row 5.
(2, 3, 5 dc columns)
Row 14: Repeat Row 6. No change.
(2, 3, 5 dc columns)
For Medium and Large only:
Row 15 (decrease row): Repeat Row 5.
(1, 3 dc columns)
Row 16: Repeat Row 6.
(1, 3 dc columns)
For Large only:
Row 17 (decrease row): Repeat Row 5.
(1 dc column)
Row 18: Repeat Row 6.
(1 dc column)
All sizes resume here:
Final point row: Ch 3, turn. Work dc2tog across any remaining ch-1 spaces until all stitches collapse to a single point. Fasten off, leaving a 6-inch tail.
Panel B (Right Panel)
Work exactly as Panel A. Fasten off, leaving a 6-inch tail.
Checkpoint: Each finished panel should measure approximately 5 (5.5, 6) inches wide at the top and 14 (14.5, 15) inches from top edge to point.
Section 3: Attaching Panels to Bodice
Lay the bodice flat, right side up. Identify the center of the lower edge and mark it with a stitch marker.
Place Panel A with its right side up and its top edge aligned with the lower edge of the LEFT half of the bodice, starting approximately 1 inch to the left of center. Leave the center 2 stitches of the bodice free on each panel’s inner edge to create the split gap.
With Yarn A and tapestry needle, whipstitch Panel A to the bodice lower edge across its top row, matching stitch for stitch.
Repeat for Panel B on the RIGHT half of the bodice lower edge, starting approximately 1 inch to the right of center.
The gap at the center creates the characteristic butterfly split where the two panels drape apart.
Section 4: Scallop Edging
With smaller hook (E-4 / 3.5 mm) and Yarn B, work the scallop edging along all four edges of each triangular panel, including the top seam edge and the two long side edges. Do not work scallop on the bodice itself.
The scallop uses 6 stitches per repeat. Before beginning, count the stitches along each edge and adjust the attachment points if needed by working a sc every stitch or every other row end to create an even multiple of 6.
Join Yarn B at the top left corner of Panel A with a sl st.
Scallop round: Sc in corner, (skip 2 sts, 5 dc in next st, skip 2 sts, sc in next st) around entire perimeter of the panel, working 3 sc into the pointed tip for the corner. Join with sl st to first sc. Fasten off.
Repeat scallop edging on Panel B.
The two inner edges (the edges that face each other at the center split) should also receive the scallop edging.
Section 5: Rose Applique
Following the Crocheted Rose Applique special stitch instructions above, make 1 rose using smaller hook and Yarn B.
Make 2 leaves following the Leaf Applique instructions using Yarn C.
Position the rose at the center of the bodice at the upper edge of the Panel A and Panel B junction, approximately 1 inch below the top bodice edge. Pin in place.
Position one leaf on each side of the rose, angled slightly outward and downward.
Using the tail ends and a tapestry needle, stitch the rose and leaves firmly to the bodice through all layers. The rose covers the raw seam where the panels join the bodice at center front.
Size Customization Tips
To add bust inches: Add 6 chains to the bodice foundation for every 1.5 inches of additional width. Also add 3 chains to each panel foundation to maintain proportional drape width.
To lengthen the bodice height: Add 2 rows of double crochet to the bodice section for approximately 0.8 inches of additional height.
To lengthen the panels: Add 2 non-decrease rows between each decrease row. This adds approximately 0.8 inches per inserted row pair without changing the taper angle.
To shorten the halter cord: Reduce chains in increments of 10, testing length against the wearer’s back neck measurement before finishing.
Finishing and Blocking Your Crochet Halter Top
Weave in all ends securely using a tapestry needle, going in at least two directions to prevent unraveling.
Wet block the bodice and panels by submerging in cool water for 10 minutes. Gently squeeze out excess water (do not wring). Lay flat on a foam blocking mat and pin the mesh panels open so the diamond mesh opens fully. Pin each panel to its finished dimensions. Allow to dry completely before unpinning, usually 12 to 24 hours depending on humidity.
The rose applique does not need blocking. If it loses shape after washing, simply reshape by hand while damp.
Care Instructions
Machine wash cold on a gentle cycle in a mesh laundry bag. Do not use bleach or fabric softener. Lay flat to dry. Do not tumble dry, as heat will cause cotton to shrink and distort the mesh pattern. Store folded rather than hung to prevent the mesh panels from stretching under their own weight.

You Did It!
Thank you so much for choosing this pattern for your next project. I truly hope you love making this romantic halter top as much as I loved designing it. If you make one, I would absolutely love to see it! Tag me on Instagram or share a photo in my Facebook group so I can celebrate your beautiful work with you.
If this pattern caught your eye, go ahead and save it to your Pinterest boards so you can find it when you are ready to cast on. And please drop a comment below if you make one. I read every single comment and it makes my day to hear from you!
You Might Also Like
- Watermelon Slice Tropical Charm Bracelet Free Crochet Pattern
- Autumn Harvest Bow Handbag Free Crochet Pattern
- Lavender Dream Crochet Flower Bracelet Pattern
- Midnight Black Crescent Bag with Silver Hardware Free Crochet Pattern
