I don’t know about you, but I have been searching for the perfect summer romper pattern for ages. Something that looks like it walked off a boutique rack but actually feels like pajamas. You know the vibe.
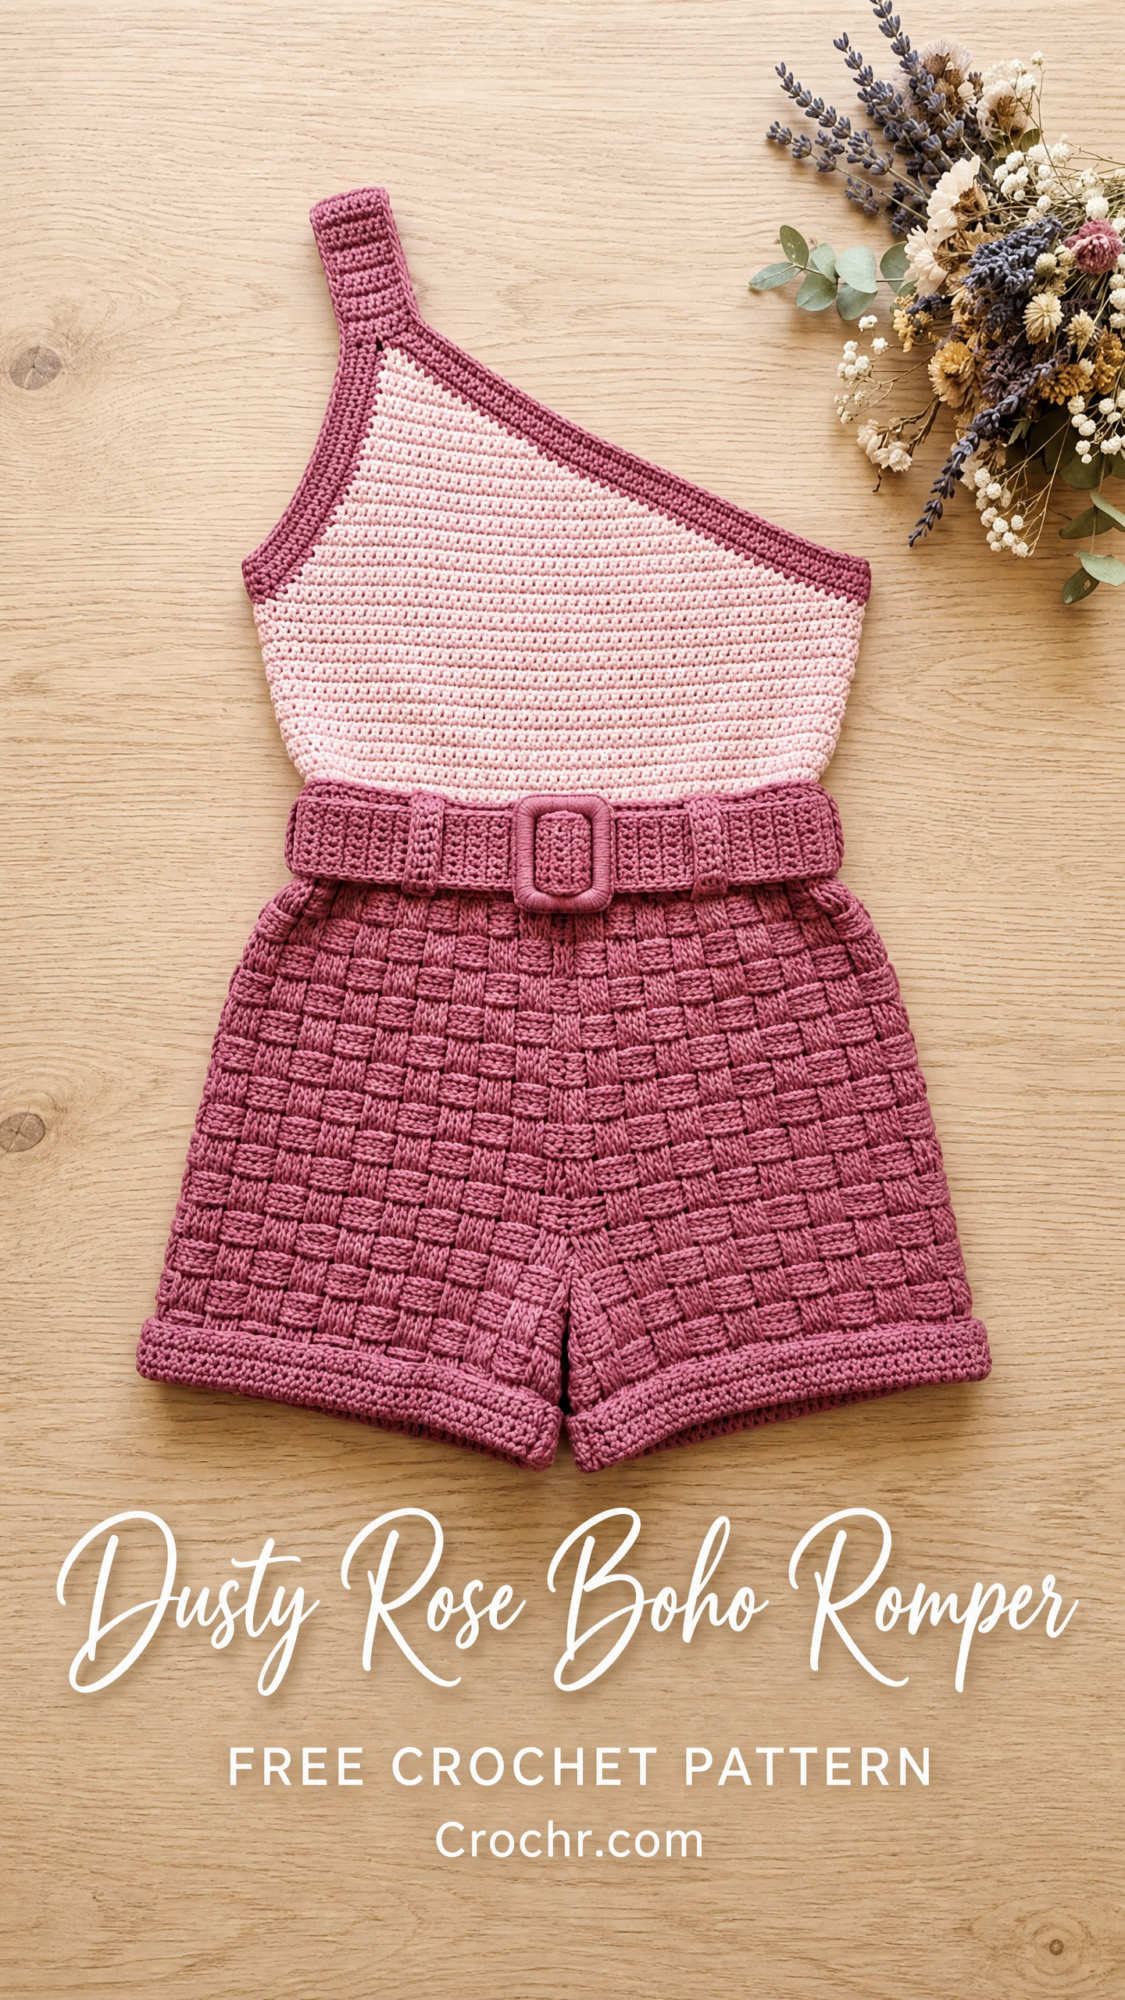
Well, this dusty rose boho romper is exactly that. It has the fitted bodice, the one-shoulder drama, and those incredible textured shorts that make people ask "wait, you MADE that?" All the style with none of the stiffness.
And here’s the thing. This pattern looks advanced, but it’s really just a handful of familiar stitches working together in smart ways. If you can single crochet and you’re willing to try post stitches, you absolutely have the skills to make this happen.
Why This Crochet Romper Pattern Works So Well
Let me tell you what makes this design special. The bodice uses simple single crochet (sc) throughout, which means it works up quickly and creates a smooth, flattering fabric. The diagonal neckline happens through basic decreases, nothing fancy required.
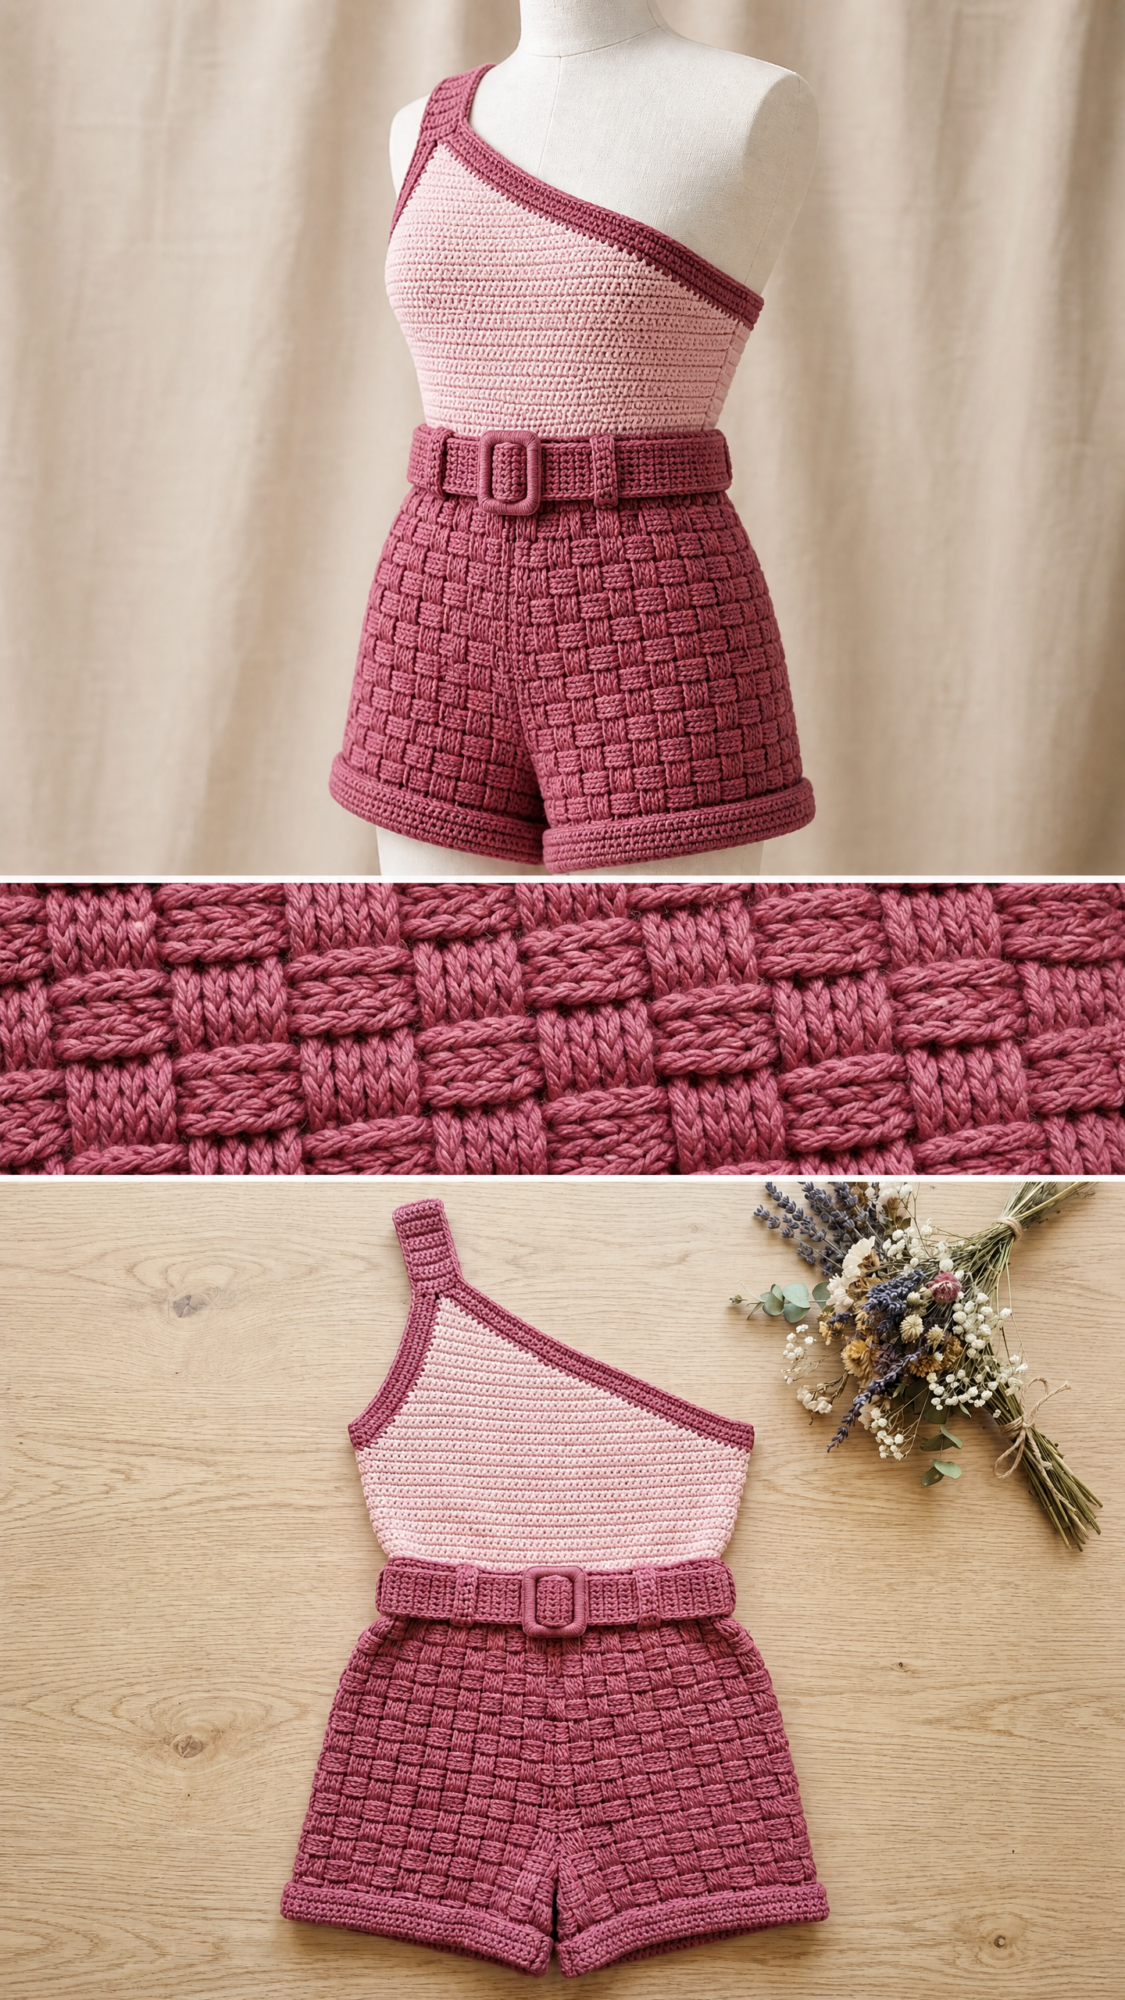
The real showstopper is those shorts. That gorgeous woven texture comes from the basket-weave stitch pattern, which alternates front post double crochets (FPdc) and back post double crochets (BPdc) to create raised squares that look incredibly professional. More on those stitches in a minute.
The construction is straightforward too. You work flat pieces, then seam them together. No complicated shaping worked in the round. No magic ring stress. Just panels that come together like a puzzle.
Skill Level and Time Commitment
I’m calling this one intermediate level. You should feel comfortable with basic shaping (increases and decreases), color changes, and seaming pieces together. If you’ve made a fitted top or a pair of shorts before, you’re ready for this.
The post stitches might be new to you, and that’s okay. I’ll walk you through them step by step. They’re honestly easier than they sound.
Time estimate: Plan for 18 to 24 hours of work depending on your pace. This isn’t a weekend project, but it’s absolutely achievable over a couple of weeks of evening crocheting.
Finished Measurements
This pattern is written for size Small (US 4 to 6). Here are your finished measurements:
I’ve included sizing tips at the end if you need to adjust up or down.
Materials You’ll Need for This Crochet Romper
Yarn
Yarn A (Main Color): DK weight cotton yarn in dusty mauve or rose, approximately 650 yards / 595 m
Yarn B (Contrast): DK weight cotton yarn in blush pink or pale pink, approximately 250 yards / 229 m
Recommended Yarn Brands
Here are a few options that work beautifully:
Lion Brand 24/7 Cotton in Dusty Pink and Blush. This mercerized cotton gives you crisp stitch definition that really shows off the basket-weave texture.
Paintbox Yarns Simply DK 100% Cotton in Dusty Rose and Blush Pink. Affordable, consistent, and easy to find with a smooth finish.
WeCrochet Dishie in Blush and Almond. A single-ply cotton DK with lovely drape for fitted summer garments.
Substitution note: Stick with cotton or cotton-blend yarns for this project. Avoid acrylic-dominant blends because they won’t block flat and can make the basket-weave section look puffy instead of structured.
Hook
US G-6 / 4.0 mm crochet hook
Notions
Gauge (Please Don’t Skip This)
I know gauge swatches aren’t the most exciting part of crochet. But for a fitted garment like this? They’re essential.
Single crochet gauge: 20 sc x 24 rows = 4 inches / 10 cm, blocked
Basket-weave gauge: 20 sts x 12 rows = 4 inches / 10 cm, blocked
Swatch in BOTH stitch patterns before you start. Block your swatches. Adjust your hook size up or down until you match. Your future self wearing this romper will thank you.
Abbreviations and Stitch Definitions
Let me break down every stitch you’ll use in this crochet tutorial.
ch: chain
sl st: slip stitch
sc: single crochet. Insert hook into stitch, yarn over and pull up a loop (2 loops on hook), yarn over and pull through both loops.
dc: double crochet. Yarn over, insert hook into stitch, yarn over and pull up a loop, (yarn over and pull through 2 loops) twice.
FPdc: front post double crochet. Yarn over, insert hook from front to back to front around the post (that’s the vertical bar) of the stitch in the row below, yarn over and pull up a loop, (yarn over and pull through 2 loops) twice. This stitch pops forward on the front of your fabric.
BPdc: back post double crochet. Yarn over, insert hook from back to front to back around the post of the stitch in the row below, yarn over and pull up a loop, (yarn over and pull through 2 loops) twice. This stitch recedes to the back of your fabric.
st(s): stitch(es)
sp: space
RS: right side
WS: wrong side
rem: remaining
rep: repeat
beg: beginning
yo: yarn over
sk: skip
tog: together
sc2tog: single crochet two together (a decrease). Insert hook in first stitch, yarn over and pull up a loop, insert hook in next stitch, yarn over and pull up a loop (3 loops on hook), yarn over and pull through all 3 loops. You’ve turned 2 stitches into 1.
inc: increase (work 2 sc in one stitch)
t-ch: turning chain
pm: place marker
sm: slip marker
Understanding the Basket-Weave Stitch Pattern
This is the star of the shorts section, and I promise it’s not as intimidating as it looks. The basket-weave pattern creates those beautiful raised squares by alternating groups of front and back post stitches.
Here’s how it works over a multiple of 6 stitches plus 2 border stitches:
Set-Up Row (RS): Ch 1, sc in first st, dc in each st across to last st, sc in last st. Turn.
Row 1 (RS): Ch 1, sc in first st, (FPdc in each of next 3 dc, BPdc in each of next 3 dc) across to last st, sc in last st. Turn.
Row 2 (WS): Ch 1, sc in first st, (BPdc in each of next 3 sts, FPdc in each of next 3 sts) across to last st, sc in last st. Turn.
Row 3 (RS): Rep Row 1.
Row 4 (WS): Rep Row 2.
Row 5 (RS): Ch 1, sc in first st, (BPdc in each of next 3 sts, FPdc in each of next 3 sts) across to last st, sc in last st. Turn.
Row 6 (WS): Ch 1, sc in first st, (FPdc in each of next 3 sts, BPdc in each of next 3 sts) across to last st, sc in last st. Turn.
Row 7 (RS): Rep Row 5.
Row 8 (WS): Rep Row 6.
Rows 1 through 8 form the complete repeat. See how the pattern switches which stitches pop forward? That’s what creates the woven look.
How to Make the Crocheted Buckle
This clever little detail makes your belt look polished and professional, all without buying hardware.
Using Yarn A and a smaller hook (US E-4 / 3.5 mm), ch 24. Sl st to first ch to form a ring.
Round 1: Ch 1. Work 24 sc around the ring. Sl st to first sc.
Round 2: Ch 1, sc in each sc around. (24 sc). Sl st to join.
Fasten off, leaving a 12 inch / 30 cm tail for sewing. Seam the short ends together to form a rectangle approximately 1.25 inches wide and 0.8 inches tall.
Step by Step Crochet Pattern Instructions
Construction Overview
This romper is worked in separate flat pieces: Front Bodice, Back Bodice, Front Shorts Panel, Back Shorts Panel, Shoulder Strap, Belt, and Crocheted Buckle. All pieces get seamed together at the end.
The bodice uses Yarn B (blush) with trim in Yarn A (dusty rose). The shorts and belt use Yarn A throughout.
The design is one-shoulder, with the strap on the wearer’s left side.
Front Bodice Panel
The front bodice has diagonal decreases on the upper left to create that gorgeous asymmetric neckline.
Using Yarn B and your 4.0 mm hook, ch 82.
Foundation Row: Sc in second ch from hook and in each ch across. Turn. (81 sc)
Rows 1 through 4: Ch 1, sc in each st across. Turn. (81 sc)
Now you’ll begin the diagonal shaping. The right edge stays straight while the left edge decreases.
Row 5 (RS): Ch 1, sc2tog over first 2 sts, sc in each st to end. Turn. (80 sc)
Row 6 (WS): Ch 1, sc in each st across. Turn. (80 sc)
Row 7 (RS): Ch 1, sc2tog over first 2 sts, sc in each st to end. Turn. (79 sc)
Row 8 (WS): Ch 1, sc in each st across. Turn. (79 sc)
Continue this pattern of decreasing on RS rows and working even on WS rows:
Row 9: Decrease row. (78 sc)
Row 10: Even row. (78 sc)
Row 11: Decrease row. (77 sc)
Row 12: Even row. (77 sc)
Row 13: Decrease row. (76 sc)
Row 14: Even row. (76 sc)
Row 15: Decrease row. (75 sc)
Row 16: Even row. (75 sc)
Row 17: Decrease row. (74 sc)
Row 18: Even row. (74 sc)
Row 19: Decrease row. (73 sc)
Row 20: Even row. (73 sc)
Row 21: Decrease row. (72 sc)
Row 22: Even row. (72 sc)
Row 23: Decrease row. (71 sc)
Row 24: Even row. (71 sc)
Row 25: Decrease row. (70 sc)
Row 26: Even row. (70 sc)
Row 27: Decrease row. (69 sc)
Row 28: Even row. (69 sc)
Row 29: Decrease row. (68 sc)
Row 30: Even row. (68 sc)
Your bodice is now approximately 5 inches tall with 68 stitches remaining.
Row 31 (RS): Ch 1, sc2tog over first 2 sts, sc in next 50 sts. Leave remaining 16 sts unworked. Turn. (51 sc)
Those 16 unworked stitches create the right armhole opening.
Row 32 (WS): Ch 1, sc in each st across. Turn. (51 sc)
Continue decreasing on RS rows:
Rows 33 through 44: Continue the decrease pattern every RS row until you have 45 sc remaining.
Rows 45 through 48: Ch 1, sc in each st across. Turn. (45 sc) These are straight rows for the strap attachment area.
Now isolate the left shoulder strap section:
Row 49 (RS): Ch 1, sc in first 7 sts only. Turn. Leave remaining 38 sts unworked. (7 sc)
Rows 50 through 62: Ch 1, sc in each of 7 sts. Turn. (7 sc per row)
Fasten off Yarn B leaving a 6 inch tail.
Front Bodice Trim
With RS facing, join Yarn A at the bottom-right corner.
Bottom Edge Trim: Ch 1, sc evenly across the foundation edge. Fasten off. (81 sc)
With RS facing, join Yarn A at the top of the strap (Row 62).
Diagonal and Armhole Trim: Ch 1, sc evenly down the diagonal left edge (approximately 44 sc), continue across the right armhole opening (approximately 16 sc), and down the right side edge (approximately 8 sc). Fasten off.
If your trim is ruffling or pulling, adjust by a stitch or two until it lies flat.
Back Bodice Panel
The back is symmetrical with two strap columns.
Using Yarn B and your 4.0 mm hook, ch 82.
Foundation Row: Sc in second ch from hook and in each ch across. Turn. (81 sc)
Rows 1 through 30: Ch 1, sc in each st across. Turn. (81 sc each row)
Row 31 (RS): Ch 1, sc in first 65 sts. Leave remaining 16 sts unworked. Turn. (65 sc)
Row 32 (WS): Ch 1, sk first st, sc in remaining 64 sts. Turn. (64 sc)
Rows 33 through 48: Ch 1, sc in each of 64 sts. Turn. (64 sc each row)
Left Strap:
Row 49 (RS): Ch 1, sc in first 7 sts only. Leave remaining 57 sts unworked. Turn. (7 sc)
Rows 50 through 62: Ch 1, sc in each of 7 sts. Turn. (7 sc per row)
Fasten off.
Right Strap:
Rejoin Yarn B at the opposite edge of Row 48.
Row 49R (RS): Ch 1, sc in last 7 sts of Row 48. Turn. (7 sc)
Rows 50R through 62R: Ch 1, sc in each of 7 sts. Turn. (7 sc per row)
Fasten off.
Back Bodice Trim
Work bottom edge trim and top edge trim as for the front bodice, adjusting for the two-strap design.
Front Shorts Panel
Using Yarn A and your 4.0 mm hook, ch 82.
Foundation Row: Sc in second ch from hook and in each ch across. Turn. (81 sc)
Waistband Row 1 (RS): Ch 1, sc in first st, dc in each st across to last st, sc in last st. Turn. (81 sts)
Waistband Row 2 (WS): Ch 1, sc in first st, dc in each st across to last st, sc in last st. Turn. (81 sts)
Hip Increase Row (RS): Ch 1, sc in first st, dc in next 14 sts, 2 dc in next st, dc in next 14 sts, 2 dc in next st, dc in next 14 sts, 2 dc in next st, dc in next 14 sts, 2 dc in next st, dc in next 12 sts, 2 dc in next st, dc in next 2 sts, sc in last st. Turn. (86 sts)
Now begin the basket-weave pattern:
Basket-Weave Rows 1 through 8: Work as described in the basket-weave stitch pattern section. (86 sts)
Repeat Rows 1 through 8 once more for a total of 16 basket-weave rows.
Cuff Rows 1 through 3: Ch 1, sc in each st across. Turn. (86 sc)
Fasten off after Row 3.
Leg Opening Split
Divide the panel for the leg openings. Each leg gets 43 stitches.
Right Leg:
Rejoin Yarn A at the right edge of Row 16 of the basket-weave section.
Rows 1 through 4: Work basket-weave pattern as established across first 43 sts. (43 sts)
Fasten off.
Left Leg:
Rejoin Yarn A at center of row.
Rows 1 through 4: Work basket-weave pattern across remaining 43 sts. (43 sts)
Fasten off.
Back Shorts Panel
Work exactly as the Front Shorts Panel.
Shoulder Strap
Using Yarn A and your 4.0 mm hook, ch 8.
Foundation Row: Sc in second ch from hook and in each ch across. Turn. (7 sc)
Row 1: Ch 1, sc in each st across. Turn. (7 sc)
Repeat Row 1 until strap measures 10 inches / 25.5 cm total.
Fasten off leaving a 12 inch tail.
Work 1 row of sc along each long edge for a finished trim.
Belt
Using Yarn A, ch 132.
Foundation Row: Sc in second ch from hook and in each ch across. Turn. (131 sc)
Rows 1 through 3: Ch 1, sc in each st across. Turn. (131 sc)
Fasten off. Your belt measures approximately 26.2 inches long and 0.6 inches wide.
Assembly Instructions
Step 1 (Bodice Side Seams): Place front and back bodice panels wrong sides together. Using Yarn A and your yarn needle, mattress stitch along the right side seam from bottom hem to underarm. Repeat for the left side seam.
Step 2 (Shoulder Strap): Seam one end of the separate shoulder strap to the top of the front left strap column. Seam the other end to the back left strap column.
Step 3 (Right Shoulder): Seam the front and back right strap columns together.
Step 4 (Shorts to Bodice): Align the top edge of the front shorts panel to the bottom edge of the front bodice. Ease the extra 5 stitches evenly across as you seam. Repeat for the back.
Step 5 (Shorts Side Seams): Seam front and back shorts panels together along both side edges from waistband to leg split.
Step 6 (Leg Finishing): Join Yarn A at an inside leg edge. Work 1 round of sc around each leg opening (approximately 48 sc per leg). Sl st to first sc. Work 1 round of sl st in each sc. Fasten off.
Step 7 (Belt and Loops): Make two belt loops by chaining 10 and slip stitching back. Attach one to each side seam at waistband level. Thread belt through loops and buckle.
Size Customization Tips
To size up: Add stitches in multiples of 6 to the shorts panels and multiples of 4 to the bodice panels.
To size down: Remove stitches in the same increments.
To lengthen the shorts: Add basket-weave repeat rows in sets of 8.
To lengthen the bodice: Add straight sc rows before beginning the shaping.
Final Thoughts on This Boho Crochet Romper Pattern
This dusty rose romper is the kind of project that feels like a real accomplishment when you’re done. Every time you put it on, you’ll remember the hours you spent learning those post stitches and carefully seaming everything together. And honestly? The compliments never get old.
Take your time with this one. Block your pieces before seaming. Try on as you go if you can. The extra effort pays off in a garment that actually fits.
Thank you so much for choosing this pattern for your next project. I genuinely hope you love making it as much as I loved designing it. If you want to share your finished romper, I would absolutely love to see it on Instagram or Facebook. Tag me so I can celebrate with you!
If this boho romper is calling your name, go ahead and pin it to your Pinterest boards so you can find it when you’re ready to start. And if you do make one, please drop a comment below. I love hearing how your projects turn out and seeing what color combinations you choose!
