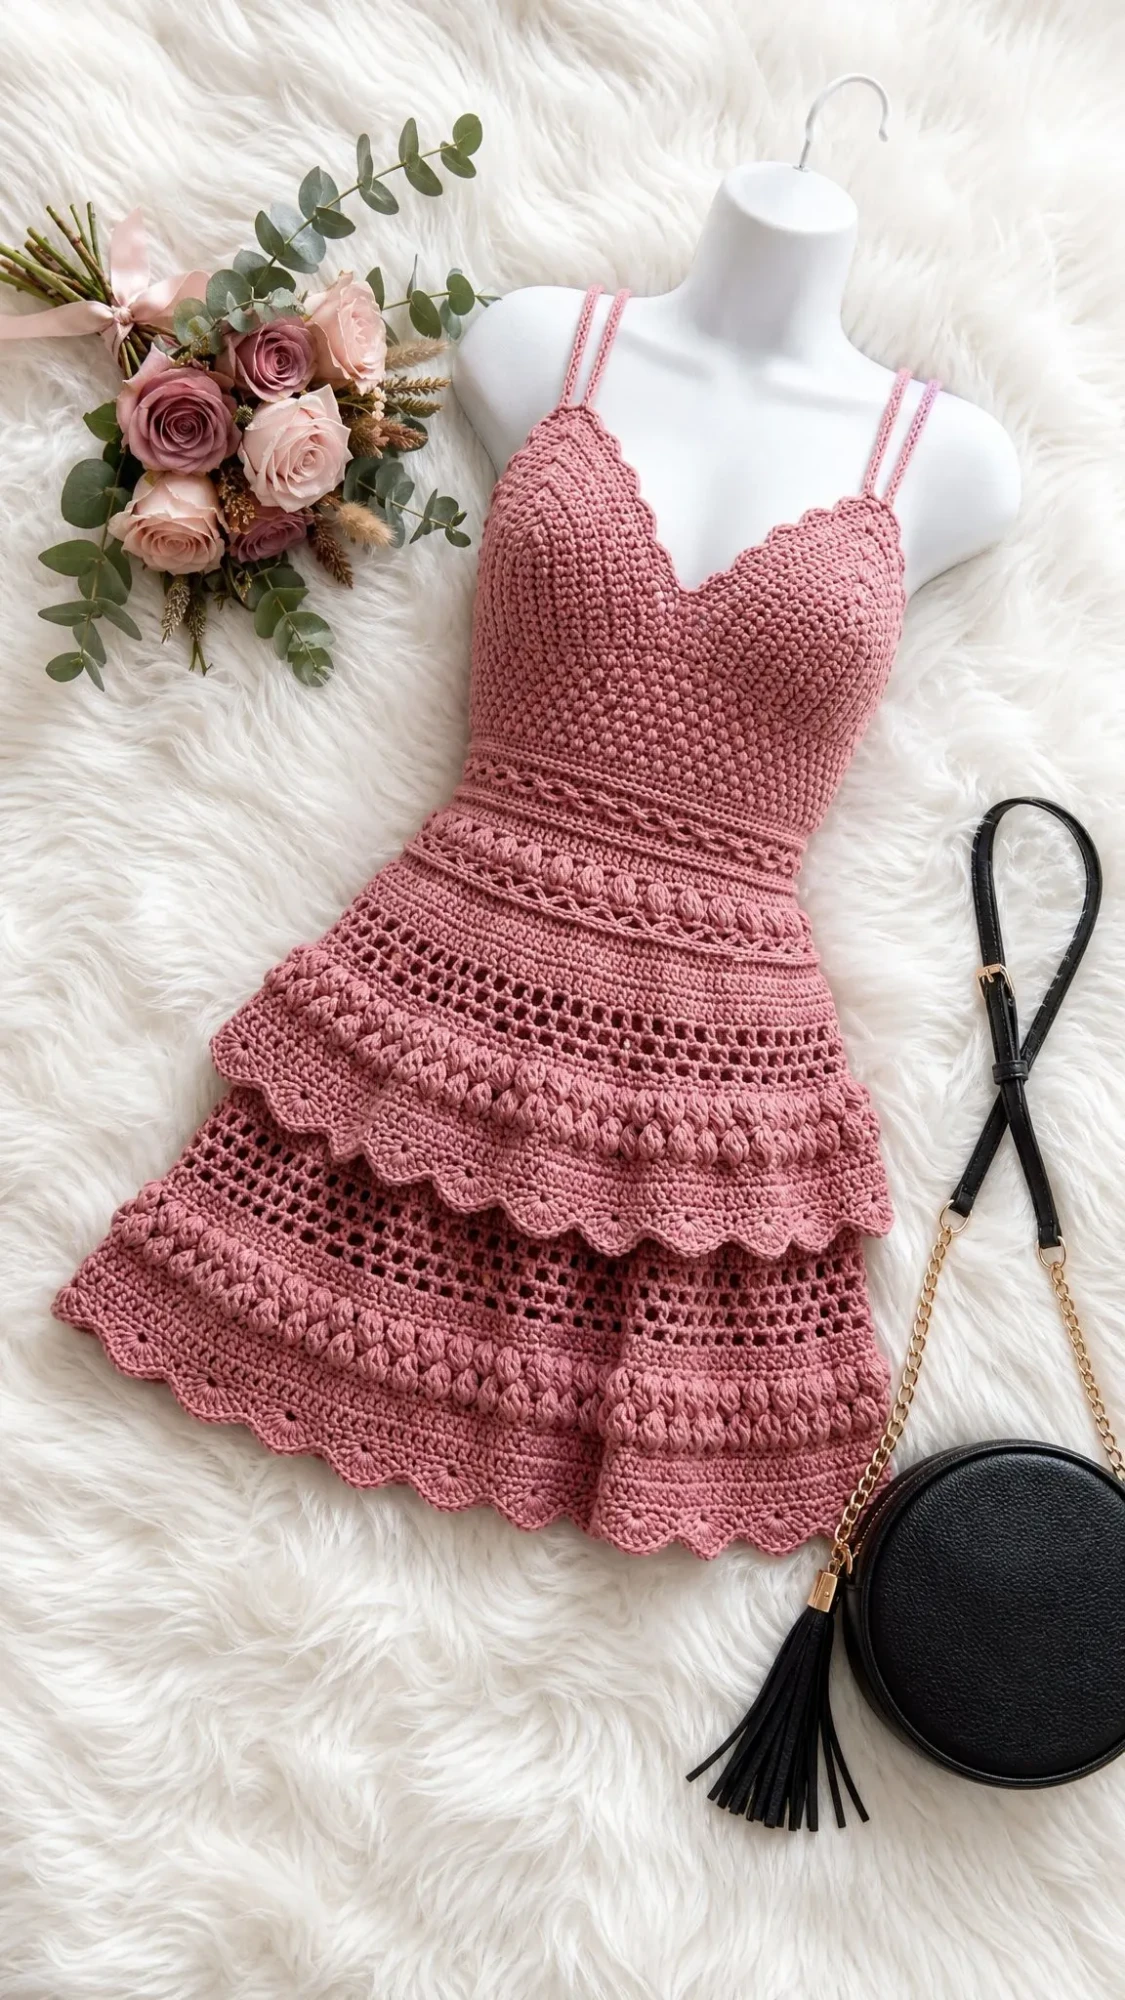
When I sat down to design this dress, I had one vision in my head. A feminine, boho-inspired piece that would feel special without being impossibly complicated to make. I wanted texture, movement, and that dreamy romantic vibe you see in vintage summer photography.
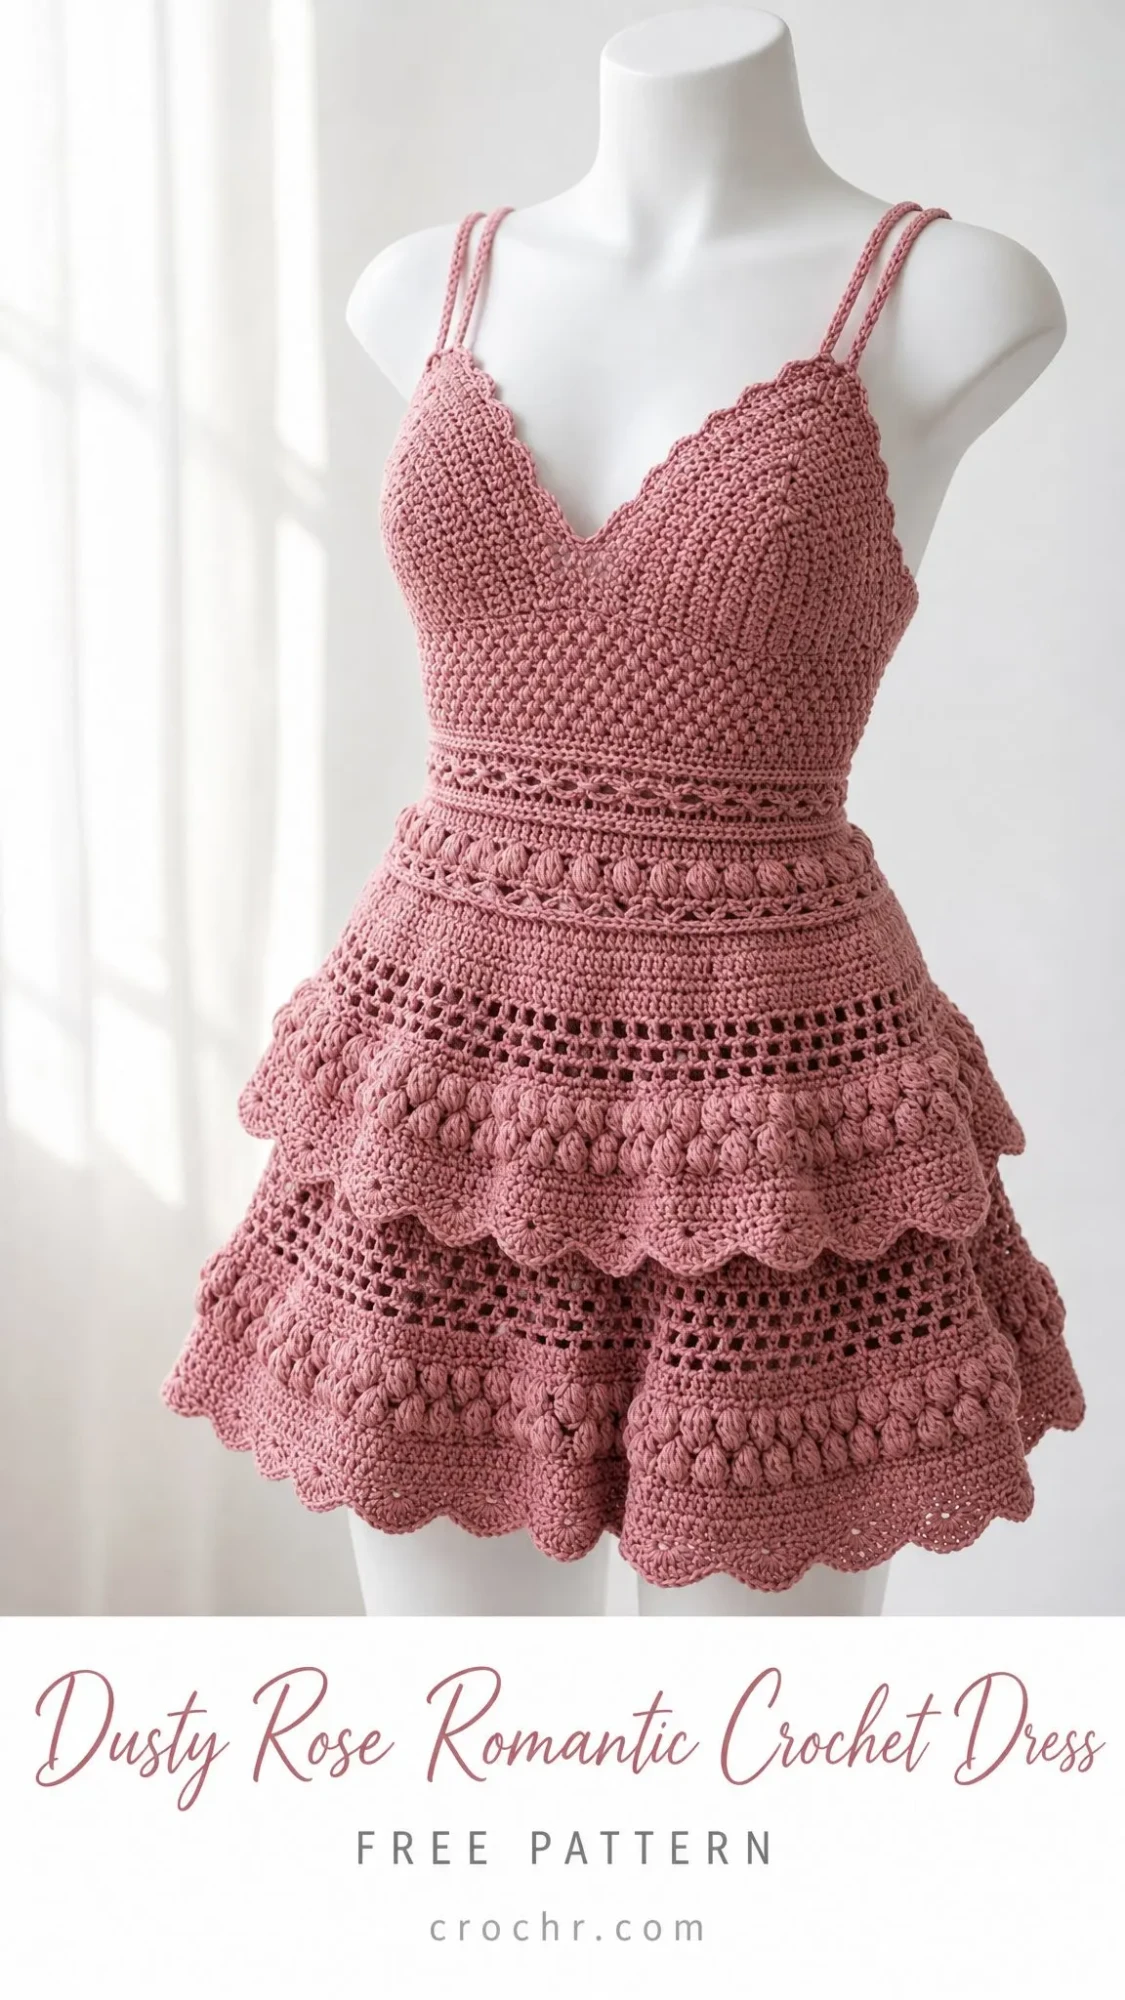
The result is everything I hoped for and more. Three cascading ruffle tiers, delicate bobble stitch details, open mesh sections, and those sweet scalloped edges that give each layer such beautiful dimension. The fitted bodice with its V-neckline and double spaghetti straps creates the perfect balance between flirty and flattering.
I am SO pleased with how this turned out. The dusty rose color feels timeless, the construction is more straightforward than it looks, and the finished dress has that effortless romantic quality that works for garden parties, beach vacations, or just feeling beautiful on a summer afternoon.
About This Crochet Dress Pattern
This tiered mini dress is worked from the top down, starting with the bodice cups and ending with three gorgeous ruffle tiers. Each tier features a repeating texture pattern of open mesh rows, bobble stitches, and that signature scalloped edging at the hem.
The construction might sound complex, but here is the honest truth. Once you understand how each tier attaches, the rest is simply repetition. You will work the bodice cups flat, join them together, then crochet the torso in continuous rounds. The skirt tiers are worked independently and attached to create that layered, cascading effect.
Skill level: Advanced Beginner to Intermediate. If you are comfortable working in the round and have made at least one garment before, you can absolutely tackle this project.
Time estimate: Plan for 30 to 45 hours of crochet time. This is a labor of love, not a weekend project. But every single hour is worth it when you slip this dress over your head.
Finished Measurements
This pattern is written for size Small/Medium with the following measurements:
Size customization tips appear at the end of the pattern for adjusting larger or smaller.
Materials Needed
Yarn: 1,000 to 1,200 yards (915 to 1,097 meters) of worsted weight (4) cotton or cotton-blend yarn in dusty rose
Recommended yarns:
Hook: US size G-6 / 4.00 mm
Notions:
Yarn substitution tip: Choose a smooth, tightly twisted cotton or cotton-blend. Avoid fuzzy or hairy fibers, which will hide your beautiful bobble and mesh texture.
Gauge
Getting gauge right is critical for garment fit. Please swatch before starting.
In single crochet worked in the round:
In bobble/mesh pattern:
Swatch at least 6 x 6 inches (15 x 15 cm). Going up a hook size gives more drape. Going down gives a more structured fabric.
Abbreviations and Stitch Definitions
Let me walk you through every stitch abbreviation you will encounter. I have included plain-English definitions so nothing catches you off guard.
Special Stitches
Bobble Stitch (bo)
This creates those gorgeous textured bumps throughout the dress. Here is how to work it:
Yarn over and insert hook into stitch or space. Pull up a loop. Yarn over and pull through 2 loops. You now have 1 half-closed double crochet on your hook. Repeat this step 4 more times in the same stitch. You will have 6 loops on your hook. Yarn over and pull through all 6 loops at once. Chain 1 to close.
The bobble should pop to the right side. When working on wrong side rows, push bobbles toward you as you work so they pop to the right side of the finished garment.
Scallop Edging
This creates the beautiful wavy hem on each tier:
Skip 2 stitches, work 5 dc in next stitch, skip 2 stitches, slip stitch in next stitch. Repeat across.
Each scallop shell uses 6 stitches total (2 skipped + 1 center + 2 skipped + 1 slip stitch anchor). Your stitch count must be divisible by 6 before starting the scallop round.
Open Mesh Row
Ch 4 (counts as dc plus ch 1). Skip 1 st. (Dc in next st, ch 1, skip 1 st) across to last st. Dc in last st.
Pattern Notes Before You Begin
Read through these notes. They will save you confusion later.
1. The bodice cups are worked flat and then joined at center front. Left and right cups are mirror images.
2. Place stitch markers at underarm join points and move them up each round.
3. Bobble stitch rows are worked on wrong side rows so bobbles pop to the right side. The pattern specifies when to turn.
4. Each ruffle tier attaches to a pickup row along the previous section. Tiers get progressively wider.
5. Chains at the beginning of double crochet rows: ch 3 counts as first dc. Ch 1 at beginning of sc rows does NOT count as a stitch.
6. Join all rounds with a slip stitch unless otherwise noted. Do not turn unless instructed.
7. This dress has no zipper or closure. The bodice stretches enough to step into.
Crochet Dress Pattern Instructions
Right Bodice Cup
Foundation: Ch 17.
Row 1 (RS): Sc in 2nd ch from hook and in each ch across. Turn. (16 sc)
Row 2 (WS): Ch 1. Sc in first st. Inc in next st. Sc across to last 2 sts. Inc in next st. Sc in last st. Turn. (18 sc)
Row 3 (RS): Ch 1. Sc2tog over first 2 sts (V-neck inner edge decrease). Sc across to last 2 sts. Inc in next st. Sc in last st. Turn. (18 sc)
Row 4 (WS): Ch 1. Sc in first st. Inc in next st. Sc across to last 3 sts. Sc2tog. Sc in last st. Turn. (18 sc)
Row 5 (RS): Ch 1. Sc2tog over first 2 sts. Sc across to last 2 sts. Inc in next st. Sc in last st. Turn. (18 sc)
Row 6 (WS): Ch 1. Sc in first st. Inc in next st. Sc across to last 3 sts. Sc2tog. Sc in last st. Turn. (18 sc)
Row 7 (RS): Ch 1. Sc2tog over first 2 sts. Sc across to last 2 sts. Inc in next st. Sc in last st. Turn. (18 sc)
Row 8 (WS): Ch 1. Sc across all sts. Turn. (18 sc)
Row 9 (RS): Ch 1. Sc2tog over first 2 sts. Sc to end. Turn. (17 sc)
Row 10 (RS): Ch 1. Sc2tog over first 2 sts. Sc to end. Turn. (16 sc)
Row 11 (RS): Ch 1. Sc2tog over first 2 sts. Sc to end. Turn. (15 sc)
Row 12 (RS): Ch 1. Sc2tog over first 2 sts. Sc to end. Turn. (14 sc)
Fasten off. The V-neck inner edge is the diagonal edge created by the decreases.
Left Bodice Cup
Foundation: Ch 17.
Row 1 (RS): Sc in 2nd ch from hook and in each ch across. Turn. (16 sc)
Row 2 (WS): Ch 1. Sc in first st. Inc in next st. Sc across to last 2 sts. Inc in next st. Sc in last st. Turn. (18 sc)
Row 3 (RS): Ch 1. Sc in first st. Inc in next st. Sc across to last 3 sts. Sc2tog. Sc in last st. Turn. (18 sc)
Row 4 (WS): Ch 1. Sc in first st. Sc2tog. Sc across to last 2 sts. Inc in next st. Sc in last st. Turn. (18 sc)
Row 5 (RS): Ch 1. Sc in first st. Inc in next st. Sc across to last 3 sts. Sc2tog. Sc in last st. Turn. (18 sc)
Row 6 (WS): Ch 1. Sc in first st. Sc2tog. Sc across to last 2 sts. Inc in next st. Sc in last st. Turn. (18 sc)
Row 7 (RS): Ch 1. Sc in first st. Inc in next st. Sc across to last 3 sts. Sc2tog. Sc in last st. Turn. (18 sc)
Row 8 (WS): Ch 1. Sc across all sts. Turn. (18 sc)
Row 9 (RS): Ch 1. Sc across to last 2 sts. Sc2tog. Turn. (17 sc)
Row 10 (RS): Ch 1. Sc across to last 2 sts. Sc2tog. Turn. (16 sc)
Row 11 (RS): Ch 1. Sc across to last 2 sts. Sc2tog. Turn. (15 sc)
Row 12 (RS): Ch 1. Sc across to last 2 sts. Sc2tog. Turn. (14 sc)
Do not fasten off. You will use this working yarn to join the cups.
Join Cups
With RS facing and working yarn attached at end of left cup Row 12, ch 2 (this creates a small chain bridge at center front bottom of V-neck). Join with sl st to the first stitch of Row 12 on right cup. (28 sts across both cups plus 2 ch bridge = 30 working positions)
Bodice Torso in the Round
Setup Rnd: Starting at center front V-point (sl st join), work as follows:
Place markers at each of the 2 underarm points.
Rnd 1: Ch 1. Sc in each st around. Join. (40 sc)
Rnd 2: Ch 1. Sc in each st around. Join. (40 sc)
Rnd 3 (WS bobble rnd, turn work so WS faces you): Ch 1. (Bo in next st, sc in next st) around. Join. (20 bo, 20 sc = 40 sts)
Turn back to RS facing.
Rnd 4: Ch 1. Sc in each st around. Join. (40 sc)
Rnd 5 (mesh rnd): Ch 4 (counts as dc, ch 1). Skip 1 st. (Dc in next st, ch 1, skip 1 st) 19 times. Join with sl st to 3rd ch of beg ch-4. (20 dc, 20 ch-1 sp)
Rnd 6: Ch 1. Sc in each dc and each ch-sp around. Join. (40 sc)
Rnd 7: Ch 1. Sc around, working 4 evenly spaced increases. Join. (44 sc)
Rnd 8: Ch 1. Sc in each st around. Join. (44 sc)
Rnd 9 (WS bobble rnd): Turn. Ch 1. (Bo in next st, sc in next st) around. Join. (22 bo, 22 sc = 44 sts)
Turn back to RS.
Rnd 10: Ch 1. Sc in each st around. Join. (44 sc)
Rnd 11: Ch 4. Skip 1. (Dc in next st, ch 1, skip 1) 21 times. Join to 3rd ch of beg ch-4. (22 dc, 22 ch-1 sp)
Rnd 12: Ch 1. Sc in each dc and ch-sp around. Join. (44 sc)
Rnd 13: Ch 1. Sc around, working 4 evenly spaced increases as before. Join. (48 sc)
Rnd 14: Ch 1. Sc in each st around. Join. (48 sc)
Checkpoint: The bodice should measure approximately 6 inches from the top of the cups to the current working round.
Waist Band
These 4 rounds create a slightly tighter waist definition.
Rnd 15: Ch 1. Working in bl only, sc in each st around. Join. (48 sc)
Rnd 16: Ch 1. Working in bl only, sc in each st around. Join. (48 sc)
Rnd 17: Ch 1. Sc in each st around (both loops). Join. (48 sc)
Rnd 18: Ch 1. Sc in each st around. Join. (48 sc)
Hip Yoke
The hip yoke transitions from waist to skirt tiers, expanding from 48 sts to 72 sts.
Rnd 19: Ch 1. Sc around, inc 4 evenly spaced. Join. (52 sc)
Rnd 20: Ch 1. Sc in each st around. Join. (52 sc)
Rnd 21: Ch 1. Sc around, inc 4 evenly spaced. Join. (56 sc)
Rnd 22: Ch 1. Sc in each st around. Join. (56 sc)
Rnd 23: Ch 1. Sc around, inc 4 evenly spaced. Join. (60 sc)
Rnd 24: Ch 1. Sc in each st around. Join. (60 sc)
Rnd 25: Ch 1. Sc around, inc 6 evenly spaced. Join. (66 sc)
Rnd 26: Ch 1. Sc in each st around. Join. (66 sc)
Rnd 27: Ch 1. Sc around, inc 6 evenly spaced. Join. (72 sc)
Rnd 28: Ch 1. Sc in each st around. Join. (72 sc)
Rnd 29 (bobble trim ridge): Turn work WS facing. Ch 1. (Bo in next st, sc in next st) around. Join. (36 bo, 36 sc = 72 sts)
Turn RS facing.
Rnd 30: Ch 1. Sc in each st around. Join. (72 sc)
Tier One
Tier One Rnd 1 (ruffle foundation): Ch 1. Inc in every st around. Join. (144 sc)
Tier One Rnd 2: Ch 1. Sc in each st around. Join. (144 sc)
Tier One Rnd 3 (mesh): Ch 4. Skip 1. (Dc in next st, ch 1, skip 1) 71 times. Join to 3rd ch of beg ch-4. (72 dc, 72 ch-1 sp)
Tier One Rnd 4: Ch 1. Sc in each dc and each ch-sp around. Join. (144 sc)
Tier One Rnd 5 (WS bobble): Turn WS facing. Ch 1. (Bo in next st, sc in next st) around. Join. (72 bo, 72 sc = 144 sts)
Turn RS facing.
Tier One Rnd 6: Ch 1. Sc in each st around. Join. (144 sc)
Tier One Rnd 7: Ch 1. Sc in each st around. Join. (144 sc)
Tier One Rnd 8 (mesh): Ch 4. Skip 1. (Dc in next st, ch 1, skip 1) 71 times. Join. (72 dc, 72 ch-1 sp)
Tier One Rnd 9: Ch 1. Sc in each dc and each ch-sp around. Join. (144 sc)
Tier One Rnd 10 (WS bobble): Turn WS facing. Ch 1. (Bo in next st, sc in next st) around. Join. (72 bo, 72 sc = 144 sts)
Turn RS facing.
Tier One Rnd 11: Ch 1. Sc in each st around. Join. (144 sc)
Tier One Rnd 12: Ch 1. Sc in each st around. Join. (144 sc)
Tier One Rnd 13 (scallop edging): Ch 1. Sl st in first st. (Skip 2 sts, 5 dc in next st, skip 2 sts, sl st in next st) 24 times. Join. (24 scallop shells)
Fasten off. Weave in ends.
Tier Two
Attach yarn with sl st in any back loop of Rnd 30.
Tier Two Rnd 1 (ruffle foundation): Ch 1. Working in bl of each st of Rnd 30, inc in every st around. Join. (144 sc)
Tier Two Rnd 2: Ch 1. Sc in each st around. Join. (144 sc)
Tier Two Rnd 3: Ch 1. Sc around, inc 1 in every 12th st (12 increases total). Join. (156 sc)
Tier Two Rnd 4 (mesh): Ch 4. Skip 1. (Dc in next st, ch 1, skip 1) 77 times. Join to 3rd ch of beg ch-4. (78 dc, 78 ch-1 sp)
Tier Two Rnd 5: Ch 1. Sc in each dc and each ch-sp around. Join. (156 sc)
Tier Two Rnd 6 (WS bobble): Turn WS facing. Ch 1. (Bo in next st, sc in next st) around. Join. (78 bo, 78 sc = 156 sts)
Turn RS facing.
Tier Two Rnd 7: Ch 1. Sc in each st around. Join. (156 sc)
Tier Two Rnd 8: Ch 1. Sc in each st around. Join. (156 sc)
Tier Two Rnd 9 (mesh): Ch 4. Skip 1. (Dc in next st, ch 1, skip 1) 77 times. Join. (78 dc, 78 ch-1 sp)
Tier Two Rnd 10: Ch 1. Sc in each dc and each ch-sp around. Join. (156 sc)
Tier Two Rnd 11 (WS bobble): Turn WS. Ch 1. (Bo in next st, sc in next st) around. Join. (78 bo, 78 sc = 156 sts)
Turn RS.
Tier Two Rnd 12: Ch 1. Sc in each st around. Join. (156 sc)
Tier Two Rnd 13 (scallop edging): Ch 1. Sl st in first st. (Skip 2 sts, 5 dc in next st, skip 2 sts, sl st in next st) 26 times. Join. (26 scallop shells)
Fasten off. Weave in ends.
Tier Three
Attach yarn with sl st in any back loop of Rnd 27.
Tier Three Rnd 1 (ruffle foundation): Ch 1. Working in bl of each st of Rnd 27, inc in every st around. Join. (144 sc)
Tier Three Rnd 2: Ch 1. Sc in each st around. Join. (144 sc)
Tier Three Rnd 3: Ch 1. Sc around, inc 1 in every 8th st (18 increases total). Join. (162 sc)
Tier Three Rnd 4: Ch 1. Sc around, inc 1 in every 9th st (18 increases total). Join. (180 sc)
Tier Three Rnd 5 (mesh): Ch 4. Skip 1. (Dc in next st, ch 1, skip 1) 89 times. Join to 3rd ch of beg ch-4. (90 dc, 90 ch-1 sp)
Tier Three Rnd 6: Ch 1. Sc in each dc and ch-sp around. Join. (180 sc)
Tier Three Rnd 7 (WS bobble): Turn WS. Ch 1. (Bo in next st, sc in next st) around. Join. (90 bo, 90 sc = 180 sts)
Turn RS.
Tier Three Rnd 8: Ch 1. Sc in each st around. Join. (180 sc)
Tier Three Rnd 9: Ch 1. Sc in each st around. Join. (180 sc)
Tier Three Rnd 10 (mesh): Ch 4. Skip 1. (Dc in next st, ch 1, skip 1) 89 times. Join. (90 dc, 90 ch-1 sp)
Tier Three Rnd 11: Ch 1. Sc in each dc and ch-sp around. Join. (180 sc)
Tier Three Rnd 12 (WS bobble): Turn WS. Ch 1. (Bo in next st, sc in next st) around. Join. (90 bo, 90 sc = 180 sts)
Turn RS.
Tier Three Rnd 13: Ch 1. Sc in each st around. Join. (180 sc)
Tier Three Rnd 14 (scallop edging): Ch 1. Sl st in first st. (Skip 2 sts, 5 dc in next st, skip 2 sts, sl st in next st) 30 times. Join. (30 scallop shells)
Fasten off. Weave in ends.
Straps (Make 4 Cords Total)
Each strap consists of 2 cords positioned side by side for the double spaghetti strap look.
Strap Cord:
Ch 50 (adjust for desired strap length).
Sl st back into each ch all the way to the beginning. (50 sl sts)
Fasten off leaving a 12 inch tail for sewing.
Strap Placement:
Position 2 cords side by side on each shoulder, spacing them approximately 0.5 inch apart. Attach front ends to the top edge of the bodice cups, approximately 1.5 inches from center V-point. Attach back ends to the straight upper back edge at matching positions. Use yarn needle and the long tails to sew cords securely through multiple stitches. Knot securely on WS. Weave in all ends.
Neckline Finishing
With RS facing, attach yarn at right shoulder strap attachment point.
Neckline Edging Rnd: Ch 1. Sc evenly around entire neckline and top edge of bodice, working approximately 1 sc per row end along diagonal cup edges and 1 sc per st along straight top edges. Work 3 sc in the corner points at top of cup outer edges for fullness. Work a sl st decrease at the V-point base to keep the center sharp. Join with sl st to first sc. Fasten off. Weave in end.
Back Bodice Edging
With RS facing, attach yarn at top right back corner.
Back Edging Rnd: Ch 1. Sc evenly across entire top back edge. Fasten off. Weave in end.
Finishing Your Romantic Crochet Dress
Block your finished dress by pinning it to shape on a blocking mat. Spray lightly with water and allow to dry completely. This helps the scalloped edges lay flat and evens out any tension variations in your stitches.
This dress has no zipper or closure. The cotton fabric has enough natural stretch for you to step into it. If you prefer additional security at the waist, you can crochet small button loops at center back and sew on hooks.
Tips for Success
Take your time with the cups. The shaping creates the V-neckline angle, and accuracy here affects the entire bodice fit.
Mark your tier attachment rounds. Before starting each tier, place a marker in the specific round you will be working into. This saves confusion later.
Push those bobbles. When working bobble rows on the wrong side, physically push each bobble toward you so it pops to the right side where it belongs.
Count after every round. Especially during the hip yoke increases and tier foundations. Getting off by even a few stitches will affect your scallop edging math.
Thank you so much for choosing this pattern. I truly hope you love making this dress as much as I loved designing it. If you complete yours, I would be absolutely thrilled to see it. Tag me on Instagram or share a photo in my Facebook group. There is nothing better than seeing these designs come to life in someone else’s hands.
If this pattern is calling to you, go ahead and save it to your Pinterest boards so you can find it when you are ready to start. And please drop a comment below if you make one. I read every single comment and love hearing about your projects.
