I call this little trio "Tropical Paradise" because it reminds me of a vacation I took years ago. I sketched the original design in a worn notebook while sitting poolside, watching flamingos wade through shallow water. The pineapple and monstera leaf came later when I wanted to create a complete set that captured that whole sunny, carefree vibe. I finally pulled out those old notes last month and brought the whole thing to life. Now it lives on my bag, and every time I see it, I smile.
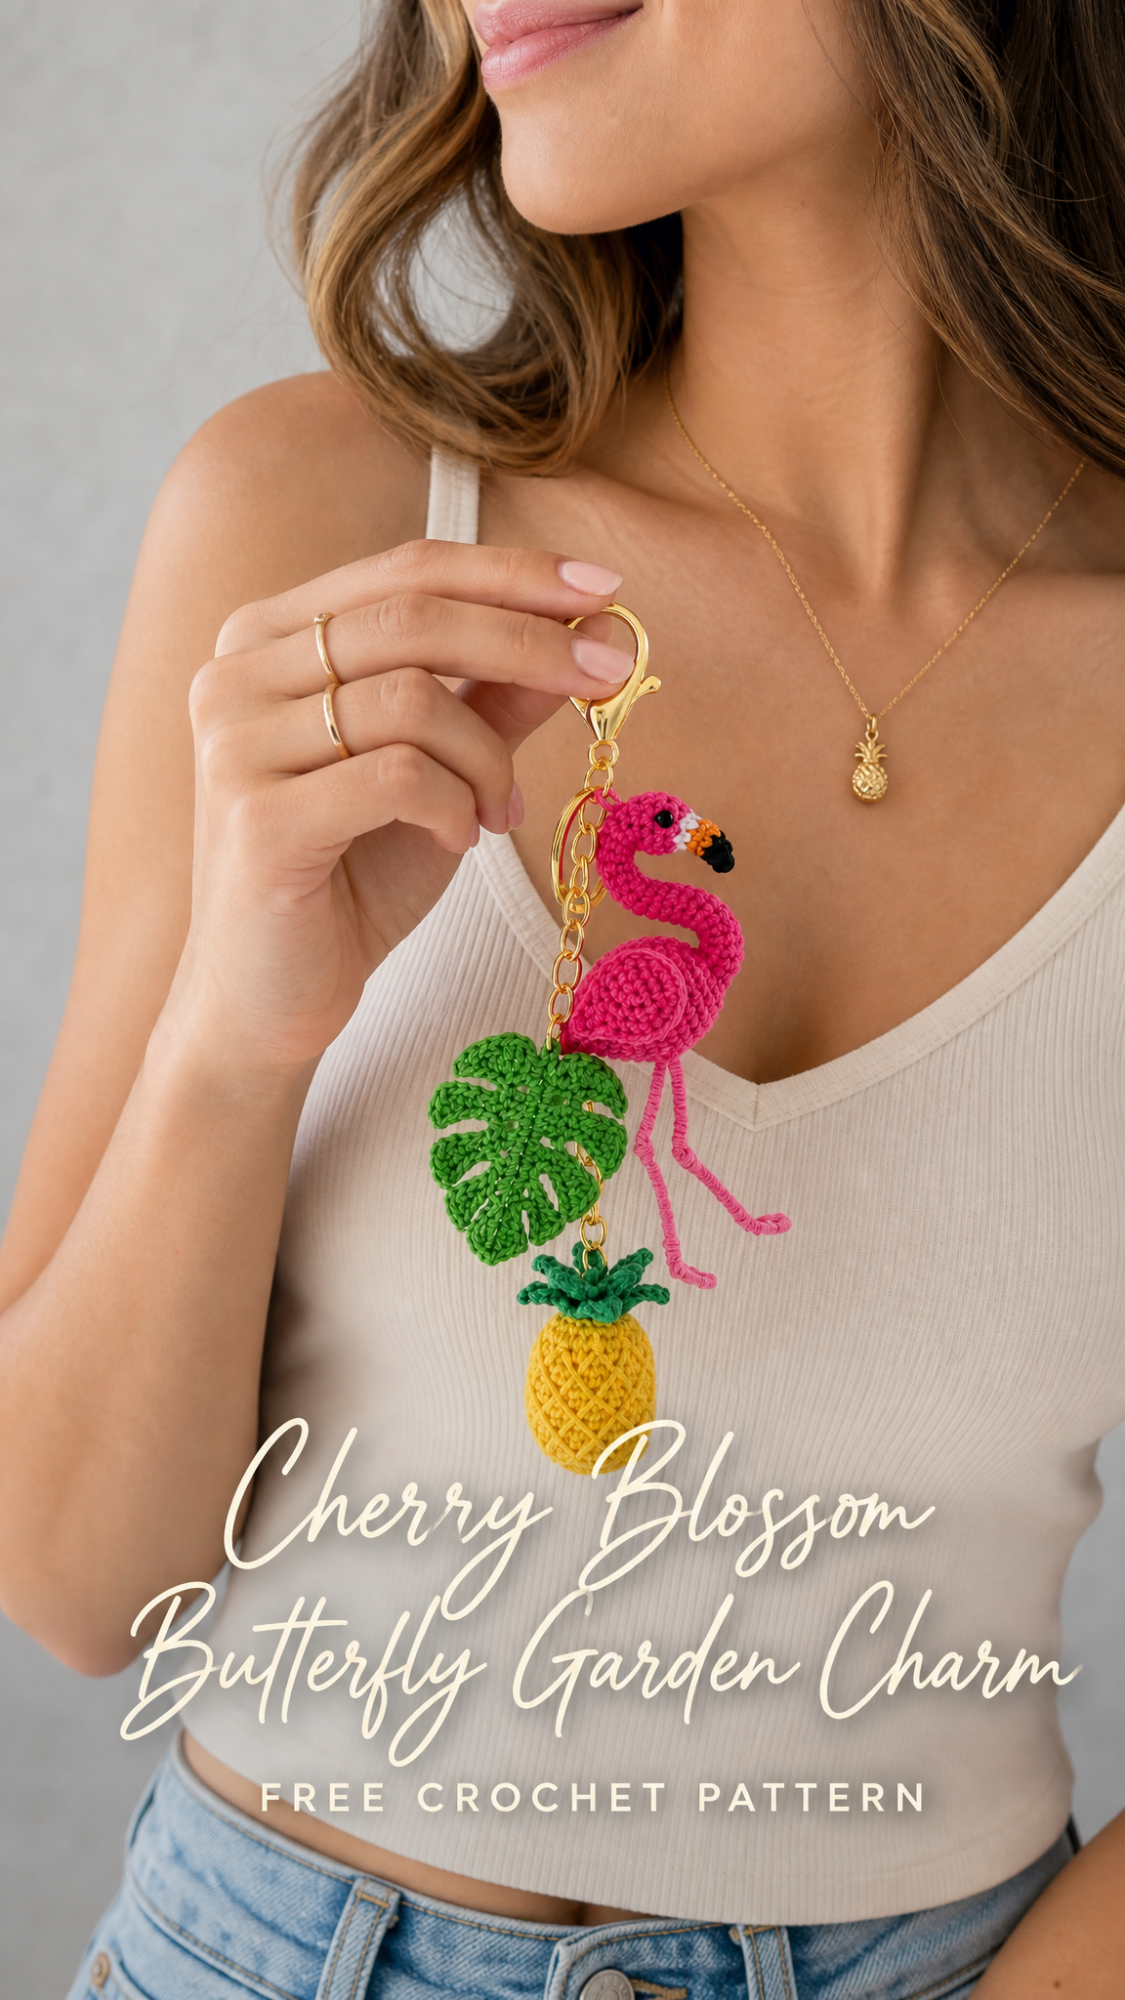
This crochet keychain charm pattern brings together three miniature amigurumi pieces: a pink flamingo, a textured pineapple, and a monstera leaf. Each piece works up quickly with crochet thread or fingering weight yarn, making this the perfect project for using up small amounts from your stash. Whether you want a fun bag charm, a zipper pull, or a unique gift for a tropical-loving friend, this pattern delivers.
What You Will Need for This Crochet Keychain Pattern
Before diving into the stitches, gather these materials. Having everything ready makes the process smooth and enjoyable.
Yarn:
Tools:
Gauge: Gauge is not critical for this project, but your stitches should be tight enough that stuffing does not show through. If you see gaps, go down a hook size.
Finished Size: The flamingo measures approximately 2.5 inches tall (not including legs). The pineapple is about 1 inch tall. The monstera leaf spans roughly 1.5 inches wide. Total keychain length is approximately 4 to 5 inches.
Skill Level: Intermediate. You should be comfortable with working in the round, increasing, decreasing, and basic amigurumi techniques.
Abbreviations and Stitch Definitions
Let me break down every stitch you will encounter in this pattern. Even if you know these well, a quick refresher never hurts.
Magic ring (MR): An adjustable loop that closes completely, leaving no hole at the center. You wrap yarn around your fingers, pull up a loop, and work your first round into that ring.
Chain (ch): The foundation stitch. Yarn over, pull through the loop on your hook. Creates one chain.
Single crochet (sc): Insert hook into stitch, yarn over and pull up a loop (two loops on hook), yarn over and pull through both loops. This is your main stitch for amigurumi.
Increase (inc): Work two single crochet stitches into the same stitch. This adds one stitch to your count.
Invisible decrease (inv dec): Insert hook through front loops only of the next two stitches, yarn over and pull through both front loops, yarn over and pull through remaining loops. Creates a cleaner decrease than standard methods.
Slip stitch (sl st): Insert hook into stitch, yarn over, and pull through both the stitch and the loop on your hook in one motion. Used for joining and finishing.
Half double crochet (hdc): Yarn over, insert hook into stitch, yarn over and pull up a loop (three loops on hook), yarn over and pull through all three loops.
Double crochet (dc): Yarn over, insert hook into stitch, yarn over and pull up a loop, yarn over and pull through two loops, yarn over and pull through remaining two loops.
Flamingo Body Pattern
The flamingo works from the head down. You will create the head, neck, and body as separate pieces, then join them together.
Head:
Round 1: With pink yarn, MR, 6 sc into ring. (6 sts)
Round 2: Inc in each st around. (12 sts)
Round 3: *Sc 1, inc* repeat around. (18 sts)
Rounds 4 to 6: Sc in each st around. (18 sts)
Round 7: *Sc 1, inv dec* repeat around. (12 sts)
Begin stuffing the head firmly at this point. The head should feel solid but not stretched.
Round 8: Inv dec around. (6 sts)
Fasten off, leaving a long tail. Close the hole by weaving through the front loops of the remaining stitches and pulling tight.
Beak:
Row 1: With orange yarn, ch 6, sc in second ch from hook, hdc, dc, hdc, sc. (5 sts)
Fasten off, leaving a tail for sewing.
With black yarn, embroider a small section at the tip of the beak to create the characteristic flamingo beak marking. Sew the beak to the front of the head, positioning it so the curved part angles downward slightly.
Eyes:
Using black yarn, embroider two small French knots or satin stitch dots on either side of the head, just above the beak.
Neck:
Round 1: With pink yarn, MR, 6 sc into ring. (6 sts)
Rounds 2 to 15: Sc in each st around. (6 sts)
Do not stuff the neck. It should remain flexible so you can bend it into the signature S-curve shape. Fasten off with a long tail.
Body:
Round 1: With pink yarn, MR, 6 sc into ring. (6 sts)
Round 2: Inc in each st around. (12 sts)
Round 3: *Sc 1, inc* repeat around. (18 sts)
Round 4: *Sc 2, inc* repeat around. (24 sts)
Rounds 5 to 8: Sc in each st around. (24 sts)
Round 9: *Sc 2, inv dec* repeat around. (18 sts)
Round 10: *Sc 1, inv dec* repeat around. (12 sts)
Stuff the body firmly.
Round 11: Inv dec around. (6 sts)
Fasten off and close the hole.
Wing (make 2):
Round 1: With pink yarn, MR, 6 sc into ring. (6 sts)
Round 2: Inc in each st around. (12 sts)
Rounds 3 to 4: Sc in each st around. (12 sts)
Round 5: Inv dec, sc 8, inv dec. (10 sts)
Flatten the wing and sl st the edges together. Fasten off with a tail for sewing.
Flamingo Assembly and Legs
This is where your flamingo really comes together. Take your time with this step.
Sew the neck to the top of the body, angling it slightly forward. Sew the head to the top of the neck. Bend the neck gently into an S-curve shape.
Legs:
Cut two pieces of wire, each about 4 inches long. Bend one end of each wire into a small three-pronged foot shape (like a bird’s foot with forward-facing toes).
Using pink yarn, wrap the wire tightly from the foot up to the top, securing with tiny dots of fabric glue if needed. Continue wrapping until the entire leg is covered.
Insert the top of each wrapped wire leg into the bottom of the body. Secure with a few stitches and a small amount of glue for durability.
Sew both wings to the sides of the body.
Pineapple Charm Pattern
This textured pineapple uses a simple technique to create that diamond pattern characteristic of real pineapples.
Body:
Round 1: With yellow yarn, MR, 6 sc into ring. (6 sts)
Round 2: Inc in each st around. (12 sts)
Round 3: Working in back loops only, sc in each st around. (12 sts)
Round 4: *Sc 1, inc* repeat around. (18 sts)
Round 5: Working in back loops only, sc in each st around. (18 sts)
Rounds 6 to 8: Sc in each st around. (18 sts)
Round 9: Working in back loops only, *sc 1, inv dec* repeat around. (12 sts)
Stuff the pineapple firmly.
Round 10: Inv dec around. (6 sts)
Fasten off and close. The back loop only rounds create subtle ridges that mimic pineapple texture.
Crown:
With dark green yarn, ch 8, sl st in second ch from hook, sc, hdc, dc, hdc, sc, sl st. This creates one leaf. Repeat to make 5 leaves total.
Sew all leaves together at their bases, then attach to the top of the pineapple body. Fan them out slightly for a natural look.
Monstera Leaf Pattern
The monstera leaf works flat with strategic chain spaces to create the signature holes.
Leaf:
Row 1: With green yarn, ch 12, sc in second ch from hook, sc across. (11 sts)
Row 2: Ch 1, turn, sc 3, ch 3, skip 2, sc 2, ch 3, skip 2, sc 2. (7 sc, 2 ch-3 spaces)
Row 3: Ch 1, turn, sc 2, 2 sc in ch-3 space, sc 2, 2 sc in ch-3 space, sc 3. (11 sts)
Row 4: Ch 1, turn, sc across. (11 sts)
Row 5: Ch 1, turn, inv dec, sc 7, inv dec. (9 sts)
Row 6: Ch 1, turn, inv dec, sc 5, inv dec. (7 sts)
Row 7: Ch 1, turn, inv dec, sc 3, inv dec. (5 sts)
Row 8: Ch 1, turn, inv dec, sc 1, inv dec. (3 sts)
Fasten off, leaving a long tail.
Stem:
Ch 10 with green yarn. Sl st in second ch from hook and across. Fasten off. Sew to the base of the leaf.
Work a second leaf if desired for a fuller look, as shown in the photos.
Final Assembly of Your Crochet Keychain
Now comes the satisfying part. You will connect all your pieces to the keychain hardware.
Using jump rings and jewelry pliers, attach each charm to the chain links of your keychain. Space them evenly so they hang at slightly different lengths. The flamingo looks best at the top or center, with the monstera leaf and pineapple flanking it below.
Make sure each jump ring is closed completely to prevent pieces from falling off during use.
Give each charm a gentle tug to test security. If anything feels loose, reinforce with a few extra stitches or a second jump ring.
Tips for Success with This Amigurumi Keychain
Working with crochet thread requires patience. The small hook and fine yarn can feel fiddly at first. Take breaks if your hands get tired.
If this is your first time working with such small materials, practice your tension on a swatch first. Your stitches should be tight and uniform.
The wire legs can be tricky. If you prefer, you can crochet i-cord legs instead. They will not be as sturdy, but they eliminate the wire-wrapping step.
Consider adding a small amount of fabric stiffener to the monstera leaf to help it hold its shape over time.
Why This Tropical Crochet Pattern Makes a Great Gift
Handmade keychains carry so much personality. This tropical trio works perfectly for summer birthdays, teacher appreciation gifts, or a treat for yourself. The bright colors pop against any bag, backpack, or set of keys.
You can customize the colors too. Try coral instead of hot pink for a softer flamingo. Swap the monstera for a palm leaf shape. Make the pineapple in variegated yellow for extra dimension.
Craft fairs and markets love unique items like this. The detailed work and tropical theme catch eyes and start conversations.
I hope you love making this tropical keychain as much as I loved designing it. If you create your own version, please share a photo on Instagram or Facebook and tag me. I would absolutely love to see your color choices and how you style it.
Save this pattern to your Pinterest boards so you can find it whenever the mood for a quick, cheerful project strikes. And if you make it, drop a comment below. Hearing from you truly makes my day, and your feedback helps other crafters decide to try it too.
