I found this dress design tucked away in one of my old project notebooks from three summers ago. I had sketched it out after watching the sunset over the ocean, mesmerized by how the colors shifted from deep terracotta at the horizon through soft cream and back again. I called it the Sunset Coral dress and promptly forgot about it for years.

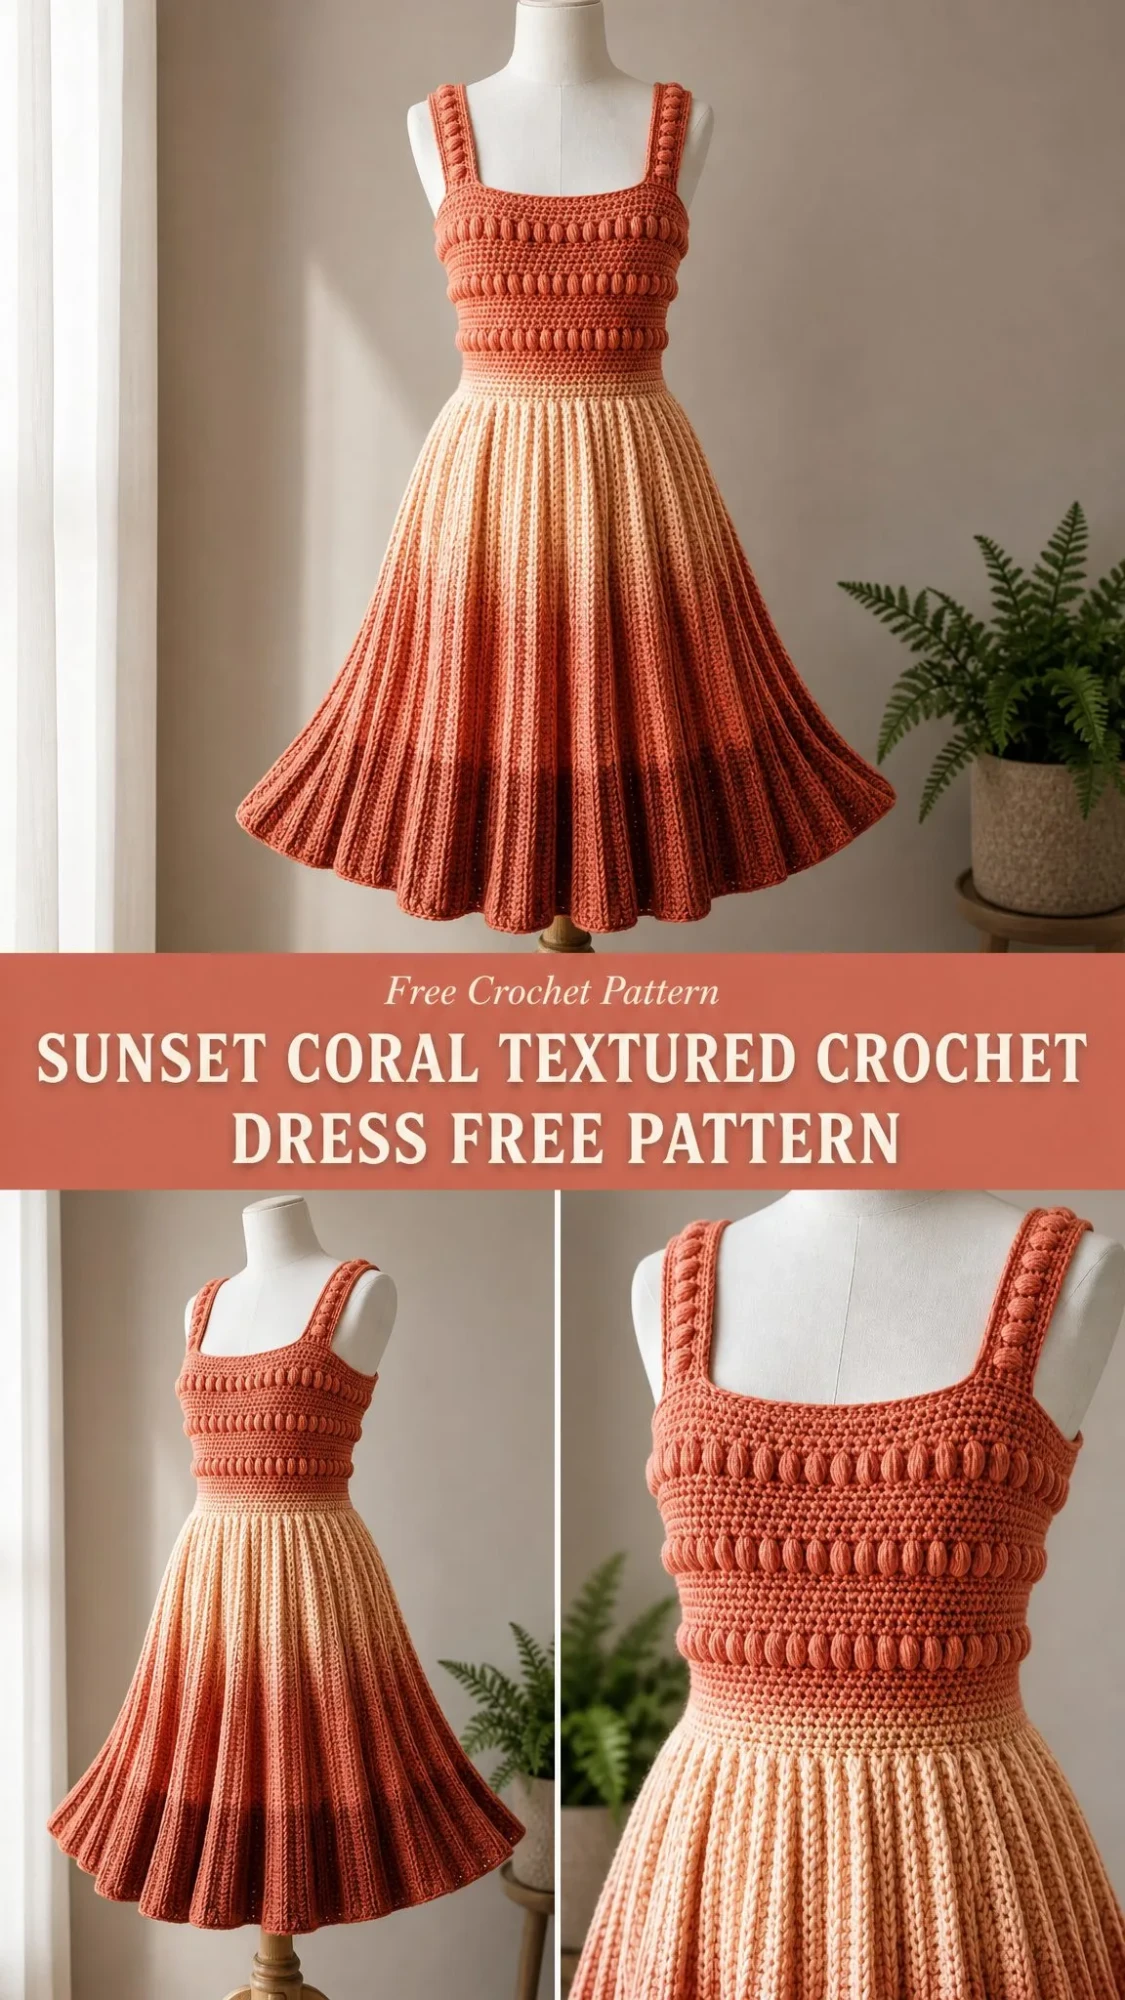
When I rediscovered those notes last month, I knew I had to bring this vision to life. The original sketch showed everything you see here: the fitted bodice with those satisfying bobble bands, the wide straps that actually stay put, and that dramatic circle skirt with its vertical ribbing catching the light just so. The ombre effect took some experimenting to get right, but the technique I landed on is simpler than it looks.
This crochet dress pattern is definitely a commitment. I will not sugarcoat that. But if you have been crocheting for a while and want a showstopper project that will make people ask "wait, you MADE that?" then pull up a chair. Let me walk you through every stitch.
About This Crochet Dress Pattern
This sundress features a square neckline, textured bodice with raised bobble stitch bands, and a full ribbed circle skirt that creates gorgeous vertical columns of texture. The ombre gradient moves from deep coral at the bodice through ivory at mid-skirt and back to coral at the hem. It is a sweeping, feminine silhouette that looks far more complicated than the techniques involved.
Skill level: Advanced. You will need comfort with working in the round, precise bobble stitch execution, flat ribbing worked and seamed, and garment shaping with waist suppression.
Time estimate: Plan for 35 to 53 hours total. The bodice takes 12 to 18 hours, the skirt takes 20 to 30 hours, and assembly plus finishing adds another 3 to 5 hours.
Finished Measurements
This pattern is written for size Small with Medium and Large in parentheses throughout, formatted as S (M, L).
Materials Needed
Yarn:
Recommended yarns: Lion Brand Comfy Cotton Blend works beautifully for drape and stitch definition. Paintbox Yarns Simply DK is a budget-friendly option that shows the ribbing columns clearly. For a luxury version, We Are Knitters The Wool in Peruvian wool adds natural elasticity.
Choose a smooth DK weight yarn with good stitch definition. Avoid fuzzy, brushed, or bouclé textures since the bobble stitches and ribbing will get lost.
Tools:
Gauge (This Is Mandatory)
Single crochet (sc): 18 stitches and 20 rows = 4 in / 10 cm, blocked
Ribbing stitch (sc-blo): 16 stitches and 20 rows = 4 in / 10 cm, blocked
I cannot stress this enough. A difference of even one stitch per 4 inches means a dress that is 2 to 3 inches off in circumference. Make a swatch at least 5 inches square, wash it, block it, and measure before you begin.
Abbreviations and Stitch Definitions
Special Stitch: The Bobble Stitch
The bobble stitch (bo) creates raised rounded bumps on the right side of your fabric. All bobbles in this pattern are worked from the wrong side so they pop outward correctly.
Here is how to work it:
1. Yarn over and insert hook into the indicated stitch.
2. Yarn over and pull up a loop. You now have 3 loops on your hook.
3. Yarn over and draw through 2 loops. You now have 2 loops on your hook.
4. Repeat steps 1 through 3 four more times in the SAME stitch. You now have 6 loops on your hook.
5. Yarn over and draw through all 6 loops at once.
6. Chain 1 to close and lock the bobble.
The bobble counts as 1 stitch. If this is your first time making bobbles, practice a few on a swatch first. They feel awkward until they click, then they become oddly satisfying.
Pattern Notes Before You Begin
Construction overview: The dress is worked in two main sections. The bodice is worked flat in two panels (front and back), then joined at the sides. The straps are made separately and attached. The skirt is worked as a wide flat rectangle of ribbing, seamed into a tube, gathered at the top, and attached to the bodice waist.
Turning chains: Chain 1 at the beginning of sc rows. The chain 1 does NOT count as a stitch. Always work the first sc into the first stitch.
Ombre color technique: The skirt gradient is created by holding two strands together at varying ratios:
To reduce bulk at transitions, start the new strand in the last yarn over of the stitch before the transition row. Carry the old strand for 3 to 5 stitches before cutting and weaving in.
Crochet Pattern Instructions
Section 1: Straps (Make 2)
Using Yarn A and G-6 hook, chain 9 (10, 11).
Row 1 (RS): Sc in 2nd ch from hook and in each ch across. Turn. (8, 9, 10 sc)
Row 2: Ch 1, sc-blo in each st across. Turn. (8, 9, 10 sc)
Row 3: Ch 1, sc-blo in each st across. Turn. (8, 9, 10 sc)
Repeat Rows 2 and 3 until strap measures 4 in / 10 cm (4.5 in / 11.5 cm, 5 in / 13 cm) from beginning. Fasten off, leaving an 18 in / 46 cm tail for seaming. Set straps aside.
Section 2: Bodice Front Panel
Using Yarn A and G-6 hook, chain 78 (87, 96).
Row 1 (RS): Sc in 2nd ch from hook and in each ch across. Turn. (77, 86, 95 sc)
Row 2 (WS): Ch 1, sc in each st across. Turn. (77, 86, 95 sc)
Row 3 (RS): Ch 1, sc in each st across. Turn. (77, 86, 95 sc)
Row 4 (WS, Bobble Row): Ch 1, sc in first 2 sts. (Bo in next st, sc in next 2 sts) rep across, ending with sc in last 2 sts. Turn. (77, 86, 95 sts)
Row 5 (RS): Ch 1, sc in each st across. Turn. (77, 86, 95 sc)
Row 6 (WS): Ch 1, sc in each st across. Turn. (77, 86, 95 sc)
Row 7 (RS): Ch 1, sc in each st across. Turn. (77, 86, 95 sc)
Row 8 (WS, Bobble Row): Ch 1, sc in first 2 sts. (Bo in next st, sc in next 2 sts) rep across, ending with sc in last 2 sts. Turn. (77, 86, 95 sts)
Row 9 (RS): Ch 1, sc in each st across. Turn. (77, 86, 95 sc)
Row 10 (WS): Ch 1, sc in each st across. Turn. (77, 86, 95 sc)
Rows 11 through 16: Rep Rows 9 and 10 three more times. (77, 86, 95 sc)
Waist Shaping Rows:
Row 17 (RS): Ch 1, sc2tog, sc across to last 2 sts, sc2tog. Turn. (75, 84, 93 sc)
Row 18 (WS): Ch 1, sc in each st across. Turn. (75, 84, 93 sc)
Row 19 (RS): Ch 1, sc2tog, sc across to last 2 sts, sc2tog. Turn. (73, 82, 91 sc)
Row 20 (WS): Ch 1, sc in each st across. Turn. (73, 82, 91 sc)
Row 21 (RS): Ch 1, sc2tog, sc across to last 2 sts, sc2tog. Turn. (71, 80, 89 sc)
Row 22 (WS): Ch 1, sc in each st across. Turn. (71, 80, 89 sc)
Row 23 (RS): Ch 1, sc2tog, sc across to last 2 sts, sc2tog. Turn. (69, 78, 87 sc)
Row 24 (WS): Ch 1, sc in each st across. Turn. (69, 78, 87 sc)
Fasten off, leaving an 18 in / 46 cm tail for side seaming. Set aside.
Checkpoint: Your front panel should measure approximately 5 in / 13 cm tall and 15.5 in / 39 cm wide at the narrowest point (Row 24).
Section 3: Bodice Back Panel
Work exactly as the Bodice Front Panel, Rows 1 through 24. At Row 24 you have (69, 78, 87 sc). Fasten off, leaving an 18 in / 46 cm tail.
Section 4: Joining Bodice and Adding Straps
Lay front and back panels with RS facing outward and WS together.
Using Yarn A, seam the side edges together using a slip stitch seam worked through both thicknesses on the WS. Seam from waist edge (Row 24) up to Row 10 on each side. Leave Rows 1 through 10 open at the top for armhole openings.
Attaching straps: Place the front panel face up. Measure in 2 in / 5 cm (2.5 in / 6.5 cm, 3 in / 7.5 cm) from each side seam along the top edge. Pin a strap to this position. Using the long tail and tapestry needle, whipstitch each strap firmly to the front top edge. Reinforce with a second pass.
Attach the other end of each strap to the back top edge directly behind the front attachment point.
Section 5: Neckline and Armhole Edge Finishing
Neckline edging: Using Yarn A, join with sl st to the front top right corner.
Rnd 1 (RS): Ch 1. Sc evenly across the front top edge (approximately 24 sc). At the corner, sc 1 in corner st. Work up the right strap outer edge, across the back top edge, down the left strap, and across the full front top. Join with sl st to first sc.
Rnd 2 (WS, Bobble edging): Ch 1. (Bo in next st, sc in next 2 sts) rep around. Sl st to join. Fasten off and weave in end.
Armhole edging (each armhole): Join Yarn A at side seam base of armhole.
Rnd 1 (RS): Ch 1. Sc evenly around armhole opening (approximately 28, 32, 36 sc). Join with sl st. (28, 32, 36 sc)
Rnd 2: Ch 1. Sc in each st around. Join with sl st. Fasten off and weave in end.
Checkpoint: The finished bodice should measure approximately 6 in / 15 cm tall (6.5 in / 16.5 cm, 7 in / 18 cm) from underarm to waist edge. The waist opening should measure approximately 28 in / 71 cm around (32 in / 81 cm, 36 in / 91 cm).
Section 6: Skirt (Ribbed Rectangle)
The skirt is worked as a flat rectangle. The height becomes the skirt length, and the width becomes the circumference. This creates vertical ribbing columns.
Using 2 strands of Yarn A held together, chain 65 (70, 75).
Row 1 (RS): Sc in 2nd ch from hook and in each ch across. Turn. (64, 69, 74 sc)
Row 2 (WS): Ch 1, sc-blo in each st across. Turn. (64, 69, 74 sc)
Row 3 (RS): Ch 1, sc-blo in each st across. Turn. (64, 69, 74 sc)
Repeat Rows 2 and 3, following the ombre color sequence in the Pattern Notes, until the skirt rectangle measures:
Fasten off, leaving a 24 in / 61 cm tail.
Section 7: Seaming and Gathering the Skirt
Hold the first and last row of the skirt rectangle together with RS facing inward. Using Yarn A and a tapestry needle, whipstitch the two short edges together along the full 64 (69, 74) stitch edge. This creates a tube. Turn RS out.
Running stitch gathering: Cut a 60 in / 152 cm length of Yarn A. Thread onto tapestry needle. Work a running stitch through every other stitch along the top edge of the skirt tube (the waist edge where ombre begins with deep coral). Gently pull to gather the top edge to match the waist circumference of the bodice (28, 32, 36 in). Distribute gathers evenly and knot temporarily.
Section 8: Attaching Skirt to Bodice
Place the bodice over the gathered skirt top edge with RS of both pieces facing outward. Align the gathered edge with the waist edge of the bodice.
Using Yarn A and G-6 hook, join yarn at the side seam of the bodice waist edge.
Joining round: Ch 1. Working through both the bodice waist edge and the gathered skirt top edge simultaneously, sc evenly around. Catch approximately every 3rd gathered stitch to maintain even distribution. Work 1 sc per stitch of the bodice waist edge. Join with sl st. (69, 78, 87 sc)
Fasten off and weave in end.
Section 9: Hem Edging
Using 2 strands of Yarn A held together, join with sl st to the hem edge at the seam.
Hem Rnd 1: Ch 1. Sc in each row-end st around the hem (approximately 440, 490, 545 sts). Join with sl st.
Hem Rnd 2: Ch 1. Sc in each st around. Join with sl st. Fasten off and weave in all ends.
Blocking and Finishing Your Crochet Dress
Wet blocking is essential for this dress. Submerge in cool water with gentle soap for at least 20 minutes. Gently press out excess water without wringing.
Lay the dress flat on blocking mats. Spread the skirt into a full circle and pin the hem to maintain its shape. Pin the bodice to the correct measurements and the straps straight.
Allow to dry completely, which may take 24 to 48 hours. Do not hang the wet dress since the weight will stretch the skirt unevenly.
A light steam after wet blocking sets the bobble textures and ribbing columns beautifully.
Care Instructions
For cotton blends, machine wash gentle cycle in cold water and lay flat to dry. For acrylic, wash gentle in warm water and lay flat. For wool, hand wash only in cool water with wool-safe detergent.
Store the dress folded flat rather than hung to prevent stretching over time.
Size Customization Tips
To size beyond S, M, L: multiply your bust circumference in inches by 4.5 stitches per inch. Divide by 2 for the front panel count and round to the nearest odd number so the bobble repeat divides evenly.
To adjust bodice height, add or remove 2-row plain sc sections between bobble rows. To adjust skirt length, add or subtract stitches from the foundation chain. To adjust skirt fullness, add or subtract rows from the rectangle.
This sunset coral textured crochet dress is genuinely one of my favorite designs I have ever put to paper. There is something about seeing that ombre gradient come together row by row that keeps you motivated through the long stretches. Take your time, trust your gauge swatch, and give yourself permission to work on this over several weeks.
If you are planning to make this dress, save this pattern to your Pinterest boards so you can find it easily when you are ready to start. And please, please leave a comment below or tag me on Instagram when you finish yours. I would absolutely love to see your color choices and how the ombre turned out for you.
