Last summer, I spent a weekend at a friend’s cabin in the woods. She had this amazing handmade bag hanging by the door, covered in little mushroom appliques, and I could not stop thinking about it. I kept imagining myself carrying something like that to farmers markets, on nature walks, or just around town feeling like I stepped out of a storybook.
Get the Ad-Free PDF Pattern
You can find the free pattern below, or you can purchase the ad-free printable PDF from my shop.
Get the Printable PDF →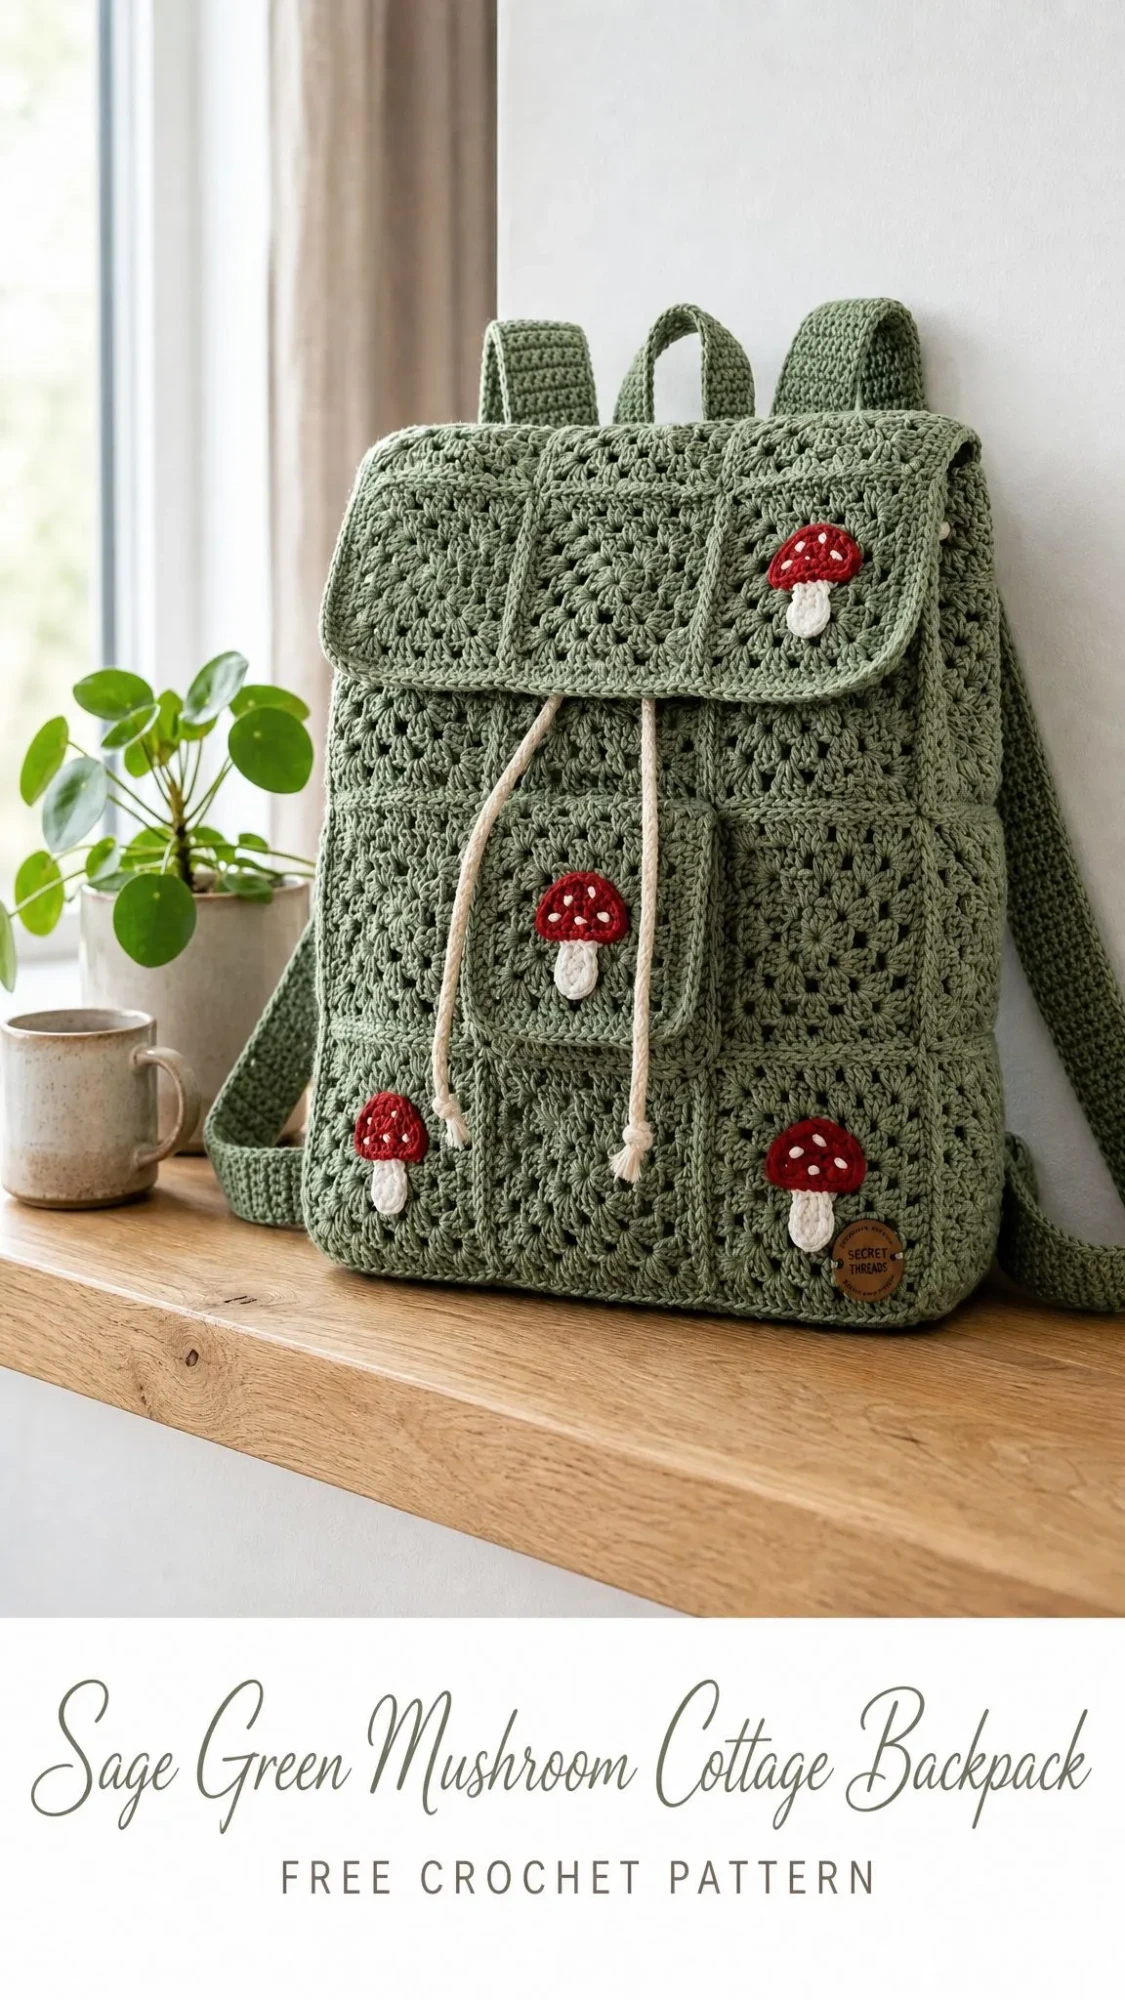
When I got home, I immediately started sketching ideas. I wanted something practical enough for everyday use but whimsical enough to spark joy every time I reached for it. The cottagecore aesthetic has my whole heart, and a backpack felt like the perfect canvas.
After months of testing and tweaking, this Sage Green Mushroom Cottage Backpack pattern is finally ready to share with you. It combines classic granny squares with a structured gusset, adjustable straps, and the cutest red and cream mushroom appliques. Let me walk you through every step.
About This Crochet Backpack Pattern
This cottagecore inspired crochet backpack pattern creates a functional, sturdy bag measuring approximately 9.5 inches wide by 11.5 inches high by 4.75 inches deep (24 x 29 x 12 cm). The construction method uses joined granny square panels with a crocheted gusset for depth, a fold over flap, a front pocket, a drawstring closure, adjustable shoulder straps, and those signature mushroom appliques.
The skill level sits at confident advanced beginner to intermediate. You will work motifs, do some seaming, attach simple hardware, and focus on neat finishing. If you have made granny squares before and feel comfortable joining pieces, you can absolutely handle this project.
Important note: This pattern uses US crochet terms throughout. UK crocheters should remember that US single crochet (sc) equals UK double crochet (dc), and US double crochet (dc) equals UK treble crochet (tr).
Materials You Will Need
Gathering your supplies before starting makes the whole process smoother. Here is everything you need for this crochet backpack tutorial:
Yarn:
Hooks:
Hardware:
Tools:
Yarn suggestions: Choose a smooth, firm worsted cotton or cotton blend. Good options include Lion Brand 24/7 Cotton, Paintbox Cotton Aran, or Lily Sugar n Cream Solids. If you substitute yarn, match the gauge and choose a fiber that holds structure. Soft acrylic may need a fabric lining for stability.
Gauge and Sizing
Getting gauge right matters for this project. Your finished pieces need to fit together properly, and the bag needs to hold its shape.
Motif gauge: One 5-round granny square measures 3.15 inches / 8 cm after blocking.
Single crochet gauge: 16 sc x 16 rows = 4 inches / 10 cm with 4.0 mm hook.
Match gauge before starting. Make a test square, block it, and measure. If yours is too big, go down a hook size. Too small? Go up a hook size.
Checkpoint: After blocking, 3 squares joined across should measure about 9.5 inches / 24 cm. If your strip is more than 0.5 inch / 1.25 cm off, change your hook size before making all your motifs.
Abbreviations and Stitch Guide
Let me break down every abbreviation you will encounter in this step by step crochet pattern:
| Abbreviation | Meaning |
|---|---|
| ch | chain |
| sl st | slip stitch |
| sc | single crochet (insert hook, yarn over, pull through, yarn over, pull through both loops) |
| hdc | half double crochet |
| dc | double crochet (yarn over, insert hook, pull through, yarn over, pull through 2 loops, yarn over, pull through remaining 2 loops) |
| tr | treble crochet |
| inc | increase (2 sc in same stitch) |
| dec | decrease (single crochet 2 together) |
| sp | space |
| st(s) | stitch(es) |
| RS / WS | right side / wrong side |
Special Stitches
Granny cluster: Work 3 dc into the indicated space. Ch-3 at the start of a granny round counts as the first dc of the first cluster.
Invisible join for squares: Hold two edges with RS up. Sew through outer loops only, aligning the 22 edge stitches on each side.
Whipstitch seam: Hold pieces WS together, sew through matching edge stitches, and pull snug without puckering.
I-cord style crochet cord: Ch the required length, then sl st in the back bump of each chain back to the start.
Pattern Notes
Ch-3 counts as 1 dc in granny rounds. Ch-1 does not count as a stitch in sc rows. Block all squares to the same size before joining. Mark the top edge of front and back panels before adding the gusset.
Left-handed note: Left-handed makers may work all rounds in the opposite direction. Keep RS facing for joining, place mushrooms to mirror the placement diagram, and thread the drawstring from the opposite eyelet if that feels more natural.
Granny Squares and Panel Plan
You will make 22 sage granny squares total. Use 18 squares for the front and back panels, 3 squares for the flap, and 1 square for the pocket front. Block each square to 3.15 inches / 8 cm.
Granny Square Instructions
Round 1: Magic ring, ch 3, 2 dc in ring, ch 2, [3 dc in ring, ch 2] 3 times, join to top of ch-3. (12 dc, 4 ch-2 corners)
Round 2: Sl st to corner sp, ch 3, 2 dc, ch 2, 3 dc in same sp, ch 1; in next corner sp work 3 dc, ch 2, 3 dc, ch 1; rep from around, join. (24 dc, 4 ch-2 corners, 4 ch-1 sps)
Round 3: Sl st to corner, work corner as above, ch 1; 3 dc in next ch-1 sp, ch 1, corner in next corner sp, ch 1; rep from around, ending before first corner, join. (36 dc, 8 side ch-1 sps, 4 corners)
Round 4: Work each corner as above and work 3 dc in each side ch-1 sp with ch 1 between clusters. (48 dc, 12 side ch-1 sps, 4 corners)
Round 5: Repeat Round 4 once more. (60 dc, 16 side ch-1 sps, 4 corners)
Edging round: Ch 1, sc in each dc and ch-1 sp, placing 3 sc in each corner sp; join. Each side has 22 edge sts including corner sc. Fasten off.
Joining Panels
Front panel: Join 9 squares in a 3 x 3 grid.
Back panel: Join 9 squares in a 3 x 3 grid.
Flap: Join 3 squares in one horizontal strip.
Pocket: Keep 1 square separate.
Checkpoint: Each 3 x 3 panel should measure about 9.5 inches / 24 cm square after seaming and a light steam block.
Body, Gusset, and Top Band
The gusset gives this backpack its structured depth. This is what transforms flat panels into a three-dimensional bag.
Gusset Strip
With sage and 4.0 mm hook, ch 21.
Row 1: Sc in 2nd ch from hook and each ch across, turn. (20 sc)
Rows 2-114: Ch 1, sc in each st across, turn. (20 sc) Fasten off, leaving a long seaming tail.
Checkpoint: Gusset should measure about 4.75 inches / 12 cm wide and 28.5 inches / 72.5 cm long. It wraps one side, the bottom, and the other side of the bag.
Attach Gusset
With RS facing out, pin the gusset around the left side, bottom, and right side of the front panel. Whipstitch evenly. Repeat to attach the back panel to the other gusset edge. Leave the top open.
Align 38 sts/edge along each front/back side section and 20 sts/edge along the bottom. Ease gently at seams; do not stretch the granny squares.
Top Band and Eyelets
Round 1: Join sage at center back top. Work 38 sc across back top, 20 sc across side gusset top, 38 sc across front top, 20 sc across other side gusset top; join. (116 sc)
Rounds 2-3: Ch 1, sc in each st around; join. (116 sc)
Round 4 (eyelets): Ch 3, skip 1, dc in next st, ch 1, skip 1, dc in next st; rep from around, ch 1, join to top of ch-3. (58 dc, 58 ch-1 sps)
Rounds 5-7: Ch 1, sc in each dc and ch-1 sp around; join. (116 sc) Fasten off.
Checkpoint: From bottom to top band, bag height should be about 11.5 inches / 29 cm.
Flap, Pocket, and Drawstring
Flap Border
Join the 3-square strip. With RS facing, join sage in the top right corner.
Border Round 1: Ch 1, work 176 sc evenly around the strip, placing markers in the 4 outside corner sts; join. (176 sc)
Border Round 2: Ch 1, sc around, placing 3 sc in each marked corner st; join. (184 sc)
Border Round 3: Ch 1, sc around, placing 3 sc in each corner st; join. (192 sc) Fasten off.
Sew the long top edge of the flap to the back of the top band, centered over the back panel. The flap folds over the drawstring opening.
Front Pocket
Use the remaining granny square as the pocket front. Work one sc round around the square, placing 3 sc in each corner. Pin to the front center lower panel, leaving the top open. Sew around sides and bottom only.
Optional pocket lip: Join sage at top-right corner of pocket. Row 1: ch 1, sc across top edge. (22 sc) Rows 2-3: ch 1, sc across. (22 sc) Fasten off and sew side edges down.
Drawstring
Make a 45 inch / 114 cm crochet cord or use cotton cord. Thread through Round 4 eyelets, entering and exiting at center front. Add knots or small tassels to the ends.
Fit tip: If the top opening feels tight, make the cord longer by 5 to 8 inches / 13 to 20 cm so the flap can lift easily.
Straps, Handle, and Hardware
Adjustable Shoulder Straps (Make 2)
With sage and 4.0 mm hook, ch 8.
Row 1: Sc in 2nd ch from hook and each ch across, turn. (7 sc)
Rows 2-126: Ch 1, sc in each st across, turn. (7 sc) Strap should measure about 31.5 inches / 80 cm unstretched. Fasten off.
Thread each strap through a 1 inch / 25 mm slider. Sew one end securely to the upper back panel and the other end to the lower back corner or D-ring. Repeat for second strap. Box-stitch the sewn ends by hand with several passes of yarn.
Top Grab Handle
Ch 8. Row 1: sc in 2nd ch from hook and each ch across. (7 sc) Rows 2-28: ch 1, sc in each st across. (7 sc) Fasten off. Sew ends to the top back band, centered between shoulder straps.
Durability checkpoint: Tug each strap firmly before use. If stitches stretch or gaps appear, add more securing passes through the strap end and bag body.
Optional Lining
For everyday use, add a simple fabric lining or inner canvas panel. Cut a rectangle to match the inside front/back and a strip for the gusset, sew into a bucket shape, then hand-stitch just below the top band.
Mushroom Appliques
These adorable mushrooms are what make this backpack truly special. You will make 5 complete mushrooms.
Mushroom Cap (Make 5)
With red and 3.5 mm hook, ch 9.
Row 1: Sc in 2nd ch from hook and each ch across, turn. (8 sc)
Row 2: Ch 1, inc, sc 6, inc, turn. (10 sc)
Row 3: Ch 1, sc in each st across, turn. (10 sc)
Row 4: Ch 1, dec, sc 6, dec. (8 sc) Do not turn.
Curved edge: Ch 1, work 10 sc evenly around the rounded top edge and 8 sc across the lower edge; join. (18 sc) Fasten off.
The finished cap measures approximately 1.4 inches / 3.5 cm wide by 1.8 inches / 4.5 cm tall.
Stem (Make 5)
With cream, ch 5. Row 1: sc in 2nd ch from hook and each ch across, turn. (4 sc) Rows 2-5: ch 1, sc across. (4 sc) Row 6: ch 1, dec twice. (2 sc) Fasten off.
Assemble Mushrooms
Sew stem behind lower center of cap. Add 4 to 6 cream French knots or tiny straight stitches on each cap for the signature spots. Place mushrooms on flap right, pocket center, lower left front, lower right front, and side/front edge. Sew around each piece with matching yarn.
Final Finishing and Care
Finishing Steps
Weave in all ends. Steam block lightly from the wrong side, avoiding hardware. Shape the body with towels inside until dry. Attach optional small faux leather style label or leave plain.
Care Instructions
Hand wash cold. Press water out gently in a towel. Reshape and dry flat. Do not bleach. Do not iron appliques or hardware.
Troubleshooting Common Issues
| Problem | Fix |
|---|---|
| Squares are different sizes | Block all motifs to 3.15 inches / 8 cm; remake any square more than 0.25 inch / 6 mm off |
| Panel ripples after joining | Seams are too tight or squares are over-blocked. Reseam with looser outer-loop stitches |
| Gusset does not reach around panels | Add sc rows before attaching; 4 rows add about 1 inch / 2.5 cm |
| Top edge flares | Work Round 1 of top band with fewer picked-up sts at sides, keeping an even total |
| Straps stretch | Use cotton, tighter hook, or add fabric/webbing backing before sewing hardware |
| Mushrooms curl | Steam lightly from WS and sew around the full edge, not only the center |

Size Customization Tips
Wider bag: Add one square to each row of the front/back panels and add 22 rows to the gusset for each extra square across the bottom.
Taller bag: Add one row of squares to front/back and add 22 rows to each side portion of the gusset.
Deeper bag: Make the gusset wider by adding chains; every 4 extra sc adds about 1 inch / 2.5 cm depth.
Keep the top band count even so the eyelet round works cleanly. If your top band count changes, use an even number and work the eyelet round as ch 1, skip 1, dc in next st around.
Maker tip: For a sturdier market bag feel, work the gusset and straps through back loops only on every other row. This adds subtle ridges and reduces stretch.
Thank you so much for choosing this pattern for your next crochet project! I genuinely hope you love making this cottagecore backpack as much as I loved designing it. If you create one, I would absolutely love to see it. Tag me on Instagram or share a photo in my Facebook group.
If this pattern inspired you, go ahead and save it to your Pinterest boards so you can find it easily when you are ready to start. And please drop a comment below if you make one. I love hearing how your projects turn out!
Want a Quick & Easy Printable Version?
Get a clean, beautifully formatted PDF of this pattern — easy to follow step by step, ready to print or save on any device. No scrolling, no distractions, just the pattern.
Get the Printable PDF →