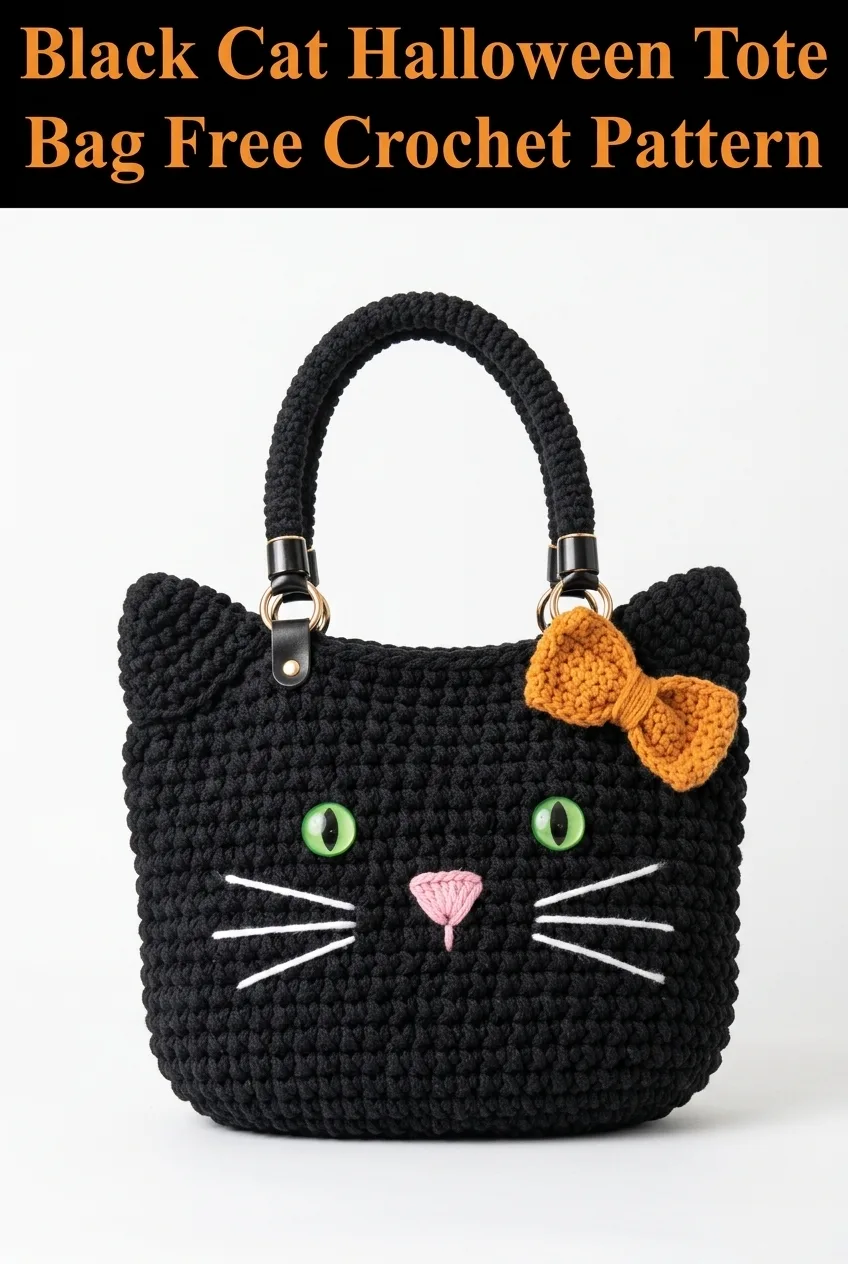
I call this one "Midnight," and she came to life in my notebook about three years ago when I was sketching ideas for my niece’s trick-or-treat bag. My niece was going through an intense black cat phase, and I wanted to make her something she would actually use beyond October 31st. The original design was much simpler, but over the years I kept refining the shape, adjusting the ears, and perfecting that sassy little bow. Now Midnight is finally ready to share with you, and I think she turned out absolutely perfect for cat lovers and Halloween enthusiasts alike.
Why You’ll Love This Black Cat Halloween Tote Bag Crochet Pattern
This black cat tote bag is the kind of project that looks incredibly impressive but is actually quite straightforward to make. The body of the bag uses basic single crochet worked in continuous rounds, which means no joining, no turning chains, and no fussy stitch counting at the end of every round. The chunky yarn works up fast, so you can realistically finish this bag in a weekend.
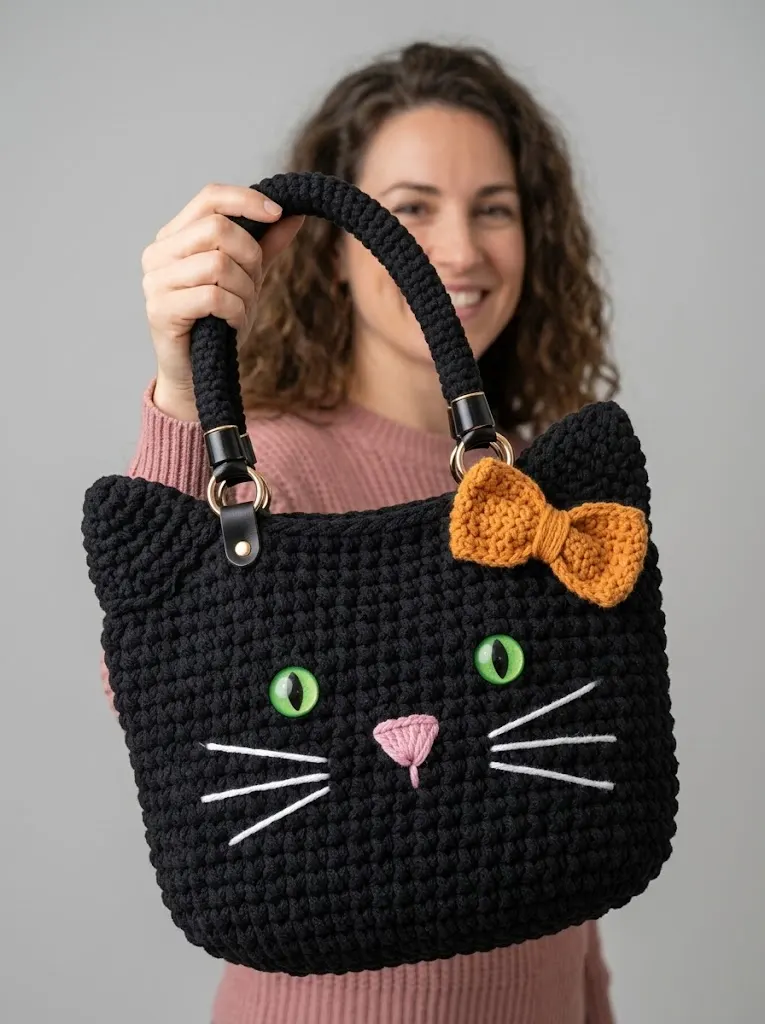
What makes this crochet pattern special is the construction. You are essentially making a large stuffed cat head shape with integrated ears, then adding a crocheted handle with hardware attachments. The face details are embroidered and attached separately, which gives you complete control over placement and expression.
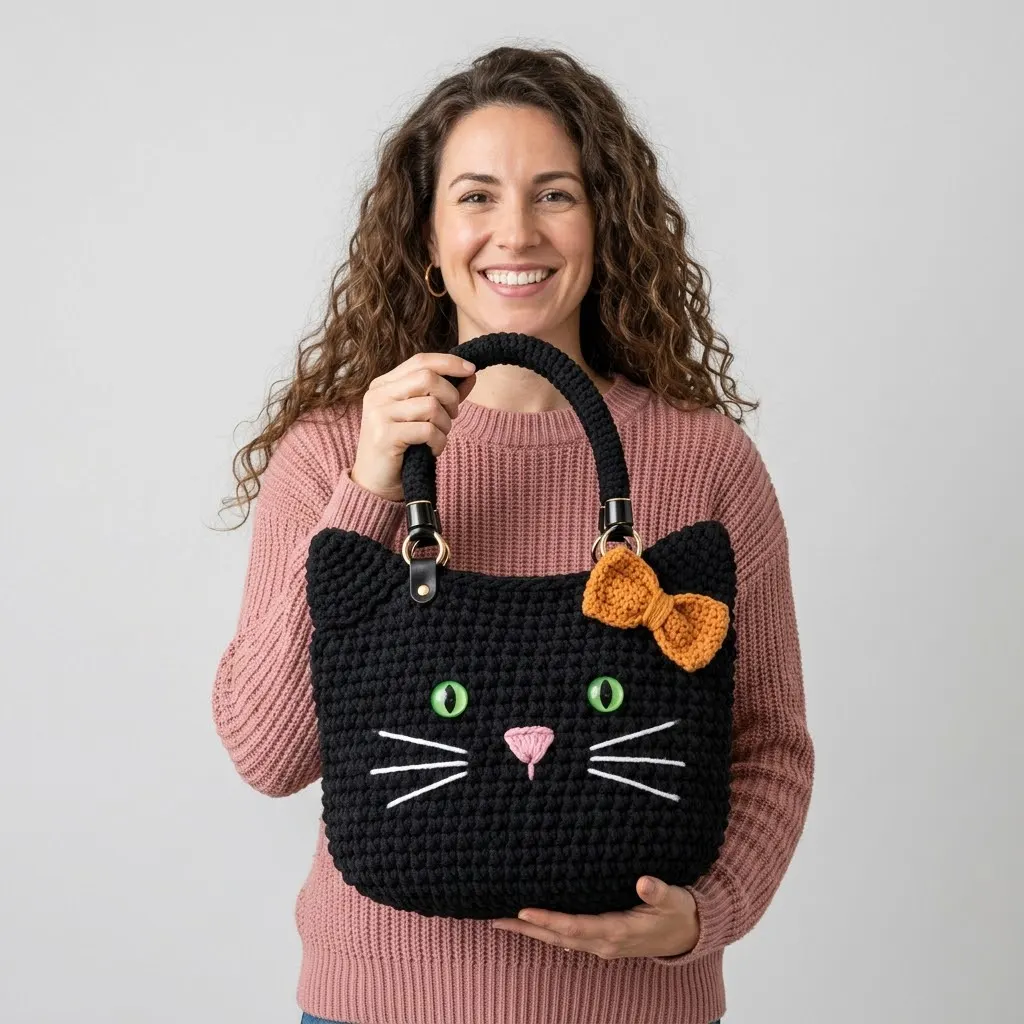
The finished bag measures approximately 12 inches wide by 10 inches tall, not including the ears or handle. It is the perfect size for carrying everyday essentials, collecting Halloween candy, or giving as a gift to the cat lover in your life.
Skill Level
Intermediate beginner. If you can single crochet in the round and follow a basic increase pattern, you can make this bag. The shaping is gradual and predictable. The trickiest part is the assembly, but I will walk you through every step.
Materials Needed
Yarn:
Hook:
Notions:
Gauge
With 8.0mm hook and super bulky yarn: 10 single crochet stitches and 11 rows = 4 inches in single crochet worked in the round.
Gauge matters here because it affects the final size and structure of your bag. Take a few minutes to check yours before starting.
Abbreviations and Stitch Definitions
ch = chain: Wrap yarn over hook, pull through loop on hook
sc = single crochet: Insert hook into stitch, yarn over, pull up a loop (2 loops on hook), yarn over, pull through both loops
inc = invisible increase: Work 2 single crochet stitches into the same stitch
dec = invisible decrease: Insert hook through front loops only of the next 2 stitches, yarn over, pull through both front loops, yarn over, pull through both loops on hook
sl st = slip stitch: Insert hook into stitch, yarn over, pull through stitch and loop on hook in one motion
FO = fasten off
Black Cat Tote Bag Crochet Pattern Instructions
Front Panel (Make 2)
You will make two identical panels and join them together. Each panel creates the cat face shape with integrated ears.
Foundation:
With MC and 8.0mm hook, ch 2.
Round 1: Work 6 sc into the second ch from hook. Place stitch marker in first stitch. (6 sts)
Round 2: Inc in each st around. (12 sts)
Round 3: *Sc 1, inc* repeat around. (18 sts)
Round 4: *Sc 2, inc* repeat around. (24 sts)
Round 5: *Sc 3, inc* repeat around. (30 sts)
Round 6: *Sc 4, inc* repeat around. (36 sts)
Round 7: *Sc 5, inc* repeat around. (42 sts)
Round 8: *Sc 6, inc* repeat around. (48 sts)
Round 9: *Sc 7, inc* repeat around. (54 sts)
Round 10: *Sc 8, inc* repeat around. (60 sts)
Rounds 11-20: Sc in each st around. (60 sts)
Do not fasten off. You will now shape the top edge and ears.
Shaping the Ears
The ears are created by working back and forth on sections of your round.
First Ear:
Row 1: Sc 12, turn. (12 sts)
Row 2: Ch 1, skip first st, sc 10, skip last st, turn. (10 sts)
Row 3: Ch 1, skip first st, sc 8, skip last st, turn. (8 sts)
Row 4: Ch 1, skip first st, sc 6, skip last st, turn. (6 sts)
Row 5: Ch 1, skip first st, sc 4, skip last st, turn. (4 sts)
Row 6: Ch 1, skip first st, sc 2, skip last st. (2 sts)
FO and weave in end.
Middle Section:
Rejoin yarn with sl st in the next unworked stitch from Round 20. Sc 24 across the top. FO.
Second Ear:
Rejoin yarn with sl st in the next unworked stitch.
Row 1: Sc 12, turn. (12 sts)
Repeat Rows 2-6 from First Ear instructions.
FO and weave in end.
Make a second panel identical to the first.
Attaching the Eyes
Before joining your panels, you need to attach the safety eyes to one panel only. This will be your front panel.
Position the eyes approximately 3 inches apart and about 4 inches up from the bottom center of the panel. The exact placement is up to you, but I recommend laying out both eyes before committing. Once you are happy with the placement, push the post through the fabric and secure with the washer backing.
Tip: If you are nervous about placement, use pins or small pieces of tape to mark your spots first. You cannot remove safety eyes once they are secured, so take your time here.
Joining the Panels
Hold both panels together with wrong sides facing each other. The right sides should both be facing outward.
Using MC and your 8.0mm hook, join with a sl st through both layers at the bottom center of the bag.
Work sc through both layers evenly around the entire edge of the bag, including up and around both ears. When you reach the top opening between the ears, work through the single layer only to create the bag opening.
Continue around the second ear and down the other side, then along the bottom until you reach your starting point.
Sl st to first sc. FO.
The Handle
With MC and 8.0mm hook, ch 4. Sl st to first ch to form a ring.
Round 1: Work 8 sc into the ring. Place marker. (8 sts)
Rounds 2-60: Sc in each st around. (8 sts)
Your handle should measure approximately 24 inches long. Adjust the number of rounds if you prefer a longer or shorter handle.
Sl st to next st. FO, leaving a long tail for attaching.
Optional: Lightly stuff the handle with poly-fil as you work to give it more body and structure. This step is not required but creates a nicer finished look.
Attaching the Handle Hardware
Thread the end of your handle through the D-ring of your swivel clasp hardware. Fold the end back on itself by about 1 inch and whip stitch securely in place. Repeat on the other end.
Clip the swivel clasps to the top corners of your bag, positioning them at the base of each ear.
The Bow (Optional)
The bow adds personality and is perfect for customizing your bag. You can make it in any color you like.
With Contrast Color A and 5.0mm hook, ch 16.
Row 1: Sc in second ch from hook and in each ch across, turn. (15 sts)
Rows 2-8: Ch 1, sc in each st across, turn. (15 sts)
FO, leaving a long tail.
Fold the rectangle so the short ends meet in the center. Wrap the tail around the middle several times to cinch and create the bow shape. Secure with a few stitches.
Sew the bow to the top of one ear using your yarn needle.
The Nose
With Contrast Color B and 5.0mm hook, ch 2.
Row 1: Work 3 sc in second ch from hook, turn. (3 sts)
Row 2: Ch 1, inc, sc 1, inc. (5 sts)
FO, leaving a tail for sewing.
This creates a small triangle shape. Sew it to the center of the face, below and between the eyes.
The Whiskers
Cut 6 pieces of white yarn, each approximately 6 inches long. Using your yarn needle, draw each piece through the fabric on either side of the nose. Three whiskers on each side works perfectly.
Trim to your desired length and adjust the angles so they fan out naturally.
Tips for Success with This Crochet Tutorial
Choosing the right yarn: The chunky tube-style yarn gives this bag its signature puffy texture. If you substitute a different yarn, your finished bag may look quite different. Cotton blends work well because they hold their shape without stretching.
Working in continuous rounds: Unlike joined rounds, continuous rounds spiral upward without a seam. Your stitch marker is essential for tracking where each round begins. Move it up every round.
Safety eye alternatives: If you are making this bag for a young child, consider embroidering the eyes instead of using plastic safety eyes. You can also use large buttons sewn securely in place.
Reinforcing the hardware: The handles take a lot of stress when the bag is full. Reinforce your stitching around the D-rings to prevent them from pulling loose over time.
Customization Ideas
This black cat tote bag crochet pattern is wonderfully versatile. Try these variations:
Caring for Your Finished Bag
Spot clean only. The chunky yarn and safety eyes make machine washing risky. If your bag gets dirty, use a damp cloth with mild soap and let it air dry completely.
I hope you love making Midnight as much as I loved designing her. This black cat Halloween tote bag crochet pattern has become one of my absolute favorites to gift, and I think it will be a hit in your life too.
If you make this bag, I would absolutely love to see it! Share your finished project on Instagram or Facebook and tag me so I can admire your work. Every version of Midnight I see makes my day.
Save this pattern to your Pinterest boards so you can find it when you are ready to start, and please drop a comment below if you give it a try. I read every single one, and hearing about your projects honestly makes my whole week. Happy crocheting!
