You know that gorgeous skein you’ve been saving? The one that’s too pretty to waste on just anything? This is the project it’s been waiting for. Go dig it out right now because this elegant peplum top is worth every yard of your special stash yarn. The construction is actually fascinating. You’ll work the fitted bodice first, then add those dramatic balloon sleeves separately, and finish with a flared peplum skirt that swings beautifully when you move. I won’t lie to you. This is an intermediate to advanced project. But if you’ve made garments before and you’re comfortable with shaping, you can absolutely do this.
About This Crochet Peplum Top Pattern
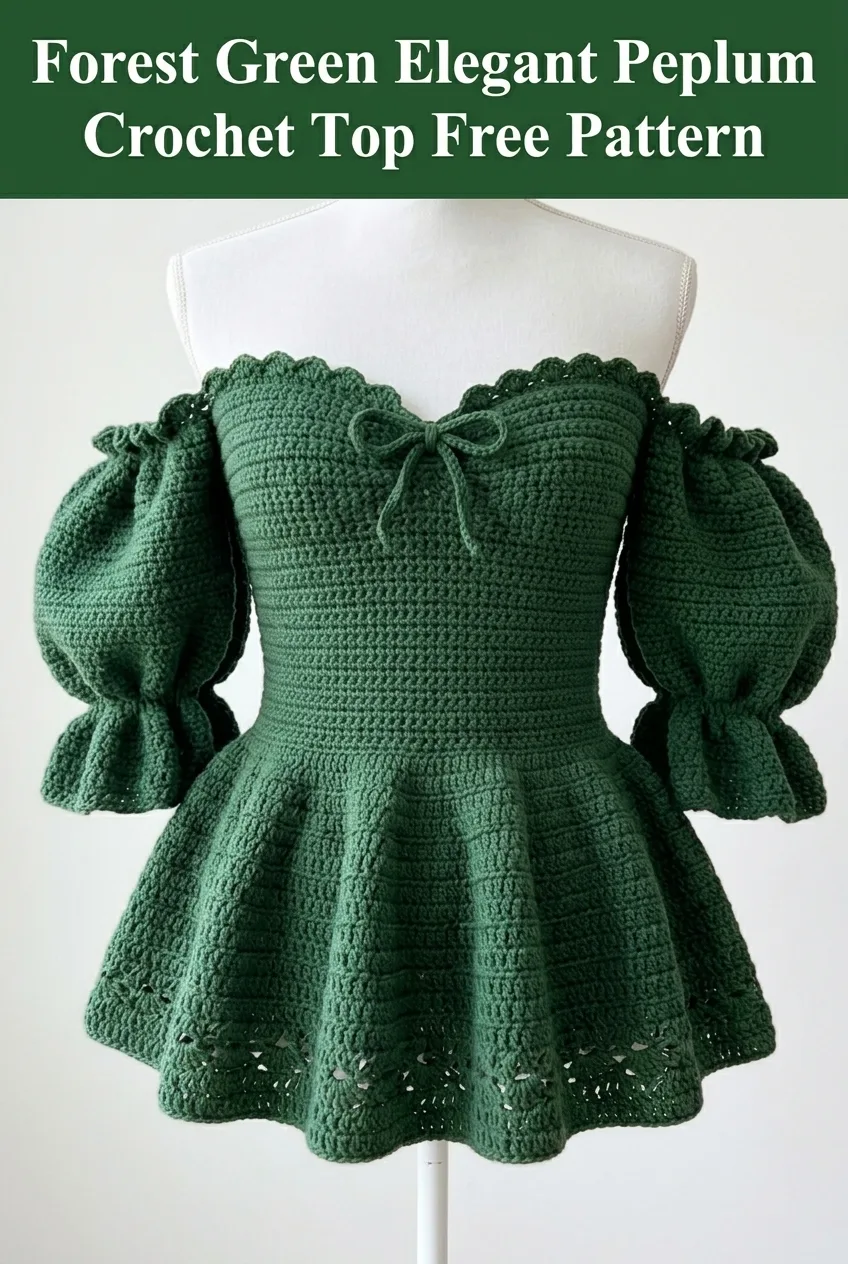
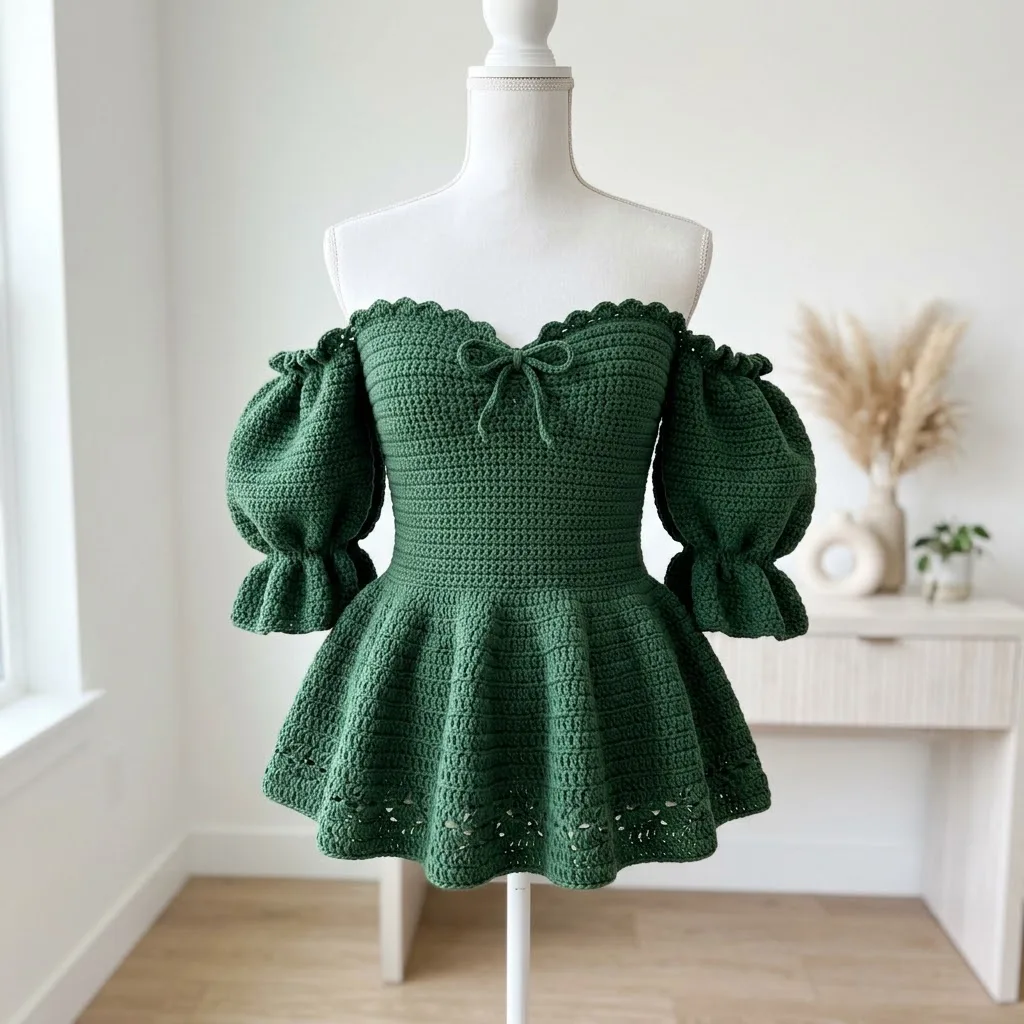
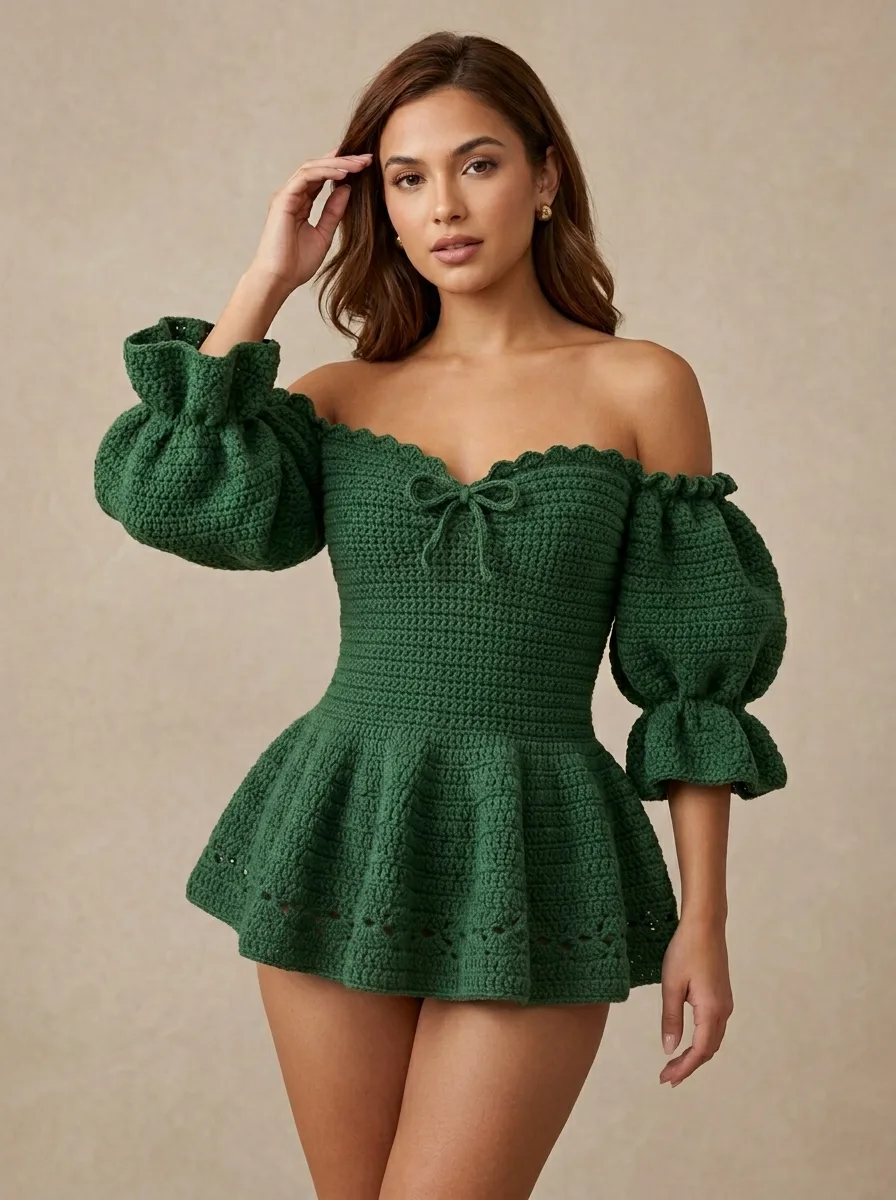
This stunning off-the-shoulder peplum top features a sweetheart neckline with a delicate scalloped edge, dramatic balloon sleeves with ruffled cuffs, a fitted bodice, and a gorgeous flared peplum skirt with an eyelet border. The deep forest green color showcases the stitch texture beautifully, but this design would look equally striking in jewel tones, pastels, or classic black.
The bodice uses a combination of single crochet (sc) and half double crochet (hdc) worked in rows to create that ribbed texture you see running horizontally across the fitted section. The peplum skirt achieves its dramatic flare through strategic increases worked into a shell stitch pattern. Those showstopping balloon sleeves? They’re worked separately in the round with increases at the elbow and gathered elastic at both ends.
This crochet pattern creates a garment that looks like it belongs on a runway, but breaks down into manageable components that you’ll piece together at the end.
Skill Level
Intermediate to Advanced
You should be comfortable with:
Don’t let that scare you off if you’re an ambitious beginner. I’ll walk you through every section, and you can always reach out if you get stuck.
Finished Measurements
This pattern is written for size Small with a fitted bodice.
For larger sizes, add multiples of your stitch repeat to the foundation chain and adjust sleeve circumference accordingly.
Materials Needed
Yarn:
A yarn with good drape is essential here. Stiff acrylic will not give you that beautiful flow in the peplum and sleeves. Look for cotton, bamboo, Tencel blends, or a soft mercerized cotton.
Hook:
Notions:
Gauge
18 stitches and 20 rows = 4 inches (10 cm) in single crochet
Please, please check your gauge. I know it’s tedious, but garments absolutely require accurate gauge or nothing will fit properly. Make a 5 inch swatch, wash and block it the way you’ll care for the finished top, then measure.
Abbreviations and Stitch Definitions
Let me walk you through every stitch you’ll need. Even if you know these, a quick refresher never hurts.
ch = chain: Yarn over, pull through the loop on your hook. This creates the foundation for your work.
sl st = slip stitch: Insert hook, yarn over, pull through both the stitch and the loop on your hook in one motion. Used for joining and moving across stitches without adding height.
sc = single crochet: Insert hook into stitch, yarn over and pull up a loop (2 loops on hook), yarn over and pull through both loops. The shortest basic stitch.
hdc = half double crochet: Yarn over, insert hook into stitch, yarn over and pull up a loop (3 loops on hook), yarn over and pull through all 3 loops. Slightly taller than sc with a nice drape.
dc = double crochet: Yarn over, insert hook into stitch, yarn over and pull up a loop (3 loops on hook), yarn over and pull through 2 loops (2 loops remain), yarn over and pull through remaining 2 loops. Creates a taller, more open fabric.
sc2tog = single crochet 2 together (decrease): Insert hook into first stitch, yarn over and pull up a loop, insert hook into next stitch, yarn over and pull up a loop (3 loops on hook), yarn over and pull through all 3 loops. Turns 2 stitches into 1.
2 sc in st = increase: Work 2 single crochet stitches into the same stitch.
shell = (2 dc, ch 1, 2 dc) all worked into the same stitch or space. Creates a fan-like cluster.
Pattern Notes
Step by Step Crochet Pattern Instructions
Bodice Back Panel
Foundation: Ch 73.
Row 1: Sc in 2nd ch from hook and in each ch across. Turn. (72 sc)
Row 2: Ch 1, working in back loops only (BLO), sc in each st across. Turn. (72 sc)
Working in the back loop only creates those beautiful horizontal ridges you see in the finished piece. This is what gives the bodice that ribbed, almost smocked appearance.
Rows 3 through 40: Repeat Row 2. (72 sc)
Your back panel should measure approximately 8 inches wide and 10 inches tall at this point.
Armhole Shaping:
Row 41: Ch 1, sl st in first 6 sts, ch 1, sc in BLO across next 60 sts, leave remaining 6 sts unworked. Turn. (60 sc)
Row 42: Ch 1, sc2tog, sc in BLO across to last 2 sts, sc2tog. Turn. (58 sc)
Rows 43 through 46: Repeat Row 42. (50 sc after Row 46)
Rows 47 through 50: Ch 1, sc in BLO across. Turn. (50 sc)
Fasten off and weave in ends.
Bodice Front Panel
Work the same as the Back Panel through Row 40.
Armhole and Sweetheart Neckline Shaping:
Row 41: Ch 1, sl st in first 6 sts, ch 1, sc in BLO in next 28 sts. Turn, leaving remaining sts unworked. You are now working the left front. (28 sc)
Row 42: Ch 1, sc2tog, sc in BLO across to last 2 sts, sc2tog. Turn. (26 sc)
Row 43: Ch 1, sc in BLO across to last 2 sts, sc2tog. Turn. (25 sc)
Rows 44 through 50: Continue decreasing 1 st at neck edge every row while keeping armhole edge straight. (18 sc after Row 50)
Fasten off.
Right Front:
Skip center 8 stitches on Row 41 for the center front opening. Join yarn and work the right side as a mirror image of the left, reversing all shaping.
Scalloped Neckline Edge
Join yarn at right back shoulder.
Round 1: Ch 1, sc evenly around entire neckline opening, working approximately 3 sc for every 2 row ends. Join with sl st.
Round 2: Ch 1, *sc in next st, skip 1 st, 5 dc in next st (scallop made), skip 1 st. Repeat from * around, adjusting as needed for smooth scallops. Join with sl st.
Fasten off.
Bow Tie Detail
Ch 80. Sc in 2nd ch from hook and in each ch across. (79 sc)
Fasten off, leaving a long tail. Thread through the center front neckline and tie in a bow. This is such a sweet detail that really finishes the look.
Balloon Sleeves (Make 2)
The sleeves are the showstopper of this top. They puff dramatically at the upper arm and gather at both ends with elastic.
Cuff Ruffle:
Ch 60. Join with sl st to form a ring, being careful not to twist.
Round 1: Ch 1, sc in each ch around. Join. (60 sc)
Rounds 2 through 4: Ch 1, sc in each st around. Join. (60 sc)
Round 5 (Increase Round): Ch 1, *sc in next 2 sts, 2 sc in next st. Repeat from * around. Join. (80 sc)
Rounds 6 through 10: Ch 3 (counts as dc), dc in each st around. Join. (80 dc)
Round 11 (Increase Round): Ch 3, *dc in next 3 sts, 2 dc in next st. Repeat from * around. Join. (100 dc)
Rounds 12 through 20: Ch 3, dc in each st around. Join. (100 dc)
Round 21 (Increase Round): Ch 3, *dc in next 4 sts, 2 dc in next st. Repeat from * around. Join. (120 dc)
Rounds 22 through 28: Ch 3, dc in each st around. Join. (120 dc)
This creates the balloon effect. Your sleeve should be puffing out beautifully now.
Round 29 (Decrease Round): Ch 3, *dc in next 4 sts, dc2tog. Repeat from * around. Join. (100 dc)
Round 30: Ch 3, *dc in next 3 sts, dc2tog. Repeat from * around. Join. (80 dc)
Rounds 31 through 33: Ch 1, sc in each st around. Join. (80 sc)
Round 34 (Gathering Round): Ch 1, *sc in next st, skip 1 st. Repeat from * around. Join. (40 sc)
Fasten off, leaving a long tail for seaming.
Ruffle Edge at Shoulder:
Join yarn at gathering round.
Round 1: Ch 1, 2 sc in each st around. Join. (80 sc)
Round 2: Ch 1, *sc, skip 1, 5 dc in next st, skip 1. Repeat from * around. Join.
Fasten off.
Peplum Skirt
The peplum is worked directly onto the bottom edge of the joined bodice.
With right side facing, join yarn at center back seam along the bottom edge of the bodice.
Round 1: Ch 1, sc evenly around entire bottom edge, working approximately 144 sc total (adjust to a multiple of 6). Join. (144 sc)
Round 2: Ch 3 (counts as dc), dc in each st around. Join. (144 dc)
Round 3 (Increase Round): Ch 3, *dc in next 2 sts, 2 dc in next st. Repeat from * around. Join. (192 dc)
Rounds 4 through 6: Ch 3, dc in each st around. Join. (192 dc)
Round 7 (Shell Pattern Begins): Ch 3, dc in same st, *skip 2 sts, shell in next st, skip 2 sts, dc in next st. Repeat from * around, ending with shell, skip 2, join.
Rounds 8 through 12: Continue shell pattern, working shells into the ch-1 space of previous shells and dc between shells.
Round 13 (Eyelet Border): Ch 4 (counts as dc plus ch 1), *skip 1 st, dc in next st, ch 1. Repeat from * around. Join.
Round 14: Ch 1, sc in each dc and ch-1 space around. Join.
Fasten off.
Assembly
1. Seam the bodice: With right sides together, whip stitch or mattress stitch the back seam closed.
2. Attach sleeves: Pin the gathered top edge of each sleeve to the armhole opening, easing fullness evenly. Whip stitch in place.
3. Thread elastic: Using a yarn needle, thread 1/4 inch elastic through the cuff gathering rounds. Adjust to fit comfortably around your arm and secure.
4. Weave in all ends: Take your time here. A garment this beautiful deserves tidy finishing.
5. Block: Wet block your finished top, pinning the peplum to encourage the flare and shaping the sleeves. Let dry completely.
Styling Your Crochet Peplum Top
This top pairs beautifully with high-waisted skirts, fitted pants, or even over a simple slip dress as a statement overlay piece. The off-shoulder style is perfect for special occasions, date nights, or anytime you want to feel like the main character.
Consider making this in ivory or champagne for bridal events, deep burgundy for fall celebrations, or classic black for maximum versatility.
Final Thoughts
I truly hope you love making this elegant peplum crochet top as much as I enjoyed designing it. The combination of fitted bodice, dramatic balloon sleeves, and flirty peplum skirt creates something that feels couture but is absolutely achievable for a dedicated crocheter. Take your time with each component, trust the process, and don’t hesitate to try things on as you go.
If you make this top, I would absolutely love to see it. Tag me on Instagram or share a photo in my Facebook group. Seeing your versions honestly makes my whole day.
Go ahead and save this pattern to your Pinterest boards so you can find it when you’re ready to start. And if you do make it, please drop a comment below. I love hearing which yarn you chose and how the project turned out for you. Happy crocheting, friend.
