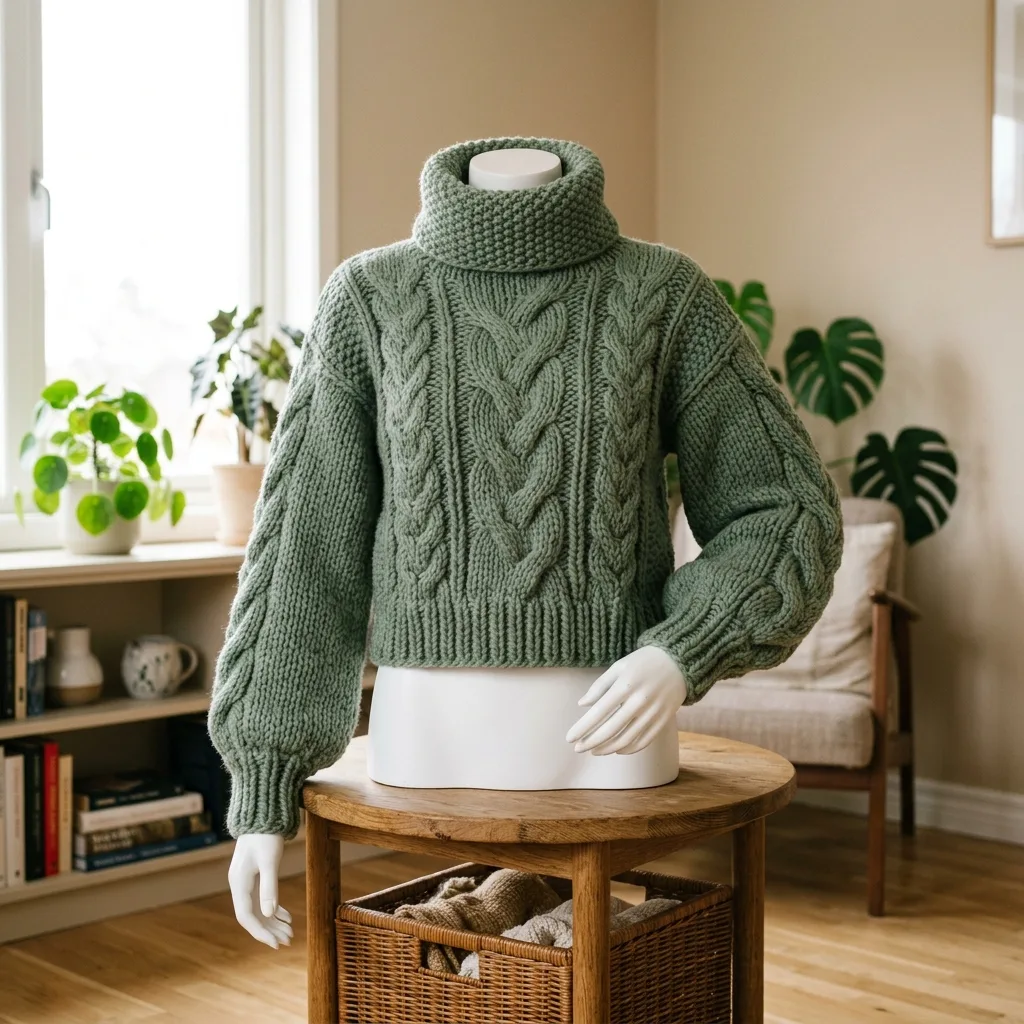
I have been dreaming about creating a crochet sweater that captures that classic cable knit look without actually needing knitting needles. This sage green crop sweater is exactly what I envisioned. I wanted cozy turtleneck warmth, stunning texture that looks way harder than it is, and a cropped modern silhouette that pairs perfectly with high-waisted jeans. After testing different cable techniques and adjusting the fit multiple times, I am SO pleased with how this turned out!
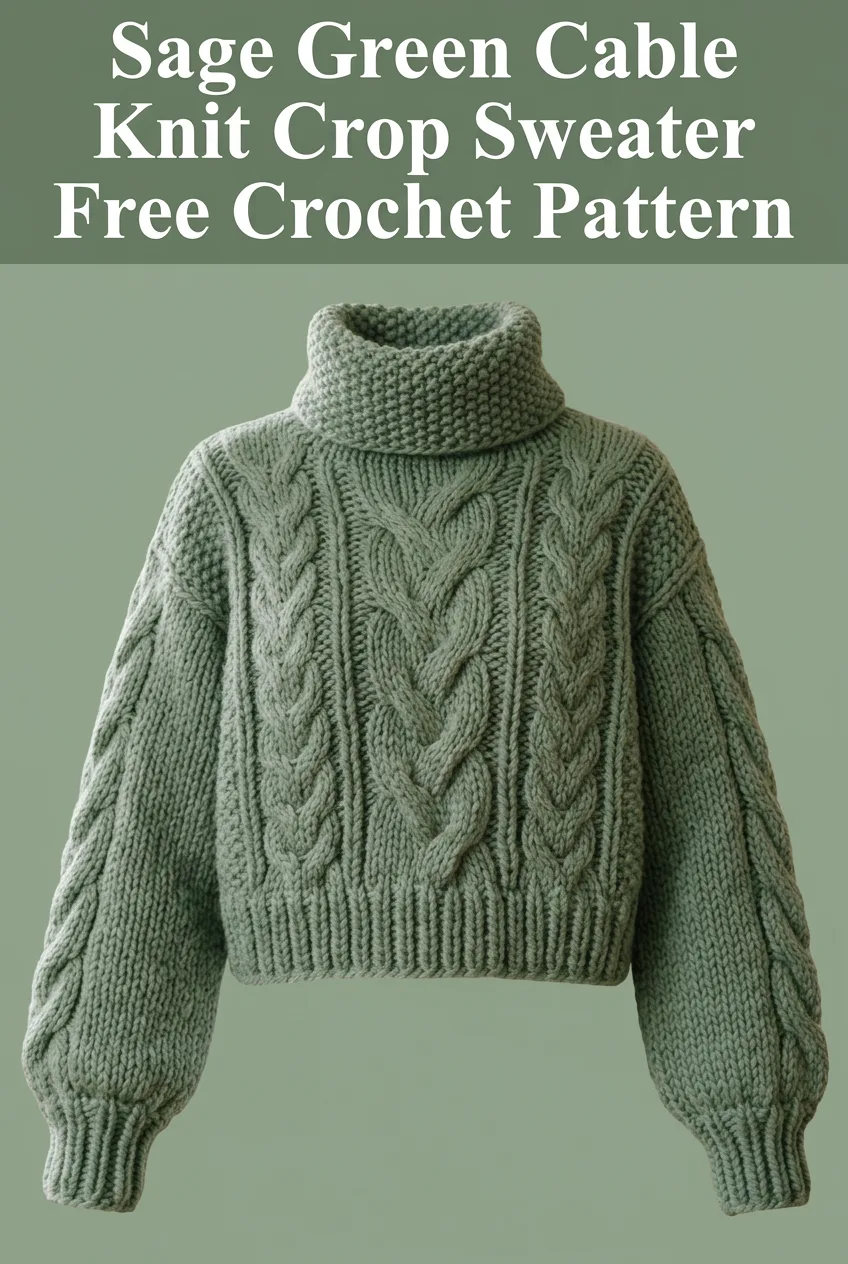
This crochet pattern uses a combination of front post stitches and strategic crossing techniques to create those gorgeous braided cables you see running down the front. The result is a sweater that looks like you spent months knitting it, but actually works up in crochet with chunky yarn that moves quickly through your hook.
Why You Will Love This Cable Knit Crochet Pattern
Let me be honest with you. Crochet cables can feel intimidating when you first see them. All those twisted, braided sections look complicated. But here is the truth. If you can work a front post double crochet, you can absolutely make this sweater. The cable effect comes from skipping stitches, working them out of order, and letting them cross over each other. That is it. No magic, no secret skills, just a simple technique repeated in a rhythm.
This crop sweater sits right at the natural waist, making it incredibly flattering. The turtleneck adds warmth without bulk, and those slightly puffed sleeves give it a modern, romantic feel. The seed stitch texture on the turtleneck and sleeve cuffs provides beautiful contrast against the bold cable panels.
Materials Needed for Your Cable Sweater
Yarn: Approximately 800 to 1000 yards of chunky weight yarn, category 5. I used a soft wool blend in sage green. Look for yarn with good stitch definition so your cables really pop. Acrylic blends work great too and make the sweater machine washable.
Crochet Hook: Size 6.5mm (K hook) or size needed to obtain gauge
Additional Tools:
Gauge: 12 stitches and 10 rows equals 4 inches in double crochet. Always check your gauge before starting. This matters especially for garments.
Finished Measurements
This pattern is written for size Medium. Finished bust measures approximately 40 inches with 4 to 6 inches of positive ease for that cozy oversized look. Finished length from shoulder to hem is approximately 18 inches. Sleeve length from underarm to cuff is approximately 17 inches.
To size up or down, add or subtract stitches in multiples of the cable panel repeat plus edge stitches.
Stitch Abbreviations and Definitions
Ch = Chain. Wrap yarn over hook, pull through loop on hook. This creates your foundation.
Sl st = Slip stitch. Insert hook, yarn over, pull through stitch and loop on hook in one motion. Used for joining and invisible movement.
Sc = Single crochet. Insert hook, yarn over, pull up a loop (2 loops on hook), yarn over, pull through both loops.
Dc = Double crochet. Yarn over, insert hook, yarn over, pull up a loop (3 loops on hook), yarn over, pull through 2 loops, yarn over, pull through remaining 2 loops.
FPdc = Front post double crochet. Yarn over, insert hook from front to back to front around the post of the stitch below (not into the top of the stitch), complete as a regular double crochet. This creates raised texture.
BPdc = Back post double crochet. Yarn over, insert hook from back to front to back around the post of the stitch below, complete as a regular double crochet.
Cable Cross (worked over 6 stitches): Skip next 3 stitches, work FPdc in each of the following 3 stitches, then working in front of stitches just made, work FPdc in each of the 3 skipped stitches. This creates the braided cable effect.
Skill Level
Intermediate. You should be comfortable with basic crochet stitches and willing to learn front post techniques. The cable crossing is easier than it looks, I promise.
Step by Step Crochet Pattern Instructions
Back Panel
The back panel uses simple double crochet with subtle texture at the sides. We are keeping it plain so the front cables really shine.
Foundation: Ch 62.
Row 1: Dc in 4th ch from hook (skipped chains count as first dc), dc in each ch across. Turn. (60 dc)
Row 2: Ch 3 (counts as dc here and throughout), dc in each st across. Turn. (60 dc)
Rows 3 through 28: Repeat Row 2. Your back panel should measure approximately 11 inches from foundation.
Armhole Shaping:
Row 29: Ch 3, skip first st, dc in next 54 sts, leave remaining 4 sts unworked. Turn. (54 dc)
Row 30: Ch 3, skip first 2 sts, dc in each st to last 2 sts, leave remaining 2 sts unworked. Turn. (50 dc)
Rows 31 through 40: Ch 3, dc in each st across. Turn. (50 dc)
Fasten off and weave in ends.
Front Panel with Cable Design
This is where the magic happens. Take your time with the cable crosses. Mark your cable sections with stitch markers if it helps you keep track.
Foundation: Ch 62.
Row 1 (Wrong Side): Dc in 4th ch from hook, dc in each ch across. Turn. (60 dc)
Row 2 (Right Side, Setup Row): Ch 3, dc in next 8 sts, FPdc in next 6 sts, dc in next 4 sts, FPdc in next 6 sts, dc in next 10 sts, FPdc in next 6 sts, dc in next 4 sts, FPdc in next 6 sts, dc in next 9 sts. Turn. (60 sts)
Row 3 (Wrong Side): Ch 3, dc in next 8 sts, BPdc in next 6 sts, dc in next 4 sts, BPdc in next 6 sts, dc in next 10 sts, BPdc in next 6 sts, dc in next 4 sts, BPdc in next 6 sts, dc in next 9 sts. Turn. (60 sts)
Row 4 (Cable Row): Ch 3, dc in next 8 sts, work Cable Cross over next 6 sts, dc in next 4 sts, work Cable Cross over next 6 sts, dc in next 10 sts, work Cable Cross over next 6 sts, dc in next 4 sts, work Cable Cross over next 6 sts, dc in next 9 sts. Turn. (60 sts)
Row 5: Repeat Row 3.
Row 6: Repeat Row 2.
Row 7: Repeat Row 3.
Row 8: Repeat Row 4.
Continue in this pattern, working cable crosses every 4th row, until piece measures same length as back panel to armhole (approximately 28 rows).
Armhole Shaping:
Work armhole shaping same as back panel while maintaining cable pattern as established.
Continue until front measures same length as back. Fasten off.
Sleeves (Make 2)
The sleeves feature that beautiful seed stitch ribbing at the cuffs that you see in the finished sweater.
Cuff:
Foundation: Ch 28.
Row 1: Sc in 2nd ch from hook, dc in next ch, *sc in next ch, dc in next ch* across. Turn. (27 sts)
Rows 2 through 6: Ch 1, *sc in dc, dc in sc* across. Turn. (27 sts)
This creates the textured ribbed cuff.
Sleeve Body:
Row 7: Ch 3, dc in each st across, dc 5 more sts evenly across row for increase. Turn. (32 dc)
Rows 8 through 10: Ch 3, dc in each st across. Turn. (32 dc)
Row 11 (Increase Row): Ch 3, 2 dc in first st, dc in each st to last st, 2 dc in last st. Turn. (34 dc)
Continue working in double crochet, increasing 2 stitches every 4th row until you have 48 stitches.
Work even until sleeve measures approximately 17 inches from cuff or desired length.
Sleeve Cap Shaping:
Row 1: Sl st in first 3 sts, ch 3, dc in each st to last 3 sts, leave remaining sts unworked. Turn. (42 dc)
Rows 2 through 4: Ch 3, skip first st, dc in each st to last 2 sts, dc2tog. Turn.
Fasten off. Repeat for second sleeve.
Turtleneck
The turtleneck uses the same seed stitch texture as the cuffs for a cohesive look.
Foundation: Ch 72, join with sl st to first ch being careful not to twist.
Round 1: Ch 1, sc in first ch, dc in next ch, *sc in next ch, dc in next ch* around, join with sl st to first sc. (72 sts)
Rounds 2 through 16: Ch 1, *sc in dc, dc in sc* around, join with sl st to first sc. (72 sts)
Your turtleneck should measure approximately 6 inches tall. Adjust rounds for shorter or taller neck as desired.
Fasten off, leaving a long tail for seaming.
Assembly Instructions
Take your time with seaming. Neat seams make all the difference in a finished garment.
1. Block all pieces before assembly. Lay flat, spritz with water, and pin to measurements. Let dry completely.
2. Seam shoulders using mattress stitch or whip stitch. Leave center 8 inches open for neck opening.
3. Attach turtleneck to neck opening, easing in any extra fabric evenly around.
4. Fold sleeves in half lengthwise to find center of sleeve cap. Pin center to shoulder seam.
5. Sew sleeves to armhole openings, matching underarm edges.
6. Sew side seams from hem to underarm.
7. Sew sleeve seams from cuff to underarm.
8. Weave in all remaining ends. Give your finished sweater a final light steam if needed.
Tips for Success with Crochet Cables
Working your first cable cross can feel awkward. Here is my advice. Use stitch markers to mark the 6 stitches of each cable panel. This helps you see exactly where to work.
When you skip stitches and work behind them, do not pull too tight. Let the crossed stitches have a little breathing room so they can twist naturally.
If your cables look flat, try going down a hook size. Tighter stitches create more defined texture.
Practice the cable cross on a swatch first if you are nervous. Make a little 20 stitch swatch and cross cables in the center until the motion feels natural.
Yarn Substitution Ideas
Want a different look? This cable knit crochet pattern works beautifully in:
Stick with chunky weight yarn that has good stitch definition. Avoid very fuzzy or heavily textured yarns as they will hide your beautiful cable work.
Care Instructions
Hand wash your finished sweater in cool water with gentle detergent. Press water out gently without wringing. Lay flat to dry on a clean towel, reshaping as needed. Store folded rather than hanging to prevent stretching.
If you used superwash wool or acrylic blend, your sweater may be machine washable on gentle cycle. Always check your yarn label.
Thank you so much for choosing this cable sweater pattern for your next project. I truly hope you love making it as much as I loved designing it. If you make one, please tag me on Instagram or share in my Facebook group. I absolutely love seeing your creations come to life in different colors and yarn choices.
If this sage green cable knit crop sweater caught your eye, go ahead and pin it to your crochet project board so you can find it when you are ready to cast on. And I would love to hear from you in the comments below. Let me know what color you are planning to make yours!
