
THIS ONE IS A SHOWSTOPPER. Seriously, if you want to make something that has people asking "wait, you MADE that?" then this rainbow granny square romper is about to become your new favorite project. The bright flower squares against that creamy mesh body? Chef’s kiss.
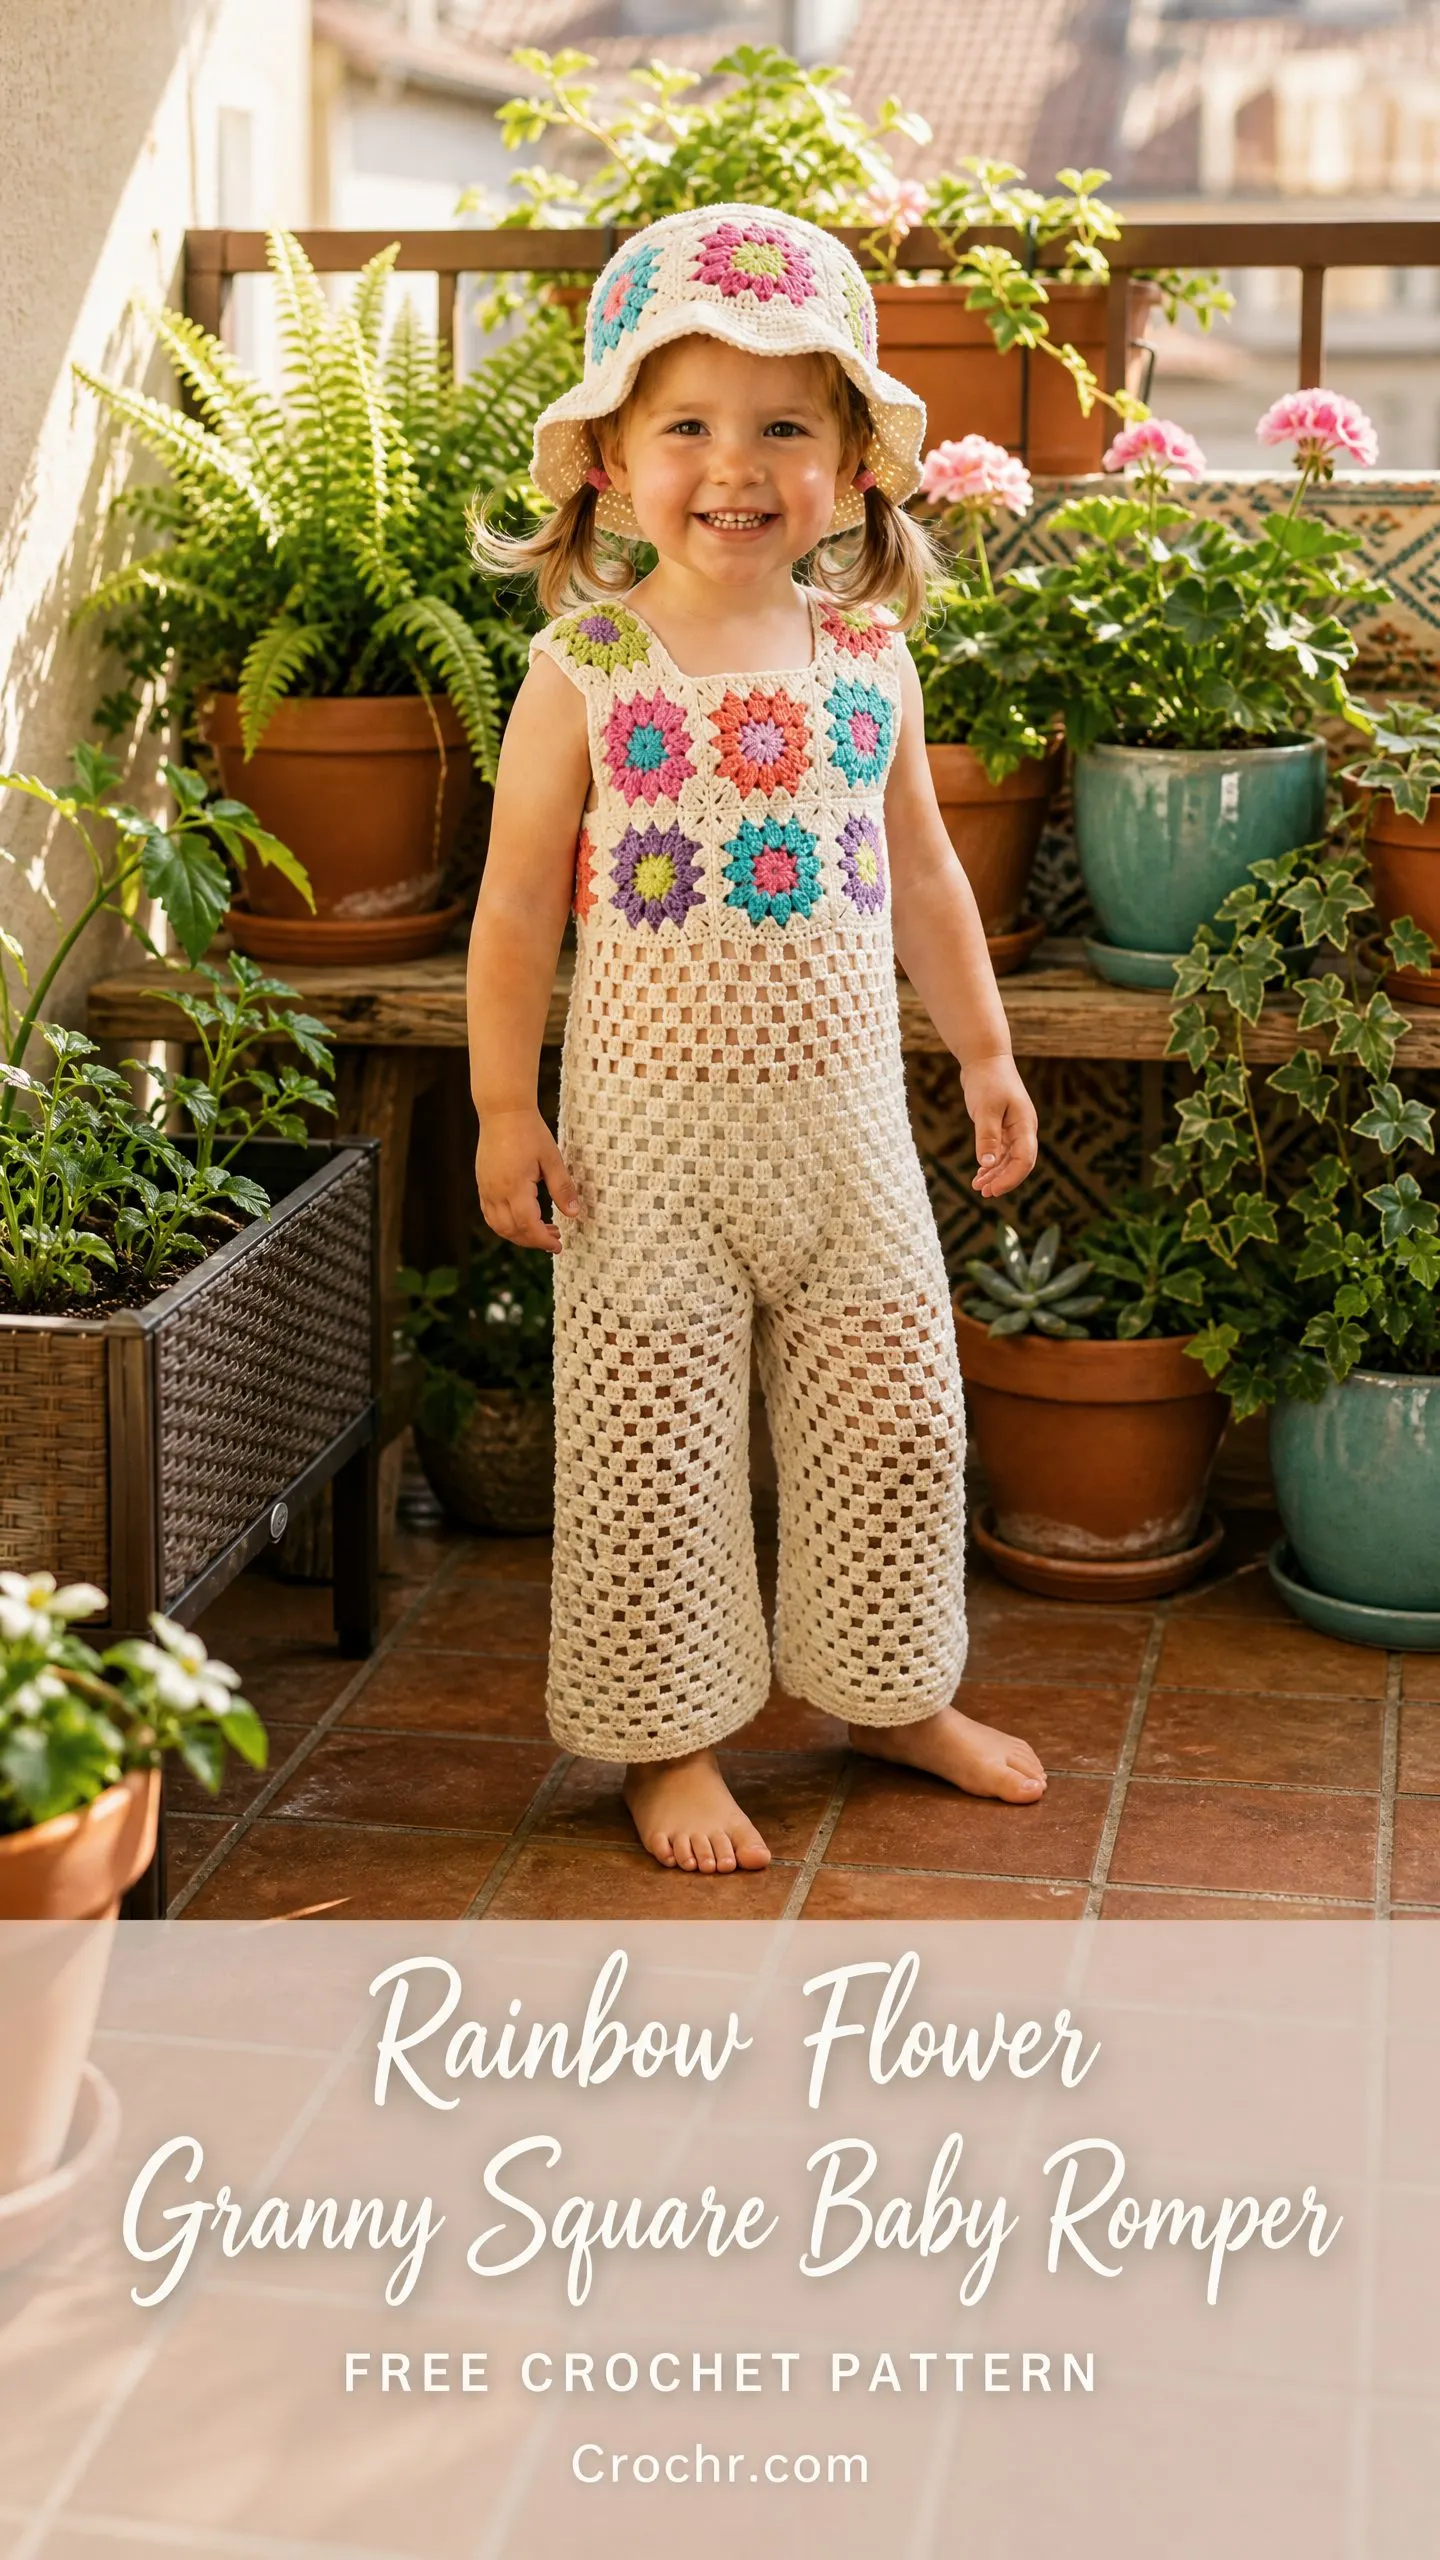
I know it looks impressive, but here’s the thing. If you can crochet a granny square and work basic stitches in the round, you absolutely have the skills to make this. The construction is clever but totally manageable, and I’ll walk you through every single step.
This makes the most incredible gift for baby showers, first birthdays, or that special little one in your life who deserves something handmade with love. Let’s dive in and make some magic happen with your hook.
Why This Crochet Pattern Works So Well
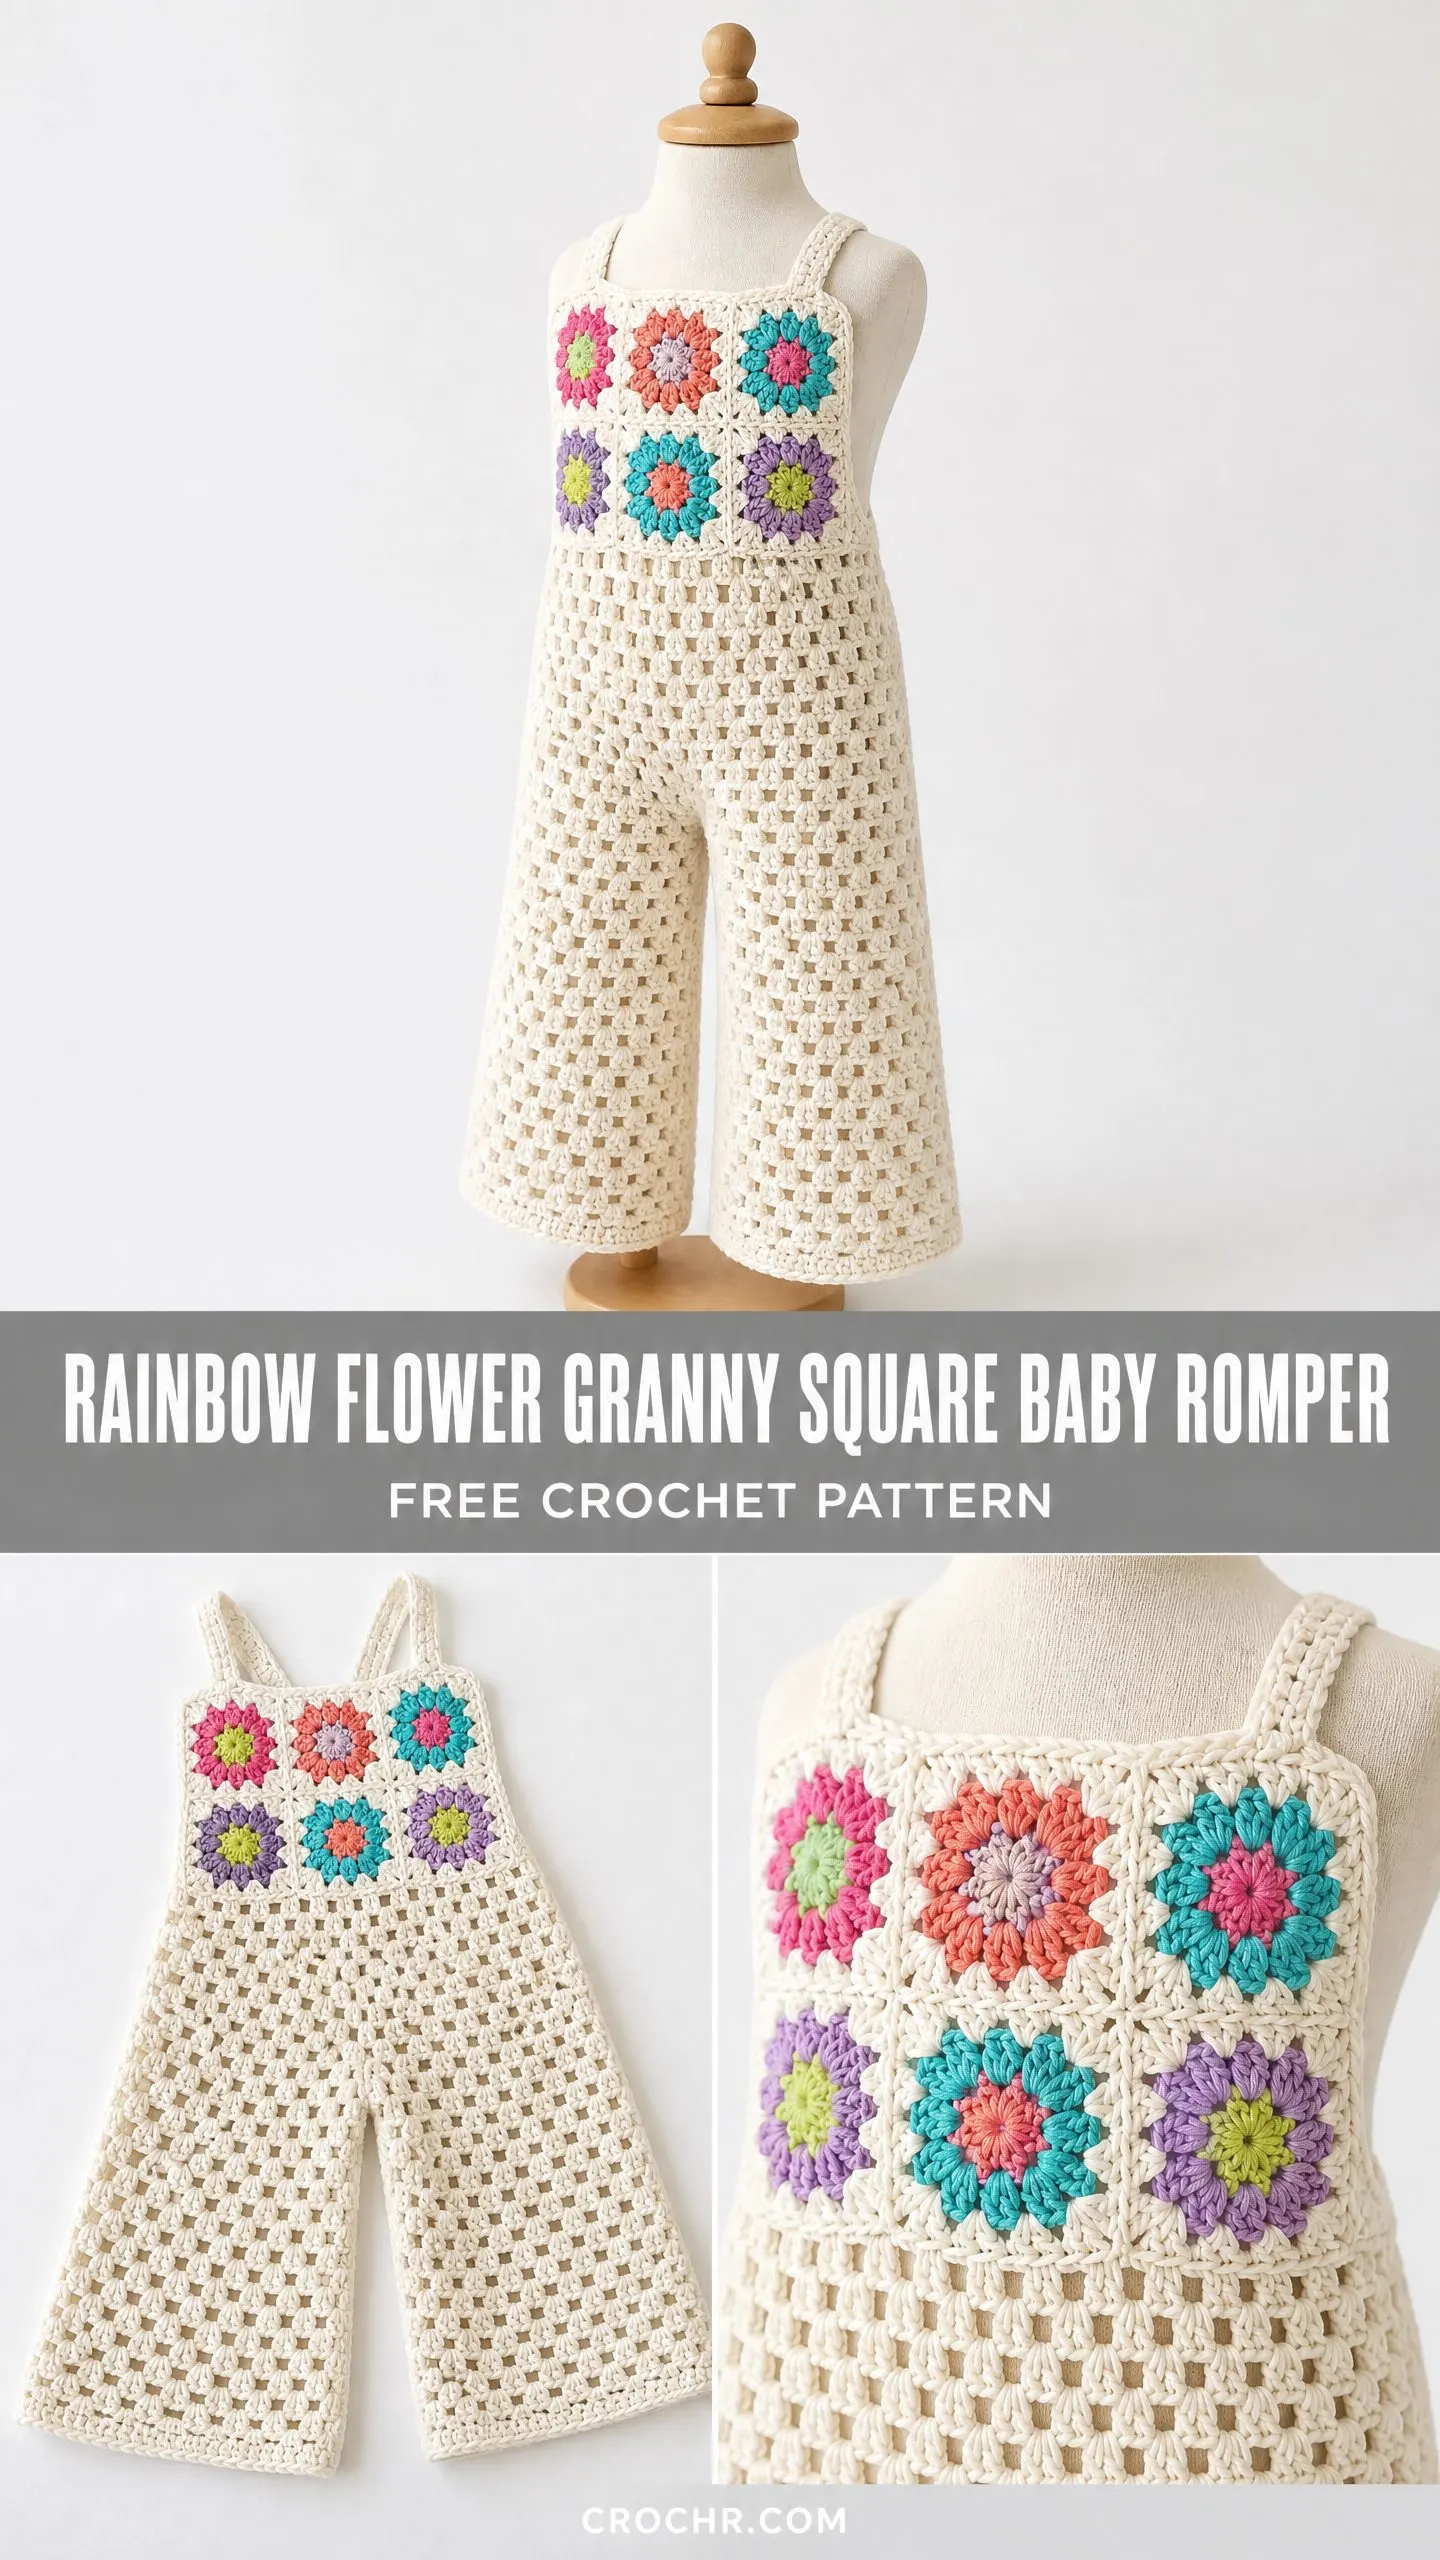
This rainbow flower granny square baby romper crochet pattern combines two classic techniques in a fresh way. The bodice uses traditional granny squares arranged in a colorful yoke. The lower body and legs use an open mesh stitch that’s breathable and has beautiful drape.
The romper is sized for approximately 18 to 24 months. The finished measurements give you a chest circumference of 20 inches and a total length from shoulder to ankle of approximately 22 inches. Perfect for an active toddler who needs room to move.
What I love most about this design is the construction method. You make all your granny squares first, join them into front and back panels, then pick up stitches and work the mesh body in the round. No complicated seaming at the end. No fussy finishing. Just smart, logical steps that build on each other.
Skill Level and Time Estimate
This is an intermediate crochet pattern. You should be comfortable with joining granny squares, working in the round, and basic shaping. If you’ve made granny squares and completed at least one simple garment before, you’re ready for this.
Complete beginners can absolutely tackle this with patience. The individual techniques aren’t difficult. There are just several of them combined in one project.
Time estimate: Approximately 12 to 18 hours total. The granny squares alone take about 4 to 5 hours depending on your speed. The body construction adds another 6 to 10 hours. This isn’t a one-evening project, but it’s not a months-long commitment either.
Materials You’ll Need
Yarn:
Yarn Suggestions:
Lion Brand 24/7 Cotton in Ecru works beautifully for the main color. It’s 100% mercerized cotton, machine washable, and holds stitch definition perfectly.
Paintbox Yarns Simply DK Cotton is another excellent choice. It comes in small affordable balls that are perfect when you only need small amounts of contrast colors.
Drops Safran offers a cotton and polyamide blend that adds slight sheen and extra durability for garments that get washed frequently.
Important: Choose cotton or cotton-blend yarns for this project. They’re breathable, washable, and non-stretchy, which helps the garment hold its shape. Avoid 100% acrylic because the open mesh won’t drape as nicely and may feel warm against baby’s skin.
Hook: US Size G-6 / 4.0 mm
Optional: US Size F-5 / 3.75 mm for tighter edging
Notions:
Gauge
Getting gauge right is essential for this garment. The chest circumference and length depend directly on accurate gauge.
Mesh stitch pattern: 18 stitches and 12 rows = 4 inches (blocked)
One granny square (3 rounds): 2.5 inches per side (blocked)
Make a swatch of at least 4 x 4 inches in mesh stitch before beginning. If your swatch is too big, go down a hook size. If it’s too small, go up a hook size.
Abbreviations
Let me define every stitch abbreviation you’ll encounter. I’ll give you the full name, the short form, and explain what it actually means.
Special Stitches
The Granny Square
This is the foundation of your bodice. Each completed square measures 2.5 inches per side when blocked.
Round 1 (Center, worked with first contrast color):
Make a magic ring. Or chain 4 and slip stitch to form a ring if you prefer.
Chain 3 (this counts as your first double crochet), work 2 dc into the ring, chain 2.
Work (3 dc into ring, chain 2) three more times.
Slip stitch to the top of your beginning chain-3 to join.
Fasten off.
(4 clusters of 3 dc, 4 chain-2 corner spaces)
Round 2 (Petals, worked with second contrast color):
Join your second contrast color to any chain-2 corner space.
Chain 3 (counts as first dc), work 2 dc in same space, chain 2, 3 dc in same space. Your first corner is complete.
Chain 1.
Work (3 dc, chain 2, 3 dc) in the next corner chain-2 space, chain 1.
Repeat around all 4 corners.
Slip stitch to top of beginning chain-3.
Fasten off.
(4 corner chain-2 spaces, 4 chain-1 side spaces)
Round 3 (Border, worked with MC):
Join MC to any corner chain-2 space.
Chain 3 (counts as first dc), 2 dc in same space, chain 2, 3 dc in same space. Corner complete.
Chain 1, 3 dc in next chain-1 space (side cluster), chain 1.
Work (3 dc, chain 2, 3 dc) in next corner space, chain 1, 3 dc in next chain-1 space, chain 1.
Repeat around remaining corners.
Slip stitch to top of beginning chain-3.
Fasten off.
(4 corner chain-2 spaces, 2 chain-1 spaces and 2 dc clusters on each side)
Mesh Stitch (Worked Flat)
Row 1 (RS): Chain 1, single crochet in first stitch, (chain 2, skip 2 stitches, single crochet in next stitch) across, turn.
Row 2: Chain 5 (counts as dc, chain 2), skip first chain-2 space, single crochet in next sc, (chain 2, double crochet in next sc, chain 2, single crochet in next sc) across, ending with dc in last sc, turn.
Row 3: Chain 1, single crochet in first dc, (chain 2, single crochet in next sc) across, ending with sc in 3rd chain of beginning chain-5, turn.
Repeat rows 2 and 3 for the mesh stitch pattern.
Mesh Stitch (Worked in the Round)
When working mesh stitch in the round, you don’t turn. The right side always faces you.
Round: Slip stitch into chain space, chain 1, single crochet in same space, (chain 2, single crochet in next sc) around, join with slip stitch to beginning sc.
Granny Square Color Map
Make 12 granny squares total. Six for the front bodice, six for the back bodice. Here’s how to assign your colors:
Square 1: Round 1 = CCA (bright pink), Round 2 = CCB (coral)
Square 2: Round 1 = CCB (coral), Round 2 = CCC (teal)
Square 3: Round 1 = CCC (teal), Round 2 = CCD (purple)
Square 4: Round 1 = CCD (purple), Round 2 = CCE (lime green)
Square 5: Round 1 = CCE (lime green), Round 2 = CCF (hot pink)
Square 6: Round 1 = CCF (hot pink), Round 2 = CCA (bright pink)
Squares 7 through 12: Repeat the same sequence as Squares 1 through 6
Feel free to mix up the color placement however you like. The important thing is that each square has two distinct bright colors plus the cream border.
After completing all 12 squares, weave in all ends and wet block each square to exactly 2.5 x 2.5 inches. Pin flat and let them dry completely before joining.
Step by Step Instructions
Section 1: Joining Squares into Bodice Panels
Front Bodice Panel:
Arrange Squares 1 through 6 in a 3-wide by 2-tall layout. Put Squares 1, 2, 3 in the top row and Squares 4, 5, 6 in the bottom row.
Step 1: Hold Square 1 and Square 2 with right sides facing together. Join MC to the corner of the shared edge. Single crochet evenly through both layers across the shared edge. Work 1 sc in each corner chain-2 space, 1 sc in each dc cluster (3 sc per cluster), 1 sc in each chain-1 space. This gives you approximately 14 sc across the joined edge. Fasten off.
Step 2: Join Square 2 to Square 3 the same way. You now have a 3-square top row.
Step 3: Join Square 4 to Square 5, then Square 5 to Square 6, forming the bottom row.
Step 4: Join the top row to the bottom row along the shared horizontal edge. With right sides facing together, join MC to corner and single crochet evenly across all three joined squares. Approximately 42 sc across. Fasten off.
Your joined front bodice panel should measure approximately 7.5 inches wide by 5 inches tall.
Back Bodice Panel:
Repeat these steps using Squares 7 through 12.
Section 2: Edging the Bodice Panels
Front Panel Edging:
With right side facing and MC, join yarn to the top right corner of the front bodice panel.
Round 1: Chain 1, single crochet evenly around the entire perimeter. Work approximately 42 sc across the top edge, 24 sc down each side, and 42 sc across the bottom edge. Work 3 sc in each outer corner to help the panel lie flat. Slip stitch to beginning sc. (approximately 136 sc around)
Repeat for the back panel.
Section 3: Seaming Side Edges
Place front and back panels with right sides facing together.
Right side seam: Working from the top right corner down to the lower right corner, single crochet through both panels. Work approximately 24 sc down the side. Fasten off.
Left side seam: Repeat for the left side.
You now have a tube. The top is the armhole and neckline area. The bottom is where you’ll pick up stitches for the mesh body.
The joined tube should measure approximately 20 inches in circumference at the lower bodice edge.
Section 4: The Straps
Each strap spans from front to back over the shoulder. They’re approximately 1 to 1.5 inches wide and 3 inches long.
With MC and your G-6 hook, join to the outer top corner of the front panel at the right shoulder.
Row 1: Chain 1, single crochet across the top of the outer square edge, working into the corner edging stitches. Work 6 sc across. Turn. (6 sc)
Rows 2 through 10: Chain 1, single crochet in each sc across. Turn. (6 sc)
Continue until strap measures 3 inches. Fasten off, leaving a long tail.
Sew the strap end to the corresponding corner of the back panel. The strap should lie flat over the shoulder.
Repeat for the left shoulder strap.
Section 5: Mesh Body (Worked in the Round)
With right side facing and MC, join yarn to the lower edge of the bodice at the right side seam.
Setup Round: Chain 1, single crochet evenly around the entire lower opening. Work 90 sc evenly spaced around. Place stitch marker at beginning of round. (90 sc)
Mesh Round 1: Chain 1, sc in first sc, (chain 2, skip 2 sc, sc in next sc) repeat around, slip stitch to beginning sc. (30 sc, 30 chain-2 spaces)
Mesh Rounds 2 through 16: Slip stitch into first chain-2 space, chain 1, sc in same space, (chain 2, sc in next chain-2 space) around, slip stitch to beginning sc. (30 sc, 30 chain-2 spaces per round)
Work a total of 16 mesh rounds. Your body should measure approximately 5 inches from the pickup row.
Section 6: Splitting for Pant Legs
You have 30 sc evenly around the tube. That means 15 sc are at the front half and 15 sc are at the back half.
Mark the front 15 sc units and the back 15 sc units with stitch markers at each side division point.
Right Leg:
Join MC to the right side division point.
Crotch Join: Chain 1, sc in same space, work mesh across 8 sc units to the center front, chain 6 (this creates the crotch), join to the center back position, continue mesh across 7 sc units back to the starting point. Join with slip stitch.
The chain-6 adds 2 additional mesh repeat units. Right leg total: 8 front units + 2 crotch units + 7 back units = 17 mesh units per round.
Leg Round 1: Slip stitch into first chain-2 space, chain 1, sc in same space, (chain 2, sc in next chain-2 space) around leg opening, slip stitch to beginning sc. (17 sc, 17 chain-2 spaces)
Leg Rounds 2 through 12: Slip stitch into first chain-2 space, chain 1, sc in same space, (chain 2, sc in next chain-2 space) around, slip stitch to beginning sc. (17 sc, 17 chain-2 spaces per round)
Leg Edging: Work 1 round of sc edging. Single crochet in each sc and 2 sc in each chain-2 space around. (51 sc around leg opening)
Slip stitch to beginning sc. Fasten off.
Left Leg:
Join MC to the center front of the crotch on the opposite side of the chain-6 from where the right leg started.
Work identically to the right leg. The left leg picks up the remaining 7 front units + 2 crotch units + 8 back units = 17 mesh units.
Left Leg Rounds 1 through 12: Same as right leg. (17 sc, 17 chain-2 spaces per round)
Left Leg Edging: Same as right leg. (51 sc)
Fasten off.
Section 7: Neckline and Armhole Edging
Neckline Edging:
With right side facing and MC, join to the top of the back right shoulder seam.
Round 1: Chain 1, single crochet evenly around the entire neckline opening. Work approximately 14 sc across the back right panel, 6 sc down the strap edge, 14 sc across the front top, 6 sc up the left strap edge, 14 sc across the back left panel. (approximately 54 sc around)
Fasten off and weave in ends.
Center Back Opening:
On each side of the center back opening, join MC to top of opening, chain 1, work 10 sc down the opening edge. Fasten off. Repeat for the opposite side.
On one side, work a chain-3 button loop at the center. Sew button to the opposite side.
Armhole Edging:
With right side facing and MC, join to the underarm of the right armhole.
Round 1: Chain 1, single crochet evenly around the armhole opening. Work approximately 14 sc across the front square top, 6 sc along the strap right edge, 14 sc across the back square top, 6 sc along the strap left edge. (40 sc around)
Slip stitch to beginning sc. Fasten off.
Repeat for the left armhole.
Finishing and Blocking
Weave in all remaining ends using a yarn needle. Bury all ends in the back of granny square borders or inside seam allowances. This is especially important for baby garments that get washed frequently.
Wet Blocking:
Fill a basin with cool to lukewarm water. Submerge the finished romper and gently press out air bubbles. Let it soak for 10 to 15 minutes. Gently squeeze out water without wringing. Roll in a clean towel to remove excess moisture.
Lay flat on a blocking mat or dry towel. Smooth the bodice panels so granny squares are square and even. Pin leg hems and neckline edges straight. Gently stretch the mesh body to even out the stitch pattern. Allow to dry completely. This may take 12 to 24 hours.
Sew your button at the back neckline opening. Make sure it’s extremely secure since children pull at closures. Consider using a backing button on the wrong side for extra strength.
Size Customization Tips
For smaller sizes (6 to 12 months):
For larger sizes (2T to 3T):
General resizing principle: Every 3 sc added to the setup round adds approximately 0.66 inches to the circumference. Every 3 rows added to the mesh body adds approximately 1 inch of length.
Care Instructions
Machine wash on gentle cycle with cold water, inside out. Lay flat to dry. Do not tumble dry, iron directly, or dry clean. Cotton and cotton-blend yarn maintains its shape and color best when air dried flat.
Store folded, not hung, to prevent the mesh from stretching under its own weight.
Final Thoughts on This Crochet Tutorial
This rainbow flower granny square baby romper is one of those projects that looks so much harder than it actually is. Yes, there are several steps. Yes, you’re combining different techniques. But each individual skill is totally approachable, and the result is absolutely stunning.
The combination of cheerful rainbow granny squares with that airy cream mesh creates something special. It’s the kind of handmade piece that becomes an heirloom. The kind of thing parents save in a keepsake box long after their little one has outgrown it.
Take your time with this project. Block those granny squares before joining them. Check your gauge. And don’t rush the finishing. The extra care shows in the final piece.
I really hope you enjoy making this sweet little romper. If you give it a try, I would absolutely love to see your finished project. Tag me on Instagram or share a photo in my Facebook group. There’s nothing better than seeing these patterns come to life in your hands.
Save this pattern to your Pinterest boards so you can find it easily when you’re ready to start. And please drop a comment below if you make one. I read every single comment and love hearing how your projects turn out. Happy crocheting, friend!
You Might Also Like
- Autumn Rust Maple Leaf Table Runner Free Crochet Pattern
- Mint Green Frog Baby Romper Set Free Crochet Pattern
- Navy Blue Nautical Barrel Purse Free Crochet Pattern
- Sunset Ombre Jellyfish Trio Free Crochet Pattern
