
This pattern is RIDICULOUSLY CUTE, and I cannot wait for you to make it! We’re talking a full matching crop top and flared skirt set with gorgeous granny circle motifs, bell sleeves, and scalloped edges. The whole thing looks like it belongs in a boutique window, but you can crochet it yourself in about 18 to 26 hours total.
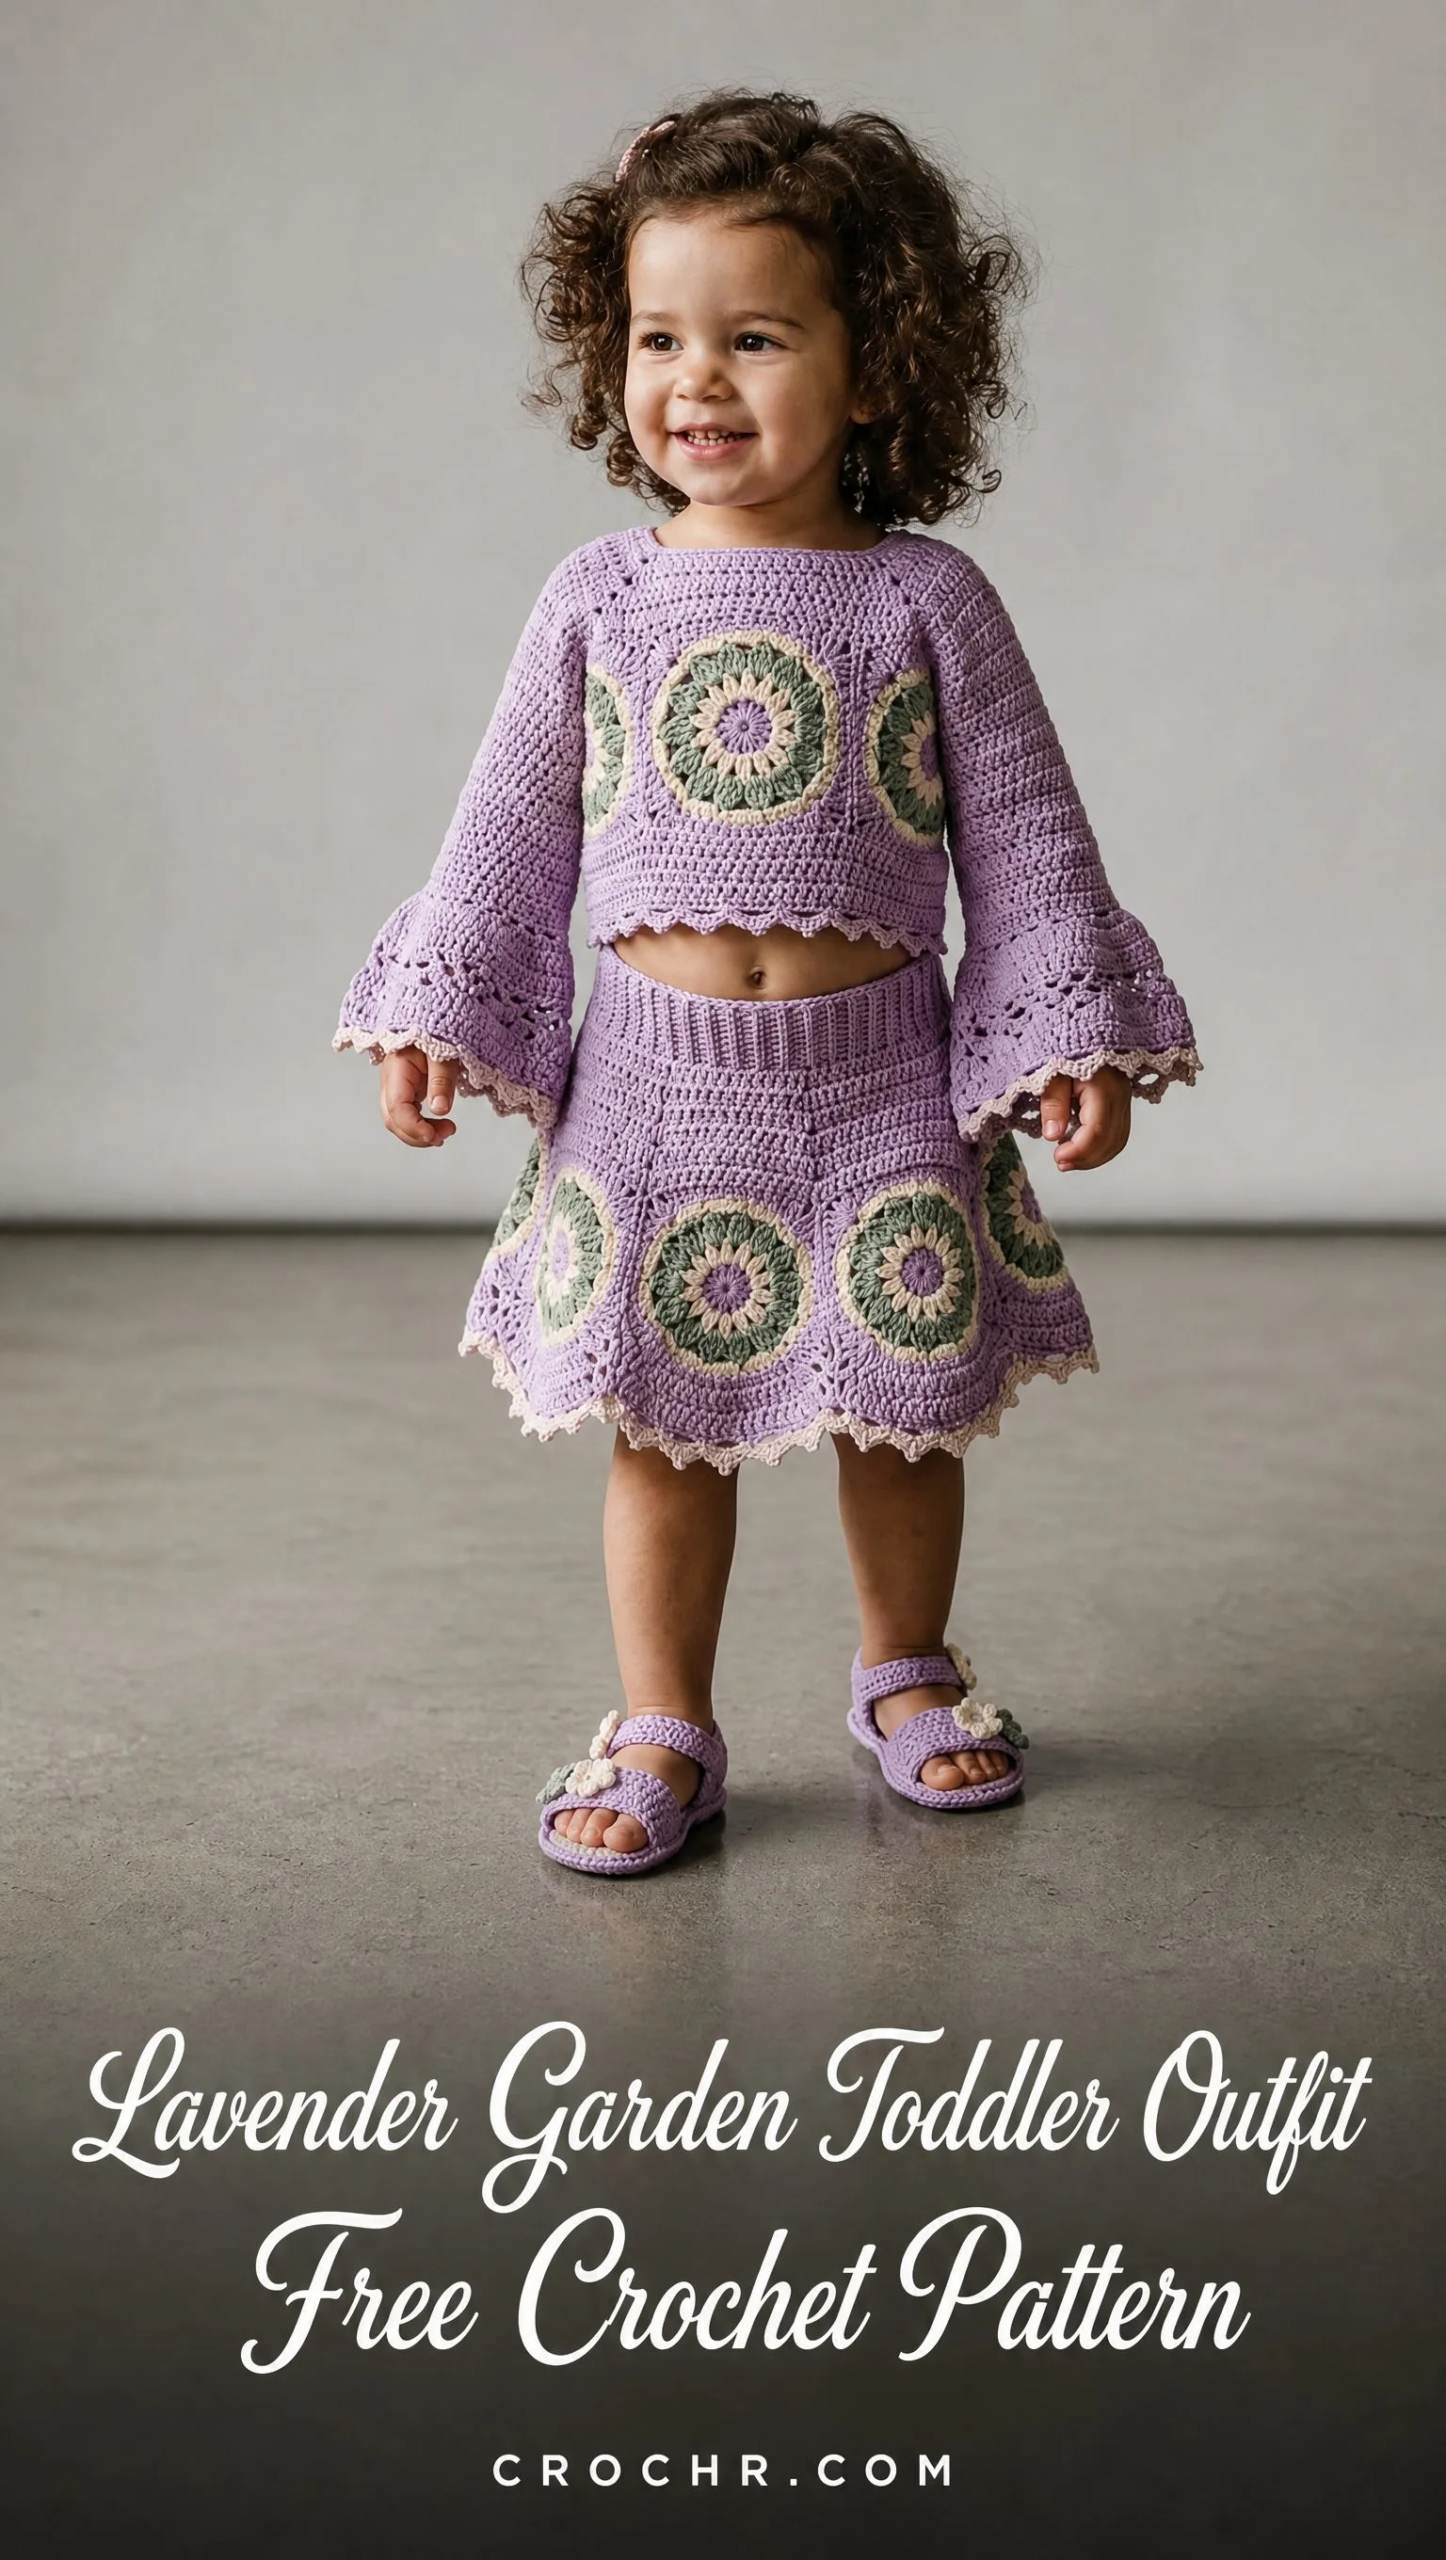
If you’ve got a little one in your life who deserves something special, this is the project. The coordinating pieces make gift-giving feel extra thoughtful, and the lavender color with sage green and cream accents is pure springtime magic.
Best part? The stitches are mostly single crochet and half double crochet. If you’ve made a couple of garments before, you’ve absolutely got this.
About This Toddler Crochet Set
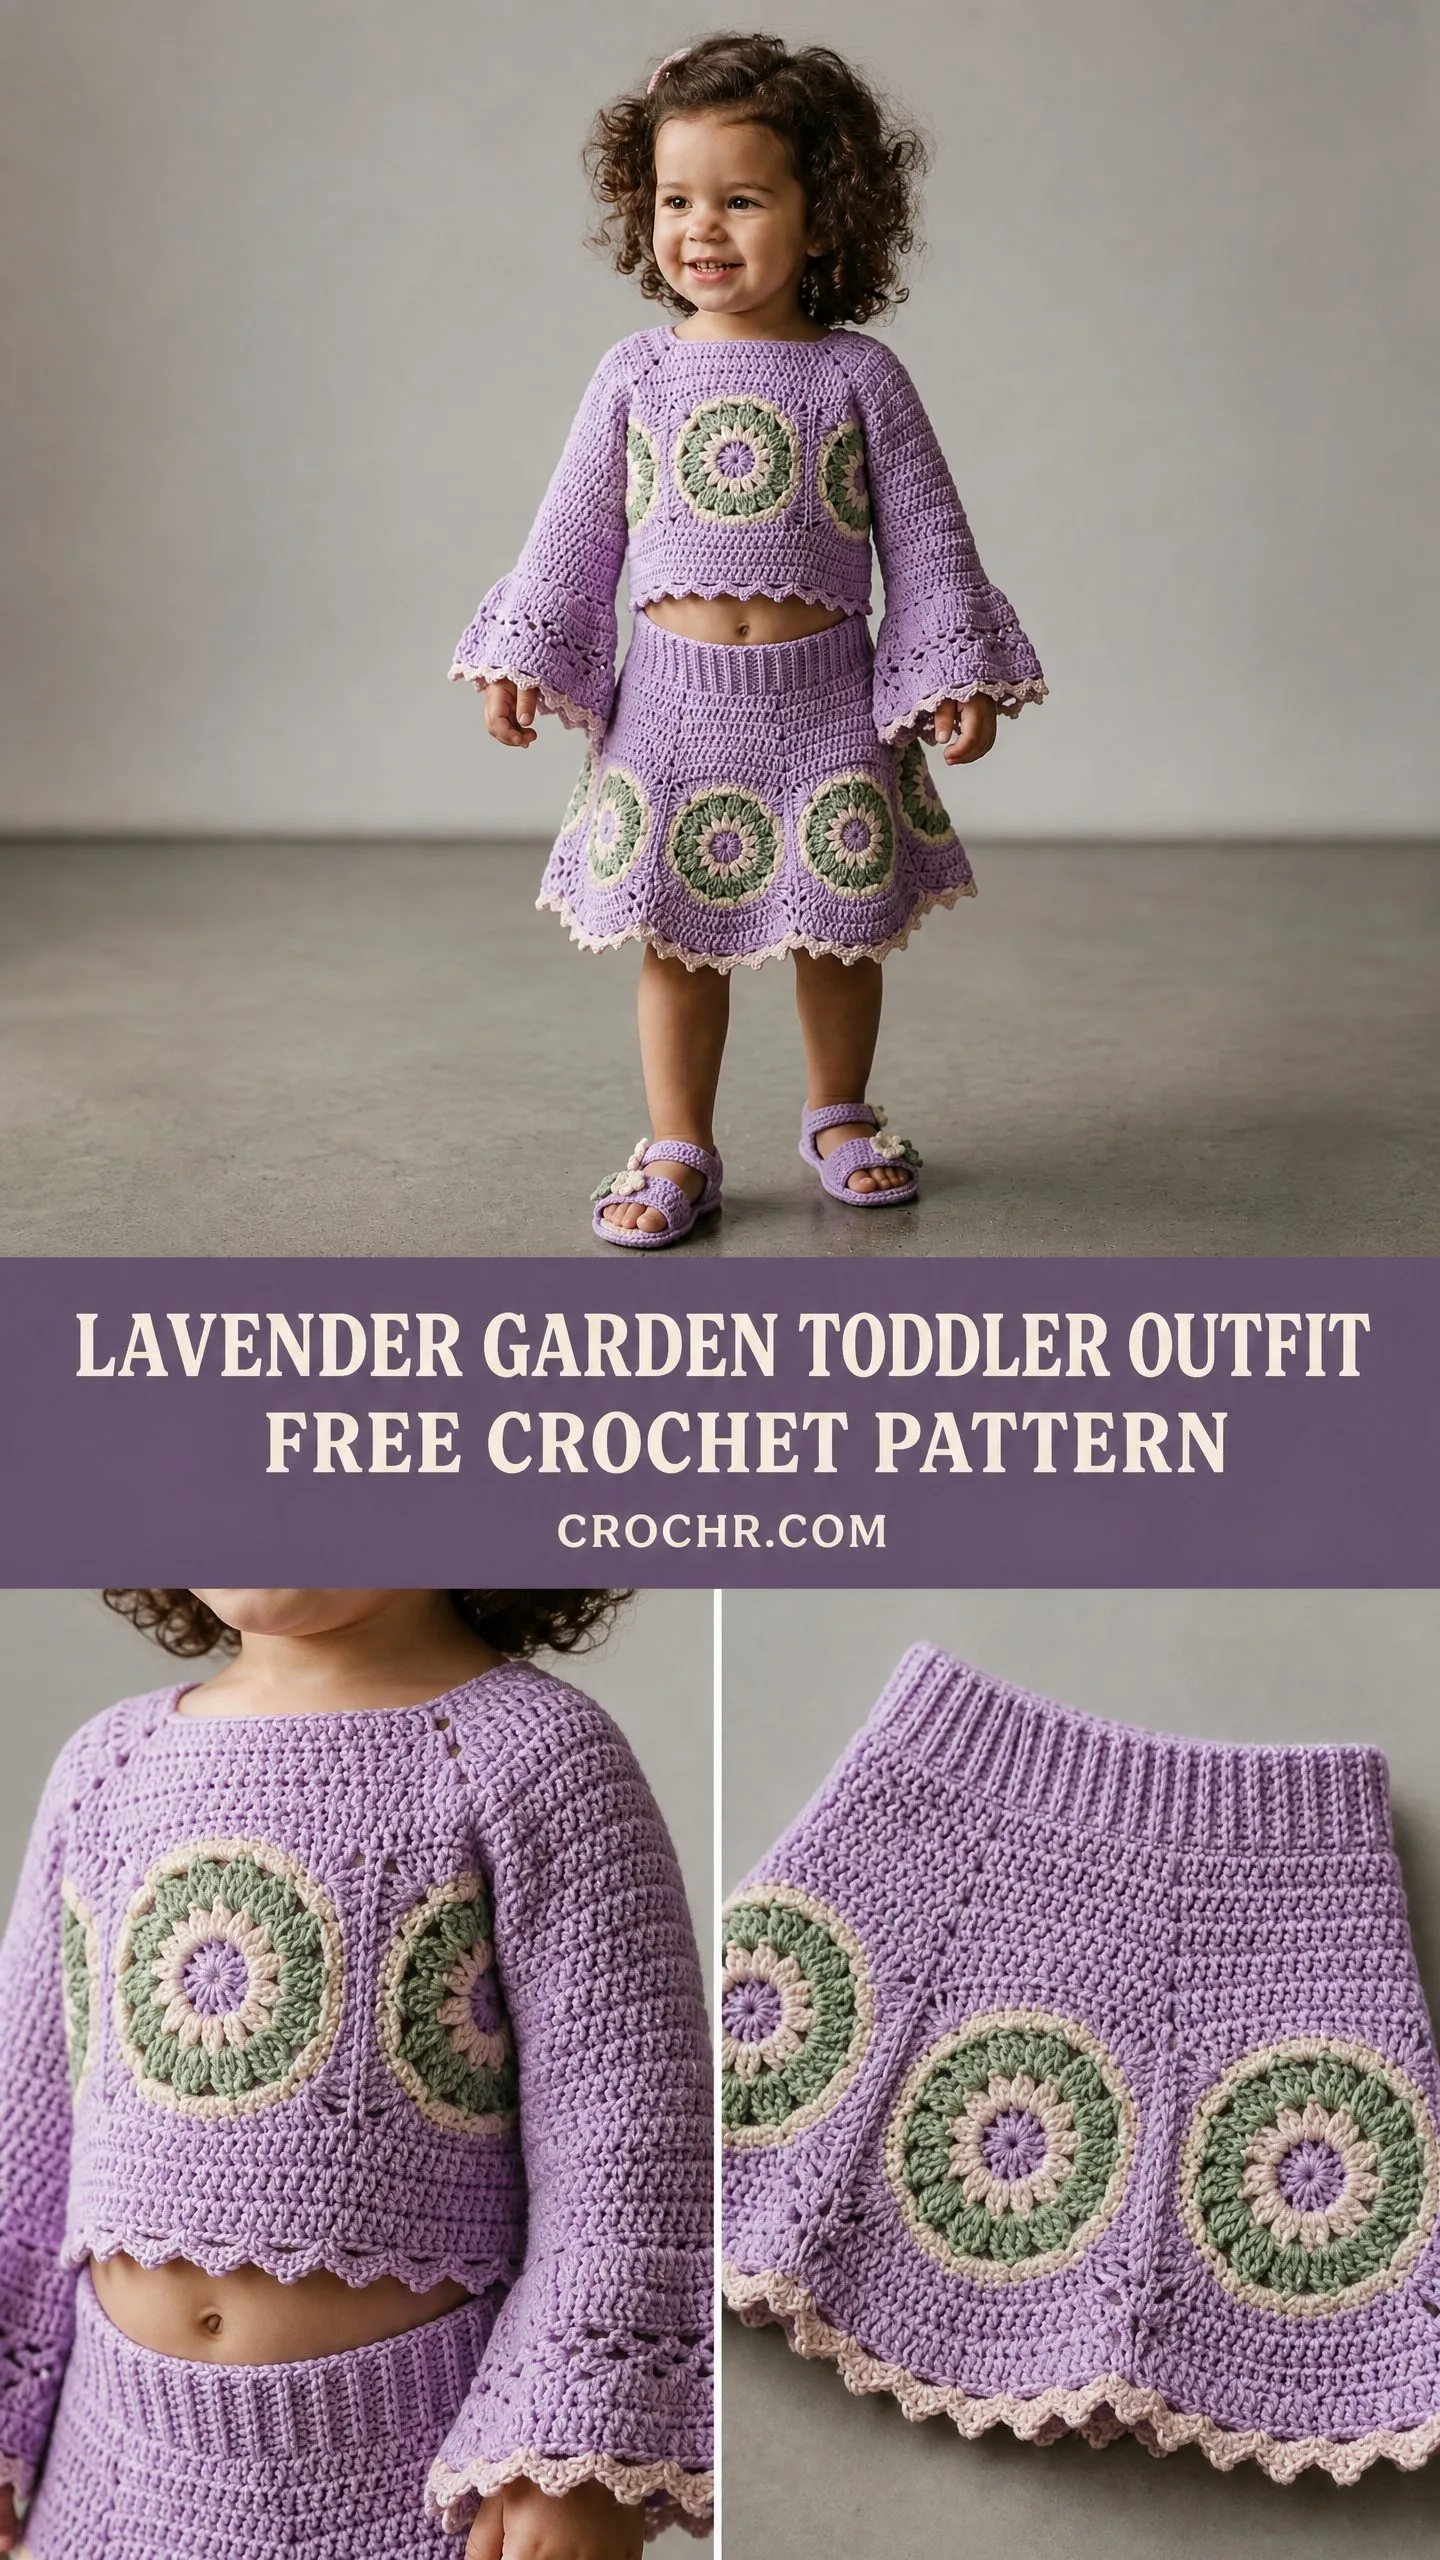
The Lavender Garden Toddler Set includes two pieces: a cropped long-sleeve top and a flared A-line skirt. Both are worked in soft lavender yarn and feature large circular granny-style motifs in sage green, cream, and soft pink. The top is constructed in the round from the bottom up, with wide bell-flared sleeves finished with a scallop-shell edging. The skirt is worked from the waistband down, flaring outward, with granny circle motifs applied to the lower half and a matching scallop shell border at the hem.
The motifs tie both pieces together visually, creating a cohesive handmade outfit that looks professionally designed. The coordinating sandals shown in reference images are purchased accessories and are not included in this pattern.
Skill Level
This pattern is rated Advanced Beginner to Intermediate. The main body stitches are simple single crochet (sc) and half double crochet (hdc), but you’ll need to be comfortable working in the round, reading motif rounds, seaming circles into fabric, and executing scallop shell edging.
If you’ve completed at least two or three garment projects, you’ll feel confident tackling this set. Don’t worry if motif work is new to you. I’ll walk you through everything step by step.
Time Estimate
The full set takes approximately 18 to 26 hours depending on your working speed. Here’s the breakdown:
Plan to spread this across several sessions. It’s a satisfying project to chip away at over a week or two.
Finished Measurements
This pattern is written for toddler size 2T, fitting a child approximately 33 to 35 inches tall with a chest of about 21 inches and a waist of about 20 inches.
Top Finished Measurements
Skirt Finished Measurements
Materials Needed
Yarn
You’ll need DK weight yarn (CYCA 3) in four colors:
Yarn Suggestions
Option 1: Lion Brand Yarn Pound of Love in Pastel Purple (MC) with Paintbox Simply DK in Grass Green (CA) and Paper White (CB). Machine washable, widely available, and very affordable.
Option 2: Paintbox Simply DK in Wisteria Purple (MC), Spearmint (CA), Paper White (CB), and Champagne Pink (CC). Excellent stitch definition with a smooth finish.
Option 3: WeCrochet Comfy DK in Hydrangea (MC), Jade (CA), Cream (CB), and Blush (CC). A slight cotton-acrylic blend gives light drape and breathability for warm weather.
Substitution note: Any smooth DK weight yarn at gauge will work. Avoid hairy or textured yarns as they obscure the motif detail. Always work a gauge swatch before starting.
Hooks
Notions
Gauge
With MC and G-6 / 4.0 mm hook:
18 stitches x 22 rows = 4 in / 10 cm in single crochet, worked in the round (not turned)
1 completed granny circle motif = approximately 4.25 in / 10.8 cm in diameter after light blocking
Gauge is critical for this garment. Please swatch and adjust hook size if necessary. Going up one hook size produces a looser, drapier fabric. Going down one hook size produces a stiffer, smaller fabric.
Abbreviations
Before we dive in, here are all the abbreviations you’ll encounter. I’ll define each one so you’re never left guessing.
Special Stitches
Scallop Shell Edging
This creates the beautiful wavy border along finished edges. Here’s how to work it:
1. Join yarn to any edge stitch with a sl st.
2. Ch 1. Work 1 sc in the same stitch.
3. Skip 2 stitches.
4. Work 5 dc all into the next stitch.
5. Skip 2 stitches.
6. Work 1 sc into the next stitch.
7. Repeat steps 3 through 6 around the entire edge.
8. Join with sl st to the first sc. Fasten off.
Important: This edging requires a stitch count divisible by 6. The pattern includes adjustments to ensure your final body round meets this requirement.
Granny Circle Motif
Each motif is worked in the round from the center outward and consists of 5 rounds plus a final border.
Round 1 (CC): Magic ring. Ch 3 (counts as 1 dc), work 11 dc into the ring. Join with sl st to top of ch-3. (12 dc)
Round 2 (CB): Join CB in any st. Ch 3 (counts as 1 dc), 1 dc in same st. Work 2 dc in each st around. Join with sl st to top of ch-3. (24 dc)
Round 3 (CA): Join CA in any st. Ch 3 (counts as 1 dc), 1 dc in same st, 1 dc in next st. (2 dc in next st, 1 dc in next st) 11 times. Join with sl st to top of ch-3. (36 dc)
Round 4 (CA): Ch 3 (counts as 1 dc), 1 dc in same st, 1 dc in each of next 2 sts. (2 dc in next st, 1 dc in each of next 2 sts) 11 times. Join with sl st to top of ch-3. (48 dc)
Round 5 (CB): Join CB in any st. Ch 1, 1 sc in same st, 1 sc in each st around. Join with sl st to first sc. (48 sc)
Final border (MC): Join MC in any st. Ch 1, 1 sc in same st, 1 sc in each of next 2 sts. (Ch 3, sk 1 st, 1 sc in each of next 3 sts) 11 times. Ch 3, sk 1 st. Join with sl st to first sc. Fasten off, leaving a 12 in / 30 cm tail for seaming. (12 ch-3 spaces around the motif perimeter)
The finished motif measures approximately 4.25 in / 10.8 cm across after light blocking.
Pattern Notes Before You Begin
1. The top is worked in the round from the bottom up. The body is worked first as a tube, then the sleeves are added separately and joined at the underarm.
2. The skirt is worked top down from a ribbed waistband. The waistband is worked flat then seamed. The body flares using increases at regular intervals.
3. All granny circle motifs are made separately and then seamed onto the finished body pieces using the MC tail and a yarn needle. They’re applied applique-style for flat, even placement.
4. The top uses 3 motifs: 1 centered on the chest and 1 on each sleeve. The skirt uses 5 motifs: 3 across the lower front and 2 across the lower back.
5. Both pieces use the same scallop shell edging at the hem in CB.
6. The turning chain at the start of each flat row counts as 1 stitch where noted.
7. The set is designed with a cropped top silhouette. The top ends approximately 1 inch above the waistband of the skirt when both are worn together.
8. Work all rounds with RS facing unless otherwise stated.
9. Join new colors with a sl st unless instructed otherwise. Weave all ends on the WS.
Crop Top Instructions
Section 1: Body Tube
The body is worked in the round (no turning) from the bottom hem up to the underarm.
Foundation: With MC and G-6 hook, ch 100. Being careful not to twist, sl st to the first ch to form a ring.
Rnd 1: Ch 1, 1 sc in each ch around. Join with sl st to first sc. (100 sc)
Rnds 2-27: Ch 1, 1 sc in each st around. Join with sl st to first sc. (100 sc)
Repeat Round 2 for a total of 27 rounds.
Checkpoint: After Round 27, the body tube should measure approximately 5 in / 12.5 cm tall from the foundation chain. The circumference should be approximately 22 in / 56 cm. Lay the tube flat and confirm the width is 11 in / 28 cm across one layer.
Do not fasten off. Set the body tube aside and make the sleeves.
Section 2: Sleeves (Make 2)
Each sleeve is worked in the round from the cuff up toward the shoulder. The sleeves begin wide at the cuff (bell shape) and taper slightly toward the upper arm.
Foundation: With MC and G-6 hook, ch 54. Sl st to first ch to form a ring.
Rnd 1: Ch 1, 1 sc in each ch around. Join with sl st to first sc. (54 sc)
Rnd 2: Ch 1, (sc2tog over next 2 sts, 1 sc in each of next 7 sts) 6 times. Join with sl st to first sc. (48 sc)
Rnd 3: Ch 1, 1 sc in each st around. Join with sl st to first sc. (48 sc)
Rnd 4: Ch 1, (sc2tog over next 2 sts, 1 sc in each of next 6 sts) 6 times. Join with sl st to first sc. (42 sc)
Rnd 5: Ch 1, 1 sc in each st around. Join with sl st to first sc. (42 sc)
Rnd 6: Ch 1, (sc2tog over next 2 sts, 1 sc in each of next 5 sts) 6 times. Join with sl st to first sc. (36 sc)
Rnds 7-21: Ch 1, 1 sc in each st around. Join with sl st to first sc. (36 sc)
Repeat for 15 rounds total at 36 stitches.
Checkpoint: The sleeve should measure approximately 6.5 in / 16.5 cm from cuff foundation to the top edge of Round 21. The upper sleeve circumference should be approximately 8 in / 20 cm.
Do not fasten off. Set aside. Repeat for second sleeve.
Section 3: Joining Sleeves to Body
You’ll now join both sleeves to the body tube to create the yoke in one seamless round.
Setup: Place a stitch marker at the exact center front of the body tube and another at the exact center back. These 2 markers divide the tube into front (50 sts) and back (50 sts).
Mark the underarm: On the front of the body, count 8 stitches to the left of center and 8 stitches to the right of center. Place markers. These 8 stitches at each side will be skipped during joining to create the armhole openings.
Joining round: Return to the body tube. Begin at the left side seam marker.
Work as follows: work 42 front sts, skip 8 underarm sts on right side, work all 36 sts of Sleeve 1, work 42 back sts, skip 8 underarm sts on left side, work all 36 sts of Sleeve 2. Join with sl st to first sc.
Total stitches in yoke joining round: 42 + 36 + 42 + 36 = 156 sc. (156 sc)
Use the yarn tail from the sleeve setup to close any gap at each underarm with 2 to 3 sl sts on the WS.
Section 4: Yoke Shaping
The yoke is worked in the round, decreasing gradually to shape the neckline.
Rnd 1 (yoke): Ch 1, 1 sc in each st around. Join with sl st to first sc. (156 sc)
Rnd 2: Ch 1, (sc2tog, 1 sc in each of next 10 sts) 13 times. Join with sl st to first sc. (143 sc)
Rnd 3: Ch 1, 1 sc in each st around. Join with sl st to first sc. (143 sc)
Rnd 4: Ch 1, (sc2tog, 1 sc in each of next 9 sts) 13 times. Join with sl st to first sc. (130 sc)
Rnd 5: Ch 1, 1 sc in each st around. Join with sl st to first sc. (130 sc)
Rnd 6: Ch 1, (sc2tog, 1 sc in each of next 8 sts) 13 times. Join with sl st to first sc. (117 sc)
Rnd 7: Ch 1, 1 sc in each st around. Join with sl st to first sc. (117 sc)
Rnd 8: Ch 1, (sc2tog, 1 sc in each of next 7 sts) 13 times. Join with sl st to first sc. (104 sc)
Rnd 9: Ch 1, 1 sc in each st around. Join with sl st to first sc. (104 sc)
Rnd 10: Ch 1, (sc2tog, 1 sc in each of next 6 sts) 13 times. Join with sl st to first sc. (91 sc)
Rnd 11: Ch 1, 1 sc in each st around. Join with sl st to first sc. (91 sc)
Rnd 12: Ch 1, (sc2tog, 1 sc in each of next 5 sts) 13 times. Join with sl st to first sc. (78 sc)
Rnd 13: Ch 1, 1 sc in each st around. Join with sl st to first sc. (78 sc)
Checkpoint: After yoke Round 13, the neckline opening should measure approximately 17 in / 43 cm in circumference. The yoke depth from underarm join to neckline is approximately 2.5 in / 6.5 cm.
Neck edging: Ch 1, 1 sc in each st around neckline. Join with sl st to first sc. Fasten off. (78 sc)
The neckline is left as a simple single crochet edge, sitting in a gentle boat neck style across both shoulders.
Section 5: Sleeve Cuff Edging
Return to the cuff foundation edge of each sleeve. With RS facing, join CB to any st of the cuff foundation chain edge.
Setup round: Ch 1, work 1 sc evenly into each ch of the foundation edge. You should have 54 sc. Join with sl st to first sc. (54 sc)
Scallop shell edging: Ch 1. (sk 2 sts, 5 dc in next st, sk 2 sts, 1 sc in next st) 9 times. Join with sl st to first sc. Fasten off CB. (9 shells)
Repeat for second sleeve.
Section 6: Body Hem Edging
Return to the foundation chain at the bottom of the body tube. With RS facing, join CB to any st of the hem edge.
Setup round: Ch 1, 1 sc in each of the 100 foundation sts around. Join with sl st to first sc. (100 sc)
Adjustment: 100 is not divisible by 6, so work 1 additional sc increase to bring count to 102. Work (1 sc in each of next 49 sts, 2 sc in next st) twice. (102 sc)
Scallop shell edging: Ch 1. (sk 2 sts, 5 dc in next st, sk 2 sts, 1 sc in next st) 17 times. Join with sl st to first sc. Fasten off CB. (17 shells)
Skirt Instructions
Section 7: Waistband
The waistband is worked flat in rows to create a ribbed channel for elastic.
With MC and G-6 hook, ch 11.
Row 1: 1 hdc in 3rd ch from hook and in each ch across. Ch 2, turn. (9 hdc)
Rows 2-56: 1 hdc in each st across. Ch 2, turn. (9 hdc)
Repeat until the waistband measures 20 in / 51 cm in length, approximately 56 rows total.
Seam the short ends of the waistband together using a sl st seam or mattress stitch to form a loop.
Thread the elastic: With a safety pin attached to one end of the elastic, thread through the waistband tube. Overlap elastic ends by 0.5 in / 1.25 cm and sew together securely with sewing needle and thread.
Section 8: Skirt Body
With RS facing, join MC to any point along the lower long edge of the waistband.
Pickup round: Ch 1. Work 90 sc evenly around the lower edge of the waistband. Join with sl st to first sc. (90 sc)
Work approximately 1 sc into every row end of the waistband, adjusting evenly to reach exactly 90 sts.
Rnds 1-3: Ch 1, 1 sc in each st around. Join with sl st to first sc. (90 sc)
Rnd 4: Ch 1, (1 sc in each of next 9 sts, 2 sc in next st) 9 times. Join with sl st to first sc. (99 sc)
Rnds 5-7: Ch 1, 1 sc in each st around. Join with sl st to first sc. (99 sc)
Rnd 8: Ch 1, (1 sc in each of next 10 sts, 2 sc in next st) 9 times. Join with sl st to first sc. (108 sc)
Rnds 9-11: Ch 1, 1 sc in each st around. Join with sl st to first sc. (108 sc)
Rnd 12: Ch 1, (1 sc in each of next 11 sts, 2 sc in next st) 9 times. Join with sl st to first sc. (117 sc)
Rnds 13-15: Ch 1, 1 sc in each st around. Join with sl st to first sc. (117 sc)
Rnd 16: Ch 1, (1 sc in each of next 12 sts, 2 sc in next st) 9 times. Join with sl st to first sc. (126 sc)
Rnds 17-19: Ch 1, 1 sc in each st around. Join with sl st to first sc. (126 sc)
Rnd 20: Ch 1, (1 sc in each of next 13 sts, 2 sc in next st) 9 times. Join with sl st to first sc. (135 sc)
Rnds 21-27: Ch 1, 1 sc in each st around. Join with sl st to first sc. (135 sc)
Checkpoint: After Round 27, the skirt should measure approximately 6.5 in / 16.5 cm from the waistband pickup round. The hem circumference should be approximately 30 in / 76 cm.
Do not fasten off.
Section 9: Skirt Hem Edging
The hem edge needs 138 sc for the scallop edging (138 divided by 6 equals 23 shells).
Increase round: Ch 1. Work (1 sc in each of next 44 sts, 2 sc in next st) 3 times. Join with sl st to first sc. (138 sc)
Scallop shell edging: With CB, join CB to any sc. Ch 1. (sk 2 sts, 5 dc in next st, sk 2 sts, 1 sc in next st) 23 times. Join with sl st to first sc. Fasten off CB. (23 shells)
Granny Circle Motifs
Section 10: Making All Motifs
Make 8 total granny circle motifs following the Granny Circle Motif instructions under Special Stitches above.
Top uses 3 motifs: 1 centered on the front chest panel, 1 on the front of each sleeve near the mid-sleeve.
Skirt uses 5 motifs: 3 evenly spaced across the lower front of the skirt and 2 evenly spaced across the lower back.
Blocking: Pin each motif to a foam blocking board, spray with water, and allow to dry completely. Blocked motifs lie flat and seam more cleanly.
Section 11: Seaming Motifs
Top placement: For the chest motif, center the motif horizontally on the front body panel, with the top edge of the motif sitting at approximately Round 18 of the body tube (about 3.25 in / 8 cm from the hem). For sleeve motifs, center each on the outer arm area of the sleeve.
Skirt placement: Space the 3 front motifs evenly across the lower front, positioning them so the bottom edges sit just above the scallop edging. Place the 2 back motifs symmetrically.
Use the long MC tail and a yarn needle to whipstitch each motif in place through the ch-3 spaces of the motif border. Take care to keep stitches invisible from the RS.
Finishing
Weave in all remaining ends on the WS of both garments. Give both pieces a light steam block or wet block to even out the stitches and help the motifs lie flat.
Try the set on your little one and make any final adjustments to elastic tension if needed.
Tips for Success
Take your time with gauge. This is a fitted garment, and being off gauge will affect the final fit significantly.
Block your motifs before attaching. Unblocked circles can be wonky and difficult to seam evenly.
Use stitch markers generously. Marking your underarm positions, center front, and center back will save you from miscounting.
Try it on as you go. If you have access to your little model, checking the fit at key checkpoints helps catch any issues early.
I hope you absolutely love making this Lavender Garden Toddler Outfit crochet pattern! It’s such a rewarding project, and the finished set is guaranteed to get compliments wherever your little one goes. If you make it, I would love to see your version. Tag me on Instagram or share a photo on Facebook so I can cheer you on!
Don’t forget to save this pattern to your Pinterest boards so you can find it again when you’re ready to start. And if you have any questions or want to share how yours turned out, drop a comment below. Happy crocheting!
You Might Also Like
- Blue Shark Baby Cocoon Wrap Free Crochet Pattern
- Dusty Rose Grid Tie Cardigan Free Crochet Pattern
- Cream Boho Tassel Purse Free Crochet Pattern
- Terracotta Sunset Floral Crochet Blouse Free Pattern
