
Bobble stitches look intimidating. I get it. All those yarn overs, all those loops on your hook, and that strange moment when the little puff pops to the wrong side of your work. But here is the truth: if you can double crochet, you can bobble. That is literally all it is. Five unfinished double crochets pulled together at the end. Nothing scary about it once you break it down.
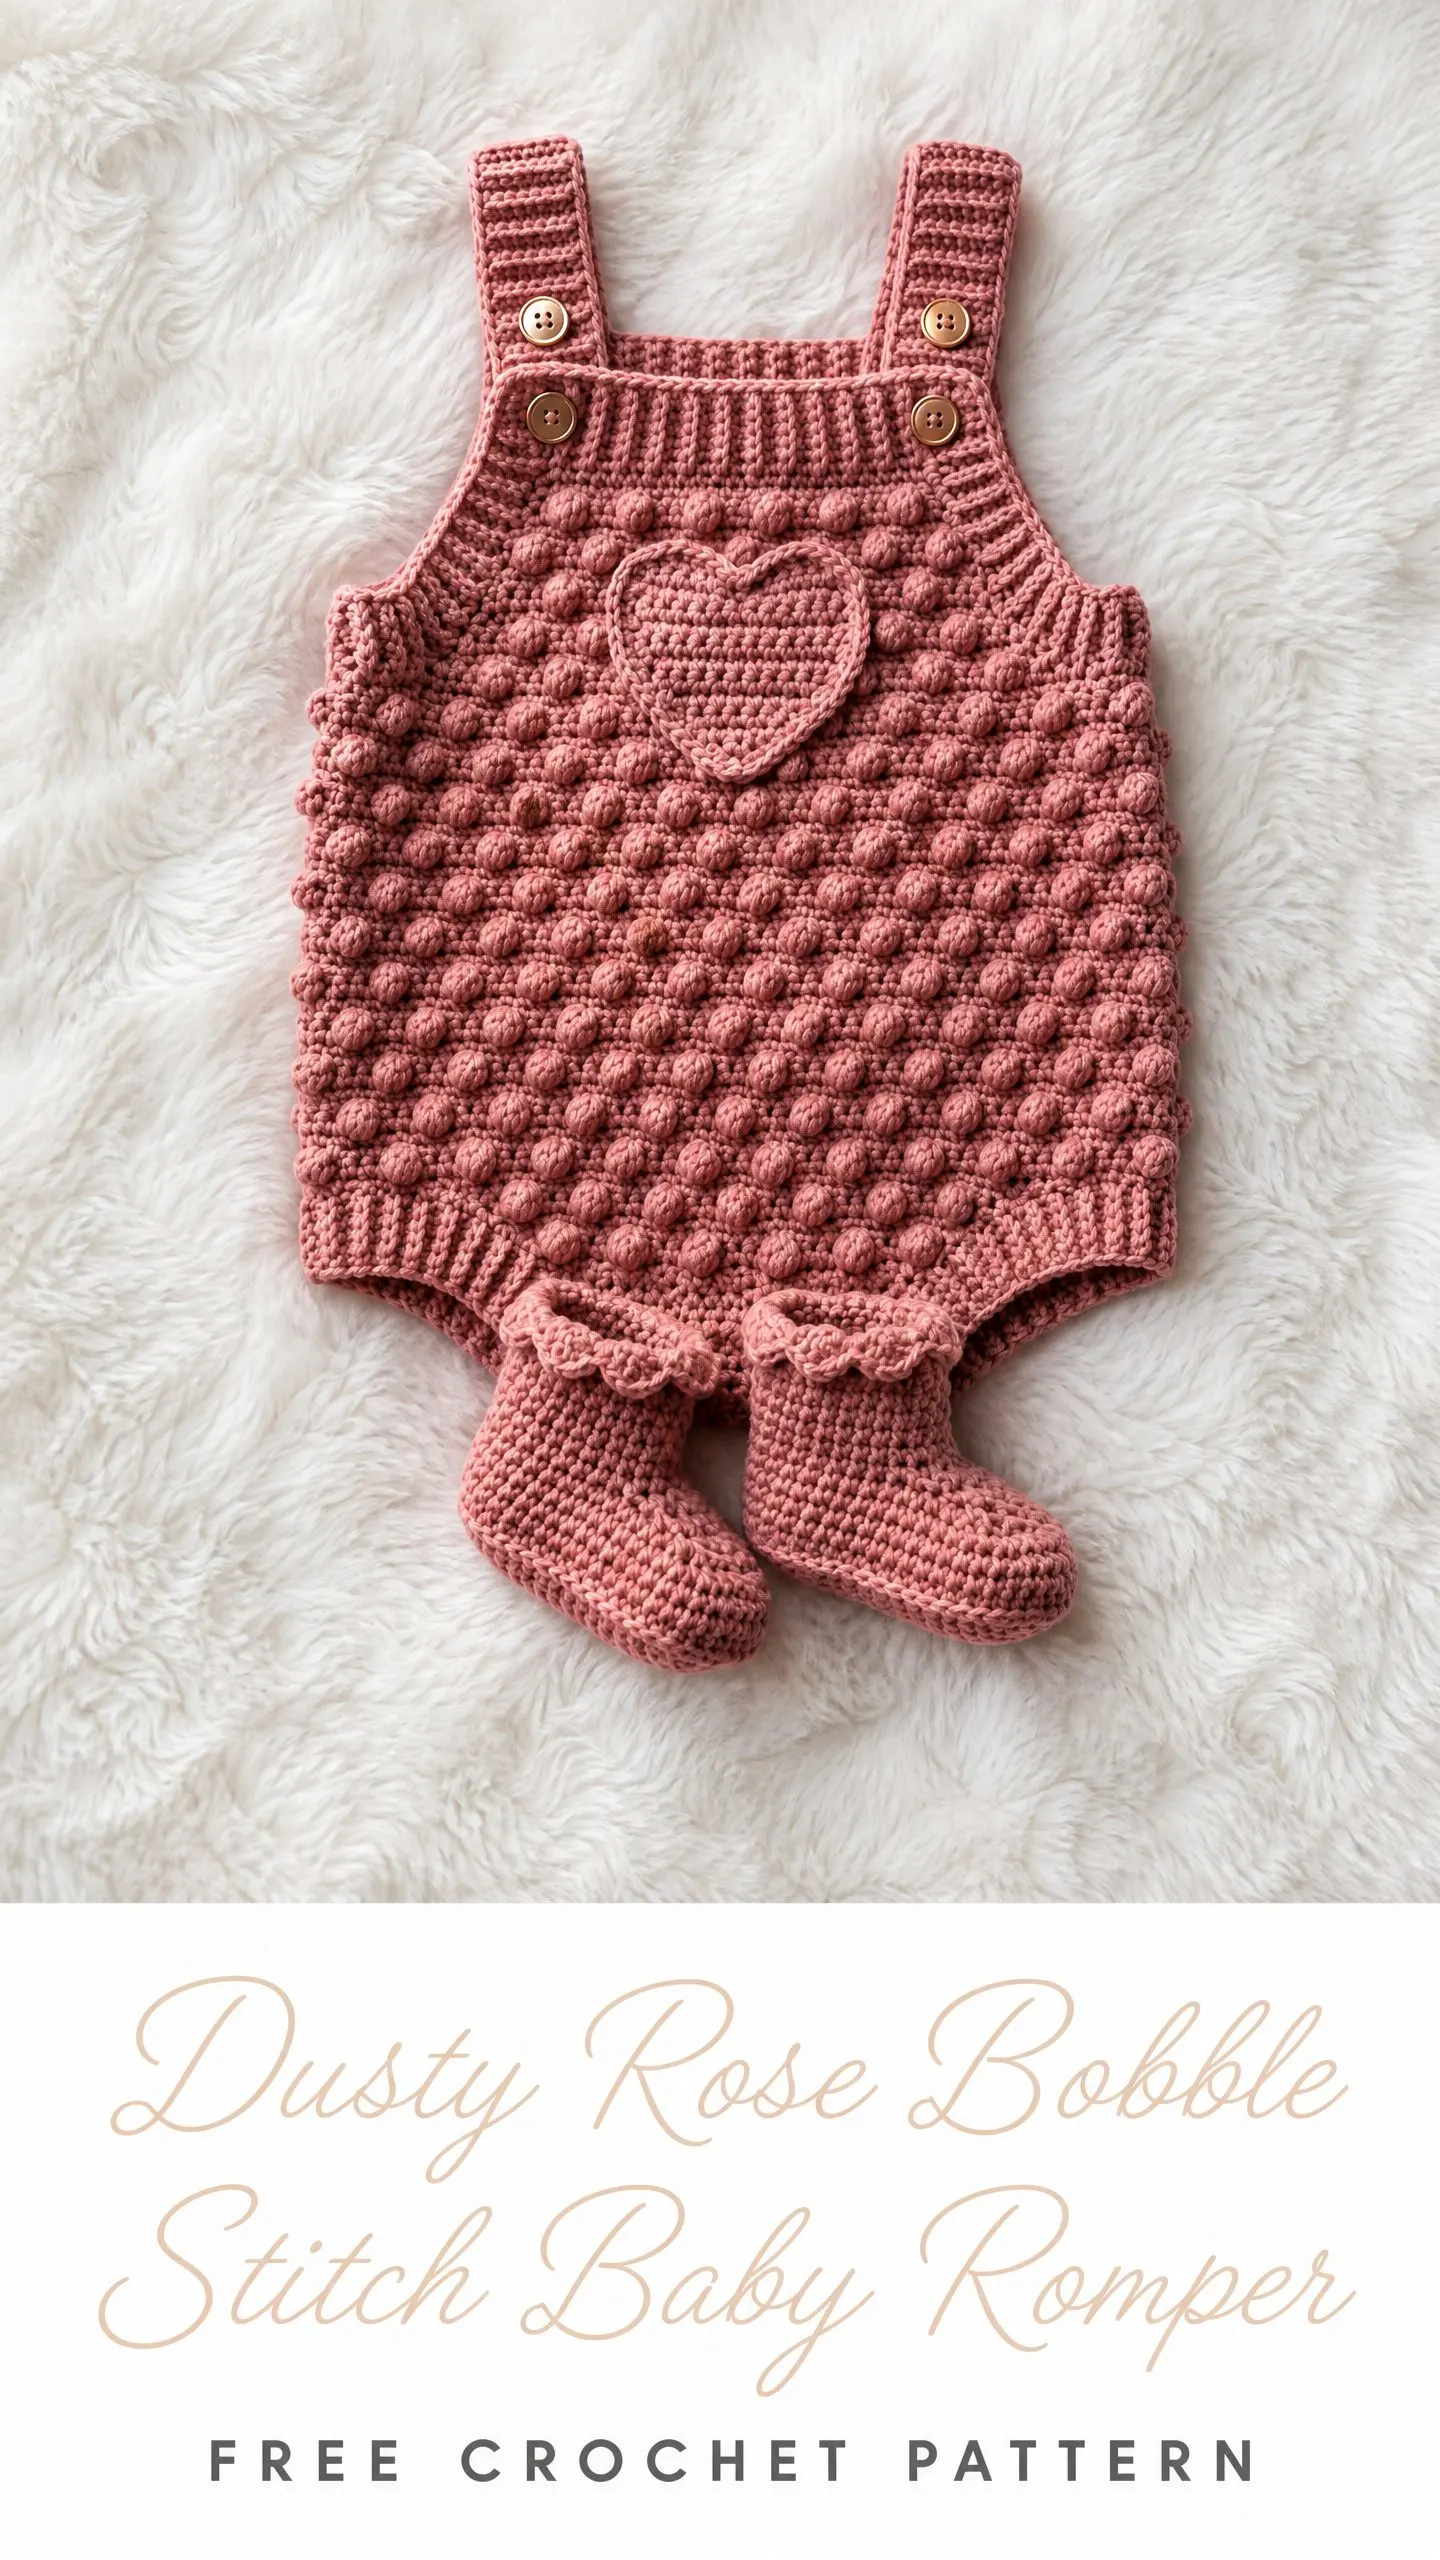
This baby romper might look like something only an advanced crocheter could tackle, but I promise you it is more approachable than it appears. The construction is modular, meaning you work flat panels and seam them together. No complicated shaping while working in the round. No magic ring stress until the tiny heart applique at the very end. And those adorable matching booties? Worked separately, so you can skip them entirely if you are short on time.
Whether you are an intermediate crocheter ready to level up or a confident beginner looking for a challenge, this pattern meets you where you are. I will walk you through every stitch, every count, and every checkpoint along the way.
Why This Baby Romper Pattern Works
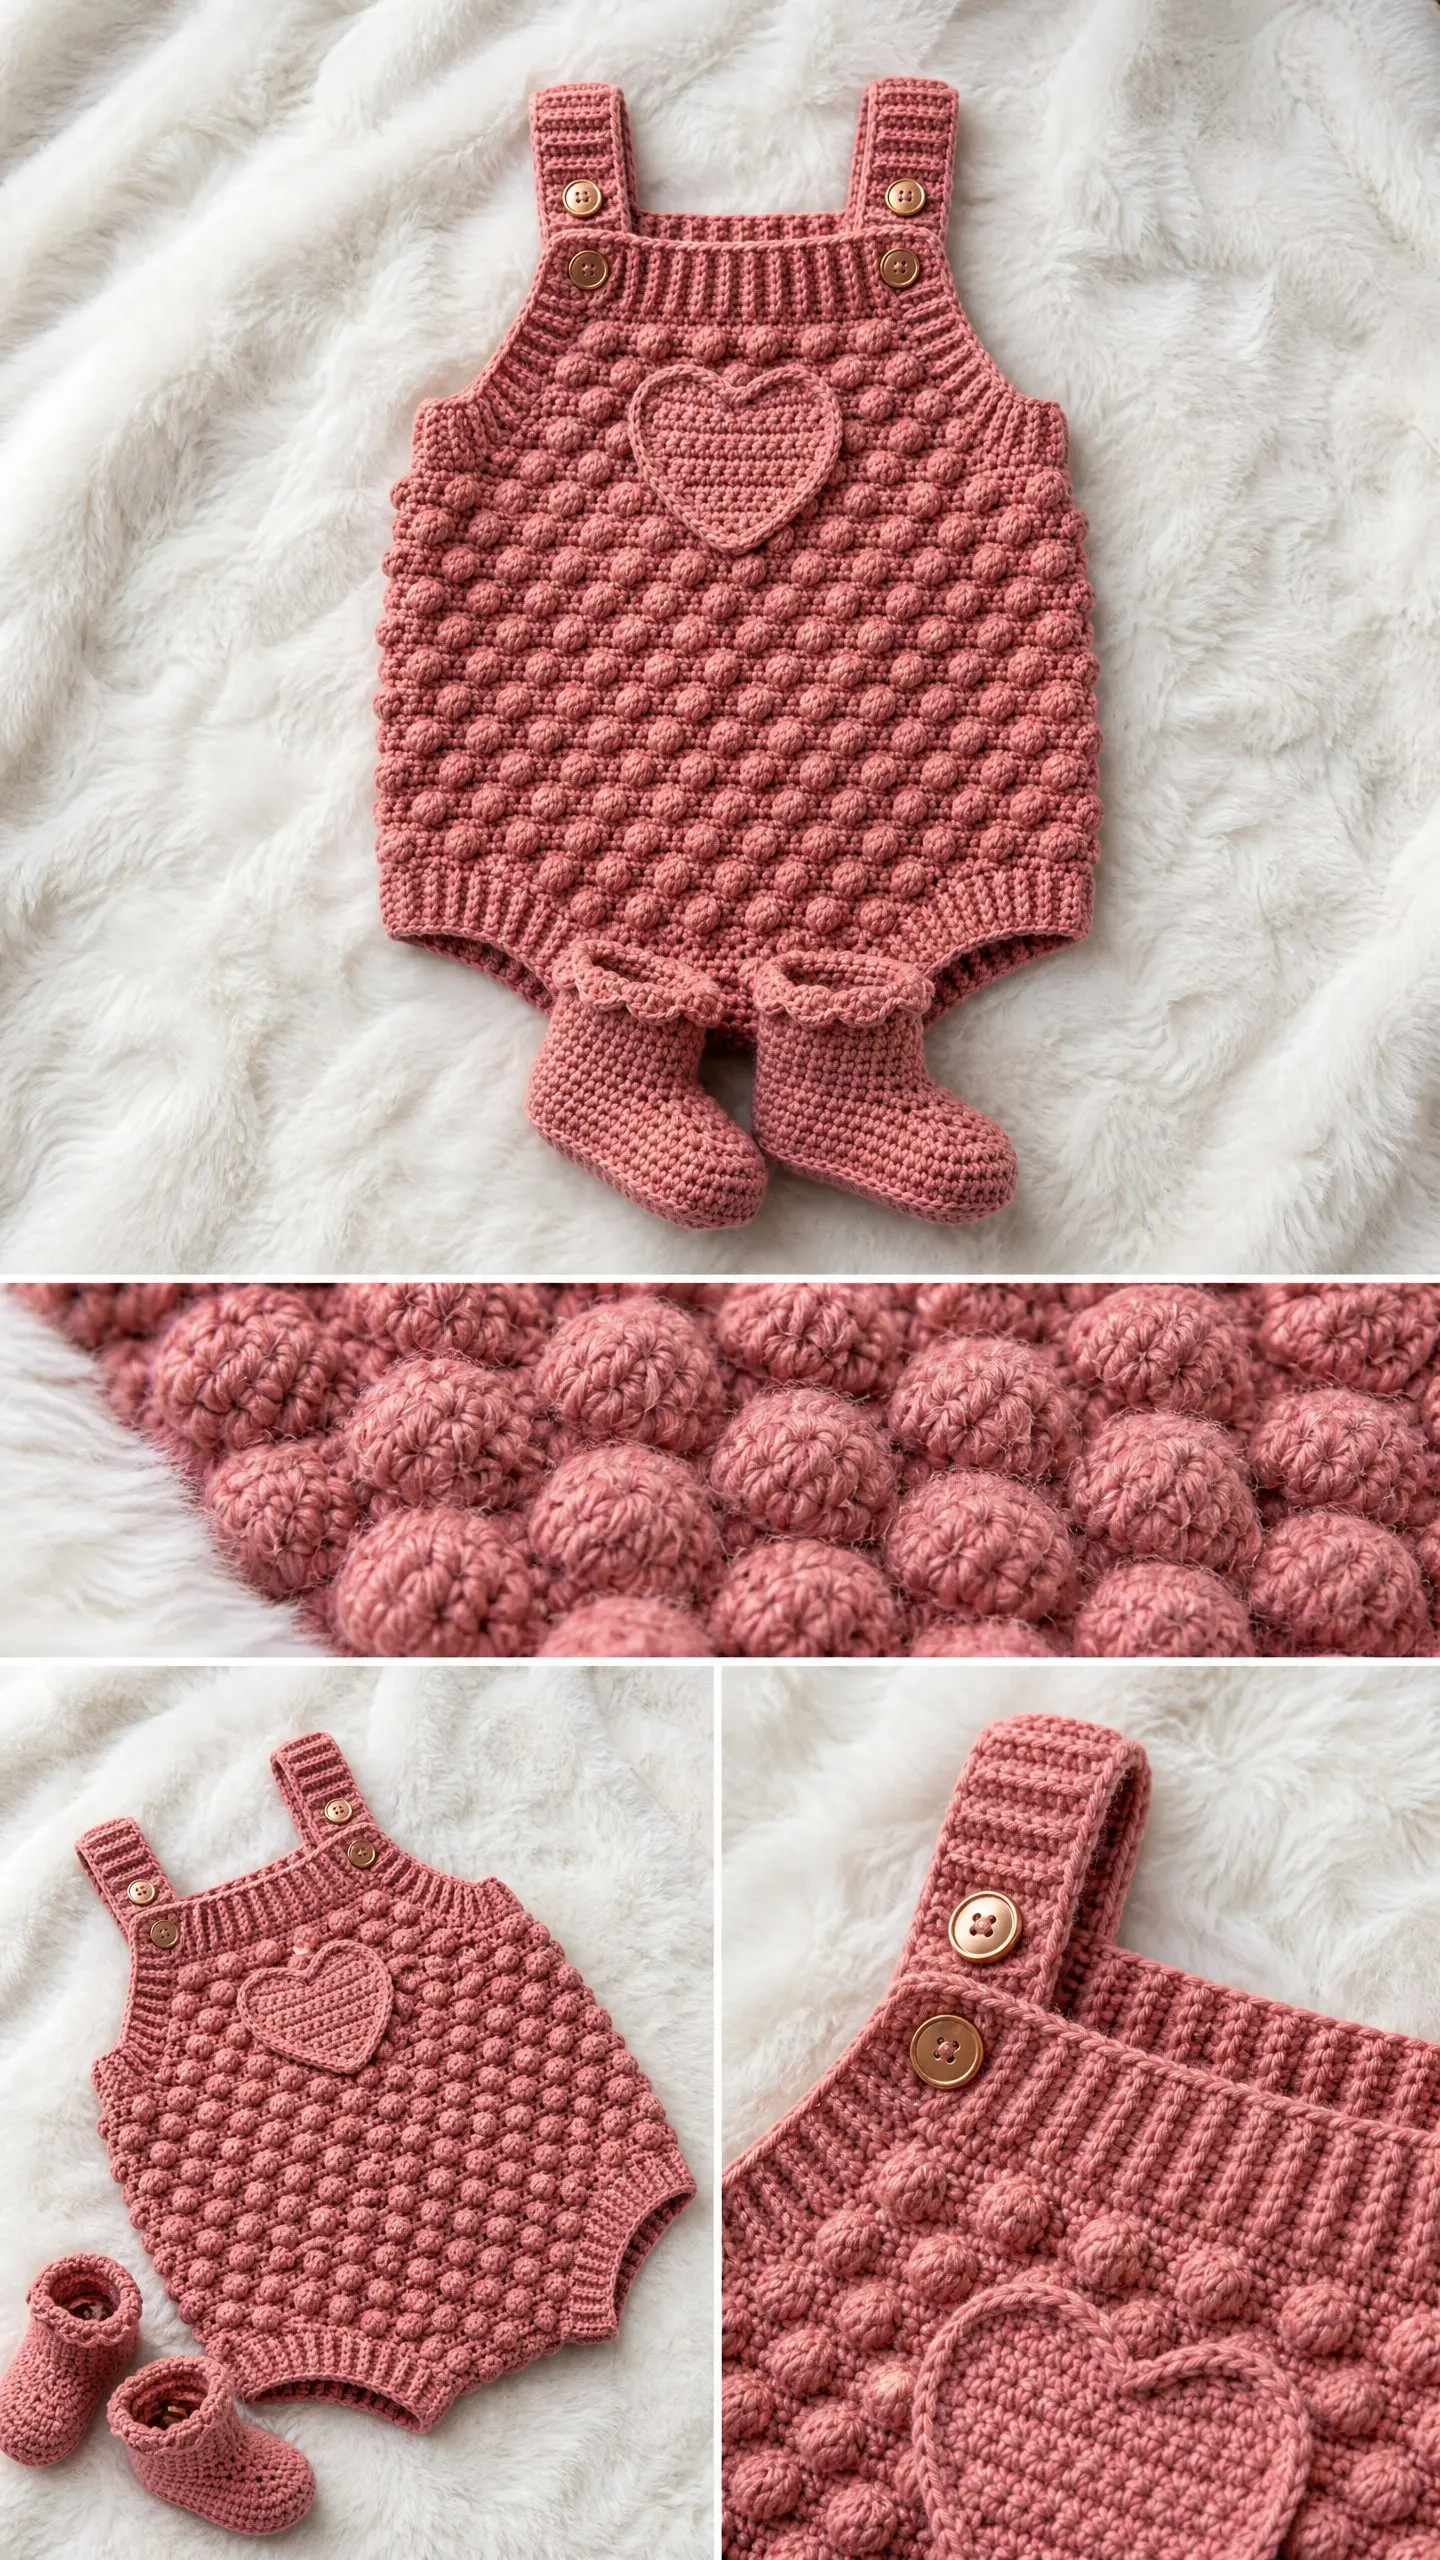
This heirloom quality romper features an allover bobble stitch body that creates the most satisfying textured fabric. The adjustable button straps make it easy to get on a wiggly baby. The ribbed chest band adds stretch and visual interest. And that crocheted heart applique centered on the bib front? Pure sweetness.
The romper is constructed in separate flat panels for the front and back bodice. You seam at the sides and shoulders, finish the leg openings with a delicate ruffle, and add matching crochet booties if you want the complete set. Everything photographs beautifully in this warm dusty rose colorway using a single solid color throughout.
Skill level: Intermediate. You should be comfortable working bobble stitches in rows, reading stitch counts carefully across shaping rows, working in rows and in the round, seaming panels, and picking up stitches for edging. No colorwork required, but tension control across the bobble sections matters for even fabric.
Time estimate: 14 to 20 hours for a complete romper including booties, depending on your working speed with bobble stitches.
Finished Measurements
Newborn to 3 months:
Size customization tips appear at the end of the instructions.
Materials You Will Need
Yarn: 300 to 350 yards / 274 to 320 meters of DK weight yarn (CYCA weight 3). 100% cotton or cotton blend recommended for drape and breathability.
Yarn suggestions:
1. Paintbox Yarns Simply DK, 100% acrylic, 137 yards / 125 meters per 50g ball. Use approximately 2 to 3 balls. Excellent stitch definition for bobbles.
2. Paintbox Yarns Cotton DK, 100% cotton, 137 yards / 125 meters per 50g ball. Superior drape and softness for baby skin.
3. Lion Brand 24/7 Cotton in DK weight, 100% mercerized cotton, 180 yards / 165 meters per 100g ball. Smooth surface shows bobble texture clearly.
Substitution note: Choose any DK weight yarn that achieves the stated gauge. Cotton and cotton blend yarns work best for baby garments due to breathability and washability. Avoid chenille or brushed fibers as they obscure the bobble texture. Always swatch before beginning.
Hooks:
Notions:
Gauge
With G-6 / 4.00 mm hook in Bobble Stitch pattern:
16 stitches and 10 rows = 4 inches / 10 cm
With F-5 / 3.75 mm hook in single crochet:
18 stitches and 20 rows = 4 inches / 10 cm
Gauge is mandatory for this garment. Incorrect gauge will produce a romper that does not fit a newborn. Take time to swatch both gauges before beginning. Block your swatch before measuring.
Abbreviations
Special Stitches
Bobble Stitch (bob)
The bobble used in this pattern is a 5 double crochet bobble worked in a single stitch or space.
Step 1: Yarn over, insert hook into designated stitch.
Step 2: Yarn over, pull up a loop (3 loops on hook).
Step 3: Yarn over, pull through 2 loops (2 loops remain on hook).
Step 4: Repeat Steps 1 through 3 four more times in the same stitch until you have 6 loops on hook.
Step 5: Yarn over, pull through all 6 loops on hook at once.
Step 6: Chain 1 to close and stabilize the bobble. This chain 1 counts as a stitch in the stitch count.
Important note: Bobbles will pop to the WS of the work as you make them. After turning, they appear on the RS. Always work bobbles on WS rows so they appear on the RS of the finished fabric.
Ribbing Stitch
Work sc in BLO across every row. This creates a stretchy, rib-like texture used for the chest band and leg cuffs.
Ruffled Edging
Working into designated edge stitches, work 3 sc in every stitch around the leg opening. This creates a gentle ruffle.
Pattern Notes Before You Begin
1. The romper front and back are worked as separate flat panels, then seamed at the sides. The straps are worked separately and buttoned to the back.
2. Bobbles appear on every other row (WS rows) so that all bobbles face the RS of the finished fabric.
3. The chest band (ribbing) is worked first as a foundation strip and the bodice is worked downward from it. Straps are worked upward from the chest band.
4. Stitch counts given at the end of every row or round in parentheses.
5. All turning chains are noted per section. In the bobble section, the turning chain does not count as a stitch unless stated.
6. Mark your RS with a stitch marker at the beginning.
Baby Romper Crochet Pattern Instructions
Section 1: Front Chest Band (Ribbing Strip)
Using F-5 / 3.75 mm hook, chain 13.
Row 1 (RS): Sc in second ch from hook and in each ch across. Turn. (12 sc)
Row 2: Ch 1, sc in BLO of each st across. Turn. (12 sc)
Repeat Row 2 until the ribbing strip measures 6.5 inches / 16.5 cm from edge to edge, approximately 32 rows total.
Fasten off, leaving a long tail for seaming if desired, or continue directly.
Checkpoint: Your ribbing strip should measure 6.5 inches / 16.5 cm wide and 1.5 inches / 3.8 cm tall (12 stitches deep). The short ends of the strip form the top and bottom edges of the bib chest band.
Section 2: Front Bodice (worked downward from chest band)
Switch to G-6 / 4.00 mm hook.
Turn your ribbing strip so the long edge (32-row edge) is at the top. You will pick up stitches along this long edge to begin the bodice.
Pick-up Row: With RS of ribbing facing, join yarn to first row-end of the ribbing strip. Ch 1. Work 32 sc evenly across the long lower edge of the ribbing strip. Turn. (32 sc)
You are picking up 1 sc per row-end of the ribbing.
Row 1 (WS, Bobble Row): Ch 1. Sc in first st. (Bob in next st, sc in next st) repeat across to last st. Sc in last st. Turn. (32 sts: 16 sc and 16 bob, counting the ch-1 closing each bobble as part of the bobble unit)
Stitch count clarity: Each bobble unit (bob + its closing ch-1) occupies one stitch position. Total stitch positions remain 32 across every row.
Row 2 (RS, Plain Row): Ch 1. Sc in each st across. Turn. (32 sc)
Row 3 (WS, Bobble Row): Ch 1. Sc in first st. (Bob in next st, sc in next st) across to last st. Sc in last st. Turn. (32 sts)
Row 4 (RS, Plain Row): Ch 1. Sc in each st across. Turn. (32 sc)
Continue alternating WS Bobble Rows and RS Plain Rows until bodice measures 4 inches / 10 cm from the bottom of the chest band, ending after a RS Plain Row. Approximately 10 rows total.
Checkpoint: Your front bodice panel (chest band + bobble bodice) should measure approximately 5.5 inches / 14 cm tall and 8 inches / 20.3 cm wide.
Section 3: Front Crotch Shaping
Continue with G-6 hook.
You will decrease at both ends to taper the crotch panel.
Decrease Row 1 (WS): Ch 1. Sc2tog over first 2 sts. Work Bobble Row pattern across to last 2 sts. Sc2tog. Turn. (30 sts)
Decrease Row 2 (RS): Ch 1. Sc2tog over first 2 sts. Sc across to last 2 sts. Sc2tog. Turn. (28 sc)
Decrease Row 3 (WS): Ch 1. Sc2tog over first 2 sts. Work Bobble Row pattern across to last 2 sts. Sc2tog. Turn. (26 sts)
Decrease Row 4 (RS): Ch 1. Sc2tog over first 2 sts. Sc across to last 2 sts. Sc2tog. Turn. (24 sc)
Decrease Row 5 (WS): Ch 1. Sc2tog over first 2 sts. Work Bobble Row pattern across to last 2 sts. Sc2tog. Turn. (22 sts)
Decrease Row 6 (RS): Ch 1. Sc in each st across. Turn. (22 sc)
Fasten off.
Checkpoint: The bottom of the crotch panel should be 22 stitches wide, measuring approximately 5.5 inches / 14 cm wide.
Section 4: Back Chest Band and Bodice
Work the back chest band ribbing strip identical to Section 1: 12 stitches wide, 32 rows long.
Pick up 32 sc along the long lower edge as in Section 2.
Work the back bodice in the same Bobble Stitch pattern as the front for the same number of rows (approximately 10 rows bobble section), ending after a RS Plain Row.
Work the Crotch Shaping exactly as Section 3.
Fasten off.
Section 5: Straps (make 2)
Using F-5 / 3.75 mm hook, chain 5.
Row 1: Sc in second ch from hook and in each ch across. Turn. (4 sc)
Row 2: Ch 1, sc in BLO of each st across. Turn. (4 sc)
Repeat Row 2 until strap measures 7 inches / 17.8 cm long, approximately 35 rows.
Last Row: Ch 1, sc across, then work a buttonhole as follows: sc 1, ch 2, sk 2, sc 1. Turn. (4 sts + ch-2 sp)
Next Row: Ch 1, sc 1, sc 2 into ch-2 sp, sc 1. Turn. (4 sc)
Work 2 more rows of sc in BLO. Fasten off, leaving tail for sewing.
Repeat for second strap.
Section 6: Assembly
Lay front and back bodice panels with RS facing together.
Seam the side edges of the bobble bodice sections together using mattress stitch or sl st seam, starting from the top of the bobble section (bottom of chest band) down to the beginning of the crotch shaping rows. Leave the crotch shaping area open (these are the leg openings).
Seam the crotch: With RS together, align the bottom 6 rows of the front and back crotch panels and seam along the center 10 stitches of each panel’s bottom edge, leaving 6 stitches on each side open for leg holes.
The leg openings are formed by the unseamed side crotch sections. Each leg opening is approximately 6 stitches on each of the front and back panels (12 stitches total around each leg opening).
Turn right side out.
Section 7: Front Bib Strap Attachment
Center each strap on the top edge of the front chest band ribbing strip, one toward each upper corner, leaving approximately 1.5 inches / 3.8 cm of space between straps at center.
Sew the non-buttonhole end of each strap securely to the top edge of the front chest band using yarn needle and yarn tail. The RS of the strap faces outward.
Sew two buttons onto the top edge of the back chest band ribbing strip, positioned to align with the buttonhole ends of the straps when draped over the shoulders.
Button straps to back.
Sew remaining two buttons to the bottom crotch seam area on one panel and work two button loops on the opposite crotch edge for snapping the crotch closed. Button loops: Work ch 4, sl st into same spot to form loop. Fasten off.
Section 8: Leg Ruffle Edging
With F-5 / 3.75 mm hook, join yarn to any stitch around a leg opening.
Rnd 1: Ch 1, sc evenly around the entire leg opening. Work approximately 24 sc around each leg opening. Sl st to first sc to join. (24 sc)
Rnd 2 (Ruffle): Ch 1. Work 3 sc in every st around. Sl st to join. Fasten off. (72 sc)
Weave in ends. Repeat for second leg opening.
Checkpoint: After all assembly and edging, the romper body from top of straps to crotch seam should measure approximately 14 to 15 inches / 35.5 to 38 cm. Chest width (flat) should measure approximately 7 to 8 inches / 17.8 to 20.3 cm.
Section 9: Heart Applique
Using F-5 / 3.75 mm hook, make a magic ring.
Rnd 1: Ch 3 (counts as first dc). Work 2 dc in ring. Ch 1. Work 3 dc in ring. Ch 1. Work 3 dc in ring. Ch 1. Work 3 dc in ring. Ch 1. Sl st to top of beginning ch-3. Sl st into ch-1 sp. (12 dc, 4 ch-1 sps)
Rnd 2: Ch 1. In the same ch-1 sp: work (sc, hdc, 3 dc, hdc, sc). This forms one lobe of the heart. Sl st to move to next ch-1 sp. Work (sc, hdc, dc, hdc, sc) in next sp. Sl st to move to next sp. Work (sc, hdc, dc, hdc, sc) in next sp. Work point: sl st down to tip of ring, ch 1. Work (sc, hdc, dc, hdc, sc) in last sp. Sl st to join.
Fasten off, leaving a tail for sewing.
Finished heart should measure approximately 2 inches / 5 cm wide and 1.75 inches / 4.5 cm tall.
Pin the heart centered on the front bib section of the chest band, approximately 0.5 inches / 1.3 cm below the top edge of the bobble bodice. Sew in place with yarn needle, leaving a very slight raised edge so it appears dimensional.
Section 10: Booties (make 2)
Using F-5 / 3.75 mm hook.
The sole is worked in rows and then the upper is worked in rounds around the sole.
Sole
Chain 9.
Round 1: Sc in second ch from hook. Sc in next 6 chs. Work 3 sc in last ch (toe). Now work along the opposite side of the foundation chain: sc in next 6 chs. Work 2 sc in last ch (heel). Sl st to join. (18 sc)
Round 2: Ch 1. Work 2 sc in first st. Sc in next 6 sts. Work 2 sc in each of next 3 sts. Sc in next 6 sts. Work 2 sc in each of last 2 sts. Sl st to join. (25 sc)
Round 3: Ch 1. Work 2 sc in first st. Sc in next 8 sts. (2 sc in next st, sc in next st) 3 times. Sc in next 8 sts. (2 sc in next st, sc in next st) 2 times. Sl st to join. (31 sc)
Upper
Round 4: Ch 1. Sc in BLO of each st around. Sl st to join. (31 sc) This creates a crisp fold between sole and upper.
Round 5: Ch 1. Sc in each st around. Sl st to join. (31 sc)
Round 6: Ch 1. Sc in each st around. Sl st to join. (31 sc)
Toe Shaping
Round 7: Ch 1. Sc in first 10 sts. (Sc2tog) 5 times over center 10 sts. Sc in last 11 sts. Sl st to join. (26 sc)
Round 8: Ch 1. Sc in first 9 sts. (Sc2tog) 4 times. Sc in last 9 sts. Sl st to join. (22 sc)
Round 9: Ch 1. Sc in each st around. Sl st to join. (22 sc)
Round 10: Ch 1. Sc in each st around. Sl st to join. (22 sc)
Cuff
Switch to G-6 / 4.00 mm hook for the cuff ruffle.
Round 11: Ch 1. Sc in each st around. Sl st to join. (22 sc)
Round 12 (Ruffle): Ch 1. Work 3 sc in each st around. Sl st to join. Fasten off. (66 sc)
Weave in all ends on bootie. Repeat for second bootie.
Checkpoint: Each bootie should measure approximately 3.5 inches / 9 cm from heel to toe and 2.5 inches / 6.4 cm tall at the cuff.
The booties are not sewn to the romper. They are worn separately.
Size Customization Tips
For 3 to 6 months: Add 2 stitches to each side of the chest band pick-up row (36 sc total). Work 2 additional rows of bobble pattern in the bodice section. Add 2 additional decrease rows to the crotch section. Extend straps by 1.5 inches / 3.8 cm. For booties, add 1 chain to the foundation (ch 10) and work 1 additional plain round before toe shaping.
For 6 to 9 months: Add 4 stitches to each side of the chest band pick-up row (40 sc total). Work 4 additional rows of bobble pattern. Add 4 additional decrease rows to crotch. Extend straps by 2.5 inches / 6.4 cm. For booties, add 2 chains to foundation (ch 11) and work 2 additional plain rounds before toe shaping.
Always re-swatch if changing yarn weight or hook size. The bobble repeat is worked over an even number of stitches, so ensure your adjusted stitch count remains even.
Finishing and Blocking
Wet block the completed romper by soaking in cool water for 15 minutes. Gently press out excess water in a towel. Lay flat on a foam blocking mat or clean towel. Pin to measurements. Allow to dry fully before handling. Cotton yarns respond especially well to wet blocking and the bobble texture will bloom and even out beautifully.
Weave in all yarn ends securely using a yarn needle, working ends in at least 2 directions through the bobble fabric to prevent them from working loose.
Sew on all buttons securely using doubled sewing thread in a matching color for extra strength. Baby clothing buttons endure significant stress.
Care Instructions
Machine wash gentle cycle, cold water, inside out. Lay flat to dry. Do not wring. Do not tumble dry as this will distort the bobble texture and may shrink the garment. Do not iron directly on the bobble sections. Steam block with a cloth barrier if pressing is needed. Check all buttons before each wear. Store folded, not hung, to prevent the shoulder straps from stretching.
Thank you so much for choosing this pattern for your little one or for a special gift. I truly hope you enjoy making it as much as I enjoyed designing it. The bobble texture is so satisfying once you find your rhythm, and the finished romper is absolutely precious.
If you make this dusty rose bobble stitch baby romper, I would love to see it! Tag me on Instagram or share your finished project on Facebook. Save this pattern to your Pinterest boards so you can find it when you are ready to cast on, and please leave a comment below if you give it a try. Happy crocheting!
You Might Also Like
- Sunset Ombre Granny Tote Free Crochet Pattern
- Lavender and Lilac Baby Dress Free Crochet Pattern
- Ocean Blue Boho Crochet Gladiator Sandals Free Pattern
- Sage Green Boho Braided Bag Free Crochet Pattern
