
Looking for the perfect handmade gift for a toddler who loves dress-up and whimsical accessories? This adorable hooded cape transforms any little one into a walking slice of birthday cake, complete with rainbow sprinkles, a kawaii face, and crocheted cherries. The construction uses single crochet (sc) throughout the main body, making it accessible even if you have never tackled a garment before.
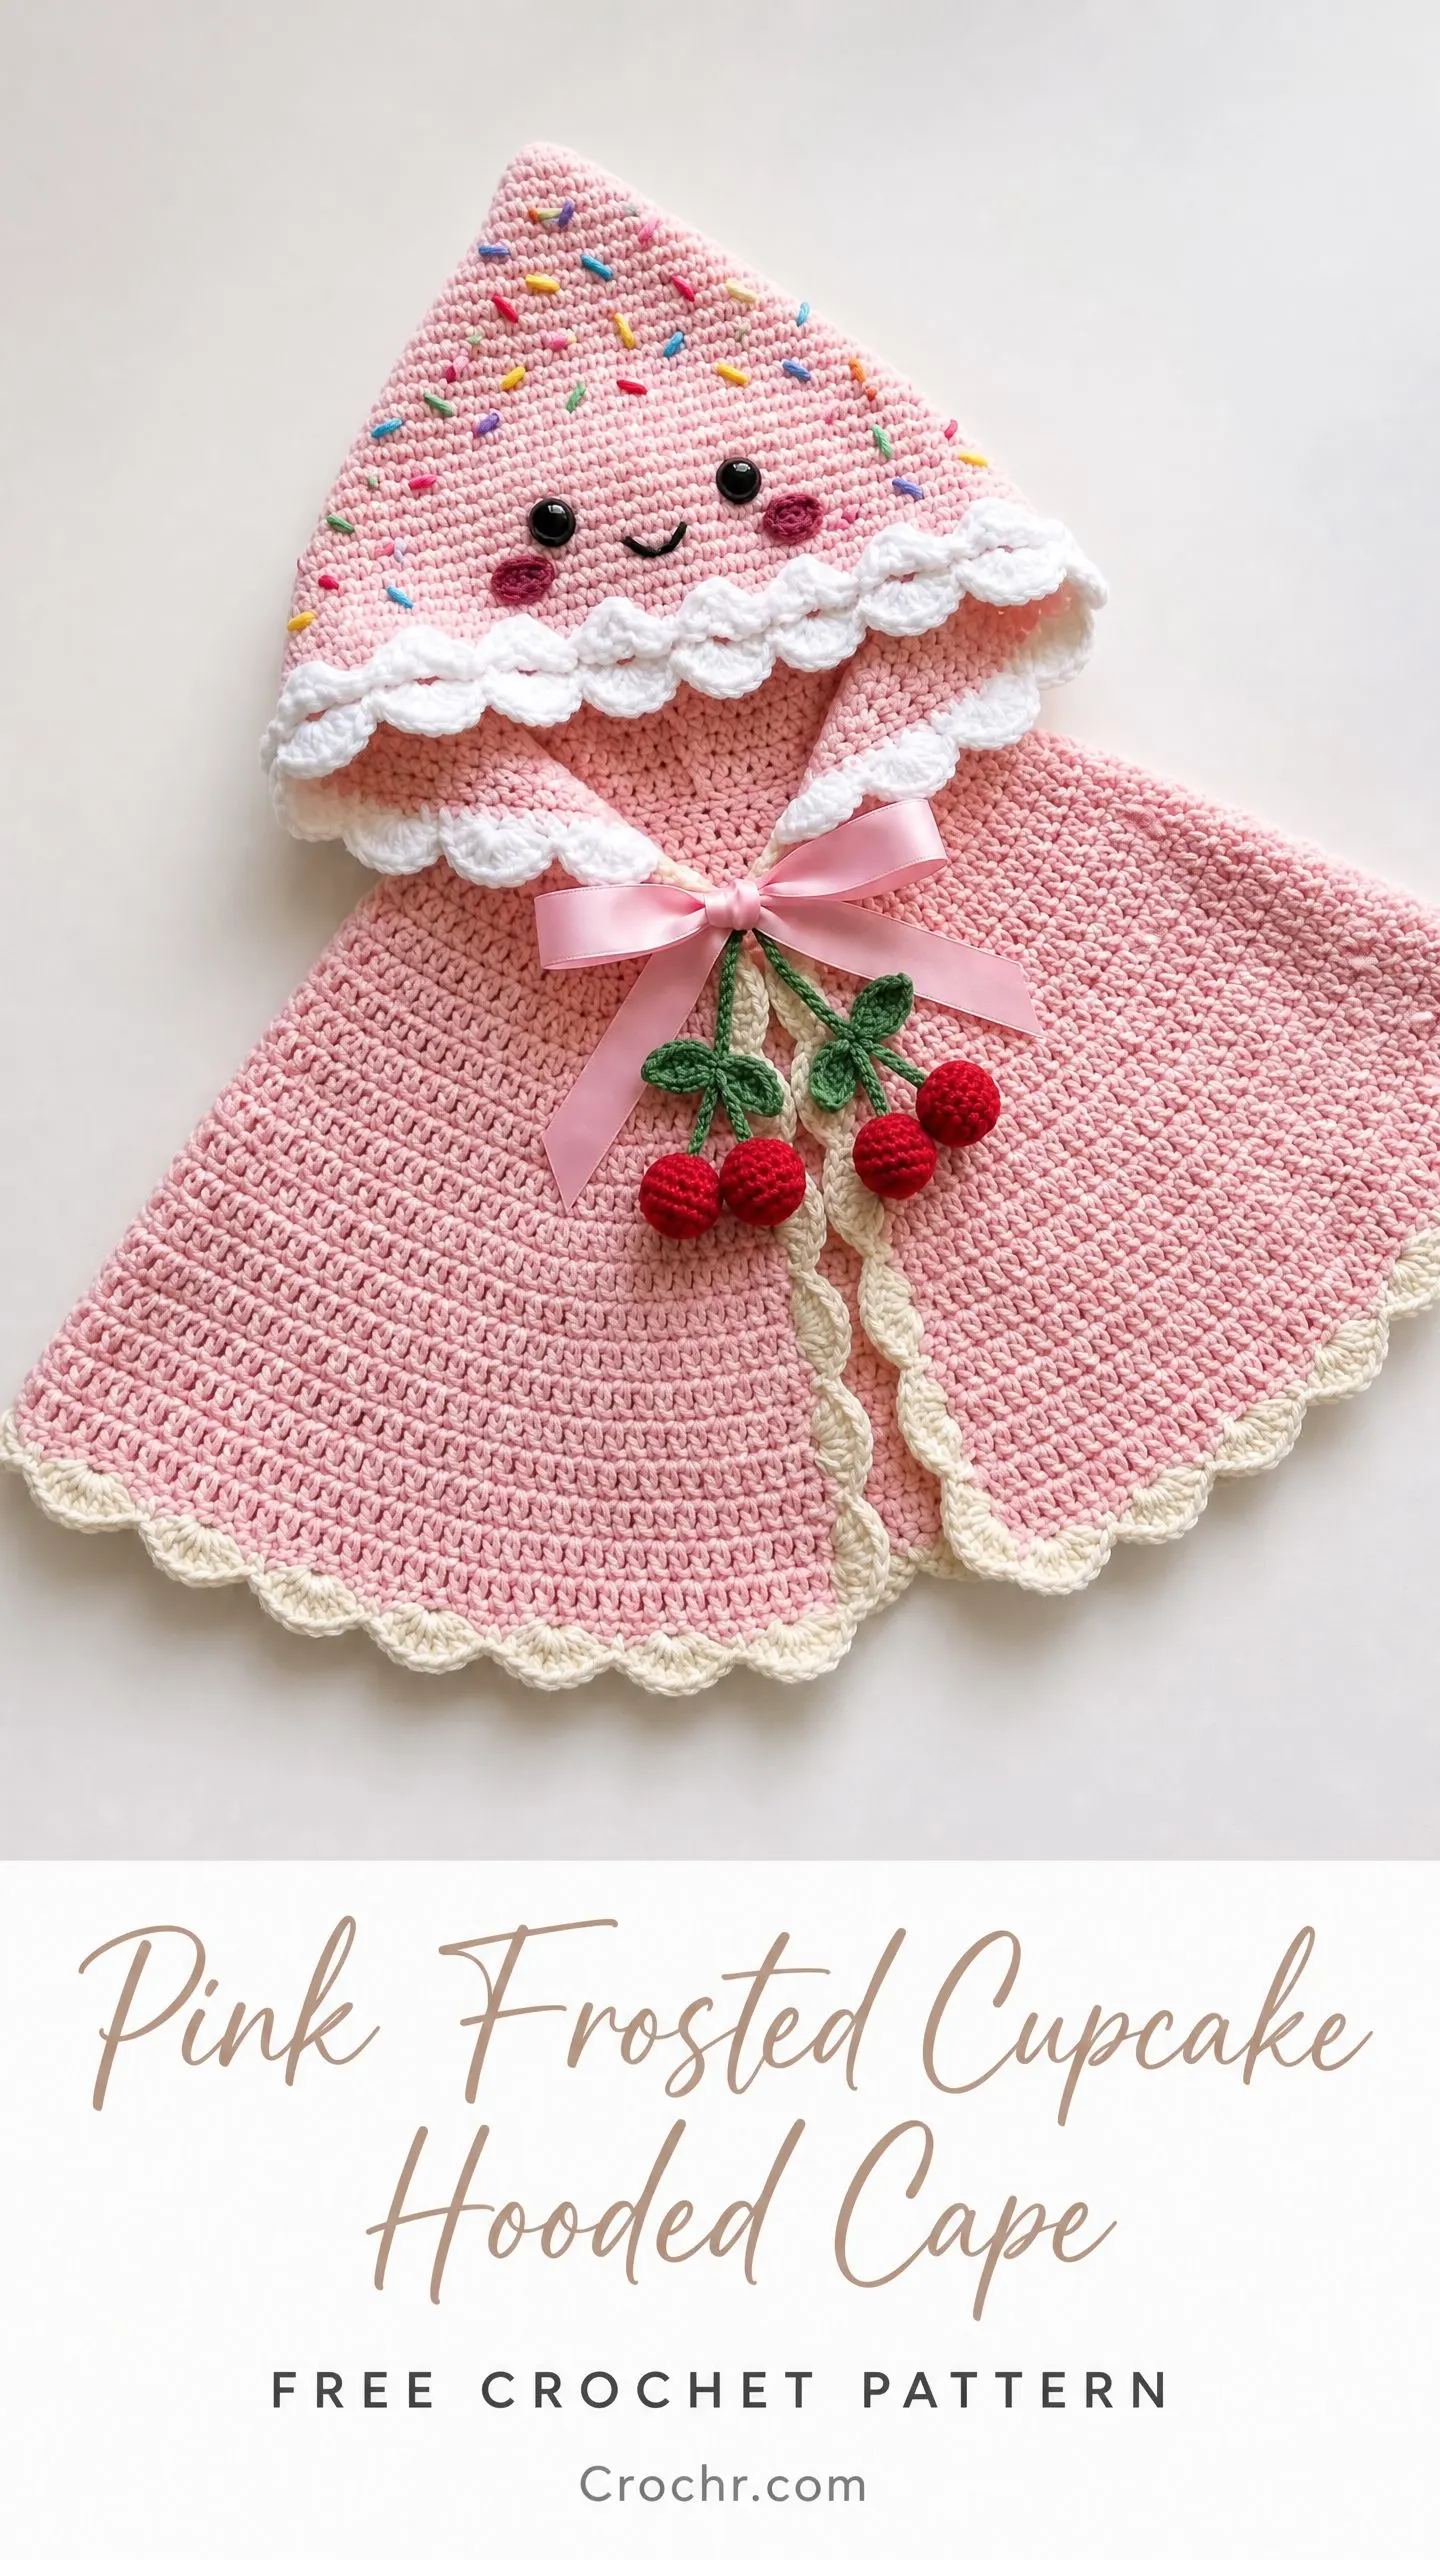
The cape works up in roughly 12 to 18 hours, depending on your pace. It fits toddler sizes 2T to 3T and makes an incredible photo prop, Halloween costume base, or everyday play piece. The scalloped edges give it that frosting look, while the pointed hood mimics a slice of cake.
Whether you are making this for your own kiddo, a grandchild, or a birthday gift, the finished result is guaranteed to get compliments. Let me walk you through every single step.
Why This Hooded Cape Pattern Works So Well
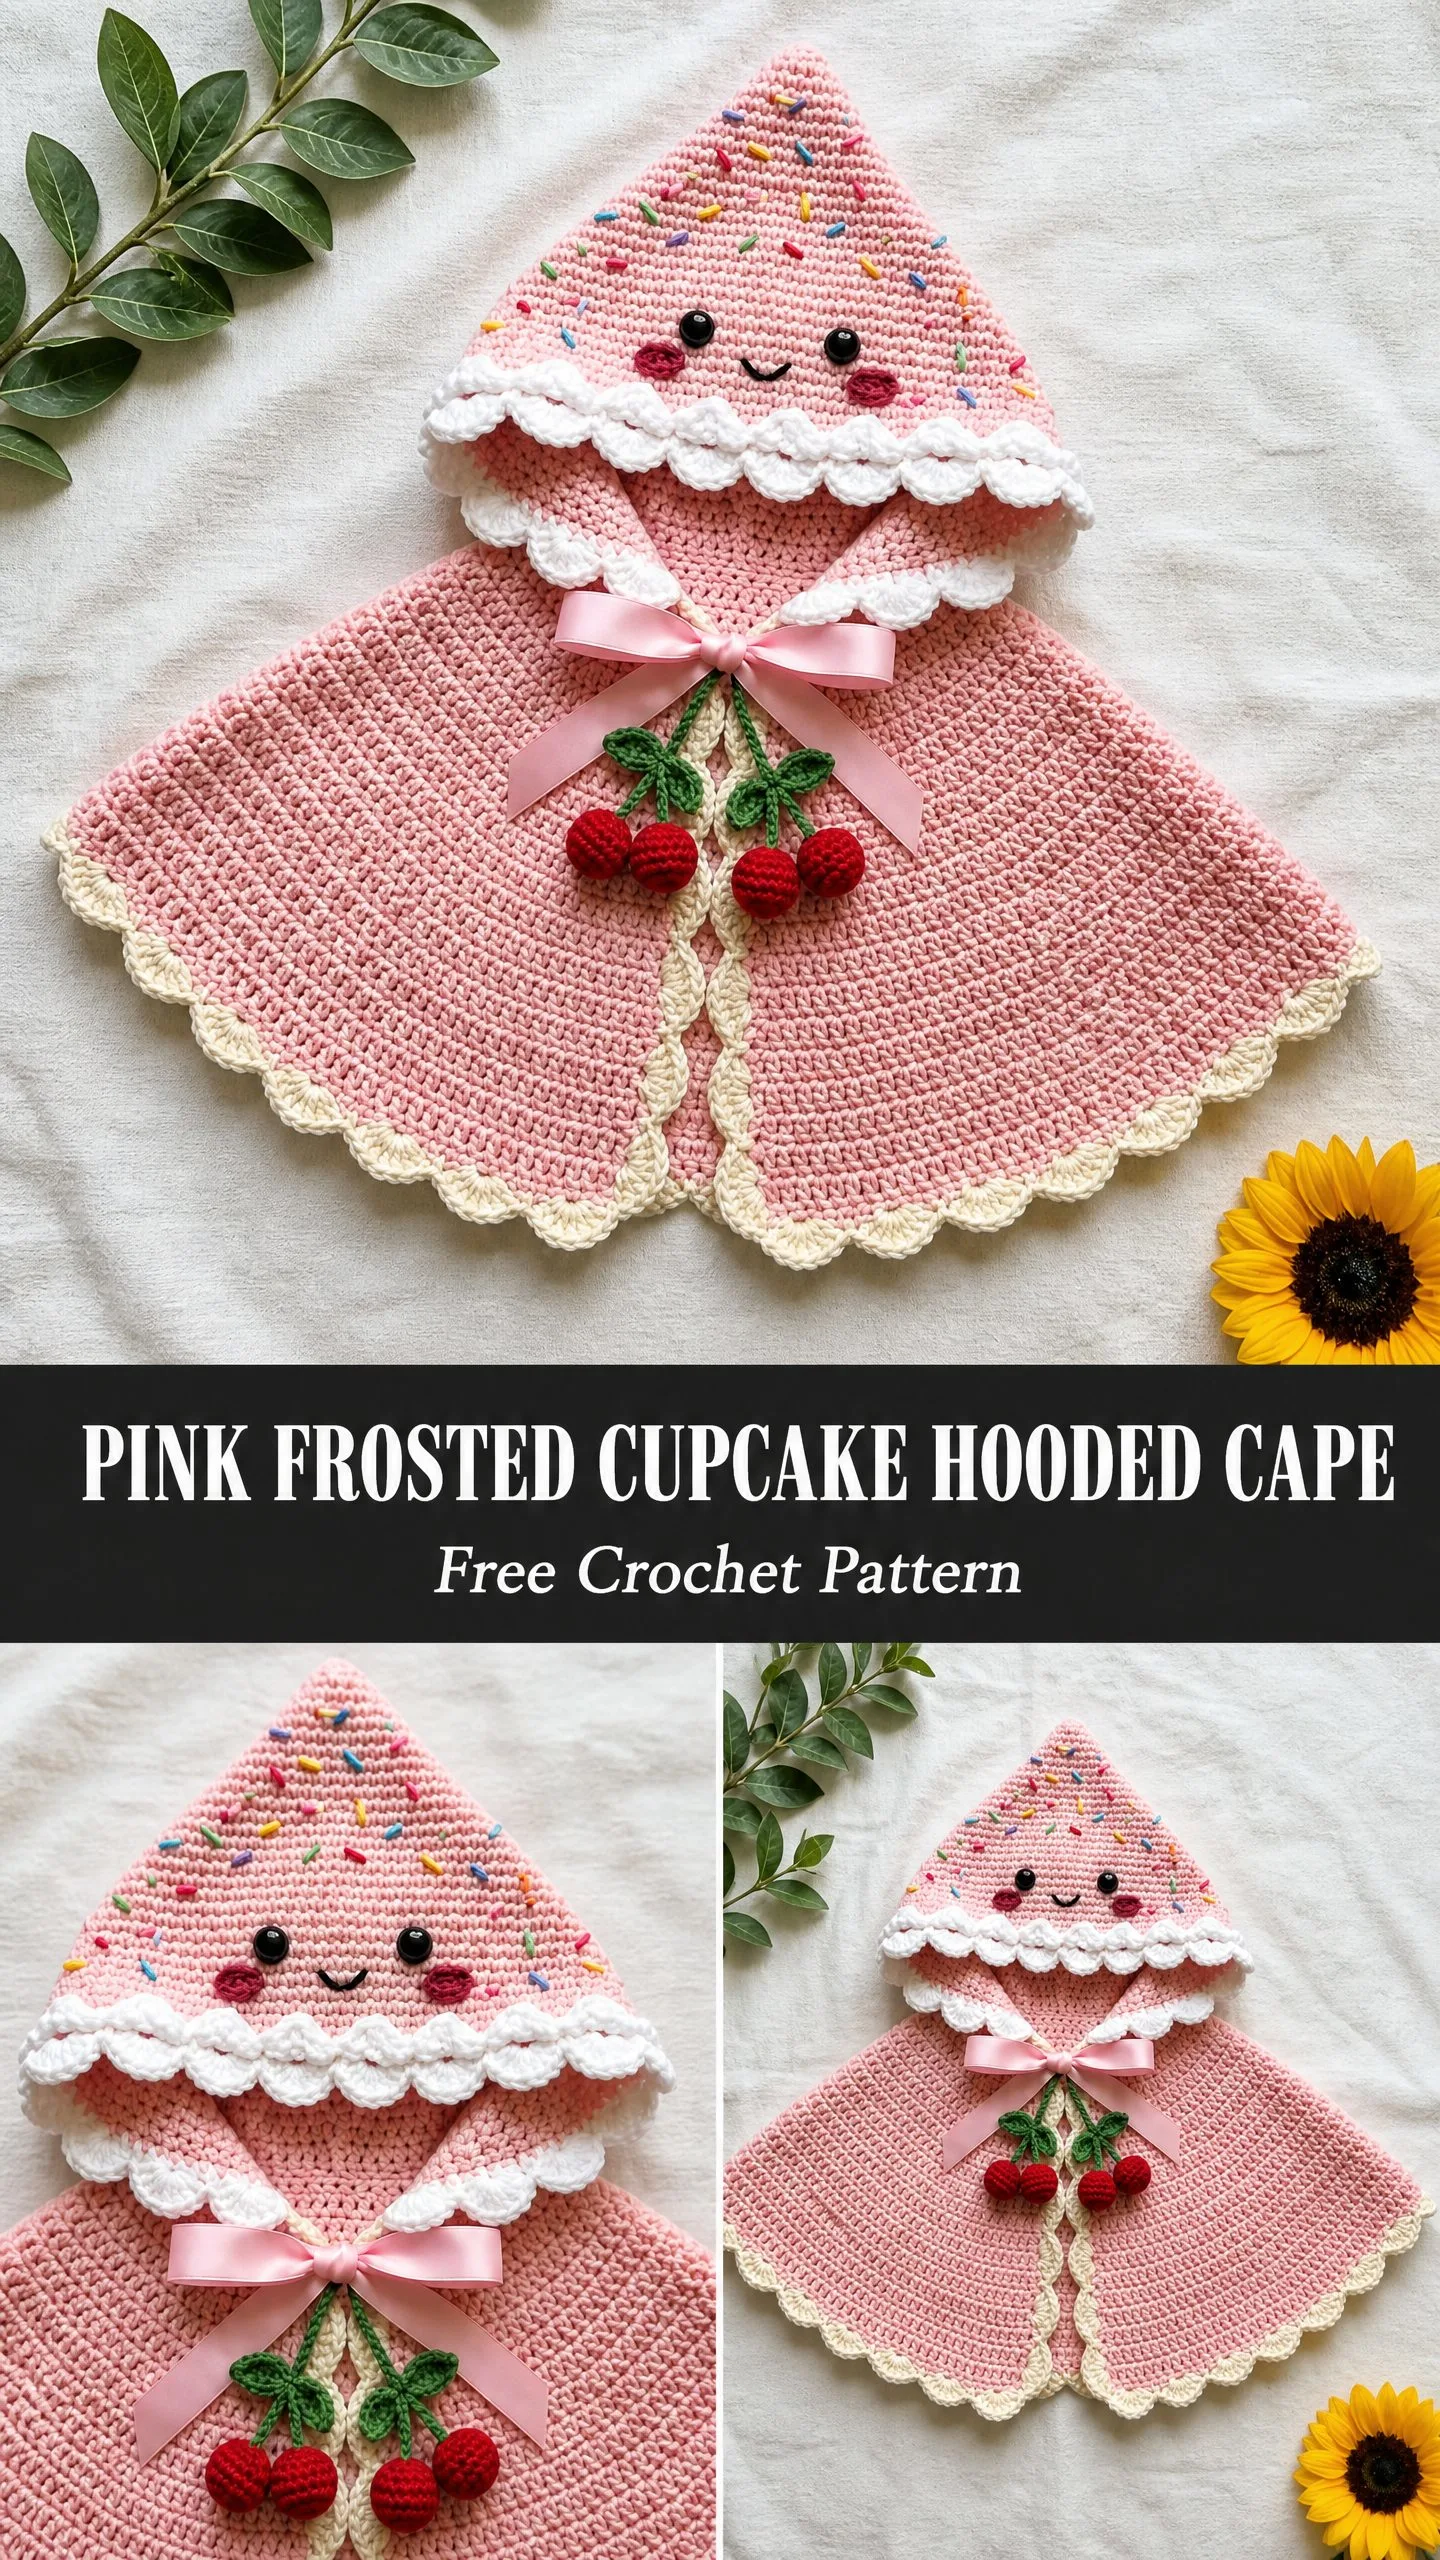
This is not your typical baby poncho. The design mimics a frosted cupcake or cake slice, which means the hood comes to a point at the top rather than a rounded shape. Rainbow sprinkles are embroidered across the hood surface. A sweet kawaii face with safety eyes and rosy cheeks sits just above the ruffle. The white scalloped trim at the neckline represents frosting dripping down.
The cape body flows out in a semicircle from the neckline, creating that classic poncho drape. A satin ribbon bow holds the front closed, and three crocheted cherries dangle below it. Every detail works together to create something truly special.
Skill Level and Time Commitment
I would call this an intermediate pattern. You need comfort with flat row construction, working in joined rounds, picking up stitches around a finished edge, and assembling separate components. None of these techniques are advanced on their own, but managing multiple elements requires some organizational confidence.
Plan for 12 to 18 hours of crochet time if you work at a moderate pace. The embellishments and finishing add extra time, so do not rush those final details.
Finished Measurements
This pattern is written for toddler size 2T to 3T.
Materials You Will Need
Yarn
Hooks
Notions
Yarn Recommendations
Lion Brand Pound of Love works beautifully here. It is machine washable, soft against skin, and widely available. Look for Rose Petal or Powder Pink for the main color.
Paintbox Yarns Simply DK held double gives exceptional stitch definition. The color range includes lovely soft pinks perfect for the frosting effect.
Cascade 220 Superwash blocks beautifully if you prefer wool. It is machine washable and gives clean, professional edges on the scallops.
Any worsted weight yarn meeting gauge will work. For a child’s garment, prioritize machine washability and softness. Avoid stiff or scratchy blends.
Gauge
With MC and J hook in single crochet:
16 stitches x 18 rows = 4 inches or 10 cm blocked
Check your gauge before starting. The neckline fit depends on accurate gauge. Even one stitch per inch difference will significantly change how the cape fits around the child’s neck.
Abbreviations and Stitch Definitions
Special Stitches
Scallop Stitch
This creates the decorative frosting borders throughout the pattern.
1. Skip 2 stitches
2. Work 5 double crochet into the next stitch
3. Skip 2 stitches
4. Slip stitch into the next stitch
One scallop uses 6 stitches total. The scallop borders are worked into a foundation row of single crochet for stability.
Magic Ring
Make a loop with the tail crossing over the working end. Insert hook through loop, draw up working yarn, chain 1 to secure. Work stitches into the ring, then pull the tail to close.
Cherry Bobble
Round 1: 6 sc into magic ring. (6 sc)
Round 2: Inc in each st around. (12 sc)
Round 3: Sc in each st around. (12 sc)
Round 4: Sc2tog around. (6 sc)
Stuff lightly with fiberfill. Sl st to close. Fasten off leaving a tail for sewing.
Pattern Instructions
Part 1: The Hood
The hood is a flat triangle worked in rows. It starts wide at the base and decreases at both edges to form the pointed top.
Foundation Chain: With MC and J hook, ch 73.
Row 1 (WS): Sc in 2nd ch from hook, sc in each ch across. Turn. (72 sc)
Row 2 (RS): Ch 1, sc2tog over first 2 sts, sc in each st across to last 2 sts, sc2tog. Turn. (70 sc)
Row 3: Ch 1, sc in each st across. Turn. (70 sc)
Row 4: Ch 1, sc2tog, sc across to last 2 sts, sc2tog. Turn. (68 sc)
Row 5: Ch 1, sc in each st across. Turn. (68 sc)
Continue this pattern of alternating decrease rows and plain rows:
Row 6: Ch 1, sc2tog, sc across to last 2 sts, sc2tog. Turn. (66 sc)
Row 7: Ch 1, sc in each st across. Turn. (66 sc)
Row 8: Ch 1, sc2tog, sc across to last 2 sts, sc2tog. Turn. (64 sc)
Row 9: Ch 1, sc in each st across. Turn. (64 sc)
Row 10: Ch 1, sc2tog, sc across to last 2 sts, sc2tog. Turn. (62 sc)
Row 11: Ch 1, sc in each st across. Turn. (62 sc)
Row 12: Ch 1, sc2tog, sc across to last 2 sts, sc2tog. Turn. (60 sc)
Row 13: Ch 1, sc in each st across. Turn. (60 sc)
Row 14: Ch 1, sc2tog, sc across to last 2 sts, sc2tog. Turn. (58 sc)
Row 15: Ch 1, sc in each st across. Turn. (58 sc)
Row 16: Ch 1, sc2tog, sc across to last 2 sts, sc2tog. Turn. (56 sc)
Row 17: Ch 1, sc in each st across. Turn. (56 sc)
Row 18: Ch 1, sc2tog, sc across to last 2 sts, sc2tog. Turn. (54 sc)
Row 19: Ch 1, sc in each st across. Turn. (54 sc)
Row 20: Ch 1, sc2tog, sc across to last 2 sts, sc2tog. Turn. (52 sc)
Row 21: Ch 1, sc in each st across. Turn. (52 sc)
Row 22: Ch 1, sc2tog, sc across to last 2 sts, sc2tog. Turn. (50 sc)
Row 23: Ch 1, sc in each st across. Turn. (50 sc)
Row 24: Ch 1, sc2tog, sc across to last 2 sts, sc2tog. Turn. (48 sc)
Row 25: Ch 1, sc in each st across. Turn. (48 sc)
Row 26: Ch 1, sc2tog, sc across to last 2 sts, sc2tog. Turn. (46 sc)
Row 27: Ch 1, sc in each st across. Turn. (46 sc)
Row 28: Ch 1, sc2tog, sc across to last 2 sts, sc2tog. Turn. (44 sc)
Row 29: Ch 1, sc in each st across. Turn. (44 sc)
Row 30: Ch 1, sc2tog, sc across to last 2 sts, sc2tog. Turn. (42 sc)
Row 31: Ch 1, sc in each st across. Turn. (42 sc)
Row 32: Ch 1, sc2tog, sc across to last 2 sts, sc2tog. Turn. (40 sc)
Row 33: Ch 1, sc in each st across. Turn. (40 sc)
Row 34: Ch 1, sc2tog, sc across to last 2 sts, sc2tog. Turn. (38 sc)
Row 35: Ch 1, sc in each st across. Turn. (38 sc)
Row 36: Ch 1, sc2tog, sc across to last 2 sts, sc2tog. Turn. (36 sc)
Row 37: Ch 1, sc in each st across. Turn. (36 sc)
Row 38: Ch 1, sc2tog, sc across to last 2 sts, sc2tog. Turn. (34 sc)
Row 39: Ch 1, sc in each st across. Turn. (34 sc)
Row 40: Ch 1, sc2tog, sc across to last 2 sts, sc2tog. Turn. (32 sc)
Row 41: Ch 1, sc in each st across. Turn. (32 sc)
Row 42: Ch 1, sc2tog, sc across to last 2 sts, sc2tog. Turn. (30 sc)
Row 43: Ch 1, sc in each st across. Turn. (30 sc)
Row 44: Ch 1, sc2tog, sc across to last 2 sts, sc2tog. Turn. (28 sc)
Row 45: Ch 1, sc in each st across. Turn. (28 sc)
Row 46: Ch 1, sc2tog, sc across to last 2 sts, sc2tog. Turn. (26 sc)
Row 47: Ch 1, sc in each st across. Turn. (26 sc)
Row 48: Ch 1, sc2tog, sc across to last 2 sts, sc2tog. Turn. (24 sc)
Row 49: Ch 1, sc in each st across. Turn. (24 sc)
Row 50: Ch 1, sc2tog, sc across to last 2 sts, sc2tog. Turn. (22 sc)
Row 51: Ch 1, sc in each st across. Turn. (22 sc)
Row 52: Ch 1, sc2tog, sc across to last 2 sts, sc2tog. Turn. (20 sc)
Row 53: Ch 1, sc in each st across. Turn. (20 sc)
Row 54: Ch 1, sc2tog, sc across to last 2 sts, sc2tog. Turn. (18 sc)
Row 55: Ch 1, sc in each st across. Turn. (18 sc)
Row 56: Ch 1, sc2tog, sc across to last 2 sts, sc2tog. Turn. (16 sc)
Row 57: Ch 1, sc in each st across. Turn. (16 sc)
Row 58: Ch 1, sc2tog, sc across to last 2 sts, sc2tog. Turn. (14 sc)
Row 59: Ch 1, sc in each st across. Turn. (14 sc)
Row 60: Ch 1, sc2tog, sc across to last 2 sts, sc2tog. Turn. (12 sc)
Row 61: Ch 1, sc in each st across. Turn. (12 sc)
Row 62: Ch 1, sc2tog, sc across to last 2 sts, sc2tog. Turn. (10 sc)
Row 63: Ch 1, sc in each st across. Turn. (10 sc)
Row 64: Ch 1, sc2tog, sc across to last 2 sts, sc2tog. Turn. (8 sc)
Row 65: Ch 1, sc in each st across. Turn. (8 sc)
Row 66: Ch 1, sc2tog, sc across to last 2 sts, sc2tog. Turn. (6 sc)
Row 67: Ch 1, sc in each st across. Turn. (6 sc)
Row 68: Ch 1, sc2tog, sc across to last 2 sts, sc2tog. Turn. (4 sc)
Row 69: Ch 1, sc in each st across. Turn. (4 sc)
Row 70: Ch 1, sc2tog twice. Turn. (2 sc)
Row 71: Ch 1, sc2tog. (1 sc)
Fasten off leaving a 12-inch sewing tail.
Checkpoint: The hood panel should measure approximately 18 inches wide at the base and approximately 9 inches tall from base to point. It should look like a tall triangle.
Hood Seaming
Fold the hood triangle in half with right sides together, aligning the two long diagonal side edges. Using your tapestry needle and matching MC yarn, whipstitch or mattress stitch the two diagonal edges together from the point downward. Leave the wide base open. This forms the cone shape. Turn right side out. The point should be sharp and centered.
Part 2: Hood Ruffle and Scallop Trim
The ruffle has two steps: first a foundation row of sc around the hood base using CA (white), then the scallop stitch pattern.
Step 1: Hood Base Foundation Row
With RS of assembled hood facing, join CA at the base of the hood seam (back center base of the cone opening). Pick up and sc in each of the 72 foundation chain stitches around the base of the hood opening. Join with sl st to first sc. (72 sc)
Step 2: Scallop Row
Working into the 72 sc foundation round just made. The scallop pattern requires a stitch count divisible by 6. 72 divided by 6 equals 12 scallops.
Sl st in first sc, (sk 2 sc, 5 dc in next sc, sk 2 sc, sl st in next sc) repeat 11 more times. (12 scallops total)
Fasten off CA. Weave in end.
Checkpoint: The ruffle around the hood base should consist of 12 white scallop shells. When worn, this ruffle frames the face and sits at the neckline.
Part 3: Cape Body
The cape is worked in joined rounds, picking up stitches from the foundation chain edge of the hood base.
Cape Setup Round (Round 1):
Rejoin MC at center back of the hood base. Working into the BACK LOOPS ONLY of the original 72 foundation chain stitches, sc in each of the 72 sts around. PM at center back. Join with sl st to first sc. (72 sc)
Round 2: Ch 1, sc in same st, sc in each st around. Join. (72 sc)
Now begin the semicircular expansion. Increases are placed at 8 evenly spaced points. With 72 sts, place markers at sts 9, 18, 27, 36, 45, 54, 63, and 72.
Round 3 (increase round): Ch 1, (sc in each st to marked st, 2 sc in marked st) repeat 8 times around. Join. (80 sc)
Round 4: Ch 1, sc in each st around. Join. (80 sc)
Round 5 (increase round): Ch 1, (sc 10, inc) repeat 8 times. Join. (88 sc)
Round 6: Ch 1, sc in each st around. Join. (88 sc)
Round 7 (increase round): Ch 1, (sc 11, inc) repeat 8 times. Join. (96 sc)
Round 8: Ch 1, sc in each st around. Join. (96 sc)
Round 9 (increase round): Ch 1, (sc 12, inc) repeat 8 times. Join. (104 sc)
Round 10: Ch 1, sc in each st around. Join. (104 sc)
Round 11 (increase round): Ch 1, (sc 13, inc) repeat 8 times. Join. (112 sc)
Round 12: Ch 1, sc in each st around. Join. (112 sc)
Round 13 (increase round): Ch 1, (sc 14, inc) repeat 8 times. Join. (120 sc)
Round 14: Ch 1, sc in each st around. Join. (120 sc)
Round 15 (increase round): Ch 1, (sc 15, inc) repeat 8 times. Join. (128 sc)
Round 16: Ch 1, sc in each st around. Join. (128 sc)
Round 17 (increase round): Ch 1, (sc 16, inc) repeat 8 times. Join. (136 sc)
Round 18: Ch 1, sc in each st around. Join. (136 sc)
Round 19 (increase round): Ch 1, (sc 17, inc) repeat 8 times. Join. (144 sc)
Round 20: Ch 1, sc in each st around. Join. (144 sc)
Round 21 (increase round): Ch 1, (sc 18, inc) repeat 8 times. Join. (152 sc)
Round 22: Ch 1, sc in each st around. Join. (152 sc)
Round 23 (increase round): Ch 1, (sc 19, inc) repeat 8 times. Join. (160 sc)
Round 24: Ch 1, sc in each st around. Join. (160 sc)
Round 25 (increase round): Ch 1, (sc 20, inc) repeat 8 times. Join. (168 sc)
Round 26: Ch 1, sc in each st around. Join. (168 sc)
Round 27 (increase round): Ch 1, (sc 21, inc) repeat 8 times. Join. (176 sc)
Round 28: Ch 1, sc in each st around. Join. (176 sc)
Round 29 (increase round): Ch 1, (sc 22, inc) repeat 8 times. Join. (184 sc)
Round 30: Ch 1, sc in each st around. Join. (184 sc)
Round 31 (increase round): Ch 1, (sc 23, inc) repeat 8 times. Join. (192 sc)
Round 32: Ch 1, sc in each st around. Join. (192 sc)
Round 33 (increase round): Ch 1, (sc 24, inc) repeat 8 times. Join. (200 sc)
Round 34: Ch 1, sc in each st around. Join. (200 sc)
Round 35 (increase round): Ch 1, (sc 25, inc) repeat 8 times. Join. (208 sc)
Round 36: Ch 1, sc in each st around. Join. Do not fasten off. (208 sc)
Checkpoint: After Round 36, the cape body should measure approximately 13 inches from the neckline pickup row to the last round.
Part 4: Cape Hem Scallop Border
The hem has 208 stitches. For scallops to divide evenly, we need a count divisible by 6.
Round 37 (adjustment round): Ch 1, sc in each st around, working sc2tog at 4 evenly spaced points (approximately every 52 sts). Join. (204 sc)
Place decreases at approximately sts 26, 78, 130, and 182. This removes 4 stitches. 204 divided by 6 equals 34 scallops.
Round 38 (Scallop Hem, worked in CA):
Join CA with sl st to any st. (Sl st in first st, sk 2 sts, 5 dc in next st, sk 2 sts) repeat 34 times, ending with sl st to first sl st. (34 scallops)
Fasten off CA. Weave in end.
Part 5: Front Opening Border
With RS facing, join CA at the top right front corner of the cape. Work sc evenly down the right front opening edge, approximately 36 sc down to hem. Fasten off.
For the left front edge, join CA at hem bottom left, sc 36 evenly up to top left. Fasten off.
Each front edge has 36 sc. 36 divided by 6 equals 6 scallops per edge.
Right front scallop: With CA, working from top to bottom, (sl st in first st, sk 2 sts, 5 dc in next st, sk 2 sts) repeat 6 times. Fasten off.
Left front scallop: With CA, working from bottom to top, (sl st in first st, sk 2 sts, 5 dc in next st, sk 2 sts) repeat 6 times. Fasten off.
Weave in all CA ends.
Part 6: Sprinkle Embellishments on Hood
Thread a tapestry needle with a short length (approximately 4 inches) of each sprinkle color. Work short straight stitches approximately 1/4 to 3/8 inch long scattered randomly across the upper two-thirds of the hood cone. Angle each stitch slightly differently, as real sprinkles are randomly oriented. Work approximately 20 to 30 sprinkle stitches total, distributing colors evenly.
Part 7: Kawaii Face
Step 1: Insert safety eyes approximately 2.5 inches above the base ruffle, centered on the front face of the hood cone, spaced approximately 1.5 inches apart. Lock the washers firmly on the inside.
Step 2: Cheeks. Using pink yarn or embroidery floss, embroider a small circle of 4 to 5 stitches below and slightly outside each eye. The cheeks should be approximately 3/4 inch in diameter.
Step 3: Smile. Using rose or dark pink embroidery floss, embroider a small curved line below the eyes, centered between them. The smile should be approximately 3/4 inch wide, gently curved upward at each end.
Part 8: Crocheted Cherries
Make 3 Cherry Bobbles using CB (red) as described in Special Stitches.
Cherry Stems: With CC (green), ch 10 for each stem. Sl st back along the chain. Fasten off.
Cherry Leaves: With CC (green), ch 5. Sc in 2nd ch from hook, hdc, dc, sl st in last ch. This forms one small leaf. Make 6 leaves total.
Assembly: Arrange 3 cherries in a cluster. Sew their stems together at a central joining point. Attach the leaves at the stem junctions.
Attach the assembled cherry cluster to the center front of the cape, just below the ribbon tie point, approximately 1 inch below the ruffle line. Sew securely.
Part 9: Ribbon Tie
Cut the 24-inch satin ribbon in half or use as one bow. Thread the center of the ribbon through the front center of the cape just below the ruffle using a tapestry needle, pulling both ends to the front evenly. Tie into a bow. Trim ribbon ends at an angle to prevent fraying.
Finishing and Blocking
Weave in all remaining yarn ends securely. Wet block by soaking in lukewarm water for 20 minutes, gently pressing out excess water in a towel, and laying flat on a blocking mat. Pin the hem scallops open and the front edges straight. Allow to dry completely.
For acrylic yarn, steam blocking works well. Hold a steam iron 1 to 2 inches above the surface without direct contact to relax the stitches.
Tips for Success with This Crochet Pattern
The hood seam is the trickiest part for most makers. Take your time aligning the edges before you start stitching. Use pins if needed.
When picking up stitches for the cape, work into the back loops only of the foundation chain. The front loops were already used for the ruffle.
Count your stitches after every increase round. Getting off by even a few stitches will throw off your scallop math at the end.
Insert the safety eyes before you finish the hood embellishments. Once those washers are on, they do not come off without damaging the fabric.
A Quick Note About Sizing
This pattern is written for 2T to 3T. To size up, add more rounds to the cape body using the same increase pattern. To size down, stop the cape body earlier. The hood size can be adjusted by starting with fewer or more foundation chains, keeping the count even for the scallop math.
Thank you so much for choosing this pattern. I hope you love making this whimsical little cape as much as I loved designing it. If you make one, I would absolutely love to see it. Tag me on Instagram or share a photo on Facebook.
If this pattern made you smile, go ahead and save it to your Pinterest boards so you can find it later. And please drop a comment below if you give it a try. Seeing your finished projects truly makes my day.
You Might Also Like
- Coastal Blue Wave Stitch Bodysuit Free Pattern
- Soft Lavender Purple Crochet Backpack Free Pattern
- Mint Green Rose Granny Square Bag Free Crochet Pattern
- Midnight Black Crescent Bag with Silver Hardware Free Crochet Pattern
