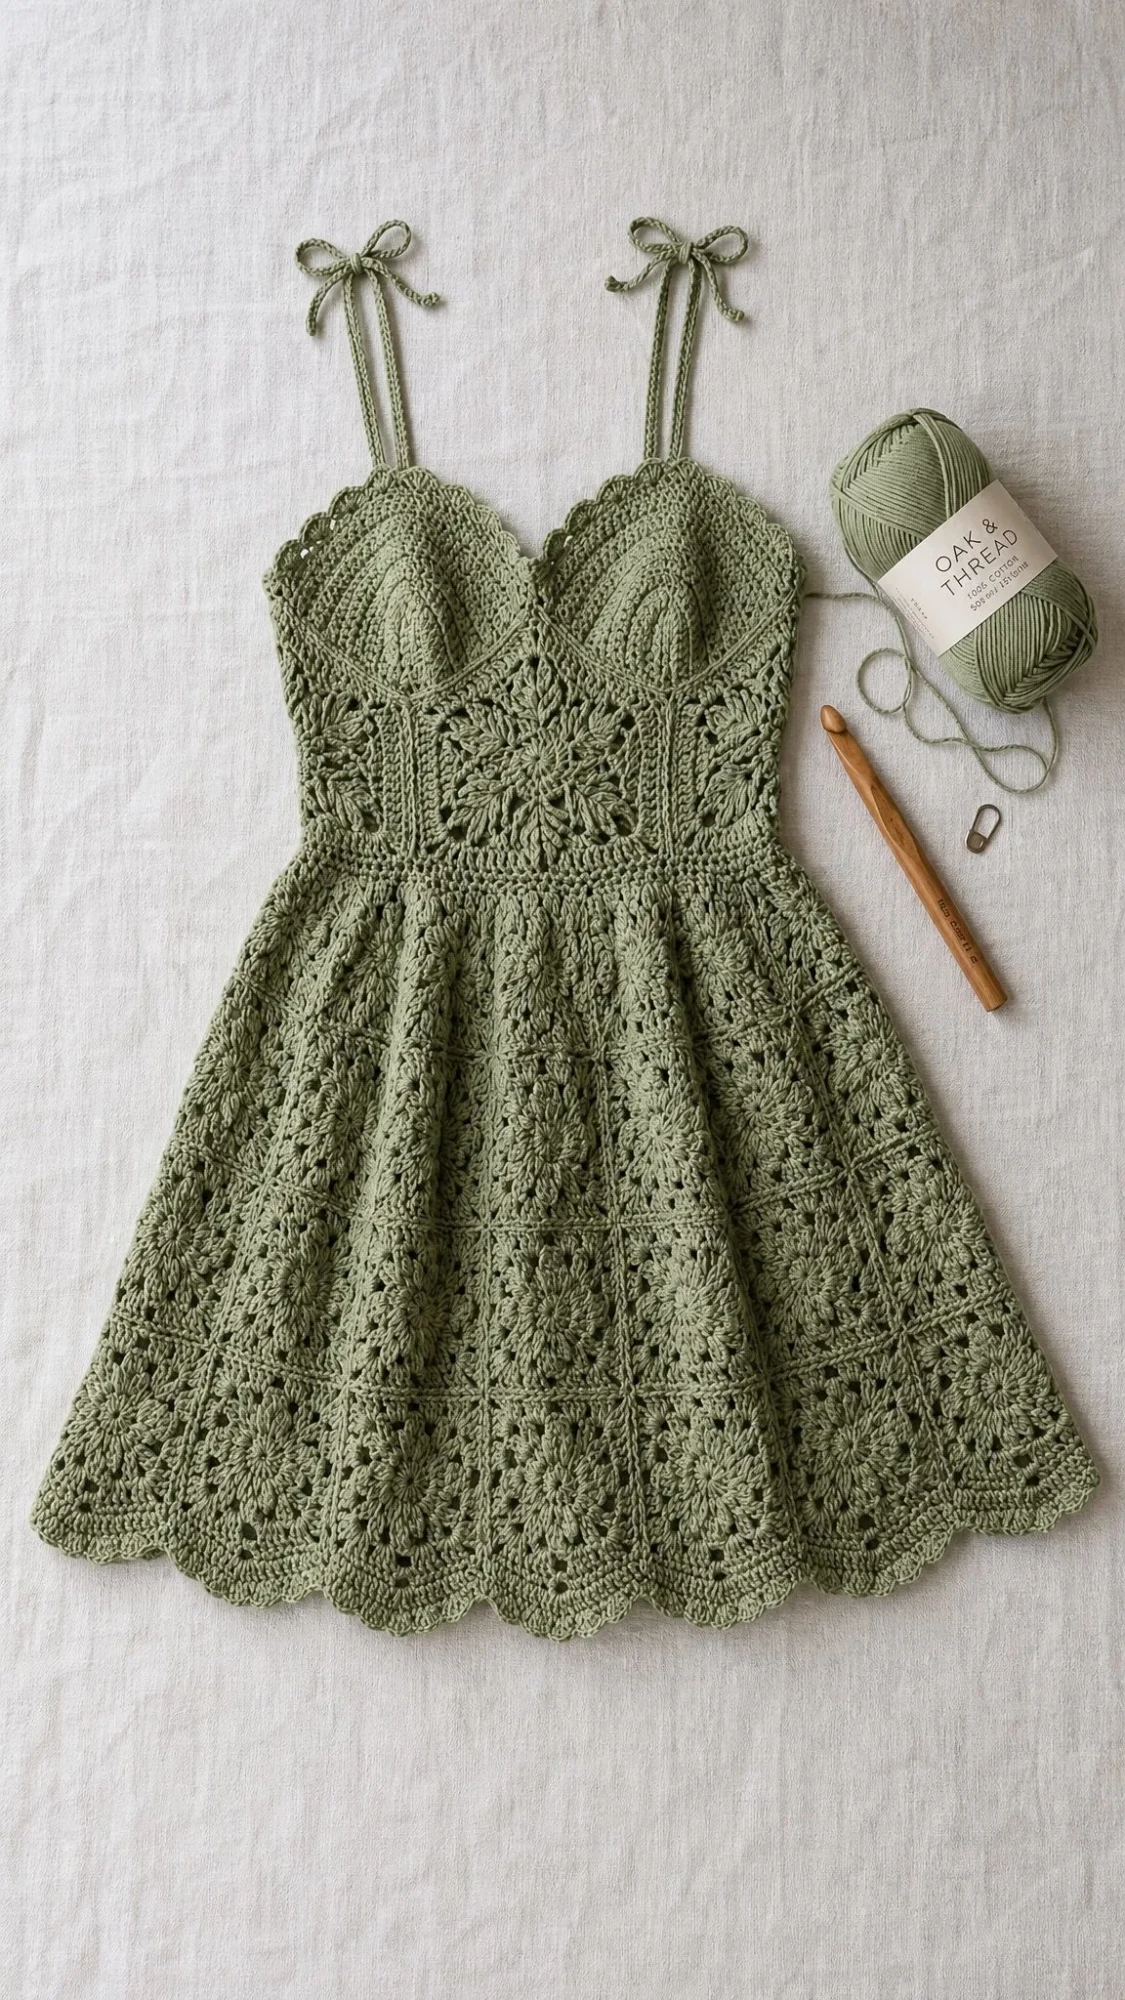
This crochet sundress combines a structured sweetheart bodice, granny square motif panels, and a botanical lace skirt with adjustable tie straps. The construction uses DK weight cotton yarn and a 4.0 mm hook. You will work the bodice cups in rounds, the bodice frame in rows, and the skirt motifs joined as you go.
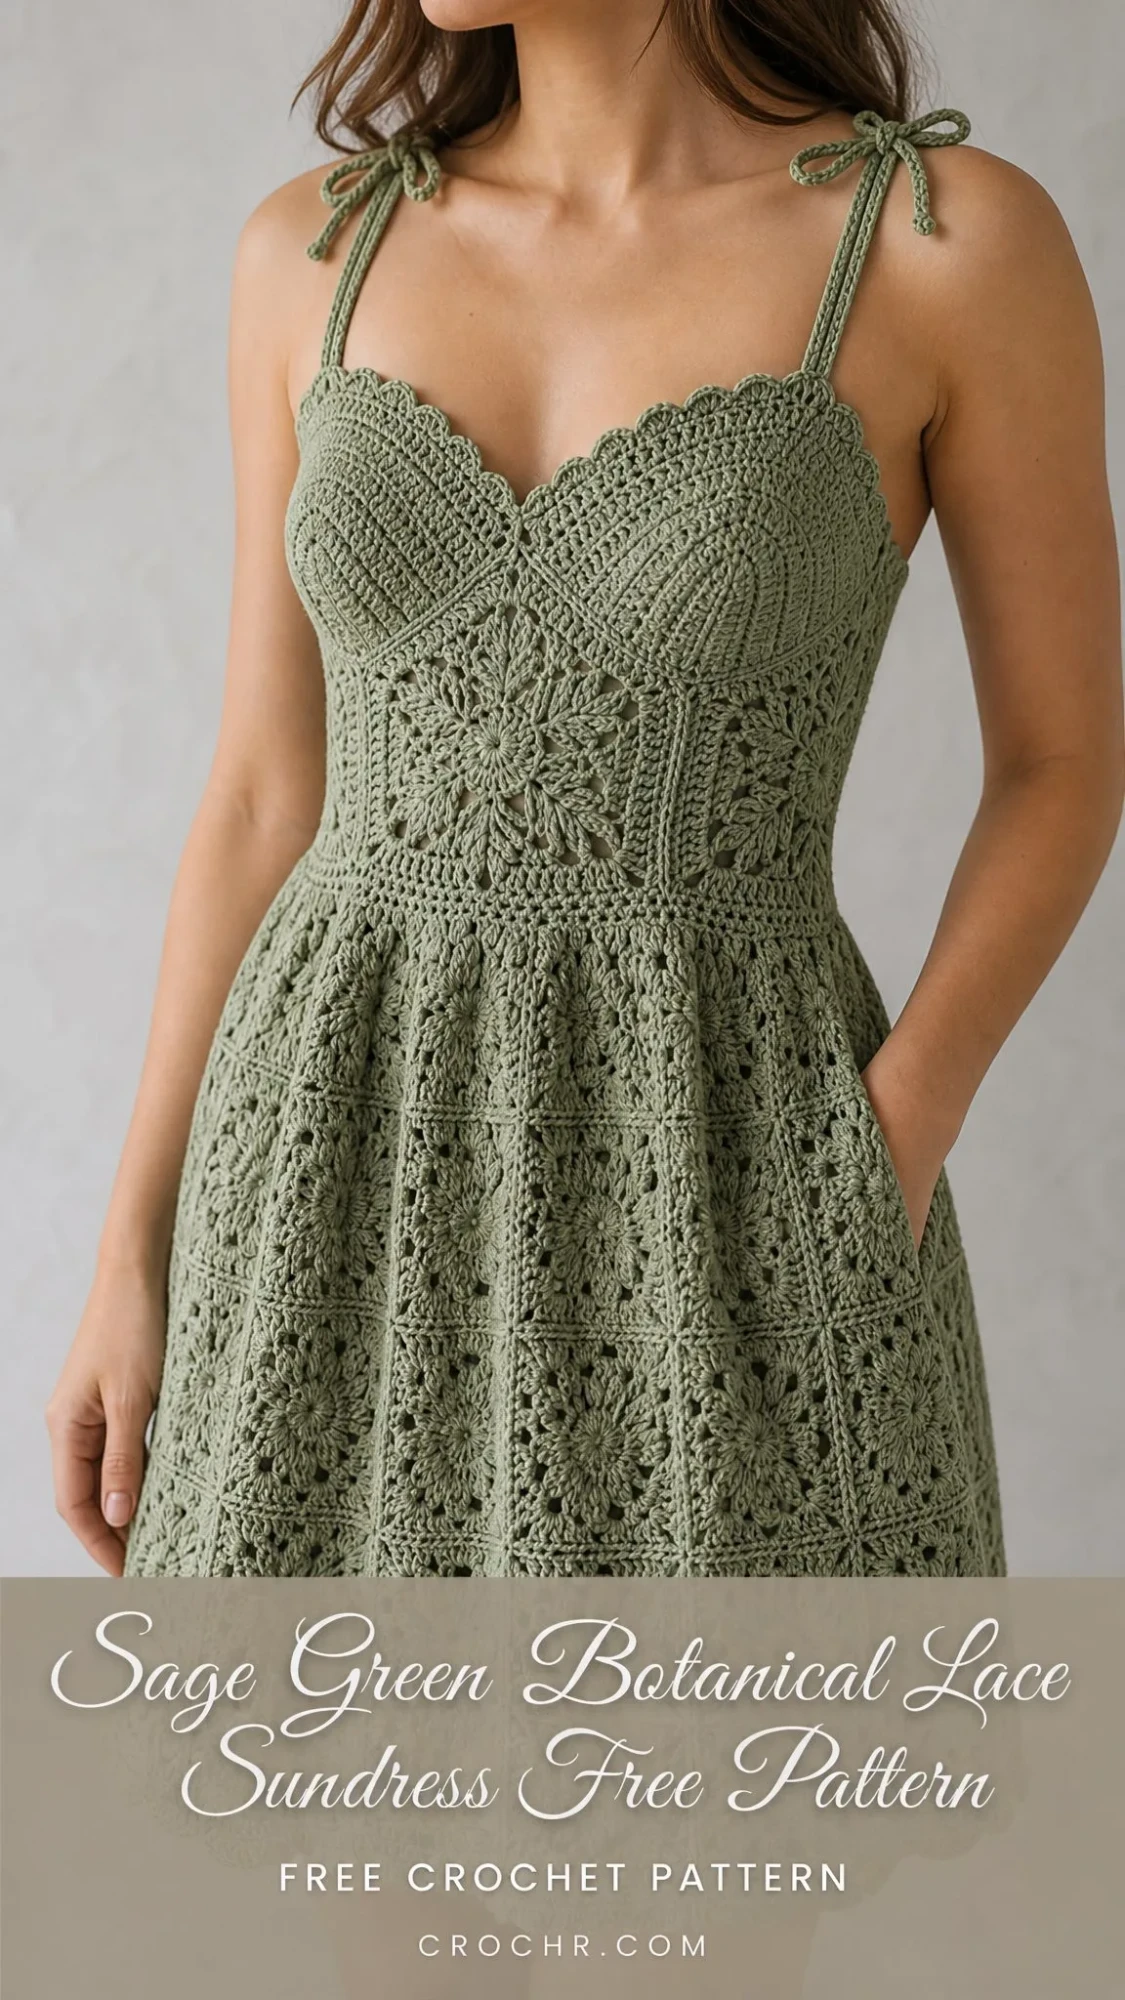
The finished dress features scalloped edges at both the neckline and hem. All sections use the same sage green yarn throughout, so there is no colorwork to manage. This is an advanced intermediate pattern that requires comfort with motif joining, bust cup shaping, and lace border execution.
If you have been wanting to create a statement garment that showcases multiple crochet techniques in one cohesive piece, this sundress delivers exactly that. The A-line silhouette flatters many body types, and the botanical lace border creates natural movement and flow.
About This Crochet Sundress Pattern
This pattern walks you through constructing a complete garment from the ground up. You will make two bust cups worked from the center outward, a fitted bodice frame that wraps around the torso, a skirt built from joined granny square motifs, and a flowing botanical lace border that creates the flared hem.
The construction order matters here. You will work the bust cups first, then the bodice frame which joins both cups together. After that comes the skirt motifs worked flat and joined as you go. Finally, you will add the hem lace border, neckline and armhole edging, and the tie straps.
Skill Level: Advanced Intermediate
Time Estimate: 60 to 90 hours for an average speed crocheter working Size Medium. Blocking and finishing add approximately 3 to 5 hours.
Finished Measurements
Size Small: Bust 32 inches (81 cm), Waist 26 inches (66 cm), Hip 36 inches (91 cm), Length bodice to hem 26 inches (66 cm)
Size Medium: Bust 36 inches (91 cm), Waist 30 inches (76 cm), Hip 40 inches (102 cm), Length 27 inches (69 cm)
Size Large: Bust 40 inches (102 cm), Waist 34 inches (86 cm), Hip 44 inches (112 cm), Length 28 inches (71 cm)
Instructions are written for Size Medium. Size Small and Large variations appear in brackets where they differ: [Small / Large].
The finished dress length is measured from the sweetheart neckline center point to the lowest point of the scallop hem.
Materials Needed
Yarn: DK weight (CYCA 3), 100 percent cotton or cotton blend recommended for drape and stitch definition
Amount: Approximately 1,400 yards (1,280 m) for Medium [Small: 1,200 yards / 1,100 m. Large: 1,650 yards / 1,510 m]
Suggested Yarns:
Substitution Note: Choose a yarn that is firmly plied with good stitch definition. Avoid fuzzy or hairy fibers as lace detail will be obscured. Swatch to confirm gauge before beginning.
Hook: US size G-6 / 4.0 mm (primary hook for all sections)
Secondary Hook: US size E-4 / 3.5 mm for edging only
Notions:
Gauge
Using G-6 / 4.0 mm hook and DK cotton yarn:
For granny square motifs (worked in the round):
One complete 5 round granny square = 4.5 inches (11.5 cm) measured side to side, blocked.
For botanical lace repeat (worked flat):
One 12 stitch lace repeat = 2.5 inches (6.4 cm), blocked.
Gauge is critical for fit. Adjust hook size as needed to match stated measurements. Swatching in cotton may show significant growth after blocking, so always block your swatch before measuring.
Abbreviations and Stitch Definitions
Let me walk you through every abbreviation you will encounter. Understanding these terms before you start will make the pattern much easier to follow.
beg = beginning
BLO = back loop only (inserting your hook under just the back loop of the stitch)
bp = back post
BPdc = back post double crochet (working around the post of the stitch from the back)
ch = chain
ch-sp = chain space (the gap created by a chain in the previous row)
dc = double crochet (yarn over, insert hook, pull up loop, yarn over, pull through 2 loops, yarn over, pull through 2 loops)
dc2tog = double crochet 2 together, a decrease that combines 2 stitches into 1
FLO = front loop only
fp = front post
FPdc = front post double crochet
hdc = half double crochet
inc = increase (2 stitches worked into the same stitch)
lp = loop
MC = magic circle or adjustable ring
rep = repeat
rnd = round
RS = right side
sc = single crochet (insert hook, pull up loop, yarn over, pull through both loops)
sk = skip
sl st = slip stitch
sp = space
st = stitch
t-ch = turning chain
tog = together
tr = treble crochet
WS = wrong side
yo = yarn over
Special Stitches Explained
Shell Stitch: Work 5 double crochet (dc) into the same stitch or space. This creates a fan shaped cluster. Throughout the bodice and lace border, this group of 5 dc counts as one shell unit.
Granny Cluster: Yarn over, insert hook, yarn over, pull up loop, yarn over, pull through 2 loops. Repeat twice more in the same space. Yarn over, pull through all 4 loops on hook. This is a 3 dc cluster worked into a chain space. Throughout the pattern "cl" refers to this granny cluster.
Picot: Chain 3, slip stitch into the third chain from hook. This creates a small decorative loop used at scallop peaks of the hem border.
V-stitch: Work (dc, ch 2, dc) all into the same stitch or space. This counts as one V-st unit throughout.
Scallop Edging: Slip stitch into first sc, skip 2 sc, work 7 dc into next sc (shell formed), skip 2 sc, slip stitch into next sc. This 6 stitch consumed unit forms one scallop arch.
Pattern Notes Before You Begin
Please read through these notes carefully. They will save you confusion later.
1. The dress is constructed in this order: left bust cup, right bust cup, bodice frame (which joins both cups and forms the waist band), skirt motifs (worked flat and joined as you go), bodice to skirt assembly, hem lace border, neckline and armhole edging, and finally the tie straps.
2. Bust cups are worked in continuous rounds on the right side. Do not join at end of each round unless instructed.
3. The bodice frame is worked flat in rows, then seamed at center back with a single column of slip stitch seaming for a clean join.
4. All motifs are worked with the right side facing throughout. Join with slip stitch to first dc of each round to close unless otherwise stated.
5. Stitch counts in parentheses at the end of each row or round reflect the total working stitches in that row or round, not including turning chains.
6. Turning chains: For sc rows, ch 1 to turn (does not count as a stitch). For dc rows, ch 3 to turn (counts as first dc). For hdc rows, ch 2 to turn (does not count as a stitch).
7. After blocking, cotton fabric will relax approximately 5 to 10 percent. All measurements in the pattern account for this growth.
Section 1: Bust Cups (Make 2)
The bust cups are worked in continuous rounds from a magic circle outward, shaped as shallow domes that create the sweetheart silhouette when placed side by side. Mark the beginning of each round with a stitch marker.
Round 1: MC, ch 3 (counts as first dc), work 11 dc into ring, join to top of ch-3 with sl st, pull ring closed. (12 dc)
Round 2: Ch 3, dc in same st, 2 dc in each st around, join to top of ch-3. (24 dc)
Round 3: Ch 3, dc in same st, dc in next st, (2 dc in next st, dc in next st) rep around, join. (36 dc)
Round 4: Ch 3, dc in same st, dc in next 2 sts, (2 dc in next st, dc in next 2 sts) rep around, join. (48 dc)
Round 5: Ch 3, dc in same st, dc in next 3 sts, (2 dc in next st, dc in next 3 sts) rep around, join. (60 dc)
Round 6: Ch 3, dc in same st, dc in next 4 sts, (2 dc in next st, dc in next 4 sts) rep around, join. (72 dc)
For Size Small only, the cup is complete after Round 6. Fasten off. Total cup circumference: approximately 16 inches (40.6 cm).
Round 7 (Medium and Large only): Ch 3, dc in same st, dc in next 5 sts, (2 dc in next st, dc in next 5 sts) rep around, join. (84 dc)
For Size Medium, the cup is complete after Round 7. Fasten off. Total cup circumference: approximately 18.5 inches (47 cm).
Round 8 (Large only): Ch 3, dc in same st, dc in next 6 sts, (2 dc in next st, dc in next 6 sts) rep around, join. (96 dc)
For Size Large, the cup is complete after Round 8. Fasten off. Total cup circumference: approximately 21 inches (53.3 cm).
Checkpoint: Each finished cup should measure approximately 5.5 inches (14 cm) across the flat diameter for Medium [Small: 5 inches / 12.7 cm. Large: 6 inches / 15.2 cm] before blocking.
Section 2: Bodice Frame
The bodice frame is a rectangular band worked flat that wraps around the torso from just below the bust cups to the natural waist. The cups attach along its top edge.
Foundation: Ch 137 [Small: ch 119. Large: ch 155].
Row 1 (WS): Sc in second ch from hook and in each ch across. Turn. (136 sc) [Small: 118 sc. Large: 154 sc]
Row 2 (RS): Ch 1, sc in each sc across. Turn. (136 sc)
Row 3: Ch 1, sc in each sc across. Turn. (136 sc)
Row 4: Ch 3 (counts as dc), dc in next 2 sts, ch 1, sk 1 st, (dc in next 3 sts, ch 1, sk 1 st) rep across to last 3 sts, dc in last 3 sts. Turn. (102 dc, 34 ch-1 sps) [Small: 88 dc, 29 ch-1 sps. Large: 115 dc, 38 ch-1 sps]
Row 5: Ch 1, sc in each dc and sc in each ch-sp across. Turn. (136 sc) [Small: 118 sc. Large: 154 sc]
Rows 6-7: Repeat Row 2. (136 sc)
Row 8: Repeat Row 4. (102 dc, 34 ch-1 sps) [Small: 88 dc, 29 ch-1 sps. Large: 115 dc, 38 ch-1 sps]
Row 9: Repeat Row 5. (136 sc) [Small: 118 sc. Large: 154 sc]
Row 10: Repeat Row 2. (136 sc)
This completes the waist band portion. The frame should measure approximately 3 inches (7.6 cm) tall at this point, unstretched.
Do not fasten off. Continue to the Cup Attachment Row.
Cup Attachment Row
Row 11 (RS, Cup Attachment): Working along the top edge of the bodice frame, sc in first 16 sts, place first cup (RS up, bottom arc facing you), working through both the frame stitch and the corresponding bottom arc stitch of the cup simultaneously, sc through both layers for next 42 sts, sc in next 26 sts of frame only (the space between cups at center front), working through both frame and second cup simultaneously, sc through both layers for next 42 sts, sc in last 10 sts of frame. Turn. (136 sc)
Row 12: Ch 1, sc across entire top edge including over cup attachment area. Turn. (136 sc)
Sweetheart Neckline Shaping: Left Half
Row 13 (RS): Ch 1, sc in first 68 sts, leave remaining 68 sts unworked. Turn. (68 sc)
Row 14: Ch 1, sc2tog, sc to end. Turn. (67 sc)
Row 15: Ch 1, sc to last 2 sts, sc2tog. Turn. (66 sc)
Row 16: Ch 1, sc2tog, sc to end. Turn. (65 sc)
Row 17: Ch 1, sc to last 2 sts, sc2tog. Turn. (64 sc)
Rows 18-19: Ch 1, sc across. Turn. (64 sc)
Fasten off left half. Mark the 64th stitch with a stitch marker (this is the outer shoulder/strap point).
Sweetheart Neckline Shaping: Right Half
Rejoin yarn with RS facing to the 69th st (the first unworked stitch from Row 13).
Row 13B (RS): Ch 1, sc in each of remaining 68 sts. Turn. (68 sc)
Row 14B: Ch 1, sc to last 2 sts, sc2tog. Turn. (67 sc)
Row 15B: Ch 1, sc2tog, sc to end. Turn. (66 sc)
Row 16B: Ch 1, sc to last 2 sts, sc2tog. Turn. (65 sc)
Row 17B: Ch 1, sc2tog, sc to end. Turn. (64 sc)
Rows 18B-19B: Ch 1, sc across. Turn. (64 sc)
Fasten off right half. Mark the first stitch with a stitch marker (outer shoulder/strap point).
Checkpoint: The completed bodice frame with cups attached should measure approximately 6 inches (15.2 cm) tall from the foundation row to the top of the neckline shaping, and approximately 30 inches (76 cm) wide along the foundation row (waist edge) for Medium [Small: 26 inches / 66 cm. Large: 34 inches / 86 cm].
Seam the center back of the bodice frame together using a slip stitch seam worked through both layers along the short vertical edges.
Section 3: Bodice Surface Texture (Optional)
This decorative overlay creates the granny square textural panel visible at the center of the bodice front. Using the same sage yarn, attach yarn to the RS center of Row 4 of the bodice frame.
Locate the center 24 sts of the bodice frame (sts 57 through 80 for Medium).
Surface Overlay Round 1: Attach yarn to center with sl st, ch 4, (3 dc cluster in same sp, ch 2) 3 times in same center point, join to top of ch-4. (4 clusters, 4 ch-2 sps)
Surface Overlay Round 2: Sl st to ch-2 sp, ch 3, (2 dc, ch 2, 3 dc) in same sp (corner made), ch 1, (3 dc, ch 2, 3 dc) in next ch-2 sp (corner made), ch 1, repeat from start 2 more times, join. (4 corners, 4 ch-1 side sps)
Surface Overlay Round 3: Sl st to ch-2 sp, ch 3, (2 dc, ch 2, 3 dc) in same corner sp, ch 1, 3 dc in ch-1 sp, ch 1, (3 dc, ch 2, 3 dc) in next corner sp, ch 1, 3 dc in ch-1 sp, ch 1, repeat from start 2 more times, join. (4 corners, 8 side clusters)
Fasten off. Tack the surface motif to the bodice fabric using the tail at corners to prevent shifting.
Section 4: Skirt Motifs
The skirt is constructed from full granny square motifs and half square motifs arranged in rows. Each full square measures 4.5 inches (11.5 cm) after blocking.
Skirt layout for Medium:
Full Granny Square Motif (Make 40)
Round 1: MC, ch 4 (counts as dc, ch 1), (dc, ch 1) 11 times in ring, join to 3rd ch of ch-4 with sl st. (12 dc, 12 ch-1 sps)
Round 2: Sl st to ch-1 sp, ch 3, 2 dc in same sp (first cluster made), ch 2, (3 dc in next ch-1 sp, ch 1, 3 dc in next ch-1 sp, ch 2) 3 times, 3 dc in next ch-1 sp, ch 1, join to top of ch-3. (8 clusters, 4 ch-2 corner sps, 4 ch-1 side sps)
Round 3: Sl st to ch-2 corner sp, ch 3, (2 dc, ch 2, 3 dc) in same corner sp, ch 1, 3 dc in ch-1 side sp, ch 1, (3 dc, ch 2, 3 dc) in next corner sp, ch 1, 3 dc in ch-1 side sp, ch 1, repeat from start 2 more times, join. (12 clusters, 4 ch-2 corner sps, 8 ch-1 side sps)
Round 4: Sl st to ch-2 corner sp, ch 3, (2 dc, ch 2, 3 dc) in same corner sp, (ch 1, 3 dc in next ch-1 sp) twice, ch 1, (3 dc, ch 2, 3 dc) in next corner sp, (ch 1, 3 dc in next ch-1 sp) twice, ch 1, repeat from start 2 more times, join. (16 clusters, 4 ch-2 corner sps, 12 ch-1 side sps)
Round 5: Sl st to ch-2 corner sp, ch 3, (2 dc, ch 2, 3 dc) in same corner sp, (ch 1, 3 dc in next ch-1 sp) 3 times, ch 1, (3 dc, ch 2, 3 dc) in next corner sp, (ch 1, 3 dc in next ch-1 sp) 3 times, ch 1, repeat from start 2 more times, join. (20 clusters, 4 ch-2 corner sps, 16 ch-1 side sps)
Fasten off and weave in ends, or join directly to next motif using the join as you go method on Round 5.
Half Square Motif (Make 4)
Chain 4, sl st to form ring.
Row 1: Ch 3, 2 dc in ring, ch 2, 3 dc in ring, ch 1, 3 dc in ring. Turn.
Row 2: Ch 3, 2 dc in ch-1 sp, ch 1, (3 dc, ch 2, 3 dc) in ch-2 sp, ch 1, 3 dc in top of ch-3. Turn.
Row 3: Ch 3, 2 dc in ch-1 sp, ch 1, 3 dc in ch-1 sp, ch 1, (3 dc, ch 2, 3 dc) in ch-2 sp, ch 1, 3 dc in ch-1 sp, ch 1, 3 dc in top of ch-3. Turn.
Row 4: Ch 3, 2 dc in ch-1 sp, (ch 1, 3 dc in next ch-1 sp) twice, ch 1, (3 dc, ch 2, 3 dc) in ch-2 corner sp, (ch 1, 3 dc in next ch-1 sp) twice, ch 1, 3 dc in top of ch-3. Fasten off.
Joining Motifs (Join As You Go Method)
Lay out all full squares in a grid: 8 columns wide, 5 rows tall.
When working a side of the motif that will be joined to an adjacent already completed motif:
Replace each ch-1 between side clusters with: ch 0 (no chain), sl st into corresponding ch-1 space of the neighboring motif, then return to complete the current cluster.
Replace each ch-2 corner with: ch 1, sl st into corner ch-2 sp of neighboring motif, ch 1.
Checkpoint: The completed motif grid should measure approximately 36 inches (91 cm) wide laid flat and 22.5 inches (57 cm) tall for Medium.
Section 5: Botanical Lace Border
The botanical lace section runs along the bottom of the skirt and forms the A-line flare at the hem. It is worked in joined rounds along the bottom edge of the skirt motif panels.
Foundation Round: With RS facing and E-4 hook, attach yarn to any corner sp at the bottom of the skirt motif grid. Ch 1, work sc evenly around the bottom edge, placing 1 sc in each ch-1 sp, 2 sc in each ch-2 corner sp, and 1 sc in the top and bottom of each cluster group. Join to first sc. (288 sc for Medium) [Small: 252 sc. Large: 324 sc]
Lace Round 1: Ch 4 (counts as dc, ch 1), sk 1 sc, dc in next sc, (ch 1, sk 1 sc, dc in next sc) rep around, ch 1, join to 3rd ch of ch-4. (144 dc, 144 ch-1 sps) [Small: 126 dc, 126 ch-1 sps. Large: 162 dc, 162 ch-1 sps]
Lace Round 2: Sl st to ch-1 sp, ch 1, sc in same sp, ch 5, sk next ch-1 sp, sc in next ch-1 sp, (ch 5, sk next ch-1 sp, sc in next ch-1 sp) rep around, ending ch 5, join to first sc. (72 ch-5 sps) [Small: 63 ch-5 sps. Large: 81 ch-5 sps]
Lace Round 3: Sl st to ch-5 sp, ch 3, (2 dc, ch 2, 3 dc) in same sp (shell corner made), ch 1, sc in next ch-5 sp, ch 1, (3 dc, ch 2, 3 dc) in next ch-5 sp, ch 1, sc in next ch-5 sp, ch 1, rep from start around, join to top of ch-3.
Continue the lace pattern as established, working additional rounds of shell and sc combinations to achieve the desired length and flare.
Size Customization Tips
To size up beyond Large: Add one additional granny square motif width to each side of the skirt. This adds approximately 4.5 inches (11.5 cm) to the hip circumference per pair of motifs added. Widen the bodice band by adding 6 sc to the foundation row and adjusting cup placement accordingly.
To lengthen the skirt: Add additional rows of botanical lace repeat sections above the hem border. Each full repeat adds approximately 1.5 inches (3.8 cm) of length.
To shorten: Omit one full row of granny squares from the skirt. This removes approximately 4.5 inches (11.5 cm).
For a different bust size without changing hip size: Adjust the bust cup radius by adding or subtracting rounds from the cup independently of the skirt motif count.
Finishing and Assembly
After completing all sections, block each piece thoroughly before assembly. Cotton will relax and the lace will open beautifully with proper blocking.
Seam the bodice to the top edge of the skirt using a slip stitch or whipstitch method. The waist edge of the bodice should align with the top edge of the motif grid.
Work a scallop edging around the neckline and armholes using the E-4 hook for a refined finish.
For the tie straps, chain approximately 80 to 100 stitches (adjust for desired length), then work sc back along the chain. Attach at the marked shoulder points and tie in bows at the shoulders.
Final Thoughts on This Crochet Sundress Pattern
This botanical lace sundress represents a true labor of love. The combination of structured bodice shaping, classic granny square construction, and flowing lace creates a garment that is both technically interesting and genuinely wearable.
Take your time with the cup shaping and do not skip blocking between sections. The finished dress will reward your patience with beautiful drape and a flattering fit.
Thank you so much for choosing this pattern for your next project. I genuinely hope it brings you hours of enjoyable stitching and a stunning finished garment you will wear all summer long.
If you loved working on this sundress, please save this pattern to your Pinterest boards so you can find it easily later. And I would absolutely love to see your finished dresses! Drop a comment below or tag me on Instagram when you make yours.
