Time to dig into that thread stash, my friend. You know that collection of embroidery floss and fine crochet thread you’ve been saving for "the right project"? This is it. These adorable tropical fish charms work up using tiny stitches and color changes that create stunning detail. I’ll be honest with you. This bracelet requires patience and a small hook, so it’s best suited for intermediate crocheters who are comfortable with miniature work. But the finished result? Absolutely worth every careful stitch.
Why You’ll Love This Tropical Fish Charm Bracelet Crochet Pattern
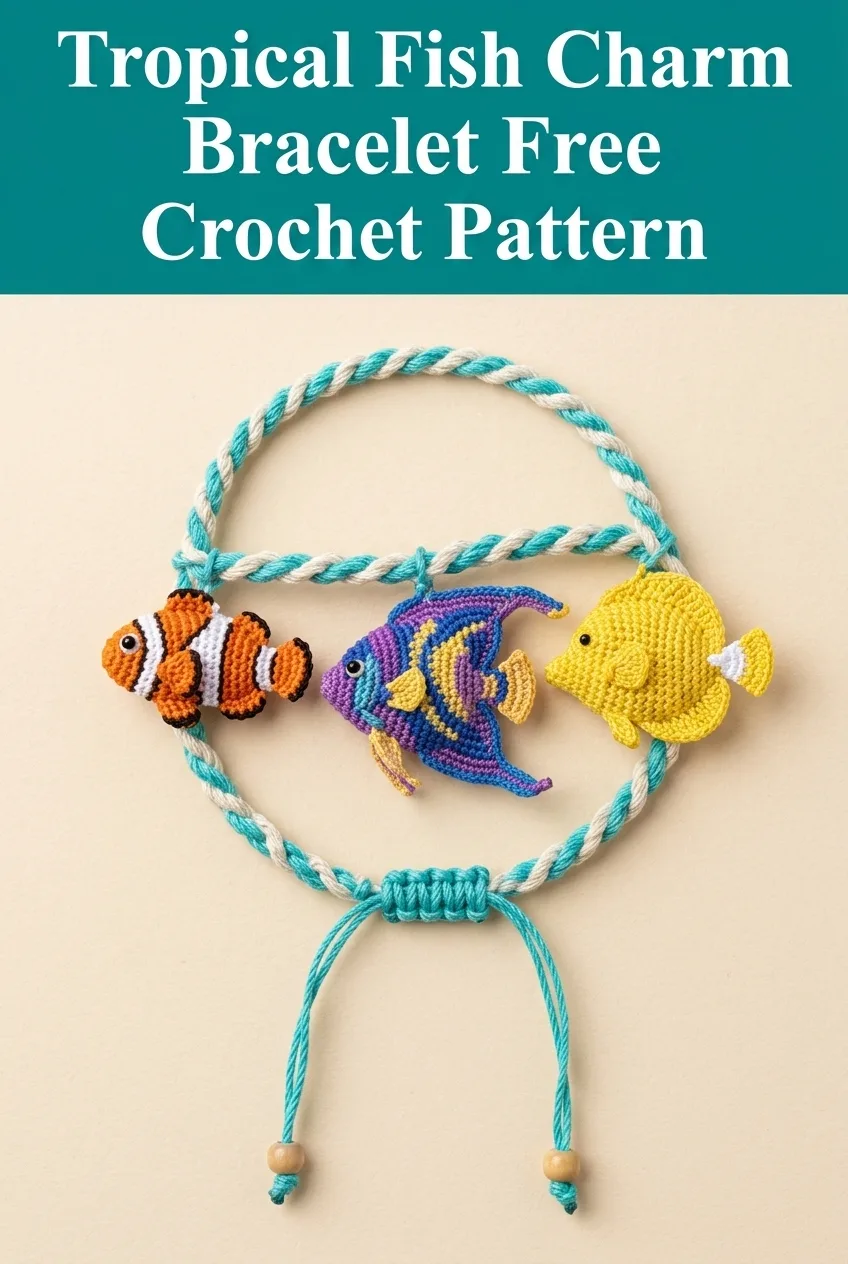
This crochet bracelet pattern combines three distinct tropical fish designs into one wearable piece of art. Each fish charm measures roughly one inch, making them perfect conversation starters. The twisted cord base keeps things simple while showcasing those detailed little swimmers.
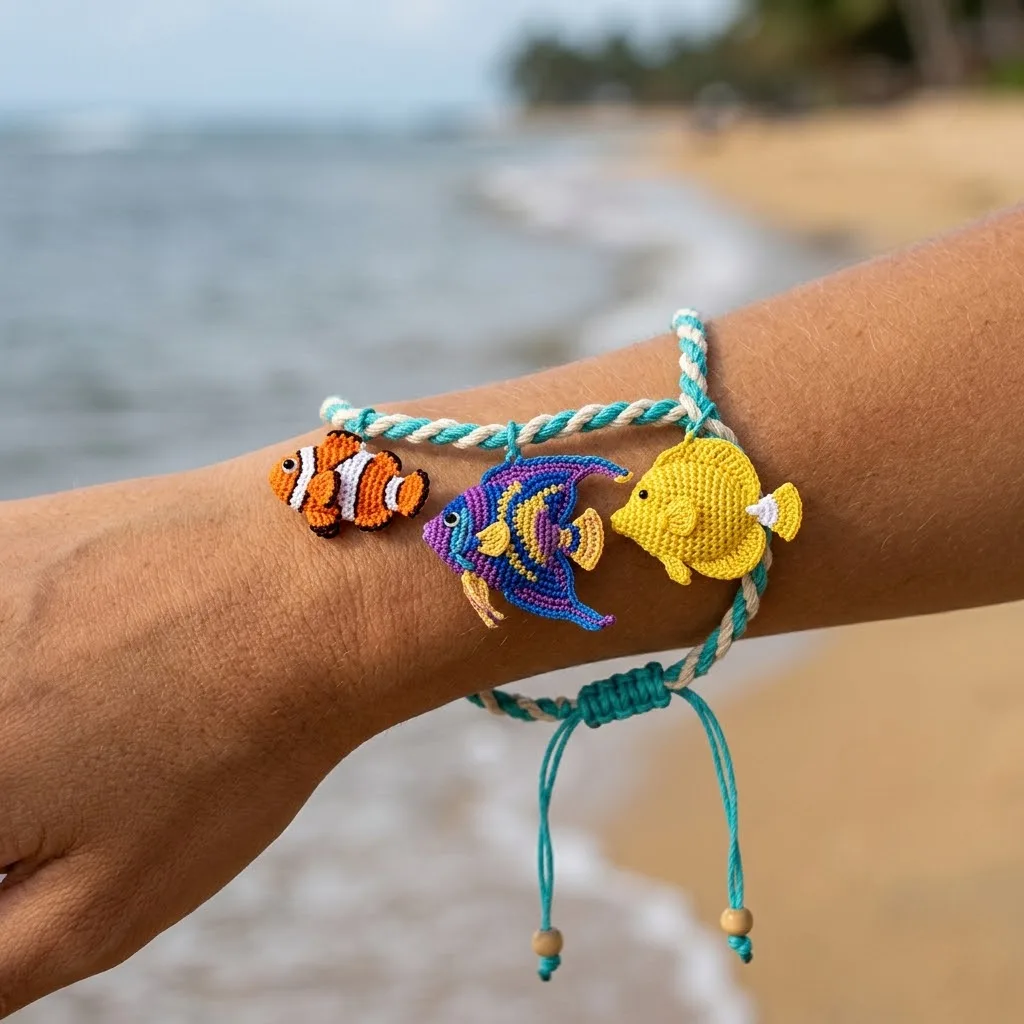
I designed this bracelet with beach lovers and ocean enthusiasts in mind. Whether you’re making it for yourself or as a gift, these cheerful fish bring instant summer vibes. The clownfish, angelfish, and yellow tang each have their own personality and color palette.
What makes this pattern special:
Skill Level
Intermediate to Advanced
This crochet tutorial requires experience working with very fine thread and small hooks. You should be comfortable with color changes, working in tight spaces, and reading detailed stitch instructions. The individual stitches are basic, but the scale demands precision.
If you’re newer to crochet, I’d suggest practicing with larger yarn first. Once you’re confident with the stitch construction, scaling down becomes much easier.
Finished Measurements
Materials Needed
Thread:
– Orange (clownfish body)
– White (clownfish stripes)
– Black (outlines and eyes)
– Purple (angelfish body)
– Blue (angelfish accents)
– Yellow (angelfish accents and yellow tang body)
– Gold or mustard (angelfish details)
– Pink or magenta (angelfish fins)
– White or cream (yellow tang mouth area)
– Teal or turquoise (bracelet cord)
– Cream or off-white (bracelet cord)
Hook:
Notions:
Gauge
Gauge is not critical for this project, but your stitches should be tight and uniform. A loose tension will result in floppy charms that don’t hold their shape. If your fish look limp, try going down a hook size.
Abbreviations and Stitch Definitions
Before we dive into the step by step instructions, let’s cover the stitches you’ll need. I’ll define each one so you know exactly what to do.
ch = chain: Yarn over, pull through loop on hook. This creates the foundation for most crochet work.
sl st = slip stitch: Insert hook, yarn over, pull through both the stitch and the loop on your hook in one motion. Used for joining and moving across stitches invisibly.
sc = single crochet: Insert hook into stitch, yarn over and pull up a loop (2 loops on hook), yarn over and pull through both loops. The most basic and common stitch.
inc = increase: Work 2 single crochet stitches into the same stitch. This adds one stitch to your count.
dec = decrease (invisible decrease): Insert hook through front loops only of the next 2 stitches, yarn over and pull through both front loops, yarn over and pull through both loops on hook. This removes one stitch cleanly.
hdc = half double crochet: Yarn over, insert hook into stitch, yarn over and pull up a loop (3 loops on hook), yarn over and pull through all 3 loops. Slightly taller than single crochet.
dc = double crochet: Yarn over, insert hook into stitch, yarn over and pull up a loop (3 loops on hook), yarn over and pull through 2 loops, yarn over and pull through remaining 2 loops. Creates a taller stitch.
FLO = front loop only: Work into just the front loop of the stitch instead of both loops.
BLO = back loop only: Work into just the back loop of the stitch instead of both loops.
Pattern Notes
Clownfish Charm Pattern
The clownfish features distinctive orange and white vertical stripes with black outlines. This little guy is the smallest of the three charms.
Body (worked flat)
Row 1: With orange thread, ch 6. Sc in 2nd ch from hook and in each ch across. (5 sc)
Row 2: Ch 1, turn. Inc in first st, sc in next 3 sts, inc in last st. (7 sc)
Row 3: Ch 1, turn. Change to white. Sc in first 2 sts, change to orange, sc in next 3 sts, change to white, sc in last 2 sts. (7 sc)
Row 4: Ch 1, turn. With white, inc in first st, sc in next st, change to orange, sc in next 3 sts, change to white, sc in next st, inc in last st. (9 sc)
Row 5: Ch 1, turn. Change to orange. Sc in first 2 sts, change to white, sc in next 2 sts, change to orange, sc in center st, change to white, sc in next 2 sts, change to orange, sc in last 2 sts. (9 sc)
Row 6: Ch 1, turn. Dec, sc in next 2 sts, change to white, sc in next st, change to orange, sc in center st, change to white, sc in next st, change to orange, sc in next 2 sts, dec. (7 sc)
Row 7: Ch 1, turn. Change to white. Sc in first st, change to orange, sc in next 2 sts, change to white, sc in center st, change to orange, sc in next 2 sts, change to white, sc in last st. (7 sc)
Row 8: Ch 1, turn. With orange, dec, sc in next 3 sts, dec. (5 sc)
Fasten off, leaving a tail for attaching to bracelet.
Fins and Tail
Top fin: Join orange at top edge of body. Ch 2, sl st in same st. Fasten off.
Bottom fin: Join orange at bottom edge of body. Ch 2, sl st in same st. Fasten off.
Tail: Join orange at back end of body. Ch 3, sl st in 2nd ch from hook, sl st in next ch, sl st in body. Ch 3, sl st in 2nd ch from hook, sl st in next ch, sl st in body. Fasten off.
Finishing Details
Using black thread and a tapestry needle, outline the white stripes with small straight stitches. Add a French knot or small bead for the eye. The black outlines really make this fish pop, so don’t skip this step.
Angelfish Charm Pattern
The angelfish is the most colorful and detailed of the three. It has a distinctive tall, angular shape with flowing fins.
Body (worked flat)
Row 1: With purple thread, ch 4. Sc in 2nd ch from hook and in each ch across. (3 sc)
Row 2: Ch 1, turn. Inc in first st, sc in next st, inc in last st. (5 sc)
Row 3: Ch 1, turn. Inc in first st, change to blue, sc in next st, change to yellow, sc in center st, change to blue, sc in next st, change to purple, inc in last st. (7 sc)
Row 4: Ch 1, turn. With purple, inc in first st, sc in next st, change to blue, sc in next st, change to yellow, sc in center st, change to blue, sc in next st, change to purple, sc in next st, inc in last st. (9 sc)
Row 5: Ch 1, turn. Change to gold. Sc in first 2 sts, change to purple, sc in next st, change to blue, sc in next st, change to yellow, sc in center st, change to blue, sc in next st, change to purple, sc in next st, change to gold, sc in last 2 sts. (9 sc)
Row 6: Ch 1, turn. With gold, sc in first 2 sts, change to yellow, sc in next 2 sts, change to purple, sc in center st, change to yellow, sc in next 2 sts, change to gold, sc in last 2 sts. (9 sc)
Row 7: Ch 1, turn. With yellow, dec, sc in next 2 sts, change to purple, sc in center st, change to yellow, sc in next 2 sts, dec. (7 sc)
Row 8: Ch 1, turn. With yellow, dec, sc in next 3 sts, dec. (5 sc)
Row 9: Ch 1, turn. Dec, sc in center st, dec. (3 sc)
Fasten off, leaving a tail.
Dorsal Fin (top)
Join purple at top point of body. Ch 5, dc in 3rd ch from hook, hdc in next ch, sc in last ch, sl st to body. Fasten off.
Ventral Fins (bottom flowing fins)
Join pink at bottom of body. Ch 6, sl st in 2nd ch from hook, sl st in each ch back to body, sl st in next st of body. Ch 7, sl st in 2nd ch from hook, sl st in each ch back to body. Fasten off.
Tail Fin
Join yellow at back of body. Ch 4, sl st in 2nd ch from hook, sl st in next 2 ch, sl st to body. Repeat once more for double tail. Fasten off.
Finishing Details
Using blue thread, add curved lines across the body following the color pattern. Add a small black French knot or bead for the eye. Touch up any color transitions with surface embroidery as needed.
Yellow Tang Charm Pattern
The yellow tang is the simplest of the three fish, with a cheerful solid yellow body and distinctive white snout.
Body (worked in continuous rounds)
Round 1: With yellow thread, create a magic ring. Work 6 sc into ring. Do not join, work in continuous spiral. (6 sc)
Round 2: Inc in each st around. (12 sc)
Round 3: *Sc in next st, inc in next st* repeat around. (18 sc)
Round 4: Sc in each st around. (18 sc)
Round 5: *Sc in next st, dec* repeat around. (12 sc)
Stuff very lightly with thread scraps if desired for dimension.
Round 6: Dec around until closed. Fasten off.
Snout
Join white thread at front center of body. Ch 3, sc in 2nd ch from hook, sl st in next ch, sl st to body. Fasten off.
Tail
Join yellow at back of body. Ch 4, dc in 3rd ch from hook, sl st in next ch, sl st to body. Repeat for V-shaped tail. Fasten off.
Dorsal Fin
Join yellow at top of body. Work 3 sc evenly along top edge, ch 1, turn. Sc in each st. Fasten off.
Finishing
Add a black French knot or tiny bead for the eye.
Twisted Cord Bracelet Base
The bracelet base is created by twisting multiple strands of thread together for a rope-like effect.
Step 1: Cut 6 strands of teal thread and 6 strands of cream thread, each approximately 36 inches long.
Step 2: Group the strands by color. Secure both groups at one end using a safety pin attached to a stable surface.
Step 3: Twist each group tightly in the same direction (clockwise) until the strands start to kink when relaxed.
Step 4: Holding both twisted groups together, allow them to twist around each other in the opposite direction (counterclockwise). This creates the two-tone rope effect.
Step 5: Secure both ends with small knots to prevent unraveling.
Adjustable Sliding Knot Closure
This closure allows the bracelet to fit various wrist sizes.
Step 1: Thread the twisted cord through a wooden bead on each end.
Step 2: Bring both ends of the cord together, overlapping by about 2 inches.
Step 3: Using a separate piece of teal thread (about 12 inches), tie a series of half hitch knots around both cords. This creates the macramé-style sliding section you see in the photo.
Step 4: Work approximately 15 to 20 knots, keeping them tight and uniform.
Step 5: Secure the ends of the knotting thread by weaving them through the knots and trimming closely.
Assembly
Now comes the fun part. Attaching your fish to the bracelet.
Step 1: Lay out your three fish charms and decide on placement. In the photo, the clownfish is on the left, the angelfish in the center, and the yellow tang on the right.
Step 2: Using a tapestry needle and matching thread, sew each fish to the twisted cord. Stitch through the back of each fish body multiple times to ensure a secure attachment.
Step 3: Space the fish evenly along the bracelet, leaving room for the closure area.
Step 4: (Optional) Apply a thin coat of fabric stiffener or clear nail polish to the fish charms for durability. Let dry completely.
Care Instructions
This delicate bracelet requires gentle handling. Remove before swimming or bathing. Spot clean only with a damp cloth if needed. Store flat to prevent tangling.
Customization Ideas
Want to make this pattern your own? Here are some fun variations to try.
Different fish: Create your own tropical fish designs using the same basic construction method. Butterflyfish, blue tangs, and moorish idols would all work beautifully.
Anklet version: Simply extend the cord length for an adorable anklet.
Single fish pendant: Make one fish charm and attach it to a simple chain for a necklace.
Earrings: Create two matching fish and add earring hooks for a coordinating set.
Different closure: Swap the sliding knot for a lobster clasp and jump rings if you prefer traditional jewelry hardware.
Troubleshooting Common Issues
Fish charms look floppy: Your tension is too loose. Try a smaller hook or pull your stitches tighter.
Colors are bleeding into each other: Carry your unused threads more carefully along the wrong side, or cut and rejoin instead of carrying.
Twisted cord keeps unraveling: Make sure you’re twisting tightly enough before allowing the strands to twist together. The initial tension is key.
Fish won’t lay flat: Block your pieces by pinning them flat and spritzing with water. Let dry completely before removing pins.
I really hope you enjoy making this tropical fish charm bracelet as much as I enjoyed designing it. These little swimmers are perfect for beach trips, summer birthdays, or just adding a pop of color to your everyday style. The detail work is meditative once you get into a rhythm, and the finished bracelet always gets compliments.
If you make this bracelet, I’d love to see your version. Tag me on Instagram or share a photo in our Facebook group. Save this pattern to your Pinterest boards so you can find it when you’re ready to start stitching, and drop a comment below to let me know which fish is your favorite. Happy hooking!
