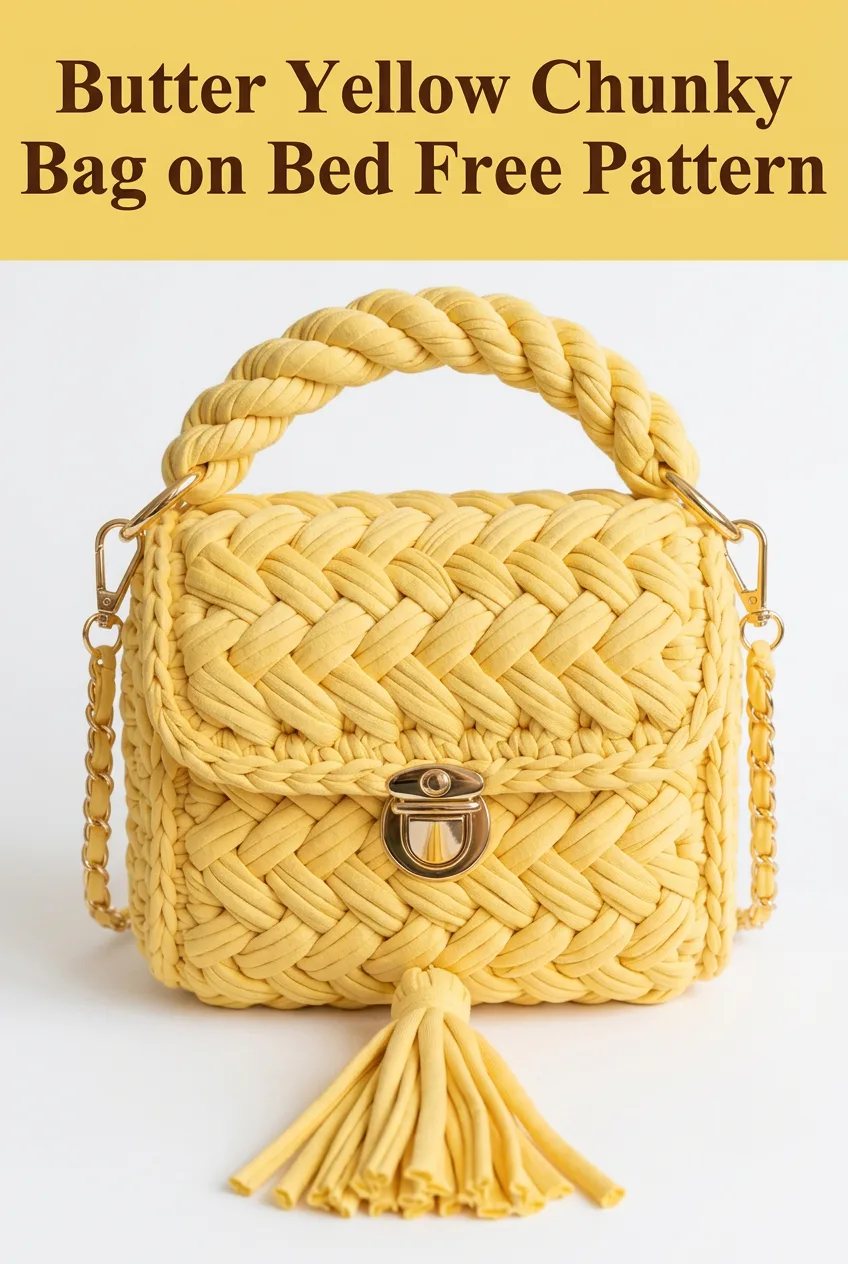
I wanted to design a bag that looked like it came straight from a boutique window, something structured and chic but still completely handmade. The moment I landed on this herringbone texture with the twisted rope handle and gold hardware, I knew I had something special. I spent hours perfecting the boxy shape and figuring out how to get that woven diagonal pattern just right. I am SO pleased with how it turned out! This butter yellow chunky bag has become my absolute favorite project to gift and make for myself.
Why This Crochet Bag Pattern Works So Well
This structured crossbody bag combines chunky t-shirt yarn with a beautiful herringbone stitch pattern that creates an eye-catching diagonal texture. The result looks far more complicated than it actually is. If you can work basic crochet stitches and follow a simple repeat, you can absolutely make this bag.
The herringbone stitch creates that gorgeous woven, braided appearance you see across the body of the bag. Paired with gold chain hardware, a twist clasp closure, and a handmade tassel, this crochet pattern produces a designer-quality accessory.
What makes this bag special:
Materials Needed
Before you start crocheting, gather everything you need. Having your hardware ready before you begin will help you size the bag correctly.
Yarn:
Hook:
Hardware and Notions:
Gauge:
With 9mm hook and t-shirt yarn in herringbone half double crochet: 8 stitches and 6 rows equals approximately 10cm (4 inches) square. Your gauge may vary slightly based on your yarn brand and tension.
Skill Level
This crochet bag pattern is intermediate level. You should be comfortable with basic stitches and working in rows. The herringbone stitch looks complex but uses a simple modification of the half double crochet.
If you have never tried herringbone stitch before, I recommend practicing a small swatch first. Once you understand the yarn-over placement, the rest of the pattern flows smoothly.
Abbreviations and Stitch Definitions
Let me walk you through every stitch and term used in this pattern.
Ch = Chain. Wrap yarn over hook and pull through the loop on your hook. This creates a foundation or adds height.
Sl st = Slip stitch. Insert hook, yarn over, pull through both the stitch and the loop on your hook in one motion. Used for joining or moving across stitches invisibly.
Sc = Single crochet. Insert hook into stitch, yarn over, pull up a loop (2 loops on hook), yarn over, pull through both loops.
Hdc = Half double crochet. Yarn over, insert hook into stitch, yarn over, pull up a loop (3 loops on hook), yarn over, pull through all 3 loops.
HBhdc = Herringbone half double crochet. This is the star of the pattern. Yarn over, insert hook into stitch, yarn over, pull through the stitch AND the first loop on hook in one motion (2 loops remain), yarn over, pull through both remaining loops. This creates the signature slanted texture.
St(s) = Stitch(es)
Rep = Repeat
Special Technique: Herringbone Half Double Crochet
The herringbone stitch is what gives this bag its beautiful diagonal woven texture. Here is how to work it step by step.
1. Yarn over your hook
2. Insert hook into the next stitch
3. Yarn over again
4. Pull through the stitch AND the first loop on your hook at the same time (this is the key difference from regular hdc)
5. You now have 2 loops on your hook
6. Yarn over and pull through both loops
Troubleshooting tip: If your fabric looks like regular half double crochet, you are probably pulling through only the stitch and leaving that first loop behind. Practice pulling through two layers at once. It feels awkward at first but becomes natural quickly.
Crochet Pattern Instructions
This bag is worked in several pieces: the base, the body, the flap, and the twisted handle. You will then assemble everything and attach the hardware.
Part 1: The Bag Base
The base creates a rectangular foundation for the structured shape.
Row 1: Ch 21. Sc in 2nd ch from hook and in each ch across. (20 sts)
Rows 2 to 10: Ch 1, turn. Sc in each st across. (20 sts)
Fasten off, leaving a long tail for seaming later. Your base should measure approximately 18cm by 14cm (7 inches by 5.5 inches).
Part 2: The Bag Body
The body is worked in joined rounds around the base, building up the sides with herringbone stitch.
Setup Round: With right side of base facing, join yarn in any corner. Ch 1. Work sc evenly around all four edges of the base: 20 sc along each long side and 10 sc along each short side. Place a stitch marker in the first sc. (60 sts)
Round 1: Ch 2 (does not count as a stitch throughout). HBhdc in each st around. Sl st to first HBhdc to join. (60 sts)
Rounds 2 to 12: Rep Round 1. (60 sts each round)
After Round 12, your bag body should stand approximately 15cm (6 inches) tall. The herringbone texture creates that beautiful diagonal pattern visible in the design.
Shaping the Top Edge:
Round 13: Ch 1. Sc in each st around. Sl st to first sc. (60 sts)
Round 14: Ch 1. Sc in each st around. Sl st to first sc. Fasten off. (60 sts)
This creates a clean finished edge at the top of the bag opening.
Part 3: The Flap
The flap is worked flat and attached to the back of the bag. It features the same herringbone texture for a cohesive look.
Row 1: Ch 21. HBhdc in 3rd ch from hook and in each ch across. (19 sts)
Rows 2 to 8: Ch 2, turn. HBhdc in each st across. (19 sts)
Shaping the Flap Edge:
Row 9: Ch 1, turn. Sc in each st across. (19 sts)
Row 10: Ch 1, turn. Sl st in first st, sc in next 17 sts, sl st in last st. (19 sts)
Fasten off, leaving a long tail for attaching to the bag.
Attaching the Flap:
Position the flap along the back top edge of the bag body. Using your tapestry needle and the yarn tail, whip stitch the first row of the flap to the inside of the bag back. Weave in the end securely.
Part 4: The Twisted Rope Handle
This handle uses a simple braiding technique with t-shirt yarn to create that chunky twisted rope appearance.
Step 1: Cut six strands of t-shirt yarn, each approximately 90cm (35 inches) long.
Step 2: Divide the strands into three groups of two strands each.
Step 3: Secure one end by tying a temporary knot or clamping to a surface.
Step 4: Braid the three sections together tightly until you reach the desired handle length, approximately 25 to 30cm (10 to 12 inches).
Step 5: Secure the other end with another temporary knot.
Step 6: At each end, wrap a small piece of t-shirt yarn tightly around the bundle several times. Thread the end through itself to secure.
Step 7: Attach D-ring hardware to each end by folding the wrapped section through the ring and stitching it closed with matching yarn.
Part 5: Making the Tassel
Step 1: Cut approximately 15 to 20 strands of t-shirt yarn, each about 20cm (8 inches) long.
Step 2: Cut one additional strand about 30cm long for tying.
Step 3: Lay the shorter strands in a bundle. Fold the long strand in half and wrap it around the center of the bundle.
Step 4: Fold the bundle in half at the wrapped point. The long strand tails become your hanging loop.
Step 5: Cut another strand about 15cm long. Wrap it tightly around all the strands about 2cm below the fold, creating the tassel head. Tuck the end under the wraps and secure.
Step 6: Trim the tassel ends evenly.
Assembly and Finishing
Now comes the satisfying part where your bag comes together.
Attaching Hardware:
1. Twist-lock clasp: Position the bottom half of the clasp on the front center of the bag body, approximately 3cm below the top edge. Mark the placement with pins. Using a sharp tool, carefully create small holes in the fabric where the clasp prongs will go through. Push the prongs through and bend them flat on the inside. Position the top half of the clasp on the flap to align when closed.
2. Side rings: Attach metal rings or D-rings to each side of the bag at the top corners. You can crochet small loops around the hardware and sew them to the bag, or use purchased bag strap connectors.
3. Chain strap: Attach the gold chain to the side rings using the lobster clasps or jump rings that came with your chain.
4. Top handle: Attach the twisted rope handle to the D-rings at the top corners of the bag.
5. Tassel: Loop the tassel hanging cord through the bottom of the twist-lock clasp and tie securely.
Finishing Touches:
Weave in all remaining yarn ends on the inside of the bag. If desired, you can line the interior with fabric for a more polished finish, though this is entirely optional.
Tips for Success with This Chunky Bag Pattern
Yarn choice matters. T-shirt yarn (also called trapillo or ribbon yarn) gives this bag its structure. Regular yarn will not produce the same results. Look for brands like Hoooked Zpagetti, Tek-Tek, or any recycled cotton t-shirt yarn.
Keep your tension consistent. Because t-shirt yarn is thick, inconsistent tension shows more than with thinner yarns. Try to maintain even pressure as you work each stitch.
Block if needed. If your bag looks a bit wobbly after assembly, you can stuff it with tissue paper and let it sit for a day or two. This helps the yarn relax into shape.
Hardware placement. Measure twice before making holes for your clasp. Once you cut into the fabric, you cannot undo it.
Customization Ideas
This crochet bag pattern adapts beautifully to different styles.
Color options: Try neutrals like cream, taupe, or black for a classic look. Bold colors like coral, teal, or burgundy make a statement piece.
Hardware variations: Silver hardware creates a cooler tone. Rose gold offers a romantic feel. Aged brass looks vintage and earthy.
Size adjustments: Add more chains to your foundation and more rounds to the body for a larger bag. Reduce for a mini crossbody.
Skip the chain: If you prefer a simpler look, make a longer twisted rope handle that works as a shoulder strap instead.
Your Butter Yellow Chunky Bag
You have now created a stunning structured crossbody bag that looks absolutely boutique-worthy. The herringbone stitch pattern, professional hardware, and thoughtful details like the twisted handle and tassel elevate this beyond typical handmade accessories.
This bag works beautifully for everyday errands, weekend outings, or as a thoughtful handmade gift. The chunky construction means it holds up well to regular use while maintaining its shape.
I hope you love making this butter yellow chunky bag crochet pattern as much as I loved designing it. The combination of texture, structure, and those gorgeous gold accents creates something truly special.
If you enjoyed this pattern, I would love for you to pin it to your Pinterest boards so you can find it again later and share it with your crafty friends. And please, if you make this bag, drop a comment below or tag me in your photos. Seeing your finished projects absolutely makes my day, and I cannot wait to see what color combinations you choose!
