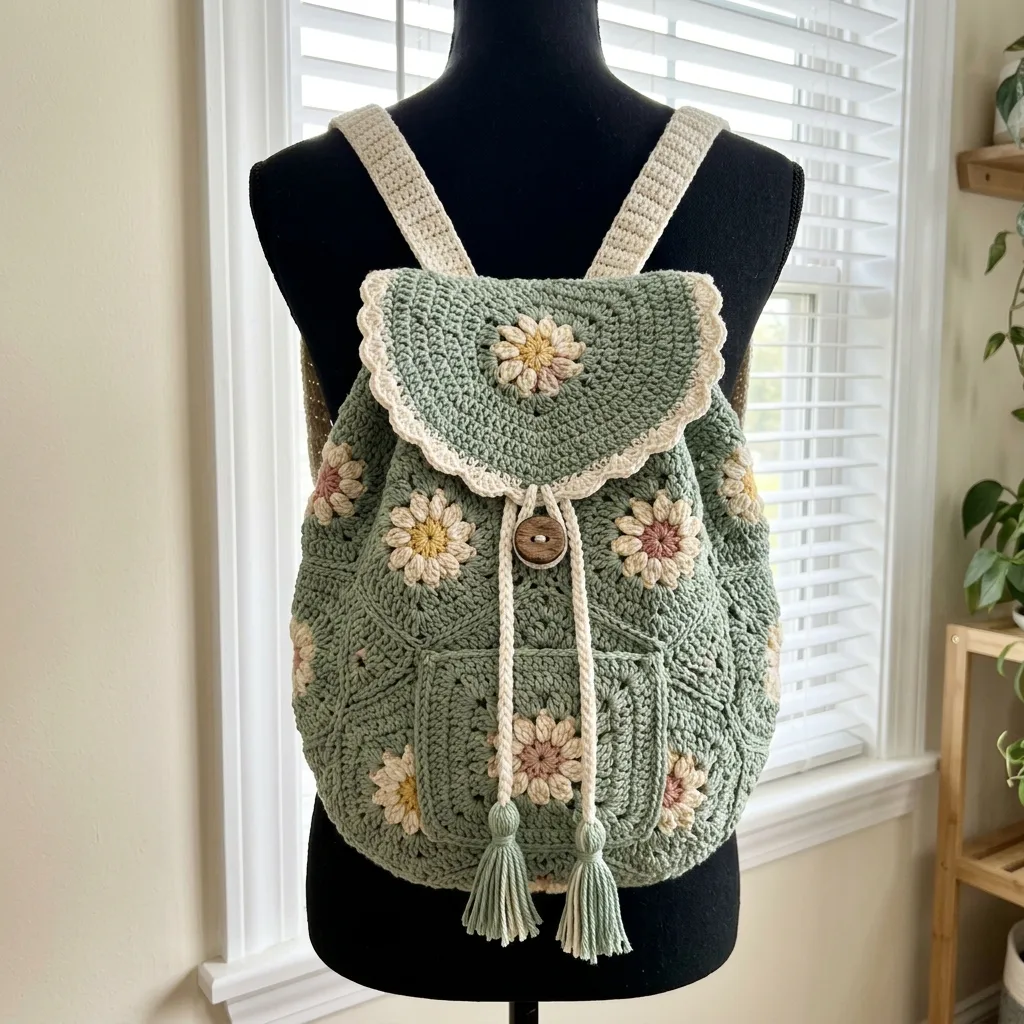
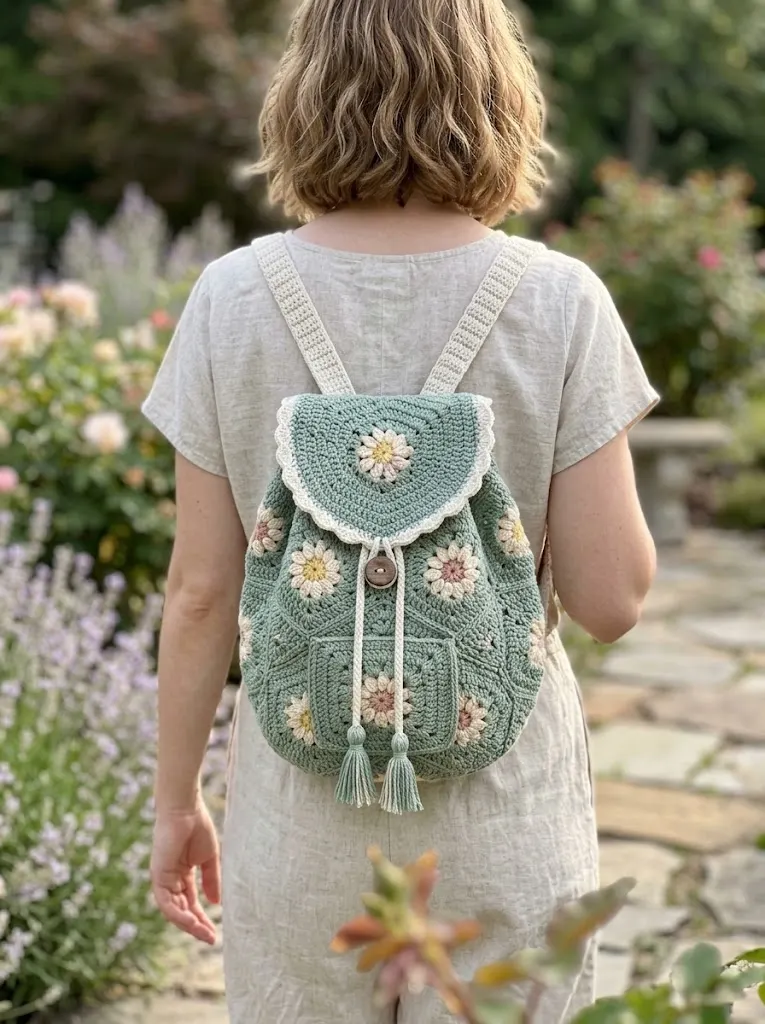
I call this one "Meadow," and she has been living in my head for nearly three years. I originally sketched her in a worn notebook during a rainy weekend, dreaming of a bag that felt both vintage and fresh. The flowers came first, then the sage green that reminded me of my grandmother’s garden. I finally brought her to life last month, and honestly, she turned out even better than I imagined. If you love granny squares and have been wanting to try a wearable bag project, Meadow is waiting for you.
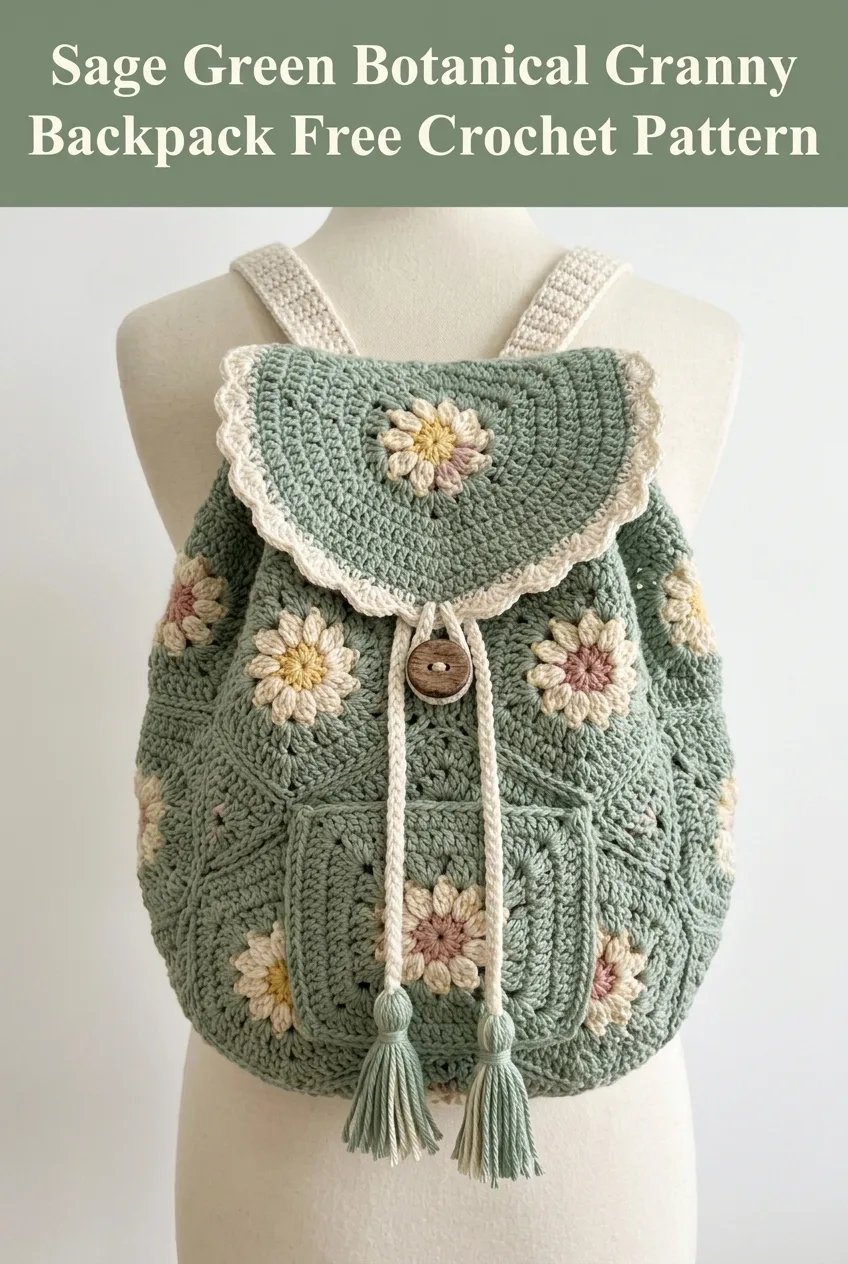
This botanical granny backpack combines classic granny square construction with modern shaping and practical features. You will work individual flower motifs, join them strategically, then add a drawstring closure, sturdy straps, and the sweetest scalloped flap. The result is a bag that looks incredibly intricate but breaks down into manageable, repeatable steps.
Why You Will Love This Crochet Pattern
This backpack hits that sweet spot between impressive and achievable. The flower granny squares use basic stitches arranged in a way that creates stunning visual impact. Once you master one square, you simply repeat the process. The construction might look complex, but I promise you can handle it.
Perfect for confident beginners and intermediate crocheters. If you can work double crochet stitches and have joined granny squares before, you have all the skills you need. If joining squares is new to you, this is a wonderful project to learn on because the layout is straightforward.
The sage green and cream color palette gives this bag a cottagecore aesthetic that works year round. Swap the colors to match your wardrobe or use up yarn from your stash. Those flower centers are perfect for scraps.
Materials Needed
Yarn:
I recommend a sturdy cotton or cotton blend yarn. 100% cotton works beautifully for bags because it holds its shape, does not stretch out over time, and has a lovely drape. Acrylic will work but may stretch with heavy use.
Hook:
Notions:
Gauge
One completed flower granny square should measure approximately 4 inches by 4 inches after blocking.
Gauge matters for this project. If your squares are too large, your bag will be floppy. Too small, and it will be stiff and undersized. Make a test square and adjust your hook size if needed.
Abbreviations and Stitch Definitions
Let me walk you through every stitch you will use. Even if you know these, a quick refresher never hurts.
Ch = Chain. Wrap yarn over hook, pull through loop on hook. This creates the foundation for most crochet work.
Sl st = Slip stitch. Insert hook into stitch, yarn over, pull through both the stitch and the loop on your hook in one motion. Used for joining and moving across stitches invisibly.
Sc = Single crochet. Insert hook into stitch, yarn over and pull up a loop (two loops on hook), yarn over and pull through both loops.
Dc = Double crochet. Yarn over, insert hook into stitch, yarn over and pull up a loop (three loops on hook), yarn over and pull through two loops, yarn over and pull through remaining two loops.
Hdc = Half double crochet. Yarn over, insert hook into stitch, yarn over and pull up a loop (three loops on hook), yarn over and pull through all three loops at once.
Puff stitch = A cluster of half double crochets worked into the same stitch to create a puffy, rounded texture. For this pattern: yarn over, insert hook, pull up a loop. Repeat two more times in the same stitch (seven loops on hook). Yarn over and pull through all seven loops.
Ch-sp = Chain space. The gap created by chains in the previous round. You work into this space, not into individual chain stitches.
Flower Granny Square Pattern
You will need 18 completed squares for the main body of the backpack. Each square starts with the flower center, builds outward with petals, then finishes with the sage green border.
Round 1: Flower Center
Using CC2 (golden yellow), make a magic ring.
Ch 3 (counts as first dc throughout), work 11 dc into the ring. (12 dc)
Sl st to top of beginning ch-3 to join. Pull magic ring closed.
Fasten off CC2.
Round 2: Petals
Join CC1 (cream) or CC3 (dusty rose) to any stitch with a sl st. For variety, alternate between cream and dusty rose flowers throughout your squares.
*In the same st, work (sc, hdc, dc, hdc, sc) to create one petal. Sl st into next st.* Repeat from * to * around. (6 petals)
Fasten off petal color.
Round 3: Building Behind Petals
This round works behind the petals you just made. Join MC (sage green) to any sl st between petals, working into the back of Round 1.
Ch 4, *sc into next sl st (between petals), ch 3.* Repeat from * to * around. End with sl st to first ch of beginning ch-4. (6 ch-3 spaces)
Round 4: First Sage Border
Working into ch-spaces from Round 3:
Ch 3, 2 dc in same ch-sp, ch 2, 3 dc in same ch-sp (first corner made). *Ch 1, (3 dc, ch 2, 3 dc) in next ch-sp.* Repeat from * to * around. Ch 1, sl st to top of beginning ch-3 to join. (6 corners, but we will square it off next round)
Round 5: Squaring Off
Ch 3, dc in next 2 dc, *(2 dc, ch 2, 2 dc) in corner ch-2 sp, dc in next 3 dc, dc in ch-1 sp, dc in next 3 dc.* Repeat from * to * around, adjusting the final repeat to sl st to top of beginning ch-3. (4 corners established)
Round 6: Final Border
Ch 3, dc in each dc around, working (2 dc, ch 2, 2 dc) in each corner ch-2 sp. Sl st to join. (17 dc per side, plus corners)
Fasten off. Weave in ends.
Make 18 squares total. I suggest making 12 with cream petals and 6 with dusty rose petals for variety, but follow your heart.
Assembling the Backpack Body
Layout
Arrange your squares in a cross shape for the body:
Joining Method
I used a slip stitch join through back loops only for a neat ridge on the inside. Hold squares with wrong sides together, right sides facing out.
Working through back loops of both squares, sl st across, matching stitch for stitch. When you reach corners, ch 1 and continue along the next edge.
Join all horizontal seams first, then vertical seams. This keeps everything aligned.
Forming the Bag
Fold the cross shape so the back panel and front panel meet at the sides. The bottom panel becomes the base.
Seam the side edges closed using the same slip stitch join method. Your bag should now stand up on its own as a rectangular pouch.
Drawstring Top Edge
Join MC to any stitch at top edge of bag.
Round 1: Ch 1, sc evenly around entire top opening, working approximately 3 sc per square edge and 1 sc in each corner. Sl st to join. Count your stitches and adjust to achieve an even number.
Rounds 2 through 4: Ch 1, sc in each sc around. Sl st to join. (Same stitch count)
Round 5 (Eyelet Round): Ch 1, *sc in next 2 sc, ch 2, skip 2 sc.* Repeat from * to * around. Sl st to join. These gaps will hold your drawstring.
Rounds 6 through 8: Ch 1, sc in each st and ch around. Sl st to join. Fasten off.
Drawstring Cord
Using CC1, ch 150 (or until cord measures approximately 36 inches). Sl st in second ch from hook and in each ch across. Fasten off.
Thread the cord through the eyelet round, starting and ending at center front. Add tassels to each end.
Tassels
Cut 20 strands of MC, each approximately 8 inches long. Fold in half, attach to drawstring end using a lark’s head knot. Trim evenly. Repeat for second tassel.
Backpack Flap
The flap is a half-circle with a scalloped edge and a center flower motif.
Flap Base
Using MC, ch 4. Sl st to first ch to form a ring.
Row 1: Ch 3, 6 dc in ring, turn. (7 dc)
Row 2: Ch 3, dc in same st, 2 dc in each dc across, turn. (14 dc)
Row 3: Ch 3, dc in same st, *dc in next dc, 2 dc in next dc.* Repeat from * to * across, turn. (21 dc)
Row 4: Ch 3, dc in each dc across, turn. (21 dc)
Row 5: Ch 3, dc in same st, *dc in next 2 dc, 2 dc in next dc.* Repeat from * to * across, turn. (28 dc)
Rows 6 through 10: Continue increasing every other row until flap measures approximately 7 inches across the straight edge and 5 inches from straight edge to curved edge.
Scalloped Edge
Join CC1 along the curved edge.
*Skip 2 sts, 5 dc in next st (shell made), skip 2 sts, sl st in next st.* Repeat from * to * along entire curved edge. Fasten off.
Center Flower
Make one flower motif following Rounds 1 and 2 of the granny square pattern. Sew to center of flap.
Attach flap to back panel of backpack by sewing straight edge to top back seam.
Backpack Straps
Make 2.
Using CC1, ch 8.
Row 1: Sc in second ch from hook, sc in each ch across, turn. (7 sc)
Rows 2 through 85: Ch 1, sc in each sc across, turn. (7 sc)
Each strap should measure approximately 24 inches. Adjust length as needed.
Fasten off, leaving a long tail for sewing.
Attaching Straps
Sew top ends of straps to top corners of back panel, spacing them approximately 4 inches apart. Sew bottom ends to bottom corners of back panel.
Front Pocket
Make one additional granny square following the full pattern.
Using MC, add a border of 2 rounds sc around all four sides.
Center pocket on front panel, slightly below center. Sew sides and bottom edge in place, leaving top open.
Button Loop and Closure
Using MC, ch 15. Sl st to first ch to form a loop.
Sew loop to center of flap, on the underside.
Sew wooden button to front of bag, positioned so loop reaches comfortably when flap is closed.
Finishing Touches
Weave in all remaining ends. Block if desired by lightly steaming or wet blocking. This helps squares lay flat and evens out your stitches.
Consider adding a fabric lining for durability and to prevent small items from poking through. A simple drawstring lining bag in coordinating fabric works beautifully.
Tips for Success with This Crochet Tutorial
Consistent tension is everything. Your squares need to match in size, so try to maintain even tension throughout. If your tension tends to vary, make a few extra squares and choose the best matches.
Block your squares before joining. Even light blocking makes assembly so much easier. Pin each square to a blocking mat, spritz with water, and let dry completely.
Count your stitches every few rows. This step by step pattern relies on accurate stitch counts for proper shaping.
Try the straps on before final sewing. Everyone carries a backpack differently. You might want longer or shorter straps depending on your height and preference.
Make It Your Own
This beginner friendly pattern adapts beautifully to different color schemes. Try all white flowers on navy blue for a nautical look. Or go bold with rainbow flowers on black. The construction stays the same regardless of your palette.
For a smaller bag, use fewer squares. A kid-sized version might use 2×2 panels instead of 3×3.
I absolutely love seeing your finished projects bring this pattern to life. Tag me on Instagram or share in our Facebook group so I can celebrate your work. There is nothing better than seeing Meadow out in the world, carried by hands that made her with love.
If this botanical granny backpack crochet pattern is calling your name but you are not quite ready to start today, pin it to your Pinterest boards so you can find it when the time is right. And please, drop a comment below when you make yours. I read every single one, and I would love to hear which color combination you chose.
