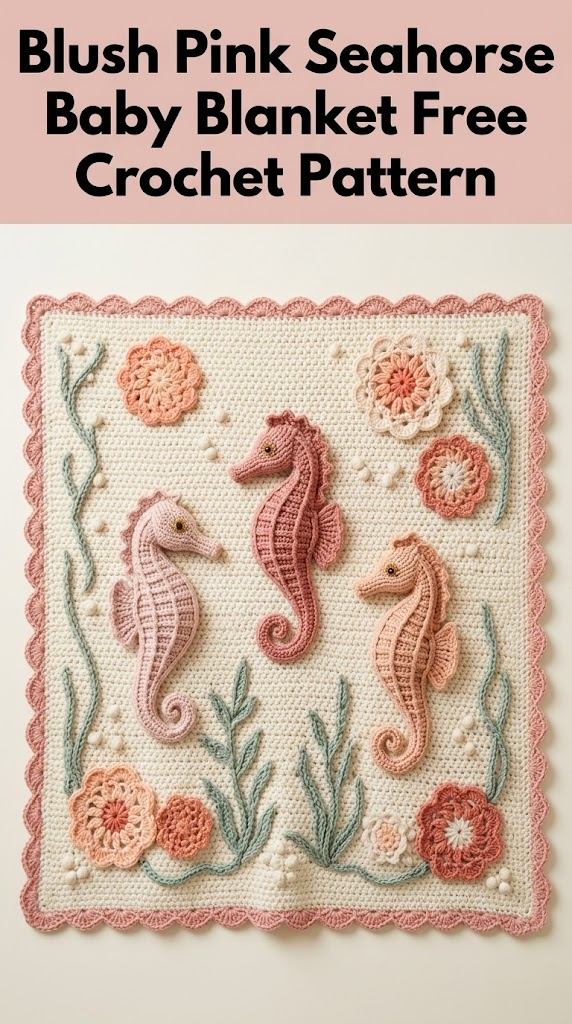
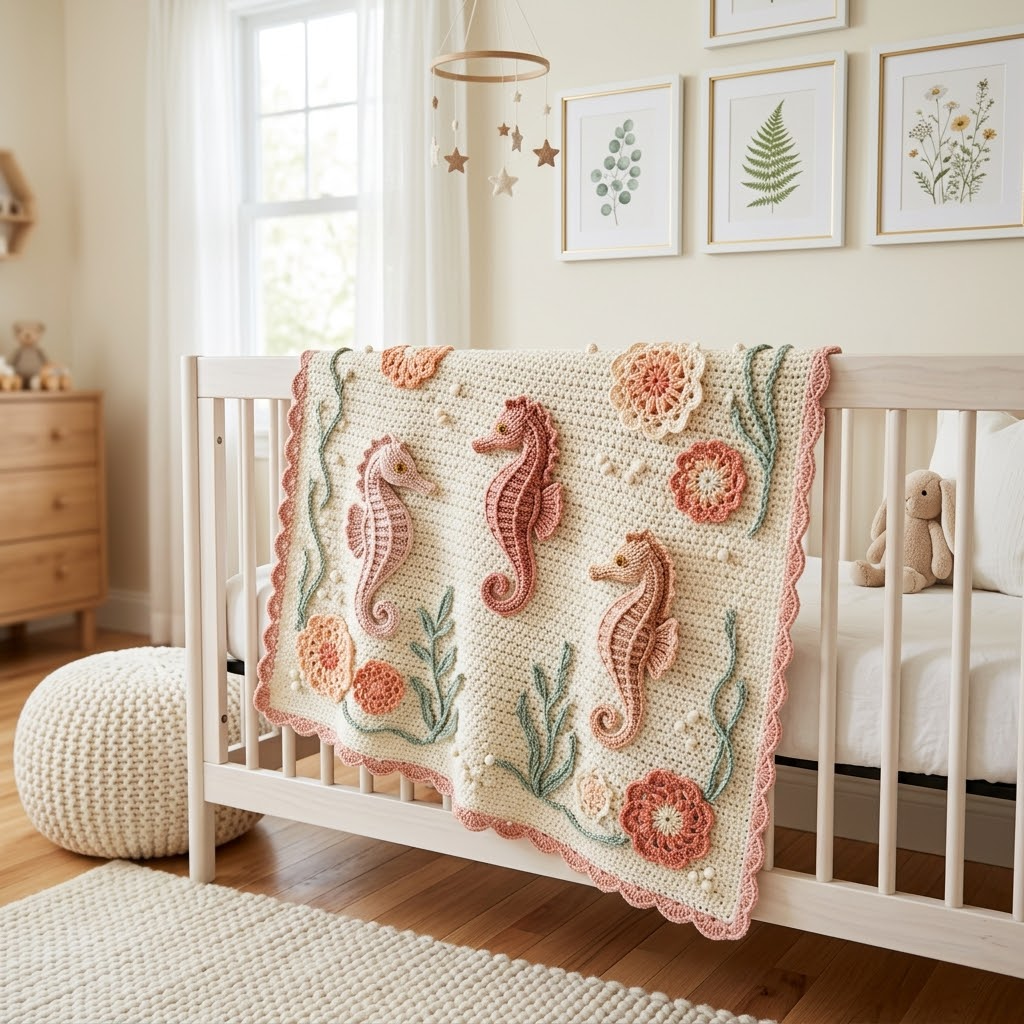
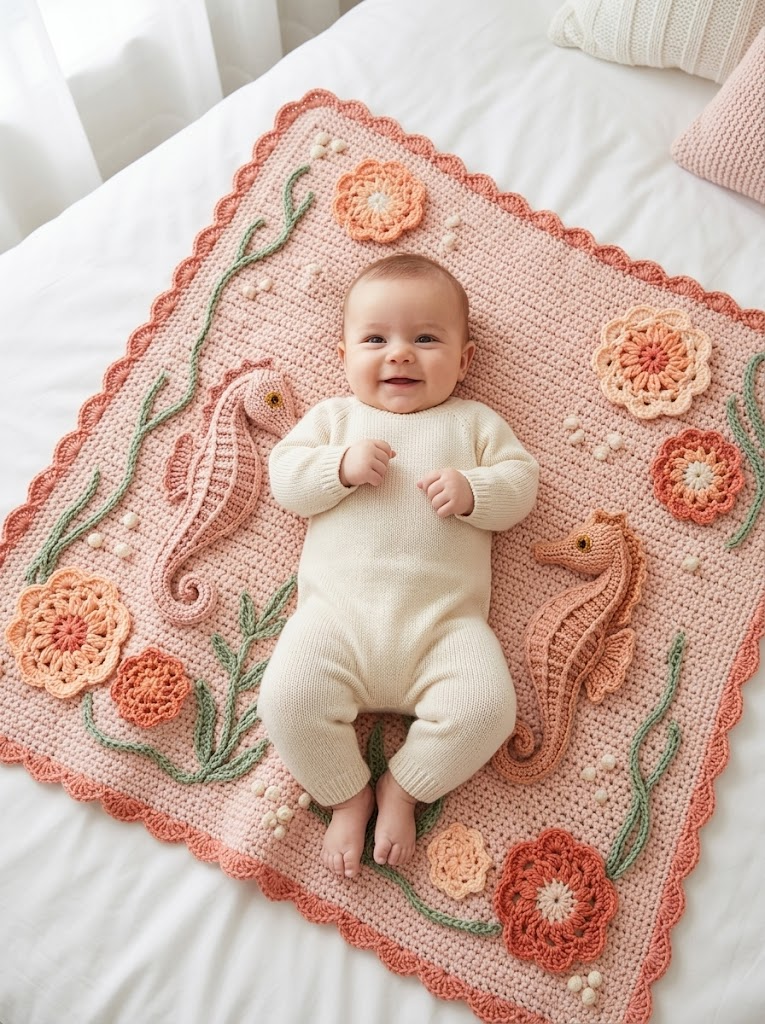
There is something magical about crocheting a blanket for a little one. This Blush Pink Seahorse Baby Blanket captures that coastal nursery charm with soft coral seahorses, delicate flowers, and gently waving seaweed against a creamy background. The scalloped border in dusty rose ties everything together beautifully.
I designed this crochet pattern to look impressive while keeping the actual construction manageable. You will work a simple base blanket first. Then you create the appliqués separately and attach them. No complicated color changes mid-row. No confusing charts. If you can crochet basic stitches and follow along step by step, you can absolutely make this blanket.
Let me walk you through everything you need to recreate this ocean-themed baby blanket from scratch.
Why This Seahorse Baby Blanket Pattern Works
This crochet tutorial breaks a complex-looking project into simple pieces. The base blanket uses straightforward stitches in one color. The seahorses, flowers, seaweed, and bubbles are all separate appliqués you make individually. You arrange and attach them at the end.
This approach means you can work on appliqués during short windows of time. Waiting at appointments. Watching television. Traveling. Then you assemble everything when your pieces are ready.
The finished blanket measures approximately 30 inches wide by 36 inches long. Perfect for a crib, stroller, or tummy time mat.
Materials You Will Need
Gathering your supplies before starting makes the whole process smoother. Here is everything required for this step by step crochet pattern.
Yarn
You will need worsted weight yarn (also called medium weight or category 4) in the following colors and approximate amounts:
I recommend a soft acrylic or cotton blend for baby items. Look for yarns labeled machine washable. Parents will thank you.
Hook and Notions
Gauge Information
For the base blanket using the 5.0mm hook and single crochet (sc):
16 stitches and 18 rows = 4 inches
Check your gauge before starting. If your swatch is larger, try a smaller hook. If smaller, go up a hook size. Gauge matters less for blankets than garments. But checking helps ensure you have enough yarn.
Skill Level
This pattern is intermediate beginner friendly. You should be comfortable with:
If some of these feel shaky, practice on scrap yarn first. There is no rush.
Abbreviations and Stitch Definitions
Let me define every stitch abbreviation before we begin. I will use these throughout the pattern.
ch = chain: Yarn over, pull through loop on hook. Creates foundation or adds height.
sl st = slip stitch: Insert hook, yarn over, pull through stitch AND loop on hook in one motion. Used for joining or invisible movement.
sc = single crochet: Insert hook into stitch, yarn over, pull up a loop (2 loops on hook), yarn over, pull through both loops. Short, dense stitch.
hdc = half double crochet: Yarn over, insert hook, yarn over, pull up loop (3 loops on hook), yarn over, pull through all 3 loops. Medium height stitch.
dc = double crochet: Yarn over, insert hook, yarn over, pull up loop (3 loops on hook), yarn over, pull through 2 loops, yarn over, pull through remaining 2 loops. Taller stitch with nice drape.
inc = increase: Work 2 stitches into the same stitch. Adds one stitch to your count.
dec = decrease (sc2tog): Insert hook in first stitch, pull up loop, insert hook in next stitch, pull up loop (3 loops on hook), yarn over, pull through all 3. Removes one stitch.
BLO = back loop only: Work into only the back loop of the stitch instead of both loops. Creates a ridge.
st(s) = stitch(es)
sp = space
Base Blanket Instructions
We start with the main blanket panel using Color A (Cream) and your 5.0mm hook.
Foundation
Ch 121.
Row 1
Sc in 2nd ch from hook and in each ch across. (120 sts)
Turn your work at the end of every row.
Row 2
Ch 1 (does not count as stitch here and throughout), sc in each st across. (120 sts)
Rows 3 through 160
Repeat Row 2.
Yes, this is a lot of rows. Put on a podcast or audiobook. The repetition becomes meditative.
Tip: Place a stitch marker at the beginning of Row 1 to mark the right side of your work. This helps when attaching appliqués later.
Checking Your Progress
At Row 80, your blanket should measure approximately 18 inches long. At Row 160, approximately 36 inches.
Fasten off. Weave in ends.
Set your base blanket aside while you create the appliqués.
Seahorse Appliqué Pattern (Make 3)
These charming seahorses are the stars of this crochet pattern. You will make three total using Color B (Blush Pink) and your 4.0mm hook.
Each seahorse measures approximately 7 inches tall when complete.
Body Section
Ch 7.
Row 1: Sc in 2nd ch from hook, sc in next 4 ch, 3 sc in last ch. Working along opposite side of foundation chain, sc in next 5 ch. (13 sts)
Row 2: Ch 1, turn. Sc in first 5 sts, inc in next 3 sts, sc in last 5 sts. (16 sts)
Row 3: Ch 1, turn. Sc in first 6 sts, inc in next st, sc in next 2 sts, inc in next st, sc in last 6 sts. (18 sts)
Rows 4-8: Ch 1, turn. Sc in each st across. (18 sts)
Row 9: Ch 1, turn. Dec, sc in next 14 sts, dec. (16 sts)
Row 10: Ch 1, turn. Dec, sc in next 12 sts, dec. (14 sts)
Rows 11-14: Ch 1, turn. Sc in each st across. (14 sts)
Belly Curve
Row 15: Ch 1, turn. Sc in first 10 sts, leave remaining 4 sts unworked. (10 sts)
Row 16: Ch 1, turn. Dec, sc in next 6 sts, dec. (8 sts)
Row 17: Ch 1, turn. Dec, sc in next 4 sts, dec. (6 sts)
Rows 18-20: Ch 1, turn. Sc in each st across. (6 sts)
Neck Section
Row 21: Ch 1, turn. Inc, sc in next 4 sts, inc. (8 sts)
Rows 22-26: Ch 1, turn. Sc in each st across. (8 sts)
Head
Row 27: Ch 1, turn. Inc, sc in next 6 sts, inc. (10 sts)
Rows 28-30: Ch 1, turn. Sc in each st across. (10 sts)
Row 31: Ch 1, turn. Dec, sc in next 6 sts, dec. (8 sts)
Row 32: Ch 1, turn. Dec, sc in next 4 sts, dec. (6 sts)
Snout
Row 33: Ch 1, turn. Dec, sc in next 2 sts, dec. (4 sts)
Rows 34-38: Ch 1, turn. Sc in each st across. (4 sts)
Fasten off leaving a long tail for sewing.
Tail (worked separately and attached)
Ch 20.
Row 1: Sc in 2nd ch from hook, hdc in next 3 ch, dc in next 6 ch, hdc in next 4 ch, sc in next 4 ch, sl st in last ch. (19 sts)
Fasten off leaving tail for sewing. Curl the tail into a spiral and tack in place with a few stitches.
Dorsal Fin Ridge
Using Color C (Coral), ch 15.
Working in BLO only: sl st in 2nd ch from hook, sc, hdc, dc, hdc, sc, sl st, sc, hdc, dc, hdc, sc, sl st, sc.
Fasten off. This creates a wavy ridge. Sew along the seahorse’s back.
Eye Detail
Using tapestry needle and a small amount of cream yarn, embroider a French knot or satin stitch circle for the eye. Add a tiny black or dark brown dot if desired.
Flower Appliqué Pattern (Make 6)
These coral and peach flowers add softness to your blanket. Make six total. Use Color C (Coral) for three and Color E (Light Peach) for three.
Flower Center
Using your chosen color and 4.0mm hook, make a magic ring.
Round 1: Ch 1, 6 sc into ring, sl st to first sc to join. Pull ring closed. (6 sts)
Round 2: Ch 1, inc in each st around, sl st to join. (12 sts)
Petals
Round 3: *Ch 3, dc in same st, dc in next st, ch 3, sl st in same st, sl st in next st.* Repeat from * around. (6 petals)
Fasten off leaving tail for sewing.
For added dimension, use Color E to add a contrasting center. Work 6 sc into a magic ring and sew to flower center.
Seaweed Appliqué Pattern (Make 6)
The wavy seaweed adds movement and whimsy. Use Color D (Sage Green) and your 4.0mm hook.
Make three tall pieces (approximately 6 inches) and three medium pieces (approximately 4 inches).
Tall Seaweed
Ch 31.
Row 1: Working in BLO, sc in 2nd ch from hook, *hdc in next 2 ch, dc in next 2 ch, hdc in next 2 ch, sc in next 2 ch.* Repeat from * across, ending with sc in last ch.
The back loop only technique creates a natural curl.
Fasten off.
Medium Seaweed
Ch 21. Work Row 1 as above.
Fasten off.
Small Leaf Clusters (Make 4)
Ch 8. Sl st in 2nd ch from hook, sc, hdc, dc, hdc, sc, sl st. This creates one leaf. Make 2-3 leaves and join at base for clusters.
Bubble Appliqué Pattern (Make 12-15)
Those adorable raised bubbles are simple bobble stitches worked individually.
Using Color A (Cream) and your 4.0mm hook:
Make a magic ring. Work 5 dc into ring, but do not complete the final yarn over of each dc. You will have 6 loops on your hook. Yarn over and pull through all 6 loops. Ch 1 to secure.
Fasten off leaving tail.
Make varying sizes by using 4 dc for smaller bubbles or 6 dc for larger ones.
Scalloped Border Instructions
This dusty rose border frames your blanket beautifully. Use Color B (Blush Pink) and your 5.0mm hook.
Round 1 – Foundation
Join yarn in any corner with a sl st.
Ch 1, work sc evenly around entire blanket. Place 3 sc in each corner. Aim for approximately 120 sc along short sides and 160 sc along long sides. Adjust as needed to keep edges flat.
Sl st to first sc to join.
Round 2 – Scallop Setup
Ch 1, sc in each st around, placing 3 sc in center corner stitch. Sl st to join.
Round 3 – Scallops
*Skip 2 sts, 5 dc in next st (shell made), skip 2 sts, sl st in next st.* Repeat from * around, adjusting at corners to maintain pattern.
Sl st to join. Fasten off. Weave in all ends.
Assembly and Finishing
Now comes the fun part. Arranging your appliqués.
Layout
Lay your blanket on a flat surface, right side up. Arrange seahorses, flowers, seaweed, and bubbles according to the image. Use rustproof pins to hold pieces in place.
Suggested placement:
Step back and adjust until you love the arrangement.
Attaching Appliqués
Using tapestry needle and matching yarn tails, whip stitch around edges of each appliqué. Take small stitches through both appliqué edge and blanket surface.
For seahorses, you may add a tiny bit of fiberfill before closing completely. This gives subtle dimension. Totally optional.
Final Touches
Weave in any remaining ends. Block your blanket if desired by wetting, pinning flat, and allowing to dry.
Care Instructions
Include these when gifting:
You Did It
This Blush Pink Seahorse Baby Blanket crochet pattern creates a truly special keepsake. The combination of the creamy base, coral appliqués, and scalloped border brings coastal charm to any nursery.
Take your time with each piece. Enjoy the process. Every stitch carries love.
Thank you so much for choosing this pattern. I hope you enjoyed crocheting along with me. If you make this blanket, I would absolutely love to see it. Tag me on Instagram or share in my Facebook group. Seeing your creations genuinely makes my day.
Happy crocheting, friend.
