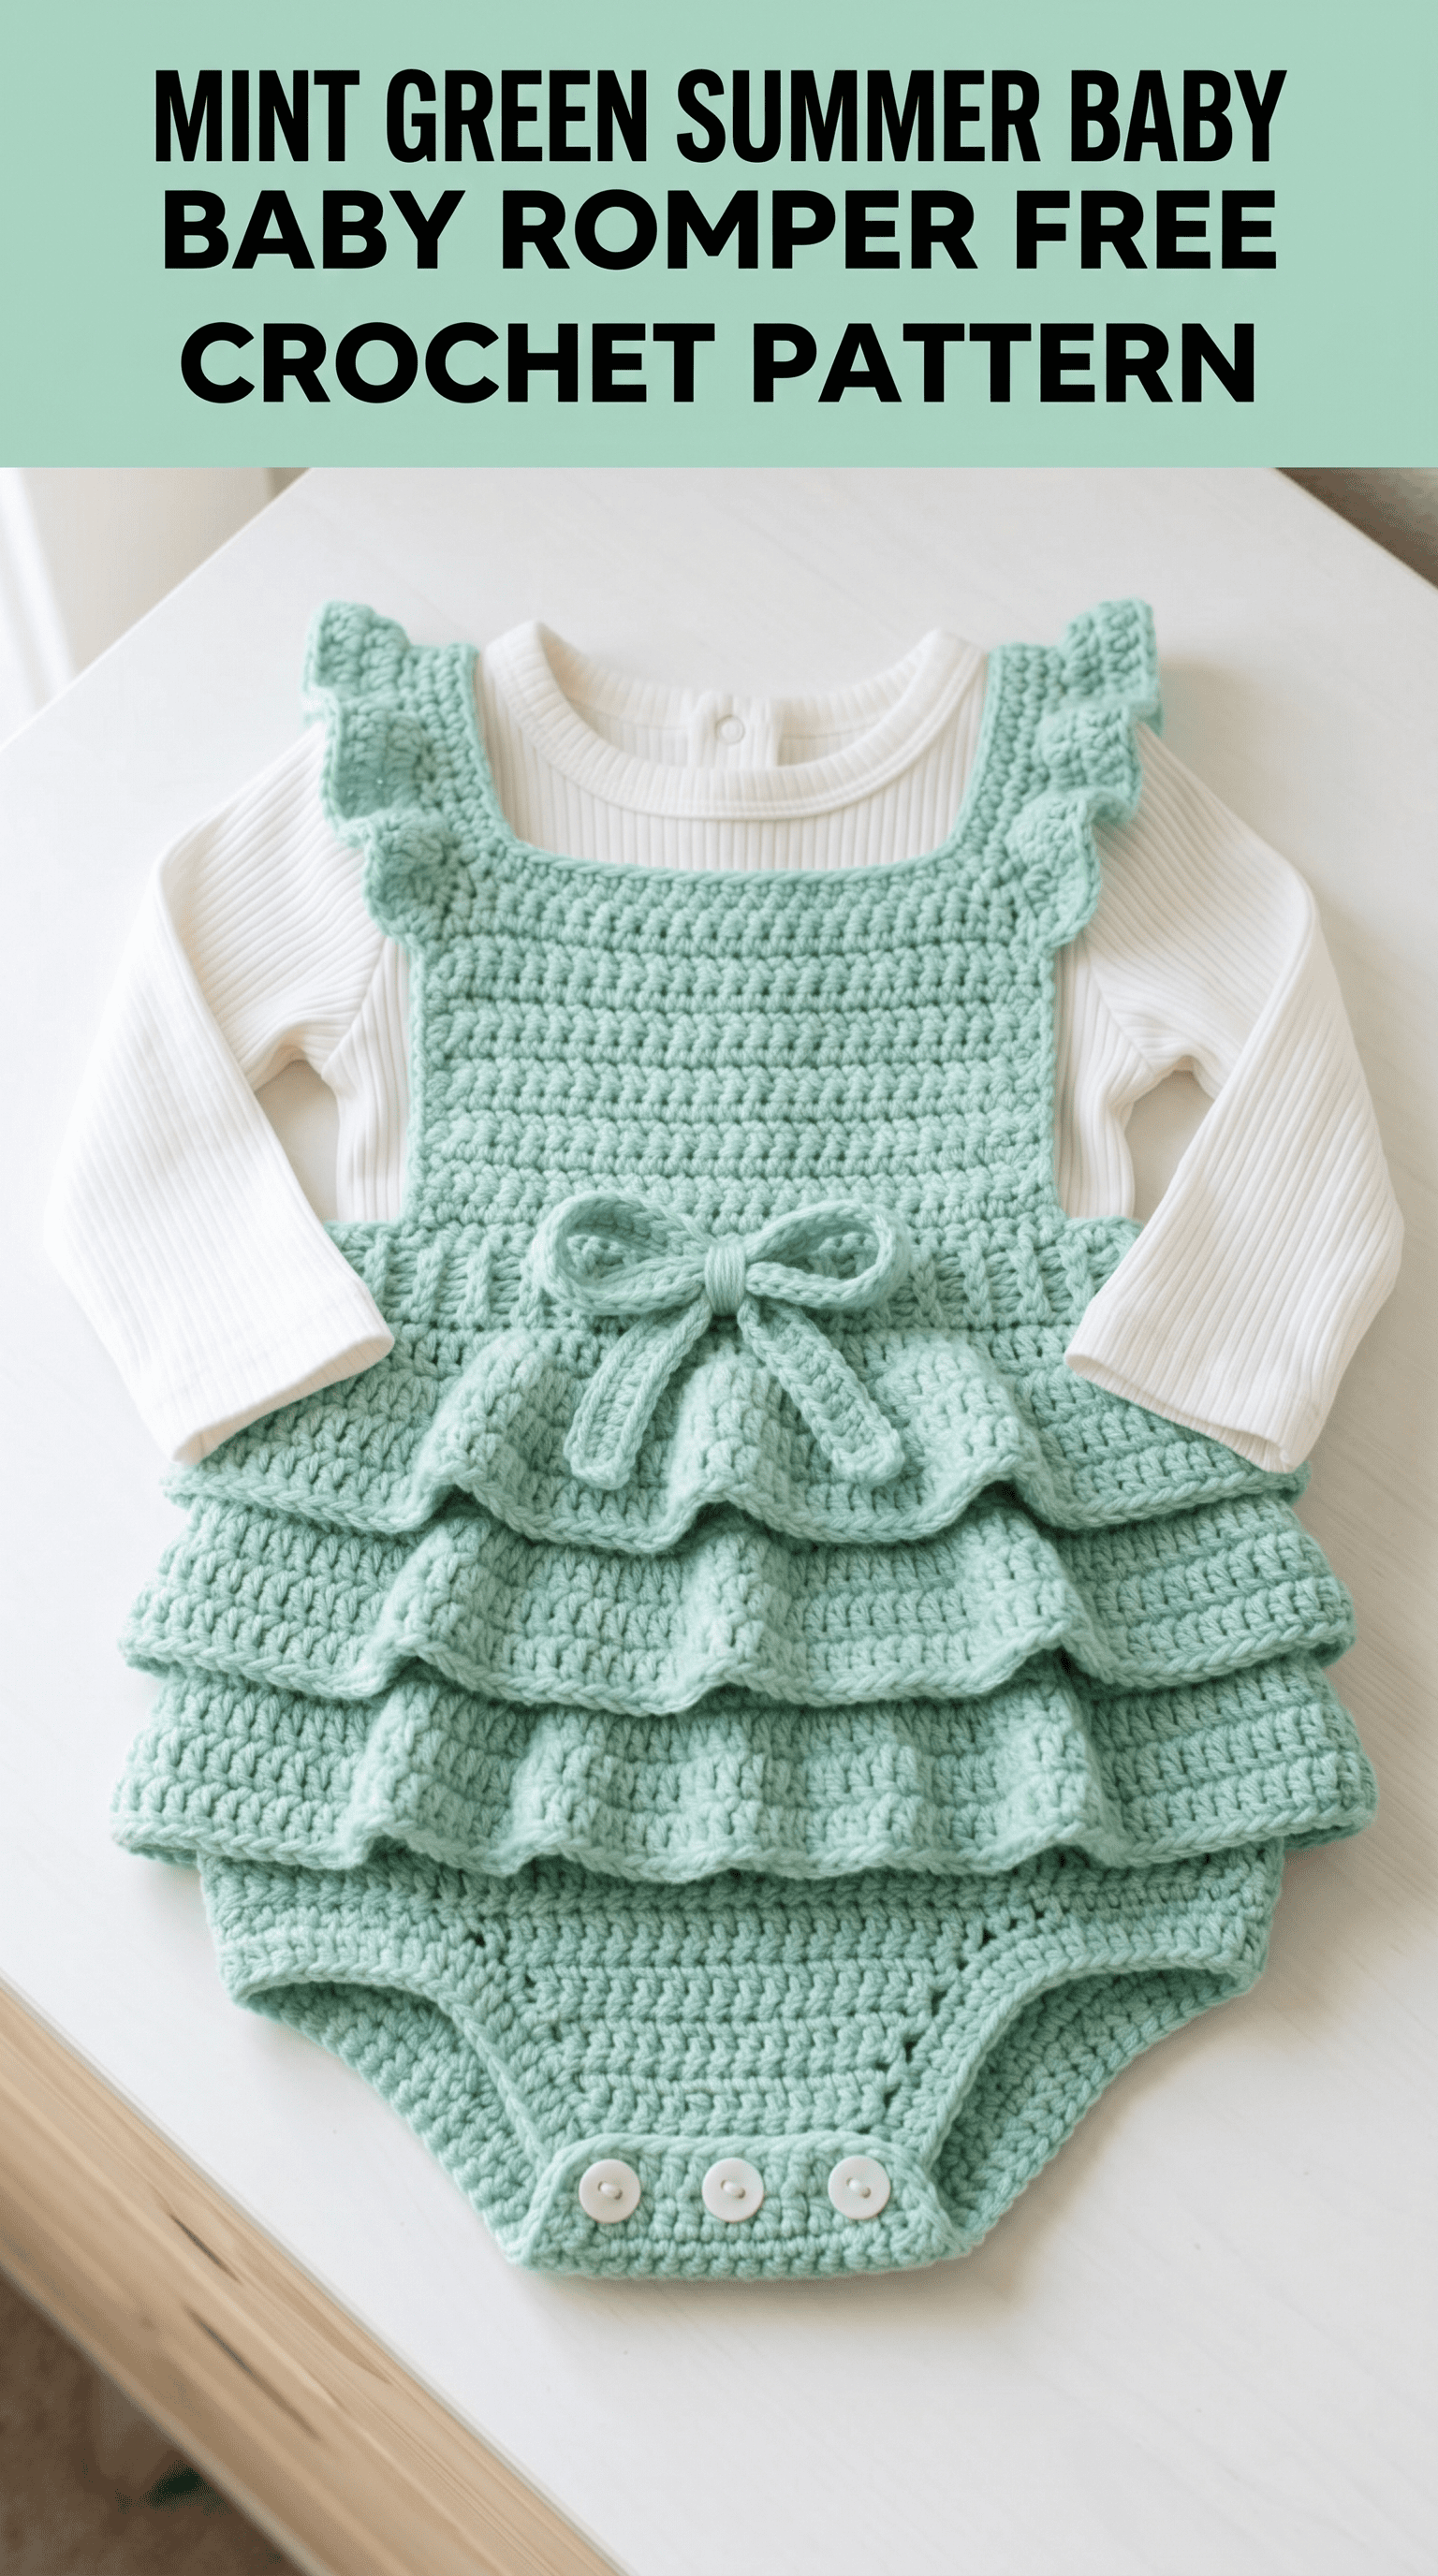
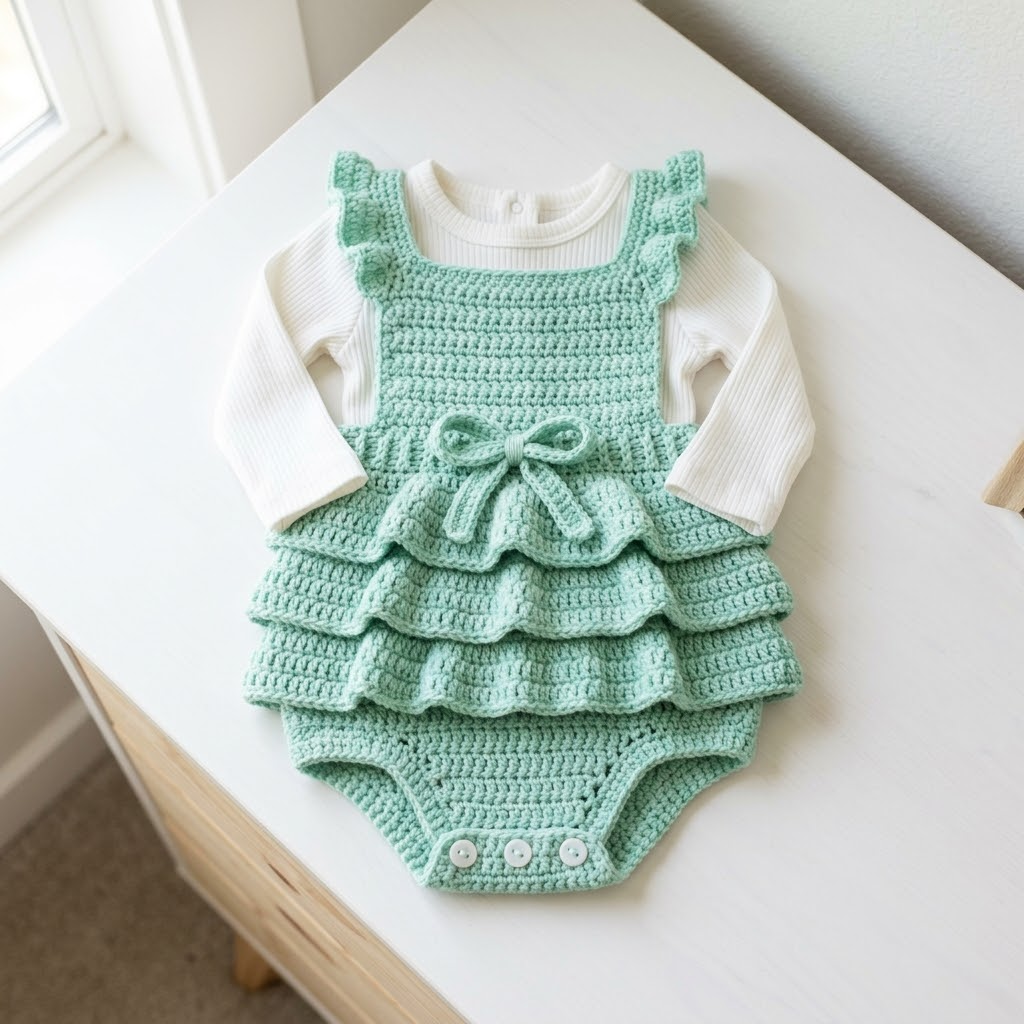
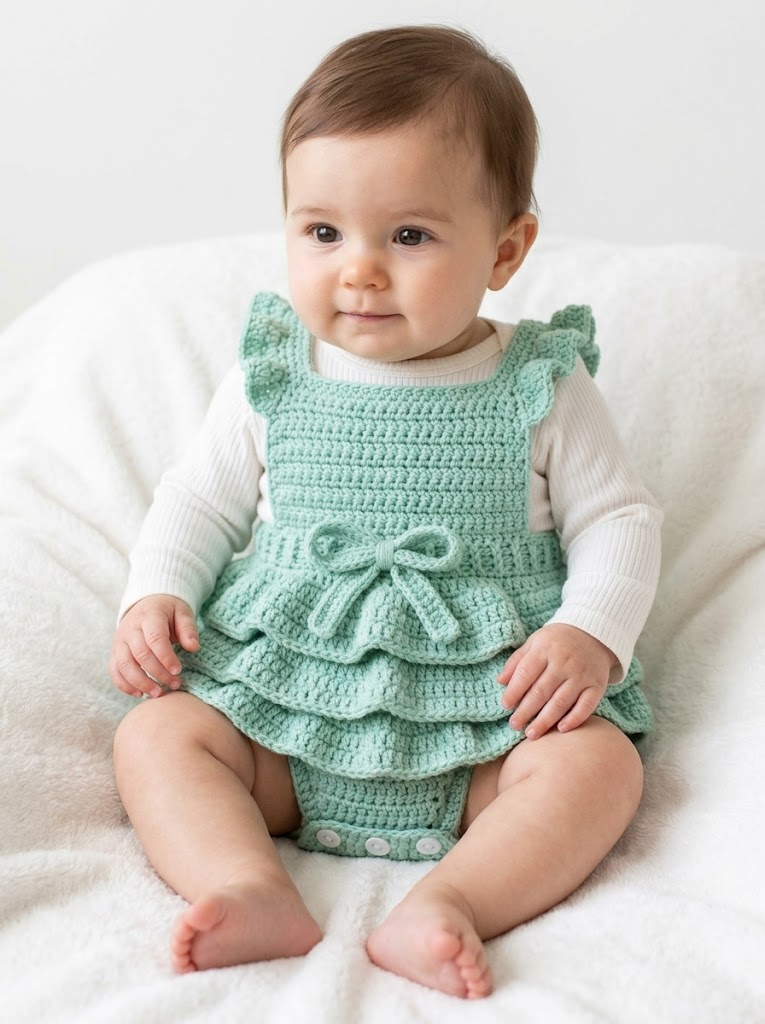
There is something absolutely magical about creating tiny garments for the littlest people in our lives. This mint green summer baby romper has quickly become one of my favorite projects to stitch up for baby showers and new arrivals. The combination of sweet ruffled tiers, delicate shoulder straps, and that adorable bow detail at the waist makes this romper a showstopper.
I designed this crochet pattern with intermediate beginners in mind. If you can work basic stitches in rows and feel comfortable increasing and decreasing, you can absolutely make this romper. The construction is more straightforward than it looks. We work the bodice flat, shape the leg openings, add the ruffles separately, then finish with straps and a bow. I will walk you through every single step.
This romper fits babies approximately 0 to 3 months. The snap closure at the crotch makes diaper changes a breeze. Pair it with a simple long sleeve onesie underneath for cooler days or let baby wear it solo when summer heat arrives.
Let me show you exactly how to create this charming piece from start to finish.
Why This Baby Romper Pattern Works So Well
The genius of this design lives in its simplicity. The main body uses rows of half double crochet (hdc) throughout. This stitch creates a fabric that is dense enough to hold its shape but still has lovely drape for those fluttery ruffles.
The mint green color photographed here would be gorgeous in countless other shades. Think soft peach for spring, creamy white for christenings, or bold coral for a summer statement piece. The tiered ruffles catch the light beautifully in any color.
What I love most is how the structural elements come together. The bodice has gentle shaping through the armholes. The ruffles attach directly to the skirt portion and layer naturally. The shoulder straps feature a subtle scalloped edge that adds femininity without overwhelming the design.
Materials You Will Need
Gather these supplies before you begin your mint green summer baby romper crochet tutorial.
Yarn:
Hook:
Notions:
Gauge:
16 stitches and 12 rows = 4 inches in half double crochet
*Always check your gauge. Proper fit depends on it.*
Stitch Abbreviations and Definitions
Let me define every stitch before we dive into the step by step instructions. Understanding these terms will make the pattern flow smoothly.
Ch = Chain: Wrap yarn over hook, pull through loop on hook. This creates your foundation and turning chains.
Sl st = Slip stitch: Insert hook, yarn over, pull through stitch AND loop on hook in one motion. Used for joining and moving across work invisibly.
Sc = Single crochet: Insert hook into stitch, yarn over, pull up a loop (2 loops on hook), yarn over, pull through both loops. The shortest basic stitch.
Hdc = Half double crochet: Yarn over, insert hook into stitch, yarn over, pull up a loop (3 loops on hook), yarn over, pull through all 3 loops at once. Slightly taller than sc with nice drape.
Dc = Double crochet: Yarn over, insert hook into stitch, yarn over, pull up a loop (3 loops on hook), yarn over, pull through 2 loops, yarn over, pull through remaining 2 loops. Taller stitch used in ruffles.
Hdc2tog = Half double crochet 2 together (decrease): Yarn over, insert hook in first stitch, pull up loop, yarn over, insert hook in next stitch, pull up loop (5 loops on hook), yarn over, pull through all 5 loops. Decreases by one stitch.
Inc = Increase: Work 2 stitches into the same stitch.
Finished Measurements
How to Crochet the Baby Romper Bodice
We begin at the top of the bodice and work downward. The front and back panels are worked separately then joined.
Front Bodice Panel
Foundation Row: Ch 35.
Row 1: Hdc in 3rd ch from hook and in each ch across, turn. (33 hdc)
Rows 2 through 8: Ch 2 (does not count as stitch here and throughout), hdc in each st across, turn. (33 hdc)
*You now have a rectangular panel approximately 8 inches wide and 2.5 inches tall.*
Armhole Shaping
Row 9: Ch 2, hdc2tog over first 2 sts, hdc in each st until 2 sts remain, hdc2tog over last 2 sts, turn. (31 hdc)
Row 10: Repeat Row 9. (29 hdc)
Row 11: Repeat Row 9. (27 hdc)
Rows 12 through 16: Ch 2, hdc in each st across, turn. (27 hdc)
*The armhole shaping is complete. The bodice narrows slightly to create a comfortable fit under baby’s arms.*
Back Bodice Panel
Work exactly as Front Bodice Panel from Foundation Row through Row 16.
Joining Front and Back Panels
Place front and back panels with wrong sides together. We will join at the sides leaving the top open for straps.
Side Seam 1: Using sl st, join yarn at bottom corner. Sl st through both layers up the side edge, working approximately 16 sl sts to reach the armhole. Fasten off.
Side Seam 2: Repeat on opposite side.
*Your bodice now forms a tube. Try it gently over a rolled towel to check the shape.*
Creating the Lower Body and Leg Openings
Continue working in joined rounds from the bottom edge of the bodice.
Round 1: Join yarn at side seam. Ch 2, hdc evenly around bottom edge of bodice, working approximately 66 hdc total. Sl st to first hdc to join. (66 hdc)
Rounds 2 through 6: Ch 2, hdc in each st around, sl st to join. (66 hdc)
Dividing for Leg Openings
Round 7: Ch 2, hdc in next 30 sts, ch 6, skip 3 sts (this creates first leg opening), hdc in next 30 sts, ch 6, skip 3 sts (second leg opening), sl st to join.
Round 8: Ch 2, hdc in each hdc and each ch around, sl st to join. (66 hdc)
Rounds 9 through 12: Ch 2, hdc in each st around, sl st to join. (66 hdc)
Crotch Shaping
Round 13: Ch 2, hdc in next 15 sts, hdc2tog, hdc in next 30 sts, hdc2tog, hdc in remaining sts, sl st to join. (64 hdc)
Round 14: Ch 2, hdc in each st around, sl st to join. (64 hdc)
Round 15: Sc in each st around, sl st to join. Fasten off. (64 sc)
*The bottom edge is complete. This firmer sc round helps the romper hold its shape.*
Adding the Tiered Ruffles
The ruffles give this baby romper crochet pattern its signature charm. We attach each ruffle directly to a round of the lower body.
First Ruffle (Bottom Tier)
Row 1: Join yarn to Round 9 of lower body at side seam. Working into the front loops only of that round, ch 3 (counts as dc), dc in each st around. Sl st to top of ch 3 to join. (66 dc)
Row 2: Ch 3, dc in same st, 2 dc in each st around, sl st to join. (132 dc)
Row 3: Ch 1, sc in each st around, sl st to join. Fasten off. (132 sc)
*The first ruffle is complete. It should flare outward nicely.*
Second Ruffle (Middle Tier)
Repeat First Ruffle instructions, joining yarn to Round 6 of the lower body.
Third Ruffle (Top Tier)
Repeat First Ruffle instructions, joining yarn to Round 3 of the lower body.
*You now have three beautiful layered ruffles. They should overlap slightly, creating that cascading effect visible in the finished romper.*
Crocheting the Shoulder Straps
The straps feature a subtle scalloped texture that adds visual interest.
Foundation: Ch 45.
Row 1: Sc in 2nd ch from hook, *skip 1 ch, 3 dc in next ch, skip 1 ch, sc in next ch*, repeat from * to * across. Fasten off.
Make 2 straps total.
Attaching Straps
Position straps on front bodice panel approximately 1 inch from each armhole edge. Using yarn needle, whip stitch securely in place.
Cross straps at back and attach to back bodice panel in corresponding positions. The cross creates that charming pinafore look.
*Take your time here. Secure attachment keeps baby comfortable and safe.*
Making the Decorative Bow
The bow sits at the waist where the ruffles begin. It adds the perfect finishing touch.
Bow Center
Foundation: Ch 8.
Rows 1 through 4: Sc in 2nd ch from hook, sc across, turn. (7 sc)
Fasten off, leaving a long tail.
Bow Loops
Foundation: Ch 30.
Row 1: Hdc in 3rd ch from hook, hdc across, turn. (28 hdc)
Row 2: Ch 2, hdc across. Fasten off. (28 hdc)
Fold this strip to create two loops meeting in the center. Wrap the bow center piece around the middle. Secure with yarn needle on the back.
Bow Tails
Foundation: Ch 20.
Row 1: Hdc in 3rd ch from hook, hdc across. Fasten off. (18 hdc)
Make 2 tails. Attach behind bow center, angling downward.
Sew completed bow to front of romper at waist level, centered between the ruffles.
Finishing Your Baby Romper
Edging the Leg Openings
Join yarn at leg opening. Sc evenly around entire opening, working approximately 40 sc. Sl st to join. Fasten off.
Repeat for second leg opening.
Adding Closures
Mark placement for 3 buttons or snaps along the crotch area. Space evenly across the front overlap section.
If using buttons, crochet small button loops on the back panel:
Button Loop: Join yarn, ch 4, sl st to same spot. Fasten off.
Make 3 loops corresponding to button positions.
Sew buttons to front panel.
*Snaps work wonderfully too and may be easier for quick diaper changes.*
Weaving Ends
Use your yarn needle to weave in all loose ends. Work tails through several stitches on the wrong side, then trim close.
Blocking (Optional but Recommended)
Wet block your finished romper for the most polished result. Soak briefly in lukewarm water, gently squeeze out excess moisture, lay flat on a towel, and shape to measurements. Allow to dry completely.
Care Instructions
Tips for Success
Gauge matters more than ever with baby garments. A romper that runs too small will not fit. Too large and it looks sloppy. Swatch first.
Count your stitches at the end of every row. Losing or gaining stitches throws off the shaping.
Use stitch markers liberally. Mark the first stitch of each round, mark where ruffles attach, mark button placement.
Try the romper on a stuffed animal or baby doll as you work to visualize the fit.
Wrapping Up Your Mint Green Summer Baby Romper
You did it. You created something beautiful and handmade for a precious little one. This mint green summer baby romper crochet pattern combines classic construction with modern style. Those layered ruffles, the sweet bow, the practical snap closure. Every detail comes together into a garment any parent would treasure.
I hope these step by step instructions gave you confidence through every round and row. Making baby clothes feels intimidating at first. But now you have the skills to create this romper in any color that catches your eye.
Thank you so much for choosing to make this pattern. It means the world to me that you spent your creative time here.
I would absolutely love to see your finished romper. Tag me on Instagram or share your photo in our Facebook group. Seeing your versions in different colors and yarns brings me so much joy. Your creativity inspires this whole community.
Happy crocheting, friend. May your yarn never tangle and your stitches always count out perfectly.
