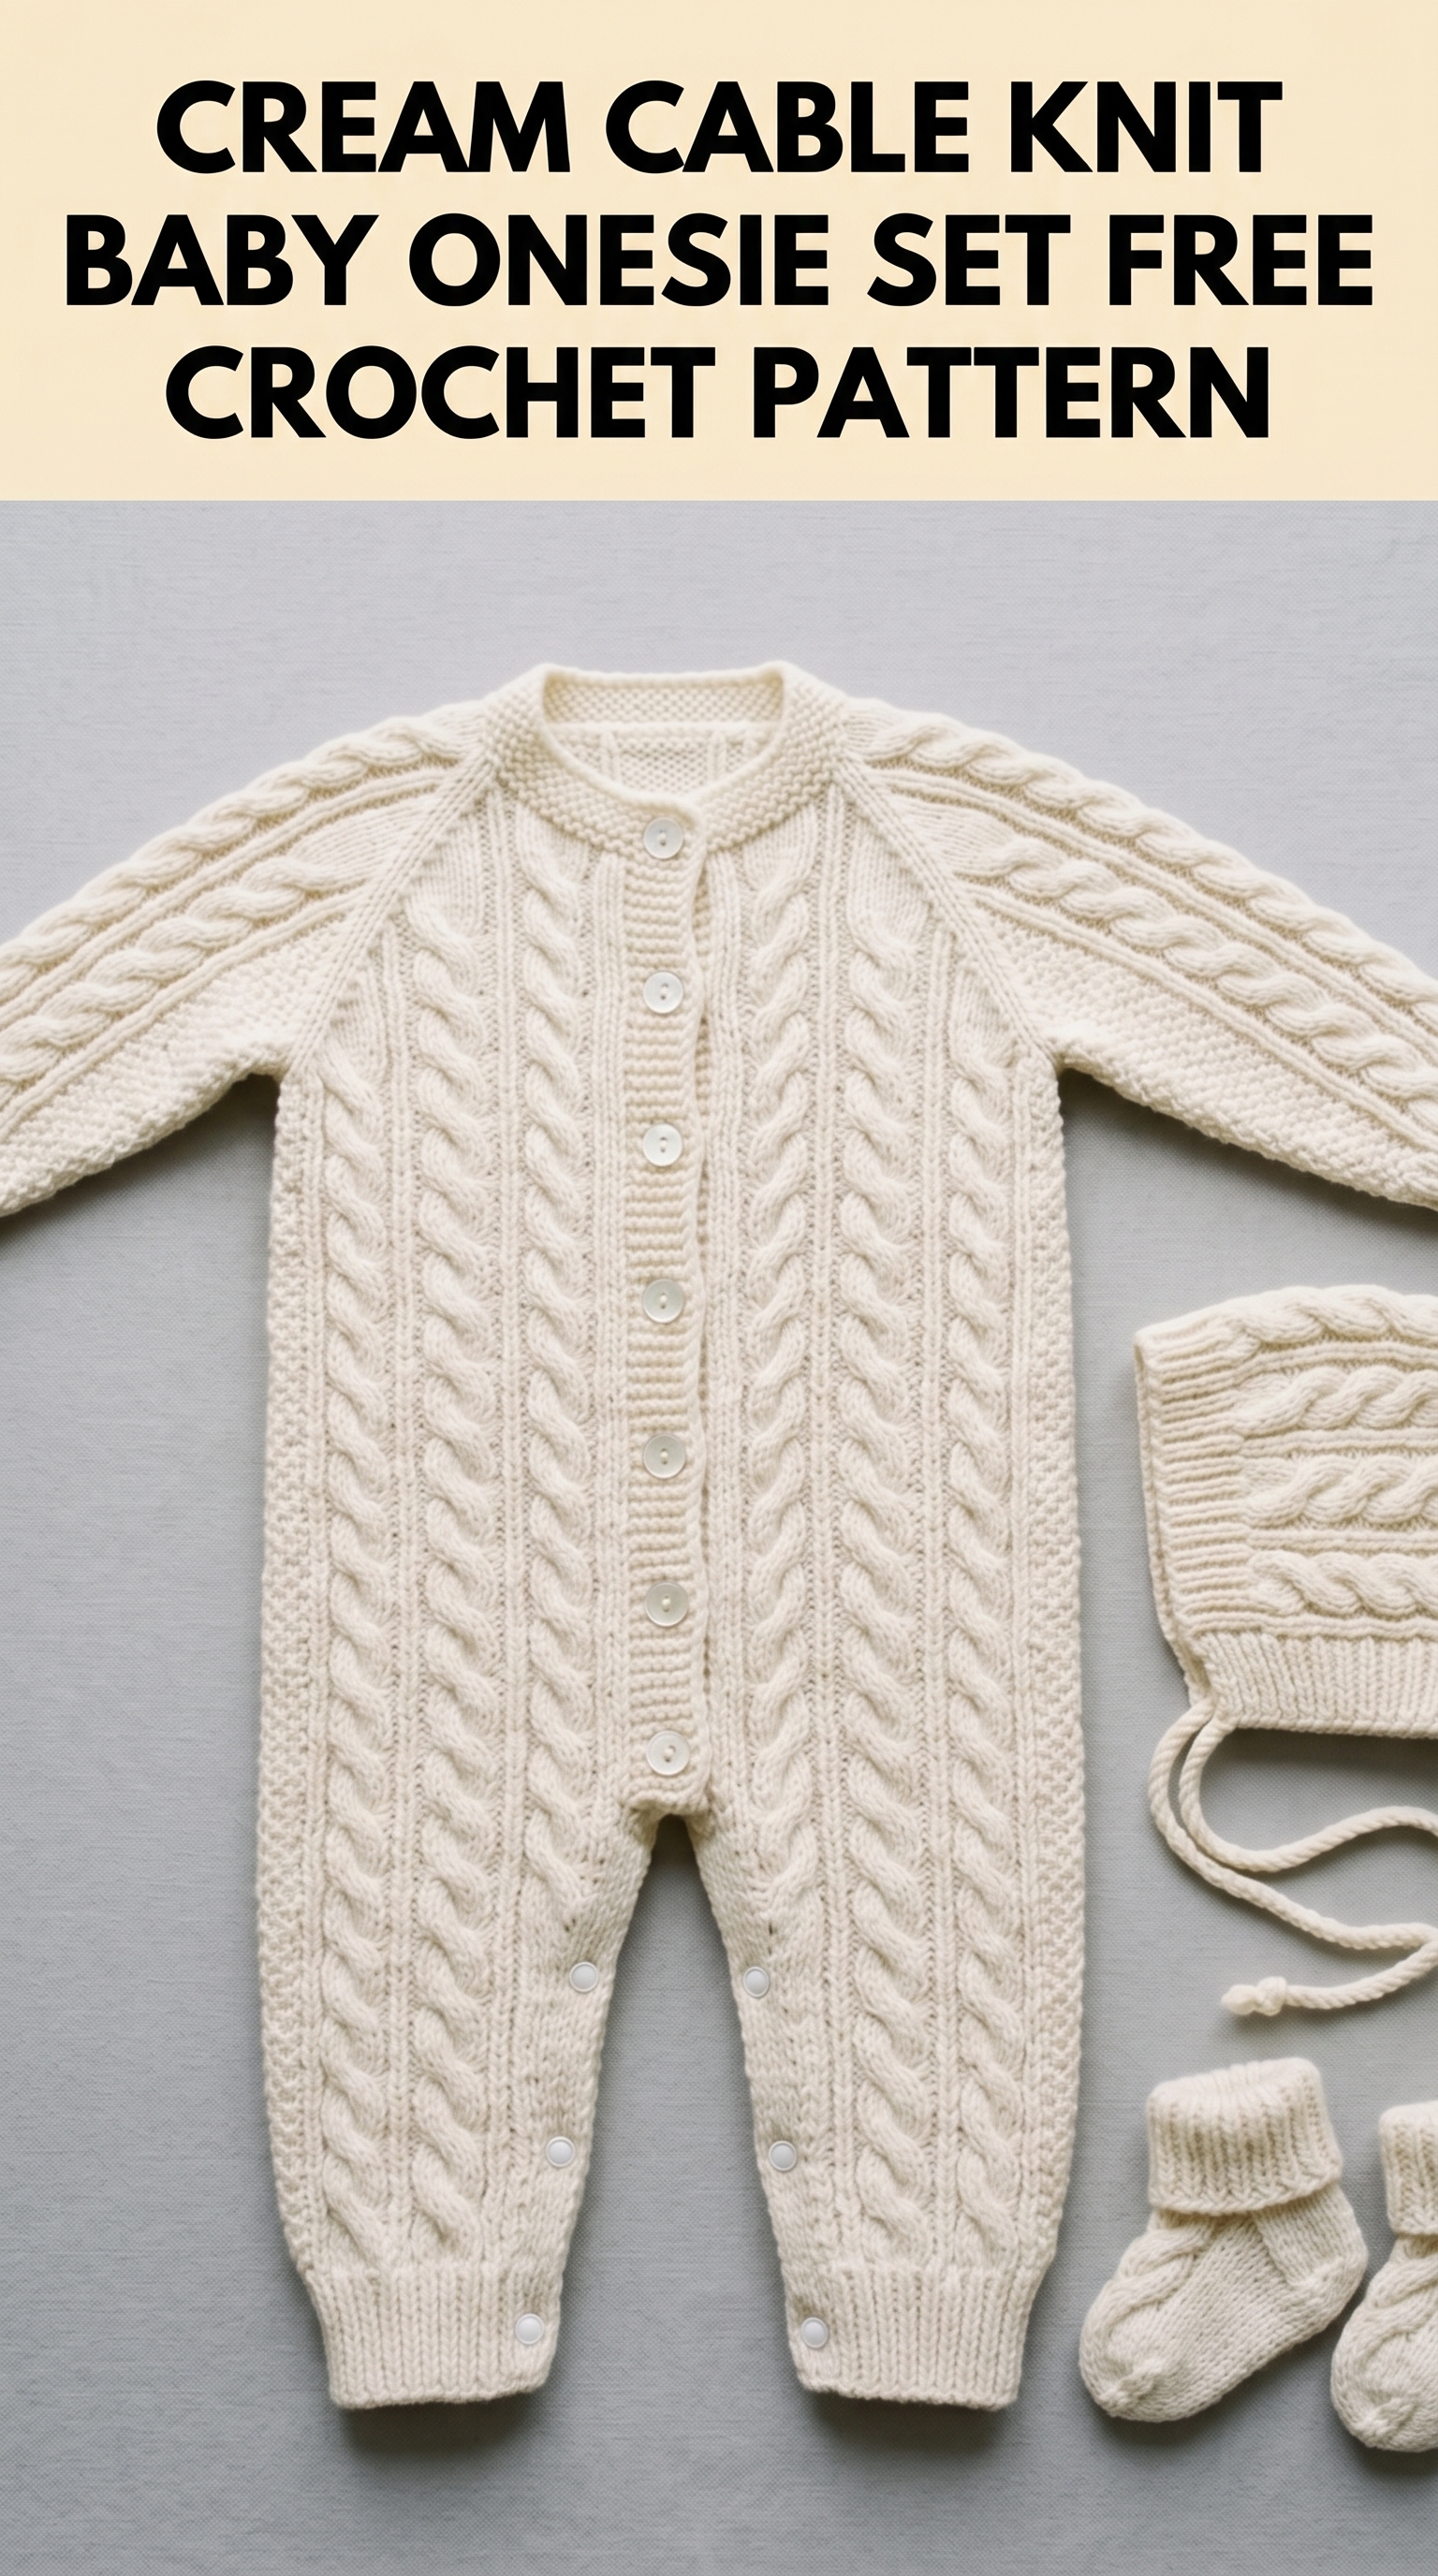
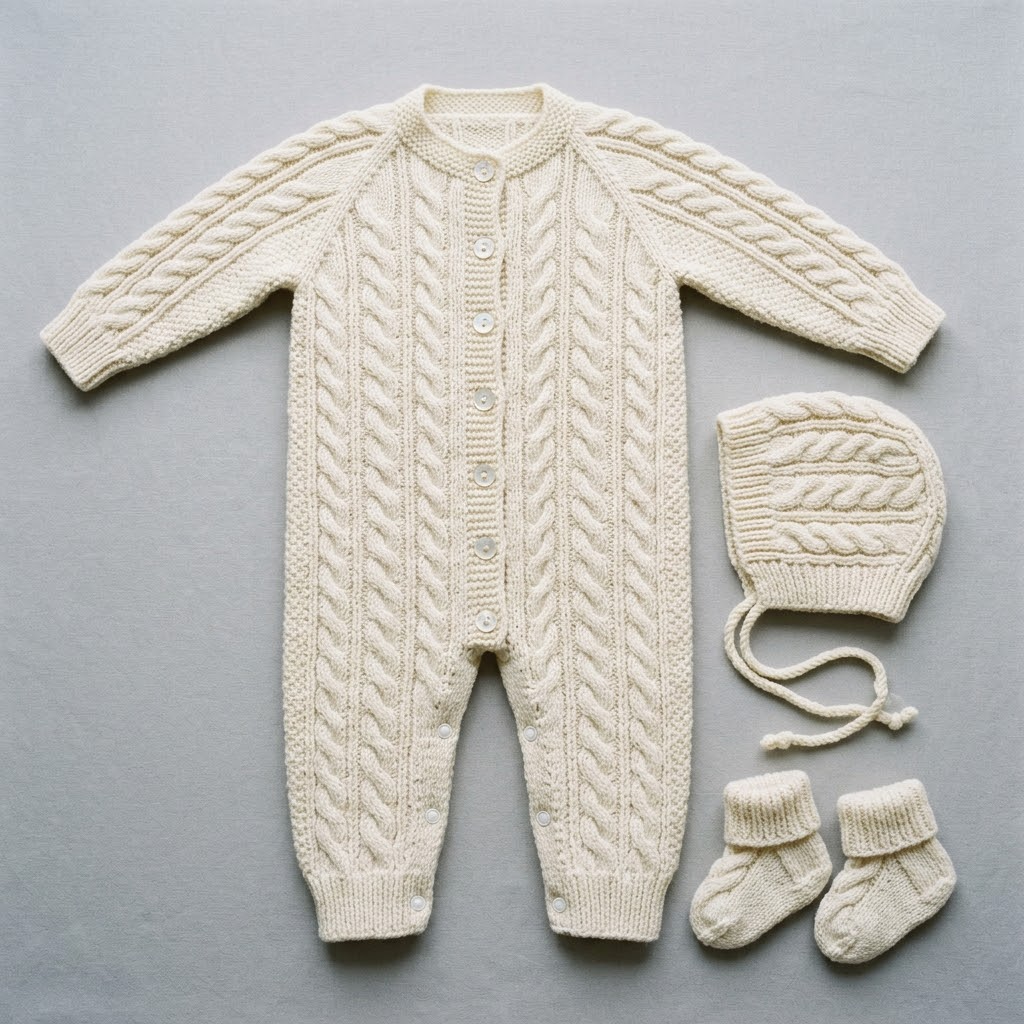
I am so excited to share this gorgeous cream cable knit baby onesie set crochet pattern with you today. This project has been sitting in my heart for months, and I finally got every detail just right. The set includes a cozy full-length romper with button front closure, a sweet bonnet with ties, and the tiniest little booties you ever did see.
Now I want to be upfront with you. This is an intermediate level crochet pattern. The cable technique looks intimidating, but I promise it is just a series of post stitches worked in a specific order. If you can make a front post double crochet, you can absolutely make cables. I will walk you through every single step.
This creamy white baby set makes the most beautiful gift for baby showers, christenings, or welcoming a new little one into the world. The classic cable design gives it that heirloom quality that parents treasure forever.
Let me show you exactly how to make this stunning set from start to finish.
Why This Cable Baby Onesie Set Is Worth Your Time
There is something magical about creating a complete matching set for a baby. This crochet baby romper pattern combines three coordinating pieces that look professionally made. The vertical cable panels create texture and visual interest while keeping the fabric stretchy enough for a growing baby.
The construction method I used makes this set surprisingly manageable. Each piece works up separately, so you can take breaks without losing your place. The romper builds from the bottom up with the legs joined at the crotch. This gives you a nice seamless look in the diaper area.
I designed the button placket to run the entire front length. This makes diaper changes so much easier for tired parents. Trust me, they will thank you for this thoughtful detail.
Materials You Will Need
Gather everything before you start. Nothing worse than running out of yarn halfway through a sleeve.
Yarn:
Hook:
Notions:
Gauge:
Finished Measurements
This pattern fits 0 to 6 month size babies.
Abbreviations and Stitch Definitions
Let me explain every stitch you will use. Read through these before starting so nothing catches you off guard.
Ch = Chain. Wrap yarn over hook, pull through loop on hook.
Sl st = Slip stitch. Insert hook, yarn over, pull through stitch and loop on hook in one motion.
Sc = Single crochet. Insert hook, yarn over, pull up loop (2 loops on hook), yarn over, pull through both loops.
Dc = Double crochet. Yarn over, insert hook, yarn over, pull up loop (3 loops), yarn over, pull through 2 loops, yarn over, pull through remaining 2 loops.
FPdc = Front post double crochet. Yarn over, insert hook from front to back around the post of the stitch below, complete as regular dc. This creates raised texture on the front.
BPdc = Back post double crochet. Yarn over, insert hook from back to front around the post of the stitch below, complete as regular dc. This recedes to the back.
Cable 4 Front (C4F) = Skip 2 stitches, work FPdc in next 2 stitches, then work FPdc in the 2 skipped stitches working in front of stitches just made. This crosses stitches to the left.
Cable 4 Back (C4B) = Skip 2 stitches, work FPdc in next 2 stitches, then work FPdc in the 2 skipped stitches working behind stitches just made. This crosses stitches to the right.
Understanding the Cable Pattern
Before we dive into the full pattern, let me break down how cables work in crochet. This is the heart of this step by step crochet tutorial.
Cables are simply post stitches that cross over each other. You skip stitches, work into later stitches first, then go back and work into the skipped ones. The order determines whether the cable twists left or right.
The cable panel in this pattern uses a 6 stitch repeat. You will work 2 background stitches in BPdc, then 4 cable stitches, then repeat.
Here is the cable panel pattern worked flat:
Row 1 (setup): Dc in each st across.
Row 2: Ch 2, *BPdc in next 2 sts, FPdc in next 4 sts*, repeat across.
Row 3: Ch 2, *BPdc in next 2 sts, C4F over next 4 sts*, repeat across.
Row 4: Repeat Row 2.
Row 5: Repeat Row 2.
Row 6: Repeat Row 3.
Repeat Rows 3 through 6 for cable pattern.
See how the cable crossing happens every 4th row? This creates that beautiful twisted rope effect you see in the finished piece.
Part One: The Romper Pattern
Right Leg
Foundation: With larger hook, ch 26.
Row 1: Dc in 3rd ch from hook and each ch across. (24 dc)
Row 2: Ch 2, *BPdc in next 2 sts, FPdc in next 4 sts*, repeat 4 times. (24 sts)
Rows 3 to 6: Work cable pattern as established, working C4F on Rows 3 and 6.
Rows 7 to 24: Continue cable pattern, increasing 1 st at beginning and end of Rows 12 and 18. (28 sts after Row 18)
Row 25 to 30: Continue in pattern without increases. Set aside. Do not fasten off.
Left Leg
Work same as Right Leg through Row 30. Fasten off.
Joining the Legs
This is where it gets exciting. You will connect both legs to form the body.
Row 31: With Right Leg still on hook, ch 4 for crotch gusset, then work across Left Leg in pattern. Ch 4, turn, work back across Right Leg. (60 sts plus 8 ch sts = 68 sts total)
Row 32: Work in pattern across all stitches, working dc in the chain stitches. (68 sts)
Rows 33 to 50: Continue cable pattern across entire body. This forms the torso section.
Dividing for Armholes
Row 51: Work 15 sts in pattern for Right Front, skip 4 sts for armhole, work 30 sts for Back, skip 4 sts for armhole, work 15 sts for Left Front. (60 sts)
You will now work each section separately.
Back Panel
Rows 52 to 62: Work cable pattern on center 30 sts only. (30 sts)
Rows 63 to 65: Work even, then decrease 1 st each side for shoulder shaping. (26 sts)
Fasten off.
Right Front Panel
Rejoin yarn at armhole edge.
Rows 52 to 60: Work cable pattern on 15 sts. (15 sts)
Rows 61 to 65: Decrease 1 st at neck edge every row while continuing pattern. (10 sts)
Fasten off.
Left Front Panel
Work same as Right Front, reversing shaping.
Sleeves (Make 2)
Foundation: Ch 20.
Row 1: Dc in 3rd ch from hook and each ch across. (18 dc)
Rows 2 to 18: Work cable pattern, increasing 1 st each side on Rows 6, 12, and 18. (24 sts after Row 18)
Rows 19 to 22: Work even in pattern. (24 sts)
Fasten off leaving long tail for seaming.
Assembly and Button Band
Seam shoulders using whip stitch. Set in sleeves, matching center of sleeve cap to shoulder seam. Seam sleeve and side seams.
Button Band: With smaller hook, join yarn at bottom Right Front edge.
Row 1: Sc evenly up Right Front, around neck, and down Left Front. Work approximately 3 sc per 2 rows.
Row 2: Ch 1, sc in each st, working buttonholes on Right Front side. For each buttonhole, ch 2 and skip 2 sts. Space 6 buttonholes evenly.
Row 3: Sc in each st, working 2 sc in each ch-2 space.
Fasten off.
Cuffs
With smaller hook, join at sleeve seam.
Round 1: Sc around wrist edge. Join with sl st. (18 sts approximately)
Rounds 2 to 4: Ch 1, sc in BLO (back loop only) around. Join.
Fasten off.
Repeat for ankle cuffs on each leg.
Part Two: The Bonnet Pattern
This sweet bonnet completes the crochet baby onesie set perfectly.
Foundation: Ch 50.
Row 1: Dc in 3rd ch from hook and each ch across. (48 dc)
Rows 2 to 12: Work cable pattern across.
Shaping the Crown
Row 13: *Work 6 sts in pattern, dc2tog*, repeat across. (42 sts)
Row 14: Work in pattern.
Row 15: *Work 5 sts in pattern, dc2tog*, repeat across. (36 sts)
Row 16: Work in pattern.
Row 17: *Work 4 sts in pattern, dc2tog*, repeat across. (30 sts)
Continue decreasing every other row until 12 sts remain.
Fasten off leaving long tail. Thread through remaining stitches and pull tight to close crown. Seam back of bonnet.
Face Edging
Join yarn at corner of face opening.
Round 1: Sc evenly around face opening. Join.
Round 2: Sl st in each st around for neat edge. Do not fasten off.
Ties
Ch 50 at one corner. Fasten off. Repeat at other corner.
Part Three: The Booties Pattern
These tiny booties use the same cable technique on a smaller scale.
Sole: Ch 8.
Round 1: 3 dc in 3rd ch from hook, dc in next 4 ch, 6 dc in last ch. Working on opposite side of chain, dc in next 4 ch, 3 dc in last ch. Join. (20 dc)
Round 2: 2 dc in next 3 sts, dc in next 4 sts, 2 dc in next 6 sts, dc in next 4 sts, 2 dc in next 3 sts. Join. (32 dc)
Round 3: Dc in BLO around. Join. (32 dc)
Rounds 4 to 6: Work cable pattern around, placing cables at center top of foot.
Toe Shaping
Round 7: Dc in next 10 sts, dc2tog 6 times across toe, dc in next 10 sts. Join. (26 sts)
Round 8: Work even.
Cuff
Rounds 9 to 12: Sc in BLO around for ribbed cuff. Join each round.
Fasten off. Weave in all ends.
Finishing Your Cable Baby Set
Block all pieces gently with steam or wet blocking. Lay flat to dry completely before sewing on buttons.
Sew buttons opposite buttonholes on Left Front of romper. Use matching thread or split yarn for invisible stitching.
Weave in every single end. Babies put everything in their mouths, so no loose threads allowed.
Tips for Success with This Pattern
Tension matters. Cables pull fabric in, so work loosely or go up a hook size if your gauge is tight.
Count your stitches after every cable row. It is easy to accidentally skip a stitch when crossing cables.
Use stitch markers to mark your cable sections. This helps you stay on track with the pattern repeat.
Take breaks. This is a detailed project. Fresh eyes catch mistakes faster.

You Made Something Beautiful
Thank you so much for choosing this cream cable baby onesie set crochet pattern for your next project. I know it takes time and patience to complete all three pieces, but the result is truly something special.
I would absolutely love to see your finished set. Please tag me on Instagram or share in my Facebook group. Seeing your creations brings me so much joy and inspires other crafters to try new techniques.
Happy crocheting, friend. You have got this.
