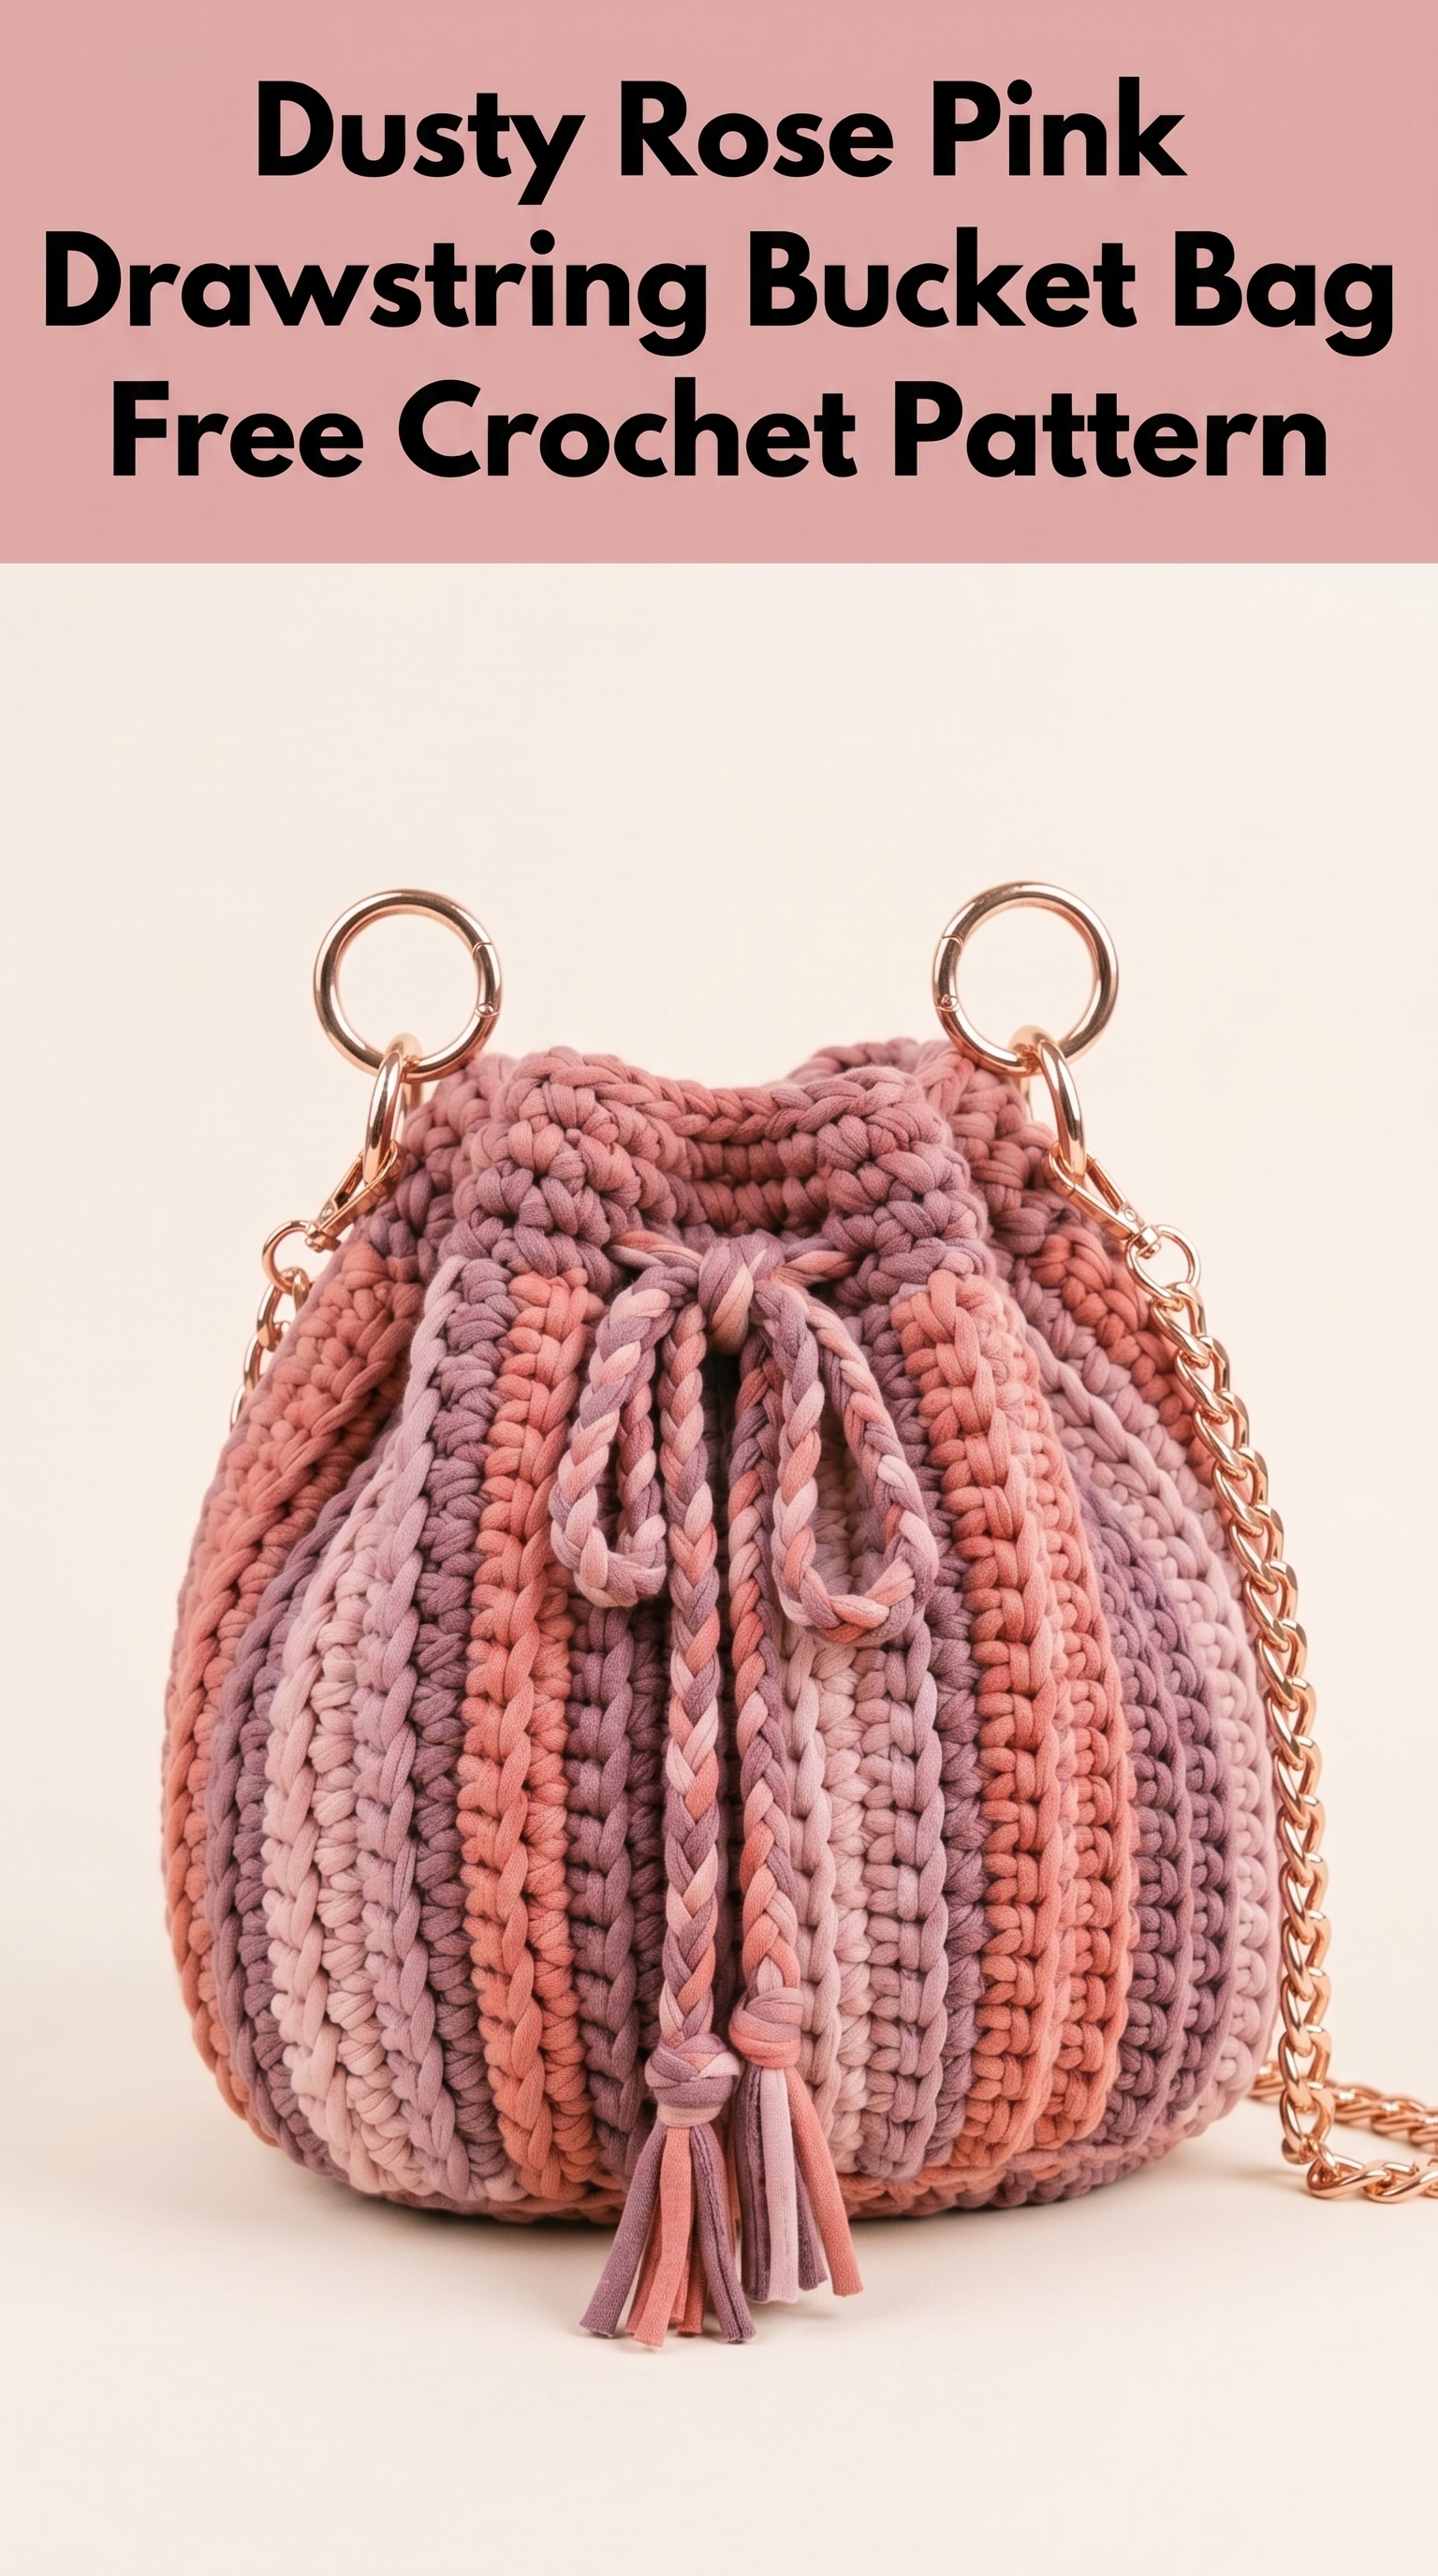
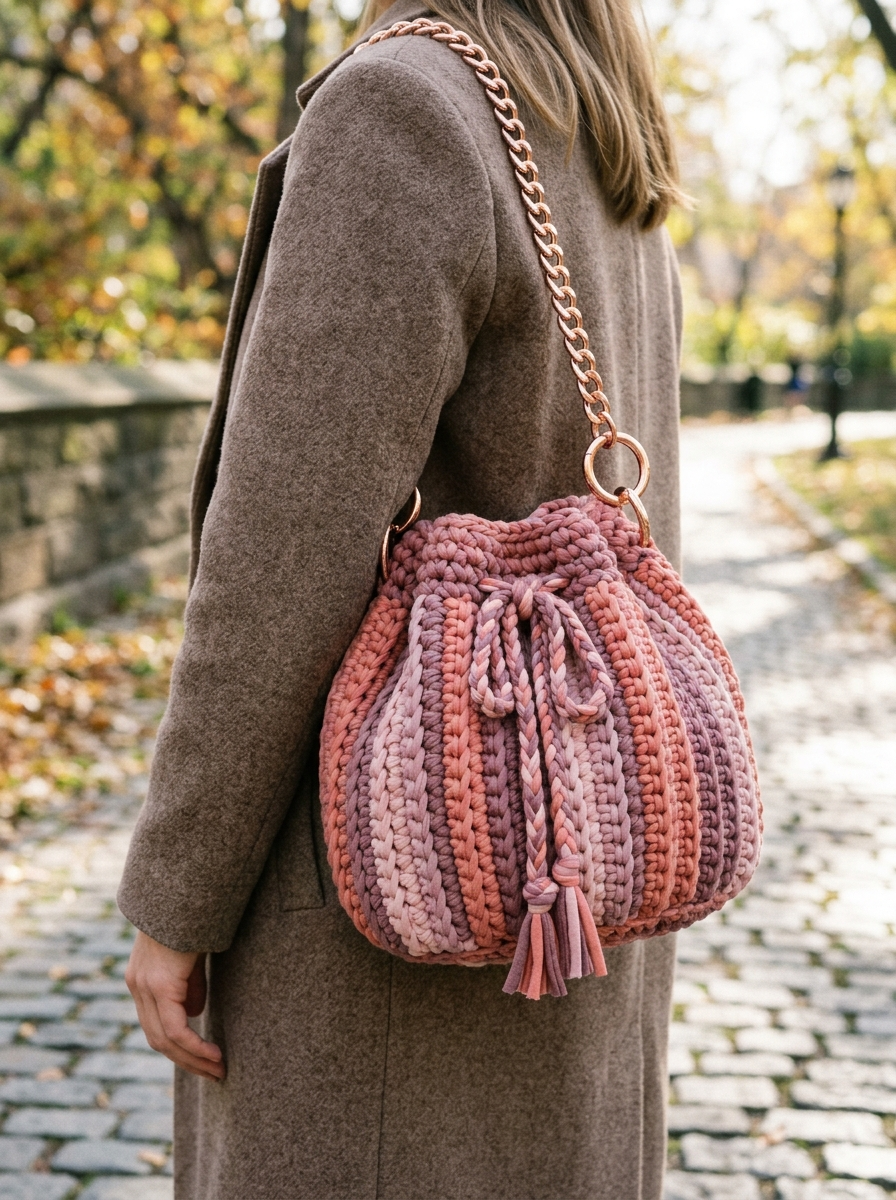
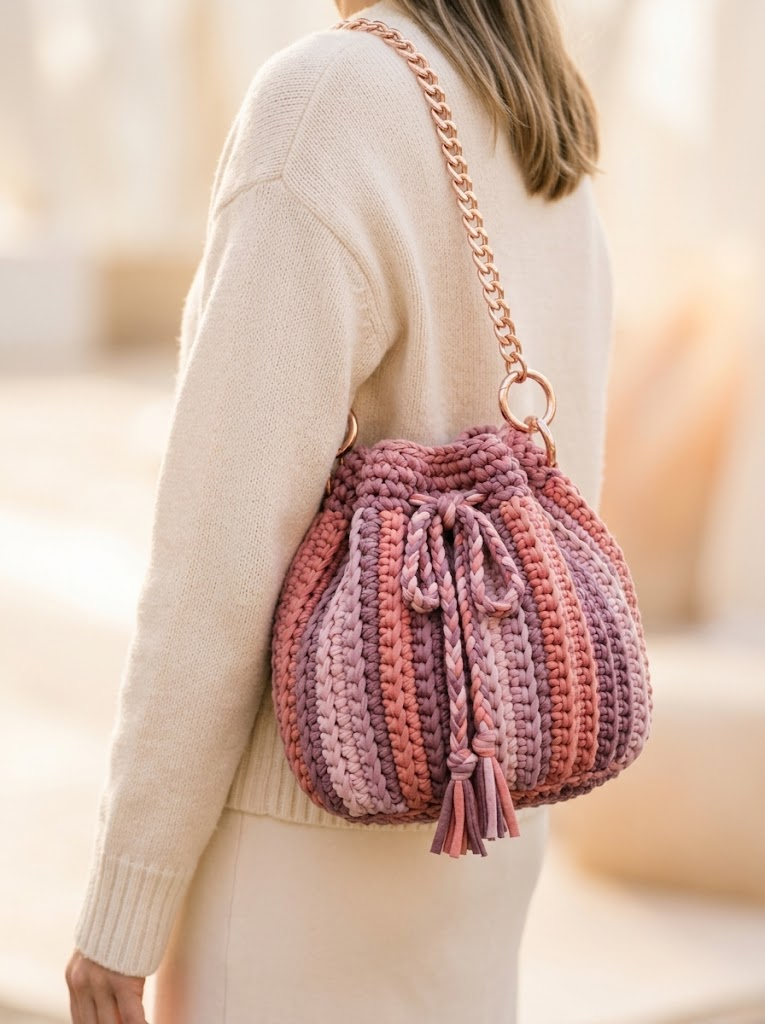
There is something so satisfying about making a bag you will actually use every single day. This dusty rose pink drawstring bucket bag is exactly that kind of project. It looks like something you would find in a boutique, but you can crochet it yourself in a weekend. The chunky texture, the elegant chain strap, and those beautiful vertical stripes make it a real showstopper.
I designed this crochet pattern with intermediate crocheters in mind, but confident beginners can absolutely tackle it. If you can work in the round and know your basic stitches, you have got everything you need. I will walk you through every step, explain the techniques, and share tips I have learned from making dozens of bags just like this one.
Let me show you how to crochet this gorgeous bucket bag from start to finish.
Why You Will Love This Drawstring Bucket Bag Crochet Pattern
This bag hits all the right notes. The construction uses t-shirt yarn (also called trapillo or ribbon yarn), which works up incredibly fast and creates that plush, sturdy fabric you see in the photos. The vertical ribbed texture comes from working in the back loop only, giving it that modern knit-like appearance without any complicated stitches.
The two-tone color scheme uses a dusty coral pink and a soft mauve that blend beautifully together. You could easily customize this with your own color combination. Think neutrals for everyday, bold contrasts for a statement piece, or even a single solid color for a minimalist look.
What makes this bag special:
Materials Needed for Your Crochet Bucket Bag
Gather everything before you start. Nothing is worse than running out of yarn halfway through a project.
Yarn:
Hook:
Hardware:
Notions:
Optional:
Gauge and Finished Measurements
Gauge: 8 single crochet stitches and 9 rows equals 4 inches in single crochet worked in back loop only with 10mm hook and t-shirt yarn.
Gauge matters for bags because it affects the final size and how sturdy the fabric feels. Too loose and your items might poke through. Too tight and the bag will be stiff and smaller than expected. Take a few minutes to check your gauge before diving in.
Finished Dimensions:
Abbreviations and Stitch Definitions
Let me break down every stitch you will use. Even if you know these already, a quick refresher never hurts.
ch = chain: Yarn over, pull through loop on hook. This creates the foundation for most crochet projects.
sl st = slip stitch: Insert hook, yarn over, pull through both the stitch and the loop on your hook in one motion. Used for joining rounds.
sc = single crochet: Insert hook into stitch, yarn over and pull up a loop (2 loops on hook), yarn over and pull through both loops.
sc-BLO = single crochet in back loop only: Work a regular single crochet, but insert your hook under only the back loop of the stitch instead of both loops. This creates the ribbed texture.
inc = increase: Work 2 single crochet stitches into the same stitch. This adds one stitch to your count.
dec = decrease (invisible decrease preferred): Insert hook through front loops only of the next 2 stitches, yarn over and pull through both front loops, yarn over and pull through both loops on hook.
Step by Step Crochet Pattern Instructions
This bag is worked from the bottom up in continuous rounds. You will start with a flat circular base, then build up the sides using back loop only stitches to create those beautiful vertical ridges.
Part 1: The Circular Base
We are starting with Color A (dusty coral pink). The base is worked in a spiral without joining rounds, so use a stitch marker to track where each round begins.
Round 1: Make a magic ring. Work 6 sc into the ring. Pull tight to close. (6 sts)
*Not comfortable with magic rings? Chain 2 and work 6 sc into the second chain from hook instead.*
Round 2: Inc in each stitch around. (12 sts)
Round 3: *Sc 1, inc in next stitch* repeat around. (18 sts)
Round 4: *Sc 2, inc in next stitch* repeat around. (24 sts)
Round 5: *Sc 3, inc in next stitch* repeat around. (30 sts)
Round 6: *Sc 4, inc in next stitch* repeat around. (36 sts)
Round 7: *Sc 5, inc in next stitch* repeat around. (42 sts)
Round 8: *Sc 6, inc in next stitch* repeat around. (48 sts)
Your base should measure approximately 7 inches across. If it is significantly smaller or larger, adjust your hook size and try again. The base needs to be flat without cupping or ruffling.
Part 2: Building the Sides
Now we transition from flat to three-dimensional. This is where the magic happens.
Round 9: Working in back loop only for this entire round, sc in each stitch around. Do not increase. (48 sts)
This single round of BLO creates a sharp edge that helps the base sit flat and the sides stand up.
Rounds 10 through 12: Continue working sc-BLO in each stitch around. (48 sts)
Now we introduce Color B for the striped effect. Here is the good news: you do not actually need to carry both colors or do complicated colorwork. The stripes you see in the finished bag are created by working vertical sections and changing colors every few stitches as you go.
Creating the Vertical Stripes:
Rounds 13 through 28: Continue working sc-BLO, but alternate colors every 4 stitches. Work 4 stitches in Color A, then 4 stitches in Color B. Repeat this pattern around for each round. (48 sts per round)
*Tip: Carry the unused color loosely along the inside of your work, or use separate bobbins for each color section. I find carrying the yarn easier with chunky t-shirt yarn since the floats are hidden by the thick fabric.*
When you reach the end of Round 28, your bag sides should measure approximately 7 to 8 inches tall.
Part 3: Creating the Drawstring Channel
The drawstring needs a channel to run through. We create this by making a row of chain spaces.
Round 29: *Sc-BLO in next 2 stitches, ch 2, skip 2 stitches* repeat around. End with sl st to first sc to join. (24 sc, 12 ch-2 spaces)
Round 30: Sc in each stitch and ch-2 space around, working 2 sc into each ch-2 space. (48 sts)
Rounds 31 through 33: Sc-BLO in each stitch around. (48 sts)
Fasten off and weave in ends.
Part 4: Making the Drawstring Cord
The drawstring is a simple twisted or braided cord. I prefer braiding because it matches the texture of the bag beautifully.
Braided Cord Method:
Cut 6 strands of yarn, each approximately 60 inches long. Use 3 strands of Color A and 3 strands of Color B.
Knot all strands together at one end. Separate into 3 groups of 2 strands each (mix the colors as you like). Braid tightly until you have a cord approximately 36 inches long. Knot the other end.
Thread the braided cord through the chain spaces you created in Round 29, weaving in and out. Both ends should emerge from the same spot.
Part 5: Making the Tassel
Cut 20 strands of yarn, each approximately 8 inches long, using both colors. Fold them in half over a short piece of yarn. Wrap another piece tightly around the top, about half an inch down from the fold. Secure with a knot. Trim the ends evenly.
Attach one tassel to each end of your drawstring cord by threading the cord end through the top of the tassel and knotting securely.
Part 6: Attaching the Hardware
This is where your bag goes from homemade to high-end.
Attaching the O-rings:
Locate two points on opposite sides of your bag, just below the drawstring channel. Cut a short piece of matching yarn, approximately 12 inches.
Thread the yarn through the O-ring. Insert your hook through the bag fabric from inside to outside. Pull both yarn ends through to the inside. Tie securely with a double knot. Weave in ends.
Repeat on the opposite side.
Attaching the Chain Strap:
Use lobster clasps or swivel hooks to connect your chain strap to the O-rings. This makes the strap removable, which is great for storage or switching out for a different strap later.
Tips for Success With This Crochet Tutorial
Tension matters. T-shirt yarn can be tricky because it stretches. Try to maintain even, medium tension throughout. Too tight and your hands will cramp. Too loose and the fabric will be floppy.
Count your stitches. Especially in the base rounds, losing or gaining a stitch throws everything off. Count after each round until you reach the sides.
Block your base. If your circular base is cupping or ruffling, wet block it by dampening and pinning flat to dry. This makes a big difference.
Line your bag. T-shirt yarn has small gaps between stitches. A simple fabric liner keeps small items from poking through and adds a polished interior finish.
Customization Ideas
Want to make this bucket bag crochet pattern your own? Here are some ideas:
You Did It!
I am so proud of you for making it through this crochet pattern. This dusty rose pink drawstring bucket bag is such a satisfying project, and I hope you love using yours as much as I love mine.
Thank you for trusting me with your time and your yarn stash. It truly means so much.
If you make this bag, I would absolutely love to see it! Tag me on Instagram or share a photo in my Facebook group. Seeing your creations is honestly the best part of my day.
Happy crocheting, friend. You have got this.
