Crocheting a fitted dress sounds intimidating, right? All those curves, that waist shaping, the sleeves that need to match. Here’s the truth: if you can double crochet and count to four, you can make this dress. The construction breaks down into logical sections, and each one builds on skills you probably already have.
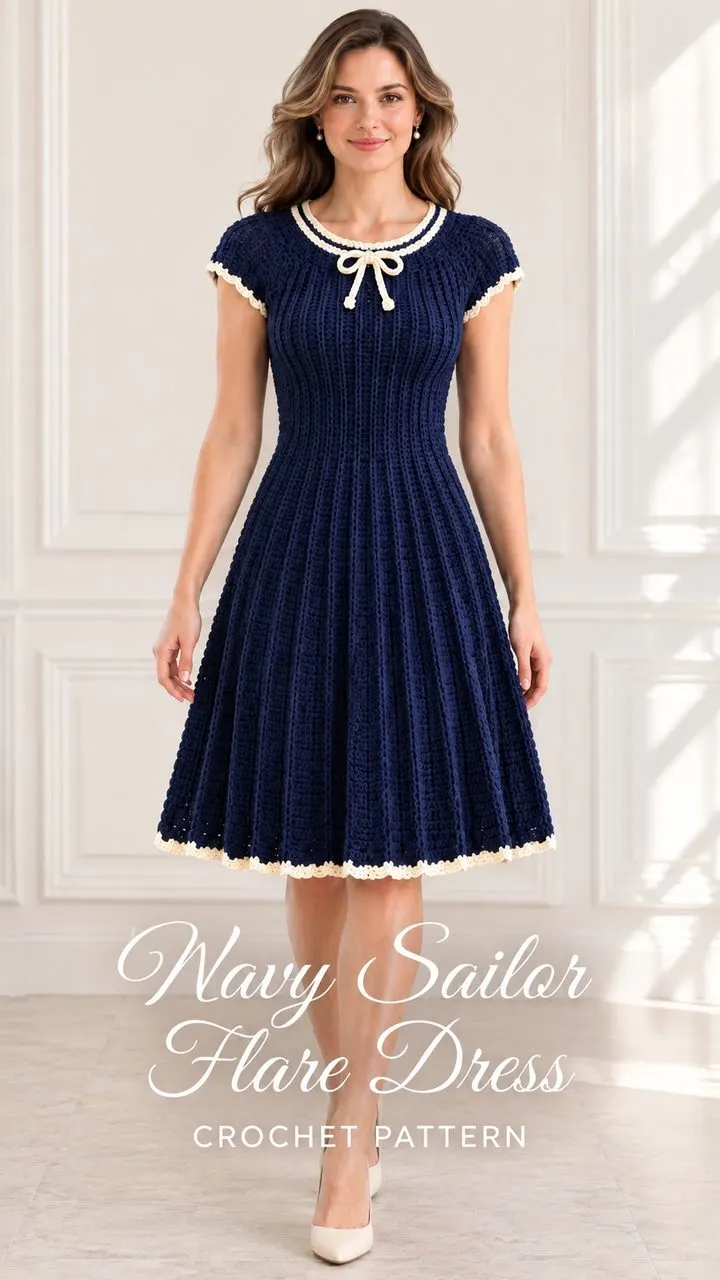
This Navy Sailor Flare Dress uses a classic top-down yoke construction. That means you start at the neckline and work your way down, trying it on as you go. No mysterious seaming at the end. No hoping the pieces fit together. You shape the bodice with simple decreases spaced evenly around, then let the skirt flare out with gradual increases.
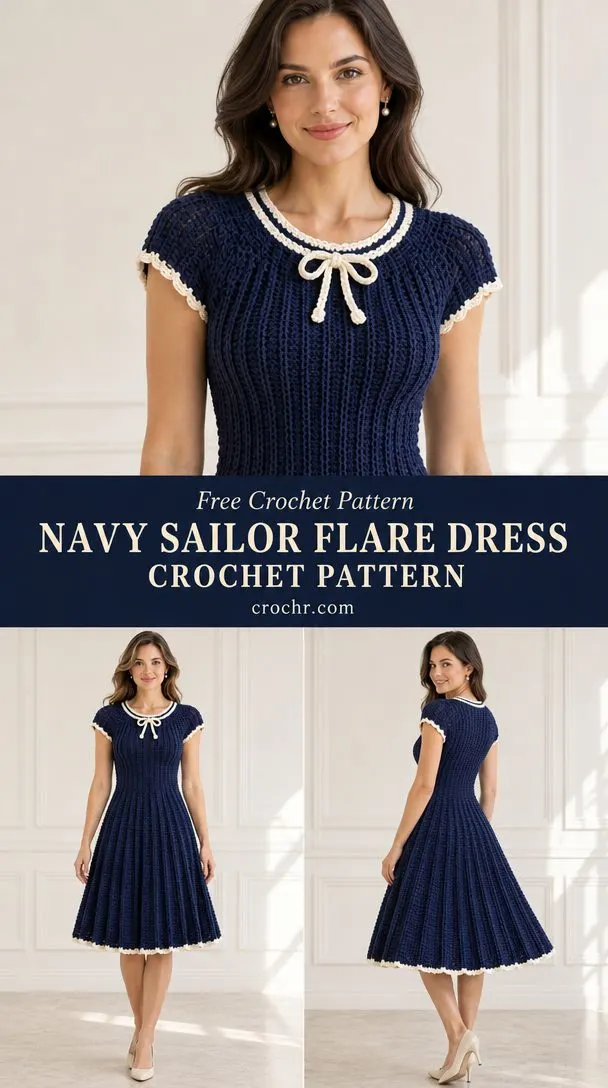
The sailor styling comes from those crisp ivory trim details at the neckline and sleeves, finished with a sweet crochet bow at center front. It reads as polished and vintage-inspired without requiring any complicated colorwork. Just a few rounds of contrast edging transform a simple navy dress into something special.
About This Design
This fitted dress features a round neckline with two thin ivory trim rows, short cap sleeves with matching edging, a shaped bodice that nips in at the waist, and a knee-length flared skirt. The ribbed texture running vertically creates visual interest and helps the fabric drape beautifully.
The pattern is written for one sample size with these finished measurements:
| Finished Measurement | Sample Size |
|---|---|
| Bust / Waist | 92 cm / 80 cm |
| Neck to Waist | 40 cm |
| Waist to Hem | 50 cm + edging |
| Upper Sleeve | 33 cm |
This fits an adult bust of 84 to 88 cm with 4 to 8 cm of positive ease at the bust. Compare the 80 cm finished waist measurement with your own waist before starting. This is a measured sample size, not a graded size range, so checking your measurements against the pattern is essential.
Materials and Tools
Yarn: Sport weight (category 2) cotton or cotton blend, approximately 300 meters per 100 grams.
- Navy: 750 grams / approximately 2250 meters
- Ivory: 100 grams / approximately 300 meters
The estimated quantities include the belt, appliques, and a modest allowance. Buy an extra 15 to 20 percent for altered length or if your swatch comes out denser than specified.
Hooks:
- Main hook: 3.5 mm (or size needed for gauge)
- Edging hook: 3.0 mm (or size needed for gauge)
Notions:
- Tapestry needle
- Scissors
- Measuring tape
- 12 locking stitch markers
- Blocking mat and pins
- Matching strong sewing thread and needle
Optional additions:
- Beaded versions: 25 to 35 smooth 4 mm sew-on ivory pearls
- Keyhole version: one 8 mm button
- Opaque slip for coverage, depending on your yarn’s density
Gauge
Getting gauge right matters tremendously for a fitted garment like this. Take the time to swatch before diving in.
Blocked main fabric: 20 stitch positions and 12 rows or rounds equals 10 x 10 cm with the main hook.
A chain space position counts as one position in the mesh yoke. Measure ribbing relaxed, not pulled sideways.
How to make your swatch:
Chain 35. Work a double crochet (dc) in the third chain from the hook and in each chain across. You should have 33 double crochets. Work 20 more rows in the bodice stitch, using chain 2 to turn each row. Wash your swatch and dry it flat. Measure the central 10 cm away from the edges. If your gauge does not match, change your hook size and repeat until both stitch gauge and row gauge are close.
Abbreviations and Special Stitches
Here are all the abbreviations used in this pattern, with definitions:
- ch = chain
- sl st = slip stitch
- sc = single crochet (insert hook, yarn over, pull up a loop, yarn over, pull through both loops)
- hdc = half double crochet
- dc = double crochet (yarn over, insert hook, pull up a loop, yarn over, pull through two loops, yarn over, pull through remaining two loops)
- FPdc = front post double crochet
- BPdc = back post double crochet
- BLO = back loop only
- st(s) = stitch(es)
- sp(s) = space(s)
- RS/WS = right side / wrong side
- rnd = round
- rep = repeat
- inc = increase
- dec = decrease
Special Stitch Definitions
FPdc (Front Post Double Crochet): Yarn over, insert your hook around the post of the indicated stitch from the front (right to left), pull up a loop, then finish as a regular double crochet. Do not also crochet into the top loops of that same stitch.
BPdc (Back Post Double Crochet): Same as FPdc, but insert your hook around the post from the back (right to left on the wrong side).
dc2tog (Double Crochet Two Together): Work a partial double crochet in each of the next 2 stitches, leaving the last loop of each on the hook. Yarn over and draw through all 3 loops. This consumes 2 stitches and produces 1 stitch. sc2tog uses the same principle without the initial yarn overs.
Rib Fabric: In right side rows or unturned rounds, repeat [FPdc in next stitch, dc in next 3 stitches]. On a wrong side row, use BPdc in place of FPdc to keep the rib texture on the right side. Preserve existing rib posts at a shaping edge and use ordinary dc in any new stitch until the next full repeat can be established.
Picot: Chain 3, slip stitch into the first of these 3 chains.
Shell: 5 double crochets into the same specified stitch or space.
Written repeats in square brackets are worked exactly the stated number of times.
Pattern Notes
Read these notes before starting. They will save you confusion later.
- Chain 2 at the start of a dc row does not count as a stitch. Work into the first stitch.
- Chain 1 at the start of a sc row does not count as a stitch.
- Joined rounds end with a slip stitch in the first actual stitch. Never count the join.
- Do not turn joined rounds unless directed.
- Mark the first stitch and move the marker each round.
About the yoke corners: Four chain 2 corner spaces separate the yoke segments. Corner chains are excluded from dc position totals. An increase corner is [dc, ch 2, dc] into that corner space. The two new dc belong to the adjacent segments, adding 8 positions across all four corners per round.
After the underarm split, there are no corner spaces. Count underarm foundation chains as stitches on the next round. Work shaping stitches as ordinary dc, then resume the established texture. At each increase round, distribute the additions in plain columns. Do not double work a rib post.
Important: Gauge and finished measurements take priority over any reference image. The pattern notes that the illustration is an AI-generated design guide, and the written stitch route is an original interpretation. Review covers internal counts, completeness, and page layout. This pattern has not been physically sample tested.
Construction Overview
This dress is worked in the following order:
- Neck foundation
- Shaped yoke
- Underarm split
- Fitted bodice
- Flared skirt
- Sleeves
- Collar/neck edge and motifs
- Assembly and blocking
Try on the dress over a slip after the underarm split and again at the waist. This top-down construction means you can adjust as you go.
Adjusting the Pattern
Length adjustment: Add or remove plain rounds between shaping rounds.
Width adjustment: First make the sample swatch. Each 8-stitch change adds about 4 cm circumference. Changing yoke depth affects sleeve and body counts, so record your new segment totals before continuing. Any alterations require a fresh fitting check.
Instructions
Yoke
With navy yarn and 3.5 mm hook, chain 124. Join without twisting. The round begins at the boundary between back and front.
Round 1: Ch 2, dc 44, ch 2, dc 18, ch 2, dc 44, ch 2, dc 18, ch 2, join. (124 dc; 4 corner spaces)
In each following yoke round, work the rib fabric across each segment and an increase corner into each of the four corner spaces. For the keyhole version, turn after Rows 2 and 3, finish Row 4 and join center front edges. Turn once so RS faces out, then work unturned rounds thereafter.
Rounds 2 through 21: Work the established texture and 4 increase corners each round.
The stitch counts progress as follows:
- Round 2: 132 positions
- Round 3: 140 positions
- Round 4: 148 positions
- Round 5: 156 positions
- Round 6: 164 positions
- Round 7: 172 positions
- Round 8: 180 positions
- Round 9: 188 positions
- Round 10: 196 positions
- Round 11: 204 positions
- Round 12: 212 positions
- Round 13: 220 positions
- Round 14: 228 positions
- Round 15: 236 positions
- Round 16: 244 positions
- Round 17: 252 positions
- Round 18: 260 positions
- Round 19: 268 positions
- Round 20: 276 positions
- Round 21: 284 positions
Checkpoint: 84 front, 58 sleeve, 84 back, 58 sleeve positions. Yoke depth is about 17.5 cm. Measure the opening and check that the yoke sits comfortably before splitting.
Underarm Split and Bodice
Rejoin yarn at the first stitch of the full front panel, immediately after a sleeve corner. Work the complete 84 stitch front, across the center front join when present, chain 8, skip 58 sleeve stitches, dc across 84 back stitches, chain 8, skip 58 sleeve stitches, join to the first body stitch. Leave the four corner spaces unworked. Do not add their chains to the body count. (184 body positions; 58 held stitches per sleeve)
The split is not counted as Bodice Round 1. Work over the chains on Round 1. Mark 8 equally spaced points, 23 stitches apart in the initial 184 stitch round. Move these markers to keep the next decreases evenly distributed.
Bodice Rounds 1 through 5: Work established bodice texture in every position. (184 sts)
Bodice Round 6: [21 stitches in texture, dc2tog] 8 times. (176 sts)
Bodice Rounds 7 through 11: Work established bodice texture in every position. (176 sts)
Bodice Round 12: [20 stitches in texture, dc2tog] 8 times. (168 sts)
Bodice Rounds 13 through 17: Work established bodice texture in every position. (168 sts)
Bodice Round 18: [19 stitches in texture, dc2tog] 8 times. (160 sts)
Bodice Rounds 19 through 27: Work established bodice texture in every position. (160 sts)
Checkpoint: 160 stitches equals 80 cm waist. Neck to waist length is about 40 cm, before any added collar. If the fit is wrong, correct it here before adding the skirt.
Skirt
Skirt Round 1: 2 dc in every waist stitch, join. (320 sts)
On ordinary skirt rounds, work the established rib or basketweave texture. On each numbered increase round below, divide the old count into the 16 blocks specified. Work each block in texture with 2 dc in its last stitch. Each increase round adds 16 stitches. Re-establish the texture over the new positions on the next round.
Skirt Round 8: [19 sts in texture, 2 dc in next st] 16 times. (336 sts)
Skirt Round 16: [20 sts in texture, 2 dc in next st] 16 times. (352 sts)
Skirt Round 24: [21 sts in texture, 2 dc in next st] 16 times. (368 sts)
Skirt Round 32: [22 sts in texture, 2 dc in next st] 16 times. (384 sts)
Skirt Round 40: [23 sts in texture, 2 dc in next st] 16 times. (400 sts)
Skirt Round 48: [24 sts in texture, 2 dc in next st] 16 times. (416 sts)
Skirt Round 56: [25 sts in texture, 2 dc in next st] 16 times. (432 sts)
All unlisted skirt rounds: Work one textured stitch in each stitch, without increases. The stitch count stays at the most recent stated total.
Final Skirt Round 60: Work texture as scheduled, including an increase if this is an increase round. (432 sts)
Skirt checkpoint: 50 cm waist to hem before edging. The planned neck to hem length is approximately 90 cm, plus 1 to 3 cm for edging. Hold the garment upright for a few minutes to check cotton stretch before committing to the hem.
Sleeves (Make Two)
Sleeve Round 1: Join main yarn at underarm. Work 8 dc across underarm chains, then 58 stitches in texture across held sleeve stitches, join. (66 sts)
Sleeve Round 2: Work rib texture evenly, join. (66 sts)
Sleeve Round 3: Work rib texture evenly, join. (66 sts)
Sleeve checkpoint: 33 cm upper circumference and approximately 2.5 cm below underarm before edging. The yoke supplies additional cap sleeve coverage.
Assembly
You will need: Main color yarn (navy), 3.5 mm hook for joining gaps, tapestry needle, matching sewing thread, markers. Work with the garment right side out.
Pass 1: Close any small hole at the underarm corners with a short duplicate stitch pass through adjacent stitch legs. Do not tighten the opening. (2 underarms closed)
Pass 2: Secure the bottom of the placket or keyhole with 3 small sewn reinforcing stitches across the join. Keep the opening above it separate. (1 reinforced opening when present)
Pass 3: Lay the garment flat and compare sleeve seams, waist, and hem. Remove temporary construction markers after the checks. (2 sleeves matched)
Checkpoint: The garment hangs level, the underarms contain no gaps, and the neck or front opening remains usable. Check bust and waist circumference again. Never force a too small neck opening over the head.
Edgings and Details
You will need: Main yarn and ivory accent color, 3.0 mm hook for neck and cuffs, 3.5 mm hook for motifs, tapestry needle and matching thread.
Neck Round 1: With ivory, sc into each foundation stitch. Place 2 sc in each of the 4 corner chain spaces to smooth the neckline. (132 sc total)
Neck Round 2: Sc in every sc, join or finish at the keyhole edge. (132 sc)
Work Neck Rounds 1 and 2 and sleeve edging in ivory. The bodice stays navy.
Hem Round: With navy, sc in every final skirt stitch, join. (Same count as final skirt round)
Sleeve Edge Round (work twice on each sleeve): With ivory, sc in each sleeve stitch, join and fasten off. (66 sc per sleeve)
Crochet Bow Tie
Tie Row 1: With ivory, ch 5. Sc in second ch and across. Turn. (4 sc)
Tie Following Rows: Ch 1, sc BLO across, turn. Continue to 45 cm for the neck bow. (4 sc per row)
Tie the short ivory strip into a bow and sew securely at center front neck.
Checkpoint: Edges lie flat without rippling. Buttons pass through their loops or holes. Motifs are securely sewn and do not pull the fabric out of shape. Compare the detail count with this design before weaving in ends.
Finishing
You will need: Matching yarn tails, tapestry needle, blocking pins and mat. Have the main 3.5 mm hook available only if a repair is needed. Use water suited to the yarn label.
Pass 1: Weave every yarn end through the wrong side of at least 6 stitches. Reverse direction twice and trim only after washing. (All ends secured)
Pass 2: Soak briefly in cool water with gentle detergent. Squeeze in a towel without twisting. Lay flat and pin the waist and skirt to the planned measurements. (1 blocked garment)
Pass 3: Let dry completely, remove pins, and measure again. Support the heavy skirt when lifting. Do not hang wet cotton. (1 final measurement check)
Final Checkpoint: Bust approximately 92 cm, waist 80 cm, skirt length 50 cm before edging. Sleeve lengths match within 0.5 cm. Record any difference and your actual yarn use before making another size.
Care Instructions
Follow your yarn label for specific care. Generally, hand wash in cool water, support the weight of the wet garment, reshape, and dry flat. Do not wring or tumble dry unless the yarn specifically permits it. Test strong colors like navy for bleeding before combining them with pale yarn like ivory. Remove or protect delicate beads before laundering.
Safety note: Beads and buttons are small parts. Check their stitching before each wear and keep them away from babies and young children. Long belts and ties can catch on things, so secure them during wear. The lace texture may need an appropriate opaque slip for coverage.
Tips for Success
Try it on as you go. This is the biggest advantage of top-down construction. After the underarm split and again at the waist are ideal checkpoints.
Count your corners. The yoke shaping depends on those four corner spaces. Lose track of one and your sleeves will be lopsided.
Block aggressively. Cotton relaxes significantly when wet. Pin it to the measurements you want, not the measurements it has.
Mark your decrease points. Those 8 markers around the bodice keep your shaping even. Move them up as you work.
Check your gauge twice. Once in the swatch and once after the first few yoke rounds. Adjusting early is much easier than frogging later.
This Navy Sailor Flare Dress is the kind of project that feels like a true accomplishment. The vertical ribbing, the elegant flare, that crisp navy and ivory combination. It all comes together into something genuinely beautiful. Whether you are making it for a special occasion or simply because you deserve a handmade dress in your closet, this pattern delivers.
If you love this design, save it to your Pinterest boards so you can find it when you are ready to cast on. And if you make this dress, please leave a comment below. Seeing your finished projects is the best part.
You Might Also Like
- Sage Green Natural Minimalist Braided Bag Free Crochet Pattern
- Watermelon Slice Tropical Charm Bracelet Free Crochet Pattern
- Mint Green Baby Poncho Free Crochet Pattern
- Neon Glow Snake Plushie Free Crochet Pattern