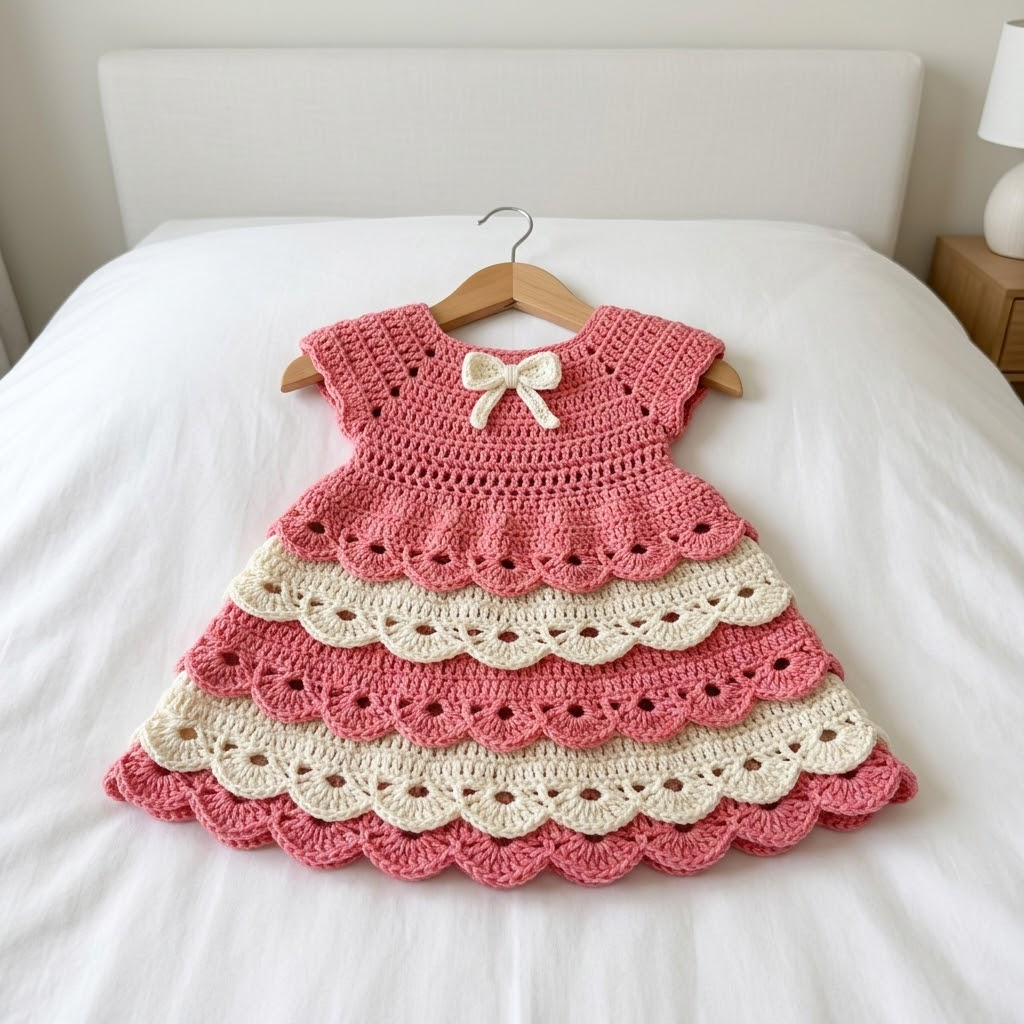
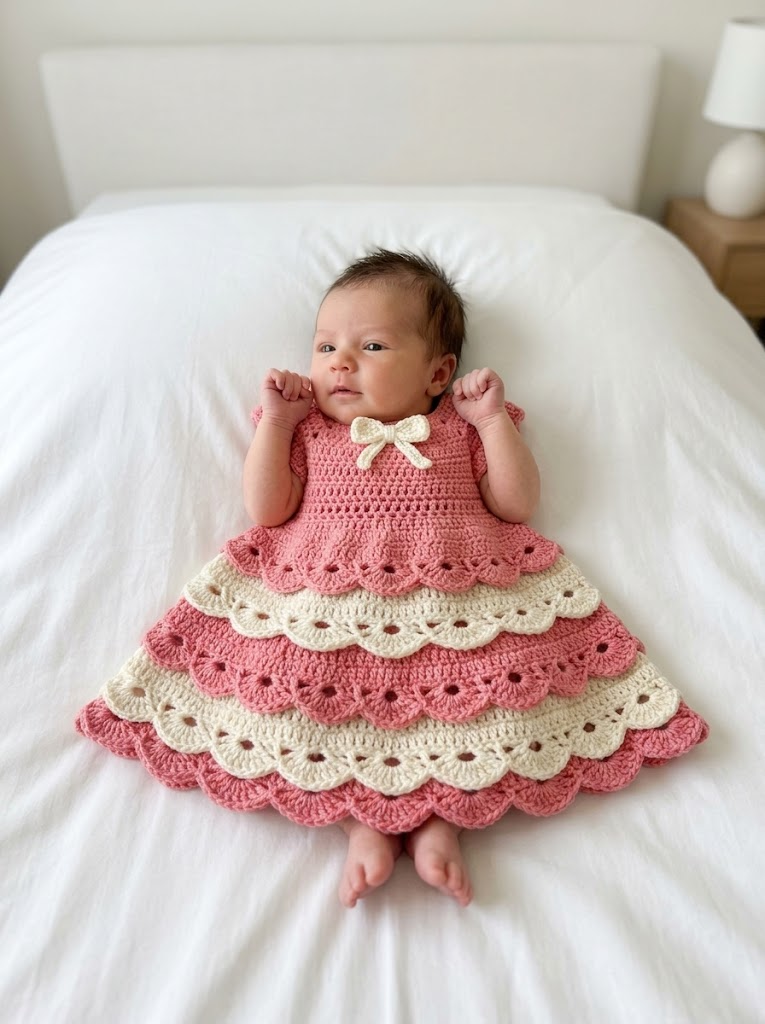
There is something absolutely magical about crocheting a tiny dress for a little one. This Strawberry Cream Tiered Baby Dress has quickly become one of my favorite projects to gift at baby showers. The combination of soft rose pink and cream creates a vintage sweetness that photographs beautifully and washes like a dream.

If you can crochet basic stitches and follow a simple repeat, you can absolutely make this dress. I promise. The tiered skirt looks impressive but it is actually just the same scallop pattern worked over and over. Once you get the rhythm, your hook practically moves on its own.
This crochet pattern walks you through every single step from the fitted bodice through those gorgeous layered ruffles. Grab your yarn and let us make something special together.
Why This Baby Dress Crochet Pattern Works So Well
The construction of this dress is smart and beginner friendly. You start at the top with the yoke, which is the curved shoulder section that sits across baby’s chest and upper back. The yoke uses simple increases to shape around tiny shoulders without any complicated armhole math.
From there, you work straight down into a fitted bodice section. This is where the dress hugs close to baby’s torso. Then comes the fun part. The tiered skirt attaches directly to the bodice and cascades down in alternating pink and cream ruffles.
Each tier features a shell stitch scallop edging that creates those beautiful wavy edges. The tiers layer slightly over each other, giving the skirt fullness and movement without adding bulk or weight.
The little cream bow at the neckline adds the perfect finishing touch. You can skip it if you prefer, but I think it gives the dress that extra sweetness.
Materials You Will Need
Yarn:
I recommend a smooth cotton or cotton acrylic blend. Avoid anything too fuzzy because the stitch definition really makes this dress shine. Look for yarn labeled as DK weight or light worsted with a recommended hook size around 4mm.
Hook:
Notions:
Gauge:
18 stitches and 10 rows = 4 inches in double crochet
*Take time to check your gauge. This dress needs to fit a real baby.*
Size Information
This pattern as written fits 6 to 12 months with the following finished measurements:
To adjust sizing, add or subtract from your starting chain in multiples of the pattern repeat. I will note where adjustments can be made.
Abbreviations and Stitch Definitions
Let me explain every stitch before we begin. Read through these so nothing surprises you mid-project.
Ch = Chain. Wrap yarn over hook, pull through loop on hook. This creates the foundation links you build upon.
Sl st = Slip stitch. Insert hook, yarn over, pull through both the stitch and the loop on your hook in one motion. Used for joining rounds.
Sc = Single crochet. Insert hook into stitch, yarn over and pull up a loop (2 loops on hook), yarn over and pull through both loops. A short, tight stitch.
Hdc = Half double crochet. Yarn over, insert hook, yarn over and pull up a loop (3 loops on hook), yarn over and pull through all 3 loops. Medium height stitch.
Dc = Double crochet. Yarn over, insert hook, yarn over and pull up a loop (3 loops on hook), yarn over and pull through 2 loops (2 loops remain), yarn over and pull through remaining 2 loops. Taller stitch with nice drape.
Dc2tog = Double crochet 2 together. A decrease that turns 2 stitches into 1. Work a dc but stop before the final pull through (2 loops on hook). Work another dc in the next stitch, stopping the same way (3 loops on hook). Yarn over and pull through all 3 loops.
Shell = 5 dc worked into the same stitch. Creates a fan shape.
Skip = Miss the indicated number of stitches without working into them.
St(s) = Stitch or stitches
Rep = Repeat
The Crochet Pattern: Step by Step Instructions
Part 1: The Yoke (Top Down Construction)
We begin at the neckline and work downward. This section creates the shaped shoulder area.
Using Color A (Rose Pink), ch 72. Join with sl st to first ch to form a ring, being careful not to twist.
Round 1: Ch 3 (counts as first dc here and throughout), dc in each ch around. Join with sl st to top of ch 3. (72 dc)
Round 2: Ch 3, dc in same st, 2 dc in each st around. Join. (144 dc)
Place stitch markers as follows to divide for armholes:
Round 3: Ch 3, dc in each st around. Join. (144 dc)
Round 4: Ch 3, *dc in next 5 sts, 2 dc in next st*, rep from * around. Join. (168 dc)
Round 5: Ch 3, dc in each st around. Join. (168 dc)
Round 6: Ch 3, *dc in next 6 sts, 2 dc in next st*, rep from * around. Join. (192 dc)
The yoke should now measure approximately 2.5 inches from the neckline.
Part 2: Divide for Armholes and Create Bodice
This is where we separate the front from the back and create openings for baby’s arms. Do not worry, it is easier than it sounds.
Round 7 (Dividing Round): Ch 3, dc in next 35 sts (back section). Ch 6, skip next 24 sts (first armhole). Dc in next 72 sts (front section). Ch 6, skip next 24 sts (second armhole). Dc in next 36 sts (remaining back). Join. (144 dc + 12 ch)
Round 8: Ch 3, dc in each dc and each ch around. Join. (156 dc)
Round 9: Ch 3, dc in each st around. Join. (156 dc)
Round 10: Ch 3, *dc in next 11 sts, dc2tog*, rep from * around. Join. (144 dc)
Rounds 11 through 14: Ch 3, dc in each st around. Join. (144 dc)
The bodice should now measure approximately 5 inches from the shoulder. Time to add some texture.
Round 15 (Eyelet Round): Ch 3, dc in next st, *ch 1, skip 1 st, dc in next 2 sts*, rep from * around, ending with ch 1, skip 1 st. Join. (96 dc, 48 ch-1 spaces)
Round 16: Ch 3, dc in each dc and each ch-1 space around. Join. (144 dc)
Fasten off Color A. The bodice is complete.
Part 3: First Tier (Rose Pink)
Join Color A to any stitch of Round 16.
Round 1: Ch 3, dc in same st, dc in next st, *2 dc in next st, dc in next st*, rep from * around. Join. (216 dc)
Round 2: Ch 3, dc in each st around. Join. (216 dc)
Round 3: Ch 3, dc in each st around. Join. (216 dc)
Round 4 (Eyelet Round): Ch 4 (counts as dc + ch 1), skip next st, *dc in next st, ch 1, skip next st*, rep from * around. Join to 3rd ch of ch 4. (108 dc, 108 ch-1 spaces)
Round 5 (Scallop Edge): Sl st into ch-1 space, ch 1, sc in same space, *skip next dc, 5 dc in next ch-1 space (shell made), skip next dc, sc in next ch-1 space*, rep from * around. Join to first sc. (36 shells)
Fasten off Color A.
Part 4: Second Tier (Cream)
This tier attaches to Round 3 of the first tier, creating that lovely layered effect.
Join Color B (Cream) to any stitch on Round 3 of the first tier (the round just before the eyelet round).
Round 1: Ch 3, 2 dc in same st, dc in next 2 sts, *3 dc in next st, dc in next 2 sts*, rep from * around. Join. (288 dc)
Round 2: Ch 3, dc in each st around. Join. (288 dc)
Round 3 (Eyelet Round): Ch 4, skip next st, *dc in next st, ch 1, skip next st*, rep from * around. Join to 3rd ch of ch 4. (144 dc, 144 ch-1 spaces)
Round 4 (Scallop Edge): Sl st into ch-1 space, ch 1, sc in same space, *skip next dc, 5 dc in next ch-1 space, skip next dc, sc in next ch-1 space*, rep from * around. Join to first sc. (48 shells)
Fasten off Color B.
Part 5: Third Tier (Rose Pink)
Join Color A to any stitch on Round 2 of the second tier.
Round 1: Ch 3, 2 dc in same st, dc in next 3 sts, *3 dc in next st, dc in next 3 sts*, rep from * around. Join. (360 dc)
Round 2: Ch 3, dc in each st around. Join. (360 dc)
Round 3: Ch 3, dc in each st around. Join. (360 dc)
Round 4 (Eyelet Round): Ch 4, skip next st, *dc in next st, ch 1, skip next st*, rep from * around. Join to 3rd ch of ch 4. (180 dc, 180 ch-1 spaces)
Round 5 (Scallop Edge): Sl st into ch-1 space, ch 1, sc in same space, *skip next dc, 5 dc in next ch-1 space, skip next dc, sc in next ch-1 space*, rep from * around. Join to first sc. (60 shells)
Fasten off Color A.
Part 6: Fourth Tier (Cream)
Join Color B to any stitch on Round 3 of the third tier.
Round 1: Ch 3, 2 dc in same st, dc in next 4 sts, *3 dc in next st, dc in next 4 sts*, rep from * around. Join. (432 dc)
Round 2: Ch 3, dc in each st around. Join. (432 dc)
Round 3 (Eyelet Round): Ch 4, skip next st, *dc in next st, ch 1, skip next st*, rep from * around. Join to 3rd ch of ch 4. (216 dc, 216 ch-1 spaces)
Round 4 (Scallop Edge): Sl st into ch-1 space, ch 1, sc in same space, *skip next dc, 5 dc in next ch-1 space, skip next dc, sc in next ch-1 space*, rep from * around. Join to first sc. (72 shells)
Fasten off Color B.
Part 7: Fifth Tier and Final Hem (Rose Pink)
This is the bottom tier. We add one extra round of scallops for a fuller hem.
Join Color A to any stitch on Round 2 of the fourth tier.
Round 1: Ch 3, 2 dc in same st, dc in next 5 sts, *3 dc in next st, dc in next 5 sts*, rep from * around. Join. (504 dc)
Round 2: Ch 3, dc in each st around. Join. (504 dc)
Round 3: Ch 3, dc in each st around. Join. (504 dc)
Round 4 (Eyelet Round): Ch 4, skip next st, *dc in next st, ch 1, skip next st*, rep from * around. Join to 3rd ch of ch 4. (252 dc, 252 ch-1 spaces)
Round 5 (Scallop Edge): Sl st into ch-1 space, ch 1, sc in same space, *skip next dc, 5 dc in next ch-1 space, skip next dc, sc in next ch-1 space*, rep from * around. Join to first sc. (84 shells)
Fasten off and weave in all ends.
Part 8: Sleeves (Make 2)
Join Color A to the center of the underarm chain.
Round 1: Ch 3, dc in each ch and each st around the armhole opening. Join. (approximately 36 dc)
Round 2: Ch 3, dc in each st around. Join. (36 dc)
Round 3 (Scallop Edge): Ch 1, sc in same st, *skip 2 sts, 5 dc in next st, skip 2 sts, sc in next st*, rep from * around. Join. (6 shells)
Fasten off. Repeat for second sleeve.
Part 9: Neckline Edging
Join Color A to center back of neckline.
Round 1: Ch 1, sc evenly around entire neckline, working approximately 72 sc. Join. (72 sc)
Round 2: Ch 1, sc in each st around. Join. Fasten off.
Part 10: Bow (Optional)
Using Color B (Cream), ch 50.
Row 1: Sc in 2nd ch from hook and in each ch across. (49 sc)
Fasten off, leaving a long tail. Tie into a bow shape and secure with yarn needle. Attach to center front of bodice just below the neckline.
Finishing Your Baby Dress
Weave in all remaining yarn ends using your yarn needle. Work the tails into stitches of the same color so nothing shows through.
Block your dress by soaking it in lukewarm water for 15 minutes. Gently squeeze out excess water without wringing. Lay flat on a towel and shape the tiers so they fan out evenly. Let dry completely.
The cotton yarn will soften beautifully with washing and wear.
Tips for Success with This Crochet Tutorial
If your tiers look uneven: Make sure you are joining each new tier to the correct round of the previous tier. The attachment round matters for proper layering.
If the bodice seems too tight: Add an extra increase round in the yoke section or go up one hook size.
If the scallops curl: Blocking solves this almost every time. Cotton can be stubborn before it is wet blocked.
For a longer dress: Add one more tier following the established increase pattern before the final hem tier.
Care Instructions
This dress is machine washable on a gentle cycle in cold water. Lay flat to dry to preserve the shape of the tiers. Cotton will shrink slightly on the first wash, so blocking before gifting is recommended.
Final Thoughts on This Baby Dress Crochet Pattern
Making this Strawberry Cream Tiered Baby Dress feels like creating a little piece of heirloom magic. The tiered construction looks far more complicated than it actually is, and watching those ruffles stack up is genuinely satisfying.
This pattern makes a stunning baby shower gift or a special occasion outfit for your own little one. Pair it with a simple white onesie underneath and prepare for endless compliments.
Thank you so much for choosing to make this project. I truly appreciate you spending your stitching time with me. If you make this dress, I would absolutely love to see it. Tag me on Instagram or share your finished photo in our Facebook group. Seeing your versions brings me so much joy.
Happy crocheting, friend. You have got this.
