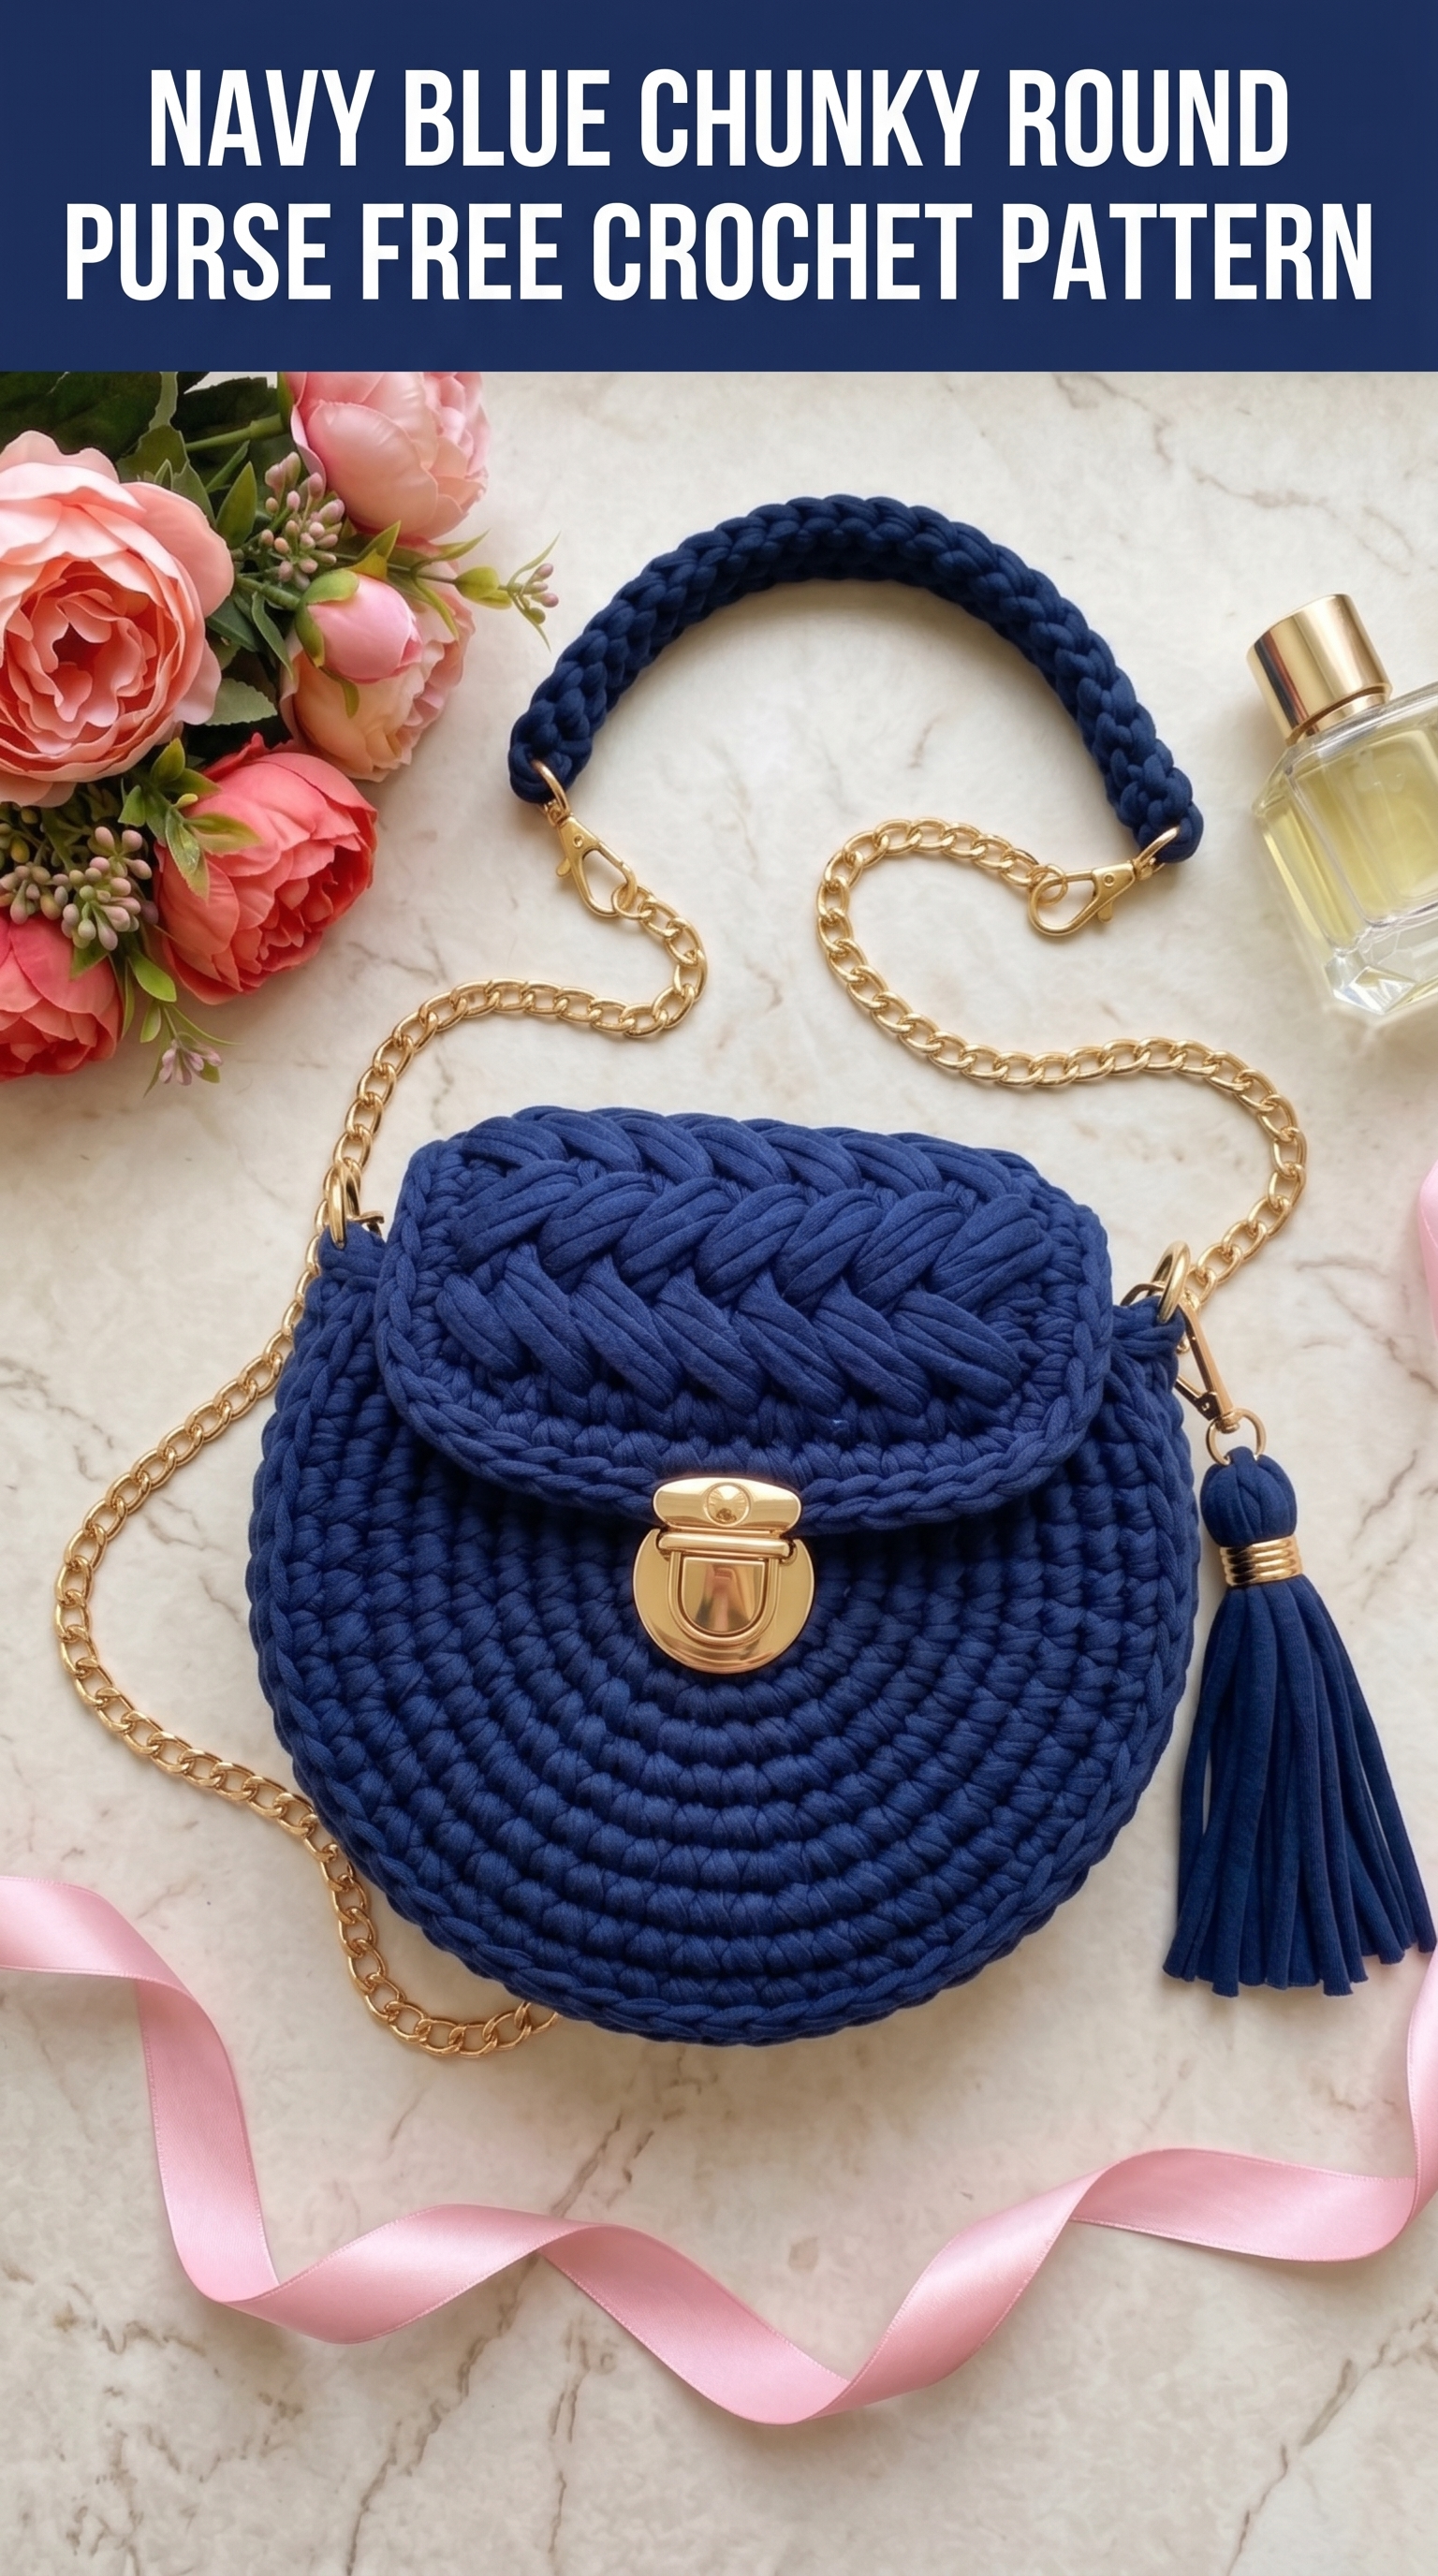
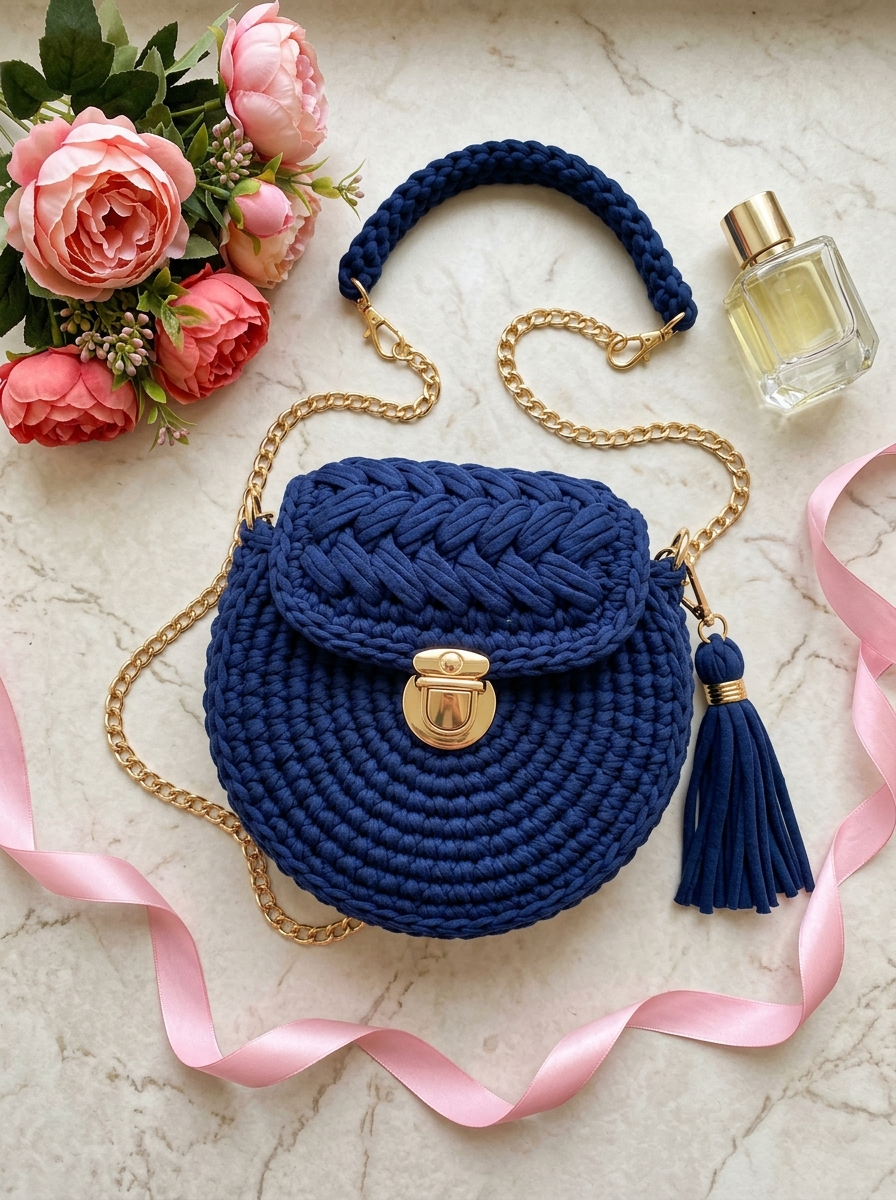
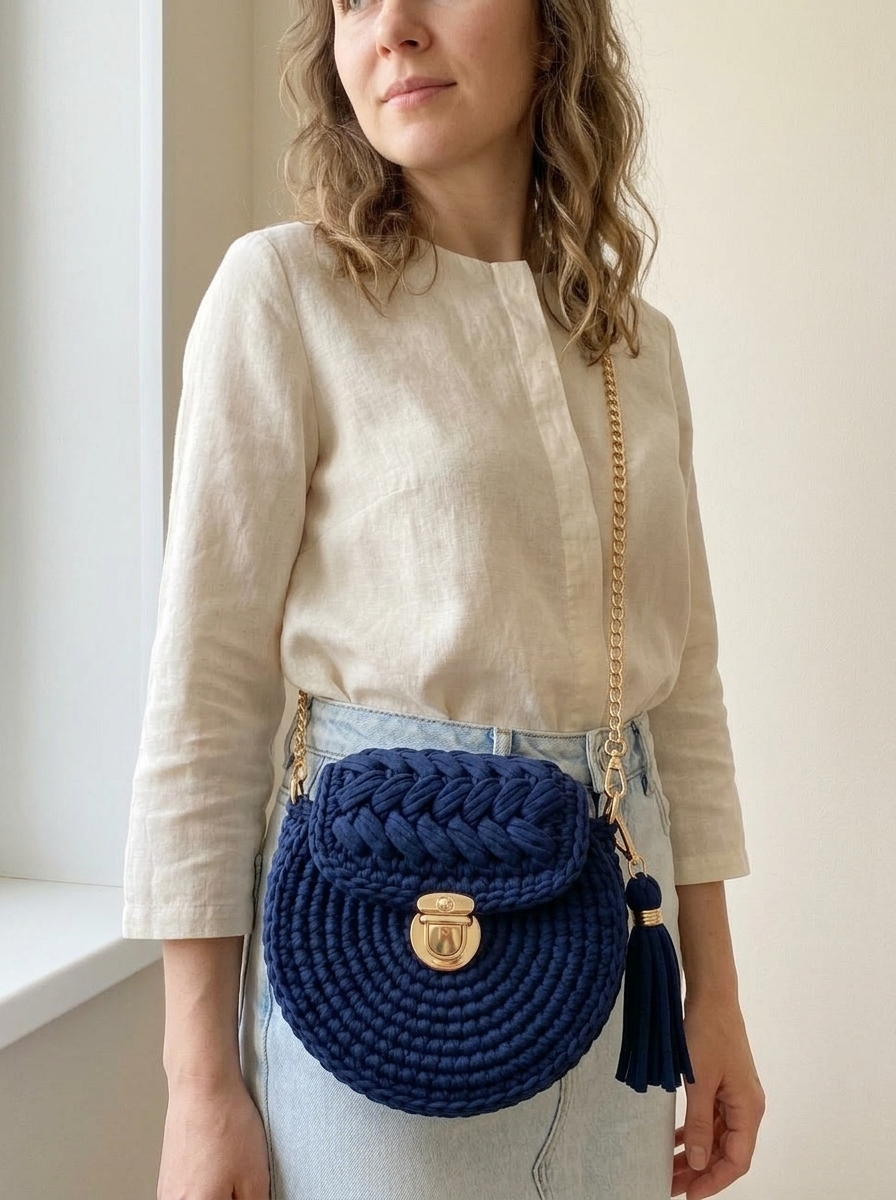
This gorgeous little crossbody bag is about to become your new favorite project. The Navy Blue Chunky Round Purse combines a classic circular shape with beautiful texture, gold hardware accents, and that satisfying weight of t-shirt yarn. I designed this piece to look high-end but work up surprisingly fast.
If you can crochet in the round and know your basic stitches, you can absolutely make this bag. The construction is straightforward, and I’ll walk you through every single step. This crochet pattern creates a structured, professional-looking purse that nobody would guess is handmade.
Let me show you exactly how to recreate this beauty from scratch.
Why This Chunky Round Purse Pattern Works So Well
The magic of this crochet tutorial lies in the yarn choice and stitch combination. T-shirt yarn (also called trapillo or zpagetti yarn) creates that dense, sturdy fabric you see in the photos. The chunky weight means fewer stitches per round, which translates to faster finishing time.
I love how the spiral construction on the base creates those beautiful concentric circles. The sides use a combination of single crochet and a decorative puff stitch border that adds visual interest without overcomplicating things.
The finished bag measures approximately 7 inches (18 cm) in diameter and 3 inches (8 cm) tall before the flap. Perfect for your phone, keys, cards, and lipstick. It’s a true everyday essential.
Materials You Will Need
Gather these supplies before you start. Having everything ready makes the process so much smoother.
Yarn
T-shirt yarn comes in rolls or skeins. Look for consistent width throughout the skein. Brands like Hoooked Zpagetti, Lily Sugar’n Cream Stripey, or any recycled cotton t-shirt yarn work beautifully.
Hook
Hardware and Notions
You can find purse hardware at craft stores, online retailers, or specialty bag-making suppliers. The gold hardware against navy blue is stunning, but silver or antique brass would also look gorgeous.
Stitch Abbreviations and Definitions
Let me explain every stitch before we begin. No confusion, I promise.
Ch = Chain: Yarn over, pull through the loop on your hook. This creates a foundation or adds height.
Sl st = Slip stitch: Insert hook, yarn over, pull through both the stitch and the loop on your hook in one motion. Used for joining or invisible movement.
Sc = Single crochet: Insert hook into stitch, yarn over, pull up a loop (2 loops on hook), yarn over, pull through both loops. The most basic stitch that creates dense fabric.
Inc = Increase: Work 2 single crochet stitches into the same stitch. This makes your circle grow outward.
Hdc = Half double crochet: Yarn over, insert hook, yarn over, pull up a loop (3 loops on hook), yarn over, pull through all 3 loops. Slightly taller than single crochet.
Puff stitch: (Yarn over, insert hook, pull up a loop) 3 times in the same stitch (7 loops on hook), yarn over, pull through all 7 loops, chain 1 to secure. Creates a raised, textured bump.
Gauge
With t-shirt yarn and a 10mm hook working in single crochet:
6 stitches and 6 rows = 4 inches (10 cm)
Gauge matters less for a bag than for a sweater, but you want your fabric dense enough that items won’t poke through. If your stitches look loose and floppy, size down your hook. If you can barely push through the yarn, size up.
Skill Level
Confident beginner to intermediate. You should be comfortable with:
If this is your first bag project, you are in the right place. I will explain everything step by step.
Step by Step Crochet Pattern Instructions
Part 1: The Circular Base (Make 2)
You will create two identical circles. One becomes the front of your purse, and one becomes the back.
Starting with a magic ring:
A magic ring (also called magic circle or adjustable loop) lets you pull the center completely closed. If you prefer, you can chain 2 and work Round 1 into the second chain from the hook instead.
Round 1: Create a magic ring. Work 6 sc into the ring. Pull the tail to close. Do not join. Place a stitch marker in the first stitch and move it up each round. (6 sts)
Round 2: Inc in each stitch around. (12 sts)
That means you put 2 single crochets into every stitch from Round 1.
Round 3: *Sc in next stitch, inc in next stitch.* Repeat from * to * around. (18 sts)
Round 4: *Sc in next 2 stitches, inc in next stitch.* Repeat from * to * around. (24 sts)
Round 5: *Sc in next 3 stitches, inc in next stitch.* Repeat from * to * around. (30 sts)
Round 6: *Sc in next 4 stitches, inc in next stitch.* Repeat from * to * around. (36 sts)
Round 7: *Sc in next 5 stitches, inc in next stitch.* Repeat from * to * around. (42 sts)
Sl st to first stitch to join. Fasten off and weave in your tail.
Your circle should measure approximately 7 inches (18 cm) across. If it is significantly smaller or larger, adjust your hook size and try again. The two circles need to match.
Repeat these instructions to create your second circle.
Part 2: The Side Gusset
This strip connects your two circles and creates the depth of your bag.
Chain 7.
Row 1: Sc in second chain from hook and in each chain across. Ch 1, turn. (6 sts)
Rows 2-44: Sc in each stitch across. Ch 1, turn. (6 sts)
Fasten off, leaving a long tail for sewing.
Your strip should be approximately 28-30 inches (71-76 cm) long. This needs to fit around the circumference of your circles. Measure against one circle and add or subtract rows if needed.
Quick tip: If your strip seems too short, do not stretch it. Add more rows. If it is too long, remove rows. You want a snug fit without puckering.
Part 3: Assembling the Bag Body
Now we connect all the pieces. Take a breath. This is easier than it sounds.
Step 1: Take one circular panel and the side gusset. Place them with right sides facing out (the side you want visible on the finished bag).
Step 2: Using your large tapestry needle and matching t-shirt yarn, whip stitch the gusset to the edge of the first circle. Work around the entire circumference. The gusset should fit exactly or nearly exactly around the circle.
Step 3: Before attaching the second circle, thread your D-rings onto the top edge of the gusset at the side seams. These will hold your chain strap.
Step 4: Whip stitch the second circle to the remaining edge of the gusset, leaving approximately one-third of the top open for the bag opening. This opening sits at the top center back of the bag.
Step 5: Reinforce your seams by going over them twice if you like extra security.
Part 4: The Flap
The flap extends from the back of the bag and folds over the front to close.
Joining the yarn:
Attach your yarn to one corner of the bag opening on the back circle. You will work back and forth.
Row 1: Sc evenly across the back portion of the bag opening, approximately 14 sc. Ch 1, turn. (14 sts)
Rows 2-8: Sc in each stitch across. Ch 1, turn. (14 sts)
Row 9 (Shaping begins): Sc2tog, sc across to last 2 stitches, sc2tog. Ch 1, turn. (12 sts)
Sc2tog = Single crochet decrease: Insert hook in next stitch, yarn over, pull up a loop, insert hook in following stitch, yarn over, pull up a loop (3 loops on hook), yarn over, pull through all 3 loops.
Row 10: Sc in each stitch across. Ch 1, turn. (12 sts)
Row 11: Sc2tog, sc across to last 2 stitches, sc2tog. Ch 1, turn. (10 sts)
Row 12: Sc in each stitch across. (10 sts)
Fasten off, leaving a tail to weave in.
Part 5: Decorative Border
This is the puff stitch trim you see along the top edge and flap. It adds that professional designer touch.
Joining for border:
Attach yarn at the corner where the flap meets the bag opening.
Round 1: Work sc evenly around the entire flap edge AND the front opening edge of the bag. Place a puff stitch at each corner of the flap for extra visual interest. Sl st to join.
Puff stitch placement: Work puff stitches every 3rd or 4th stitch along the flap edge, with sc stitches between them. This creates that braided, textured look visible in the photo.
Fasten off and weave in ends.
Part 6: Installing the Hardware
The push lock clasp:
1. Position the clasp base plate on the front of the bag body, centered and about 1 inch down from the top edge
2. Mark the screw or prong locations with pins
3. Use small scissors to poke holes for the prongs
4. Push the prongs through and secure the backing plate inside the bag
5. Position the flap over the clasp and mark where the catch needs to go
6. Install the catch portion on the underside of the flap
D-rings and chain:
Your D-rings should already be attached at the side seams. Simply clip your chain strap to both D-rings.
Crocheted strap wrap (optional):
For the padded section where the chain sits on your shoulder:
Chain 30. Sc in second chain from hook and across. Fasten off. Wrap this around a section of your chain and whip stitch the edges together.
Part 7: The Tassel
Using remaining t-shirt yarn:
1. Cut 8-10 strips approximately 8 inches long
2. Fold in half
3. Thread a separate piece through the fold to create a hanging loop
4. Insert the tassel cap over the top
5. Secure with glue or by crimping if your cap allows
6. Attach to one D-ring or the zipper pull of your clasp
Helpful Tips for Success
Tension consistency: T-shirt yarn is thick and can tire your hands. Take breaks. Keep your tension firm but not strangling tight.
Joining yarn: When starting a new skein, overlap the old and new ends for 2-3 stitches, then continue. The bulk of t-shirt yarn hides joins well.
Blocking: This bag does not require blocking. The weight of the yarn creates its own structure.
Lining (optional): If you want extra polish, cut a fabric liner to fit inside and hand sew it in place. This protects delicate items and adds professionalism.
Customization Ideas
This crochet pattern adapts beautifully to your personal style.
Wrapping Up Your Navy Blue Chunky Round Purse
You made it through this entire crochet tutorial, and I am so proud of you. This navy blue chunky round purse crochet pattern creates something truly special. The combination of simple stitches, quality hardware, and that beautiful t-shirt yarn produces a bag that looks like it belongs in a boutique window.
Take your time with the assembly. That is where the magic happens. And remember, every handmade item carries its own character. Little variations make it yours.
Thank you so much for choosing this pattern and trusting me to guide you through it. I genuinely hope your finished bag brings you joy every time you grab it on your way out the door.
I would absolutely love to see your finished purse. Please tag me on Instagram or share your photos in my Facebook group. Seeing your creations makes my whole day brighter.
Happy crocheting, friend. You have got this.
