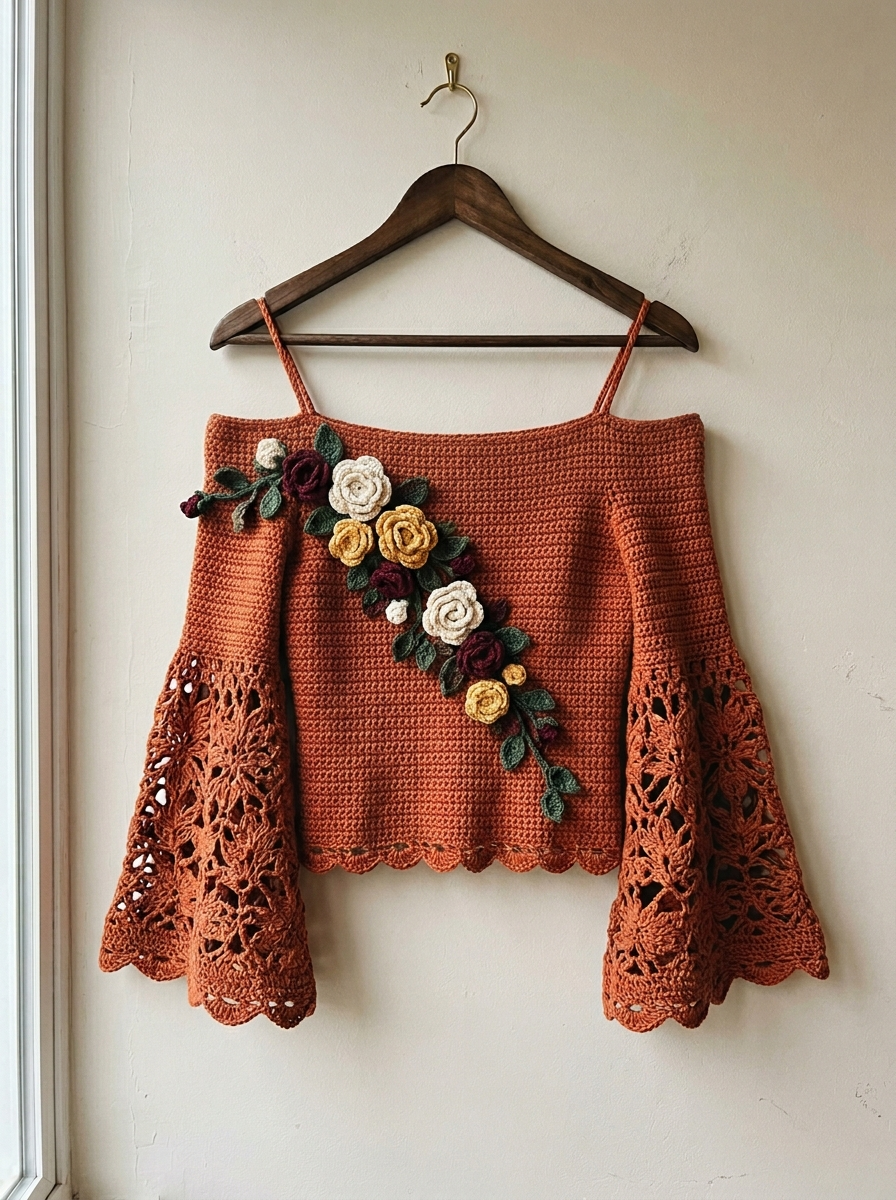
This gorgeous terracotta crochet blouse has been living in my head rent-free since I finished it. I had to share this crochet pattern with you.

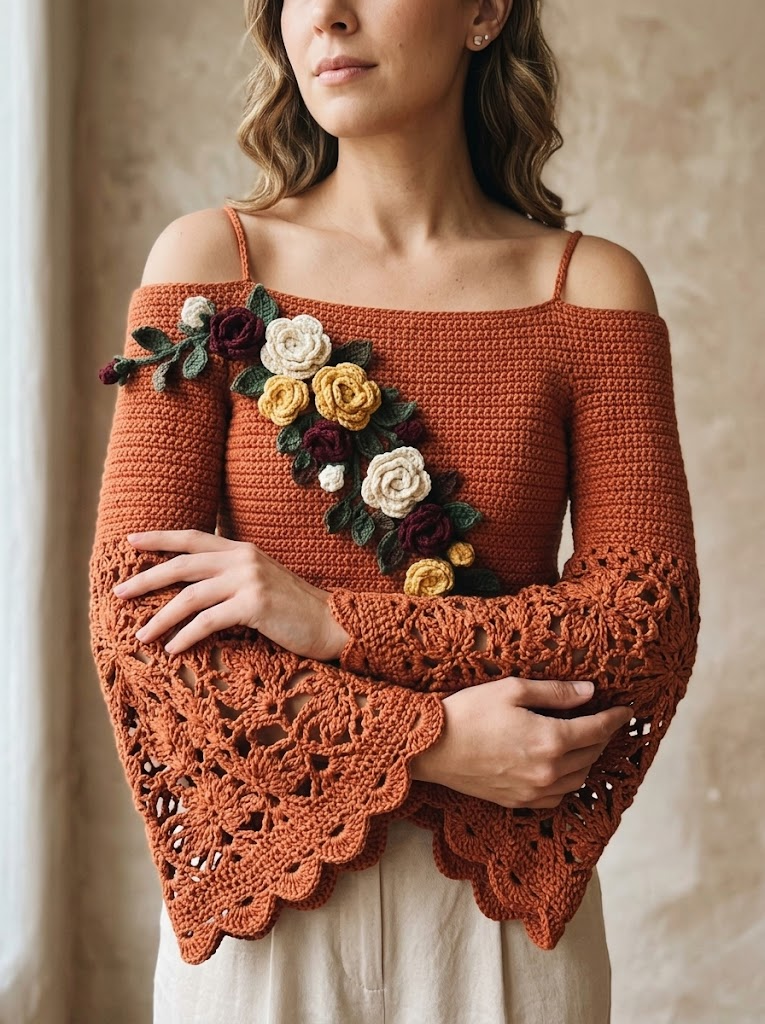
Picture a warm fall evening. Golden hour light. A cozy off-shoulder top with dramatic bell sleeves and a cascade of handmade roses tumbling across your shoulder. That is exactly what we are making today.
This floral crochet blouse pattern looks intimidating. I get it. Those lace bell sleeves, the 3D flowers, the delicate spaghetti straps. But here is the truth: if you can single crochet and double crochet, you can absolutely make this top. We will break it down piece by piece. Promise.
Let me walk you through everything you need to recreate this romantic boho blouse from scratch.
Why This Crochet Blouse Pattern Works
The magic of this design is contrast. You have a solid, sturdy bodice worked in simple stitches. Then those sleeves explode into dramatic openwork lace. The 3D floral appliqué adds texture and color without complicating the actual garment construction.
Each element is beginner friendly on its own. We just combine them into something that looks much harder than it is.
The terracotta color makes this perfect for late summer through fall. Pair it with high-waisted jeans or a flowing maxi skirt. Either way, you will get compliments.
Materials You Will Need
Yarn:
I recommend a DK weight yarn (also called light worsted or size 3) with good stitch definition. Cotton works beautifully for warm weather wear. A cotton-acrylic blend adds softness and is easier on the hands.
Hook:
Notions:
Gauge:
18 stitches and 20 rows = 4 inches in single crochet with 4.0mm hook
Please check your gauge. This pattern is sized for a relaxed fit, but gauge still matters for a wearable garment.
Skill Level and Techniques
Skill Level: Intermediate
Stitches Used:
Special Techniques:
Size Information
This pattern is written for size Small/Medium with a finished bust measurement of approximately 36-38 inches. The relaxed fit allows for 2-4 inches of positive ease.
Finished Measurements:
To size up or down, add or subtract 8 stitches (approximately 1.5 inches) to your foundation chain. Adjust body length as desired before joining sleeves.
Crochet Pattern Instructions
Front Bodice Panel
We start with the front bodice. This is worked flat in rows from the bottom up.
Foundation: With MC and 4.0mm hook, ch 82.
Row 1: Sc in 2nd ch from hook and in each ch across. Turn. (81 sc)
Row 2: Ch 1 (does not count as st throughout), sc in each st across. Turn. (81 sc)
Rows 3-40: Repeat Row 2. (81 sc)
Your panel should measure approximately 18 inches wide and 8 inches tall.
Shaping the Top Edge:
Row 41: Ch 1, sc in first 20 sts, hdc in next 41 sts, sc in last 20 sts. Turn. (81 sts)
Row 42: Ch 1, skip first st, sc in next 19 sts, hdc in next 41 sts, sc in next 19 sts, skip last st. Turn. (79 sts)
Row 43: Ch 1, skip first st, sc in next 18 sts, hdc in next 41 sts, sc in next 18 sts, skip last st. Turn. (77 sts)
Fasten off and weave in ends.
Back Bodice Panel
Work exactly as Front Bodice Panel.
Joining Front and Back
Place front and back panels with wrong sides together. Using MC, join with sl st at bottom corner.
Side Seams:
Working through both layers, sl st evenly up side edge for approximately 6-7 inches, leaving 4-5 inches open at top for armholes.
Repeat on other side.
Bell Sleeves (Make 2)
This is where the drama happens. These sleeves use a lace motif pattern that creates beautiful openwork. Take your time here.
Cuff Foundation: With MC, ch 48, join with sl st to form ring, being careful not to twist.
Round 1: Ch 3 (counts as dc), dc in each ch around, join with sl st to top of ch-3. (48 dc)
Round 2: Ch 3, dc in same st, *skip 2 sts, 5 dc in next st (shell made), skip 2 sts, dc in next st*. Repeat from * around, ending with 5 dc in last st before join, join with sl st. (8 shells)
Round 3: Ch 3, *5 dc in center dc of shell, dc in dc between shells*. Repeat from * around, join. (8 shells)
Rounds 4-8: Repeat Round 3.
Round 9 (Increase Round): Ch 3, dc in same st, *5 dc in center of shell, 2 dc in dc between shells*. Repeat from * around, join. (8 shells, 16 dc between)
Rounds 10-14: Ch 3, *5 dc in center of each shell, dc in each dc between*. Repeat around, join.
Round 15 (Increase Round): Ch 3, dc in same st, *7 dc in center of shell (larger shell), 2 dc in next dc, dc in each dc to next shell*. Repeat from * around, join.
Rounds 16-20: Continue established pattern, working 7-dc shells and maintaining increases every 5th round.
Lace Motif Section (Rounds 21-30):
Round 21: Ch 5 (counts as dc + ch 2), skip 2 sts, *dc in next st, ch 2, skip 2 sts*. Repeat from * around, join to 3rd ch of ch-5. (Mesh round established)
Round 22: Sl st into ch-2 space, ch 3, 4 dc in same space (half shell), *ch 1, skip next ch-2 space, 5 dc in next ch-2 space (shell)*. Repeat from * around, ch 1, join.
Round 23: Sl st to center dc of shell, ch 3, 4 dc in same st, *ch 2, sc in ch-1 space, ch 2, 5 dc in center dc of next shell*. Repeat from * around, join.
Rounds 24-28: Continue lace pattern, alternating shells with chain spaces and sc connections.
Round 29 (Scallop Edge): *Sc in center of shell, ch 3, dc in same st, ch 3, sc in same st (picot scallop made)*. Work scallop in each shell around, join.
Fasten off, leaving long tail for seaming.
Attaching Sleeves
Pin sleeve opening to armhole, matching underarm seams. With MC, whipstitch or sl st sleeves to bodice, easing fullness evenly around armhole.
Spaghetti Straps (Make 2)
Chain: Ch 80 (or desired length plus 10 extra chains).
Row 1: Sl st in 2nd ch from hook and each ch across. Fasten off.
Attach straps to inside top edge of front bodice, approximately 3 inches from each side edge. Attach back ends to corresponding position on back panel.
Try on and adjust length as needed before securing permanently.
Bottom Scallop Edging
Join MC at any point along bottom edge of bodice.
Round 1: Ch 1, sc evenly around entire bottom edge, join. (Approximately 162 sc)
Round 2: Ch 1, sc in first st, *skip 2 sts, 5 dc in next st (shell), skip 2 sts, sc in next st*. Repeat from * around, adjusting final repeat as needed to end evenly. Join.
Round 3: *Sc in sc, (sc, ch 2, sc) in center dc of shell*. Repeat from * around, join. Fasten off.
3D Floral Appliqué
This is my favorite part. These crochet roses bring the whole blouse to life.
Rolled Rose (Make 5-7 in assorted colors)
Using cream, mustard, or burgundy yarn with 3.5mm hook:
Foundation: Ch 42.
Row 1: Dc in 4th ch from hook, dc in next ch, *3 dc in next ch, dc in next 2 ch*. Repeat from * across. (approximately 60 dc)
Row 2: Ch 3, turn, *3 dc in next st, dc in next st*. Repeat from * across.
Fasten off, leaving 12-inch tail.
Assembly: Starting at the beginning of the strip, roll the crocheted piece tightly, allowing natural curl of the double crochets to form petals. Use tail to stitch through bottom layers, securing the rose shape. Do not pull too tight. Let petals stay fluffy.
Leaves (Make 12-15)
Using forest green yarn with 3.5mm hook:
Foundation: Ch 10.
Row 1: Sc in 2nd ch from hook, hdc in next ch, dc in next 2 ch, tr in next ch, dc in next 2 ch, hdc in next ch, 3 sc in last ch. Working along opposite side of foundation chain: hdc in next ch, dc in next 2 ch, tr in next ch, dc in next 2 ch, hdc in next ch, sc in last ch. Join with sl st to first sc.
Fasten off, leaving tail for attaching.
Small Buds (Make 3-4)
Ch 4, join to form ring.
Round 1: Ch 1, 8 sc in ring, join. (8 sc)
Round 2: Ch 1, (sc, hdc, dc, hdc, sc) in each st around, join. (8 small petals)
Fasten off.
Arranging and Attaching Flowers
Lay your finished blouse flat. Position largest roses first, creating a diagonal cascade from left shoulder toward right hip. Tuck medium roses between large ones. Add small buds to fill gaps.
Arrange leaves to peek out from behind and between flowers. Let some leaves extend beyond the flower cluster for natural movement.
Pin everything in place. Try on the blouse to check placement.
Using matching yarn colors, stitch flowers and leaves securely to bodice front. Work from the back of the fabric when possible to hide stitches.
Finishing Touches
Blocking: Wet block your finished blouse by soaking in lukewarm water for 15 minutes. Gently squeeze out excess water (never wring). Lay flat on blocking mats, pin sleeves open to show lace pattern, and allow to dry completely.
Weaving Ends: This project has many ends from color changes. Weave each end through at least 2 inches of stitches, working along the same row to hide tails completely.
Helpful Tips for Success
The bodice goes quickly. Do not rush the sleeves. That lace pattern requires counting, but once you establish the rhythm, it flows.
If your shells look uneven, you are probably crocheting too tightly. Relax your tension for the lace sections.
The flowers are very forgiving. No two handmade roses look identical, and that is the beauty of this step by step crochet tutorial. Imperfections read as organic charm.
Consider making extra flowers. You can use extras as hair accessories, bag clips, or brooch pins.
Final Thoughts on This Crochet Blouse Pattern
This terracotta floral crochet blouse is absolutely a project you can finish. Yes, it has several components. Yes, those bell sleeves require attention. But every single piece uses fundamental stitches you already know.
I designed this crochet pattern to challenge you just enough while still being achievable. The result is a handmade statement piece you will treasure and wear constantly.
Thank you so much for choosing to make this with me. Truly. Knowing someone is working through my patterns and creating something beautiful makes all the writing worth it.
When you finish your blouse, please share a photo. Tag me on Instagram or post in my Facebook group. I want to see your color choices, your flower arrangements, your styling. Every version is unique and I genuinely love seeing them all.
Happy crocheting, friend. You have got this.
